Page 156 of 592
FOG LIGHT SWITCH (if so
equipped)
To turn the fog lights on, turn the headlight
switch to the
Page 161 of 592
∙ Only certain power outlets are de-signed for use with a cigarette lighter
unit. Do not use any other power out-
let for an accessory lighter. For addi-
tional information, it is recommended
that you visit a NISSAN dealer.
∙ Do not use with accessories that ex- ceed a 12 volt, 120W (10A) power draw.
∙ Do not use double adapters or more than one electrical accessory.
∙ Use power outlets with the engine running to avoid discharging the ve-
hicle battery.
∙ Avoid using power outlets when the air conditioner, headlights, or rear
window defroster is on.
∙ Before inserting or disconnecting a plug, be sure the electrical accessory
being used is turned OFF.
∙ Push the plug in as far as it will go. If good contact is not made, the plug
may overheat or the internal tem-
perature fuse may open.
∙ When not in use, be sure to close the cap. Do not allow water or any other
liquid to contact the outlet.
Page 169 of 592

way. To stop the roof, push the switch once
more while it is opening or closing.
Tilting the moonroof
To tilt up, first close the moonroof, then
push the switch
�3and release it; it need
not be held. To tilt down the moonroof,
push the switch to the tilt down position
�1.
Resetting the moonroof switch
If the moonroof does not operate properly,
perform the following procedure to initial-
ize the moonroof operation system.
1. If the moonroof is open, close it fully by repeatedly pushing the moonroof
switch to the close position
�1to tilt the
moonroof up.
2. Push and hold the switch to the close position
�1.
3. Release the moonroof switch af ter the moonroof moves slightly up and down.
4. Push and hold the switch to the open position
�2to fully tilt the moonroof
down.
5. Check if the moonroof switch operates normally. If the moonroof does not operate properly
af ter performing the procedure above,
have your vehicle serviced. It is recom-
mended that you visit a NISSAN dealer for
this service.
Auto-reverse function (when
closing or tilting down the
moonroof )
The auto-reverse function can be acti-
vated when the moonroof is closed or
tilted down by automatic operation when
the ignition switch is placed in the ON po-
sition or for a period of time af ter the igni-
tion switch is placed in the OFF position.
Depending on the environment or driv-
ing conditions, the auto-reverse func-
tion may be activated if an impact or
load similar to something being caught
in the moonroof occurs.
Page 170 of 592

CAUTION
∙ Remove water drops, snow, ice orsand from the moonroof before
opening.
∙ Do not place heavy objects on the moonroof or surrounding area.
Sunshade
Open and close the sunshade by sliding it
forward or backward.
If the moonroof does not close
Have your moonroof checked and re-
paired. It is recommended that you visit a
NISSAN dealer for this service.
�1The interior light can be turned ON re-
gardless of door position. The light will
go off af ter a period of time unless the
ignition switch is placed in the ON po-
sition when any door is opened.
�2The interior lights can be set to operate
when the doors are opened. To turn off
the interior lights when a door is open,
push the switch, the interior lights will
not illuminate, regardless of door posi-
tion.
The lights will go off when the ignition
switch is placed in the ON position, or
the driver’s door is closed and locked.
The lights will also go off af ter a period
of time when the doors are open.
NOTE:
The step lights illuminate when the
driver and passenger doors are opened
regardless of the interior light switch po-
sition. These lights will turn off auto-
matically af ter a period of time while
doors are open to prevent the battery
from becoming discharged.
Page 171 of 592
MAP LIGHTS
To turn the map lights on, push the
switches. To turn them off, push the
switches again.
Page 172 of 592
The HomeLink® Universal Transceiver pro-
vides a convenient way to consolidate the
functions of up to three individual hand-
held transmitters into one built-in device.
HomeLink® Universal Transceiver:∙ Will operate most radio frequency de- vices such as garage doors, gates,
home and office lighting, entry door
locks and security systems.
∙ Is powered by your vehicle’s battery. No separate batteries are required. If the
vehicle’s battery is discharged or is dis-
connected, HomeLink® will retain all
programming.
When the HomeLink® Universal Trans-
ceiver is programmed, retain the original
transmitter for future programming pro-
cedures (Example: new vehicle pur-
chases). Upon sale of the vehicle, the
programmed HomeLink® Universal
Transceiver buttons should be erased
for security purposes. For additional
information, refer to “Programming
HomeLink®” in this section.
Page 189 of 592
 posi-tion, place the ignition switch in the
LOCK position and make sure you carry
the Intelligent Key with you.
2. Close all doors.
3. Push any d")
Locking doors
1. Move the shif t lever to the P (Park) posi-tion, place the ignition switch in the
LOCK position and make sure you carry
the Intelligent Key with you.
2. Close all doors.
3. Push any door handle request switch
�1while carrying the Intelligent Key
with you.
4. All doors and the trunk will lock.
5. The hazard warning lights flash twice and the outside chime sounds twice. NOTE:
∙ Request switches for all doors and trunk can be deactivated when the “Ext.
Door Switch” setting is switched to OFF
in the vehicle settings of the vehicle in-
formation display. For additional infor-
mation, refer to “Vehicle information
display” in the “Instruments and con-
trols” section of this manual.
∙ Doors lock with the door handle re- quest switch while the ignition switch is
not in the LOCK position. ∙ Doors do not lock by pushing the door
handle request switch while any door is
open. However, doors lock with the me-
chanical key even if any door is open.
∙ Doors do not lock with the door handle request switch with the Intelligent Key
inside the vehicle and a beep sounds to
warn you. However, when an Intelligent
Key is inside the vehicle, doors can be
locked with another Intelligent Key.
Page 202 of 592
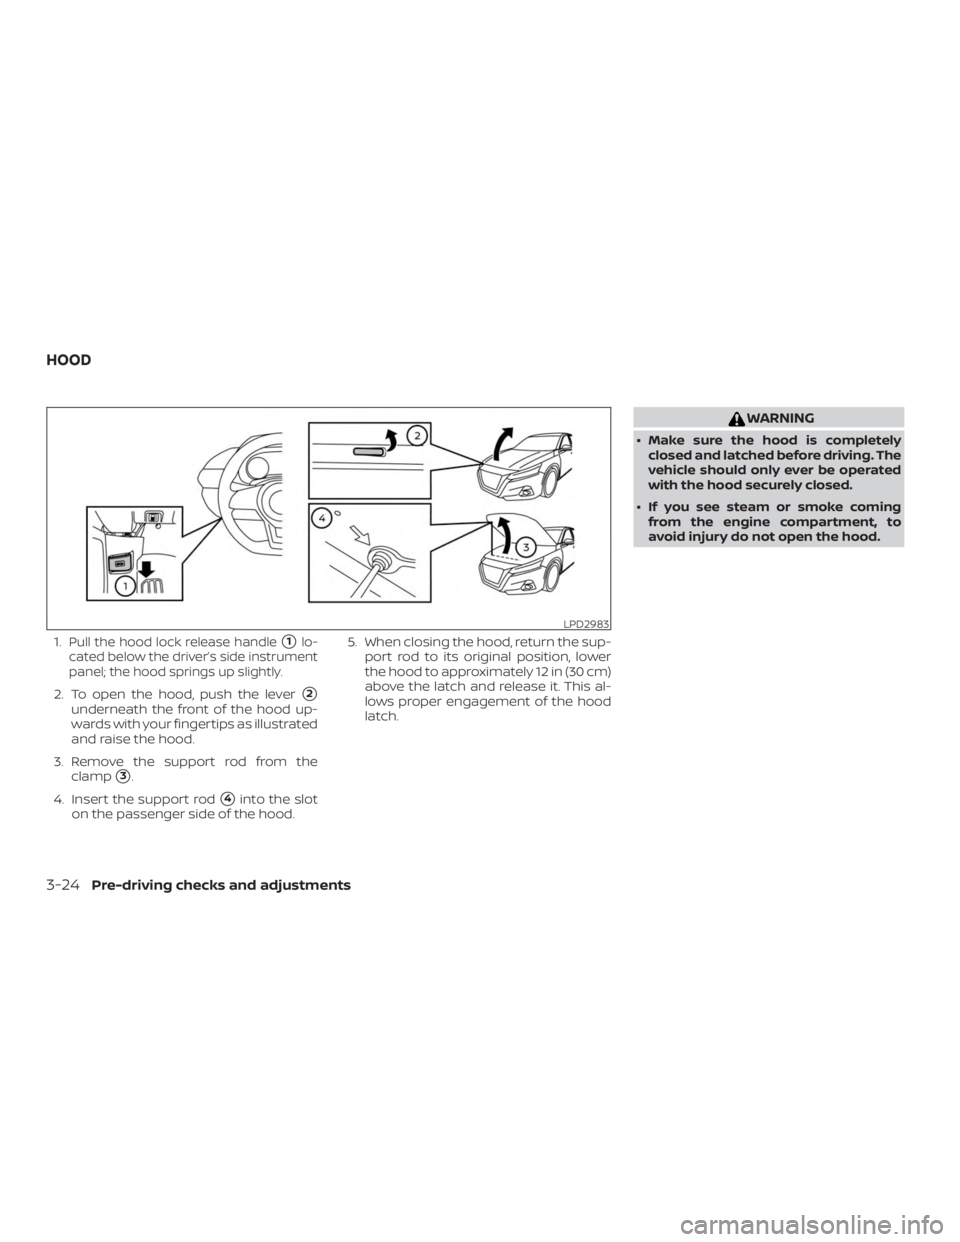
1.Pull the hood lock release handle�1lo-
cated below the driver’s side instrument
panel; the hood springs up slightly.
2. To open the hood, push the lever�2
underneath the front of the hood up-
wards with your fingertips as illustrated
and raise the hood.
3. Remove the support rod from the clamp
�3.
4. Insert the support rod
�4into the slot
on the passenger side of the hood. 5. When closing the hood, return the sup-
port rod to its original position, lower
the hood to approximately 12 in (30 cm)
above the latch and release it. This al-
lows proper engagement of the hood
latch.

To turn the fog lights on, turn the headlight
switch to the")