Page 251 of 592
1. AUTO (automatic) climate controlbutton / temperature control dial
(drivers side)
2. Display screen
3.
Page 264 of 592

Additional information:∙ When replacing a wheel without the TPMS such as the spare tire, the TPMS
does not monitor the tire pressure of
the spare tire.
∙ The TPMS will activate only when the vehicle is driven at speeds above
16 mph (25 km/h). Also, this system may
not detect a sudden drop in tire pres-
sure (for example, a flat tire while driv-
ing).
∙ The low tire pressure warning light does not automatically turn off when the tire
pressure is adjusted on all four tires. Af-
ter all four tires are inflated to the rec-
ommended pressure, the vehicle must
be driven at speeds above 16 mph
(25 km/h) to activate the TPMS and turn
off the low tire pressure warning light.
Use a tire pressure gauge to check the
tire pressure.
∙ The “Tire Pressure Low - Add Air” warn- ing appears in the vehicle information
display when the low tire pressure
warning light is illuminated and low tire
pressure is detected. The “Tire Pressure
Low - Add Air” warning turns off when
the low tire pressure warning light turns
off. ∙ The “Tire Pressure Low - Add Air” warn-
ing appears each time the ignition
switch is placed in the ON position as
long as the low tire pressure warning
light remains illuminated.
∙ The “Tire Pressure Low - Add Air” warn- ing does not appear if the low tire pres-
sure warning light illuminates to indi-
cate a TPMS malfunction.
∙ Tire pressure rises and falls depending on the heat caused by the vehicle’s op-
eration and the outside temperature.
Do not reduce the tire pressure af ter
driving because the tire pressure rises
af ter driving. Low outside temperature
can lower the temperature of the air
inside the tire which can cause a lower
tire inflation pressure. This may cause
the low tire pressure warning light to
illuminate. If the warning light illumi-
nates, check the tire pressure for all four
tires.
∙ The Tire and Loading Information label is located in the driver’s door opening. ∙ You can also check the tire pressure of
all tires (except the spare) on the vehicle
information display screen. The order of
the tire pressure figures displayed on
the screen corresponds with the actual
order of the tire position.
For additional information, refer to “Low tire
pressure warning light” in the “Instruments
and controls” section, “Tire Pressure Moni-
toring System (TPMS)” in the “In case of
emergency” section and “Tire pressure” in
the “Do-it-yourself ” section of this manual.
Page 271 of 592

WARNING
Do not operate the push-button igni-
tion switch while driving the vehicle ex-
cept in an emergency. (The engine will
stop when the ignition switch is pushed
three consecutive times in quick suc-
cession or the ignition switch is pushed
and held for more than 2 seconds.) If the
engine stops while the vehicle is being
driven, this could lead to a crash and
serious injury.When the ignition switch is pushed without
depressing the brake pedal, the ignition
switch will illuminate.
Push the ignition switch center:∙ Once to change to ON.
∙ Two times to change to OFF.
The ignition switch will automatically re-
turn to the LOCK position when any door is
either opened or closed with the switch in
the OFF position. The ignition lock is designed so that the
ignition switch cannot be placed in the OFF
position until the shif t lever is moved to the
P (Park) position.
When the ignition switch cannot be placed
in the OFF position, proceed as follows:
1. Move the shif t lever to the P (Park) posi- tion.
2. Push the ignition switch. The ignition switch position will change to the ON
position.
3. Push the ignition switch again to the OFF position.
The shif t lever can be moved from the P
(Park) position if the ignition switch is in
the ON position and the brake pedal is
depressed.
If the battery of the vehicle is discharged,
the ignition switch cannot be moved
from the LOCK position.
Some indicators and warnings for opera-
tion are displayed on the vehicle informa-
tion display. For additional information, re-
fer to “Vehicle information display” in the
“Instruments and controls” section of this
manual.
Page 286 of 592

∙While pulling up the electronic park-
ing brake switch during driving, the
parking brake is applied and a chime
sounds. The electronic parking brake
indicator light in the meter and in the
parking brake switch illuminates.
This does not indicate a malfunction.
The electronic parking brake indica-
tor light in the meter and in the park-
ing brake switch turns off when the
parking brake is released.
∙ When pulling the electronic parking
brake switch up with the ignition
switch in the OFF or AUTO ACC posi-
tion, the parking brake switch indica-
tor light will continue to illuminate for
a short period of time. The automatic brake hold function main-
tains the braking force without the driver
having to depress the brake pedal when
the vehicle is stopped at a traffic light or
intersection. As soon as the driver de-
presses the accelerator pedal again, the
automatic brake hold function is deacti-
vated and the braking force is released. The
operating status of the automatic brake
hold can be displayed on the vehicle infor-
mation display.
Page 287 of 592
 OFF indicator
light, electronic parking brake warn-
ing light or master warning light illu-
minate and")
∙ The automatic brake hold functionwill not be activated if the Vehicle Dy-
namic Control (VDC) OFF indicator
light, electronic parking brake warn-
ing light or master warning light illu-
minate and the chassis control sys-
tem fault message appears in the
vehicle information display.
∙ To maintain the braking force to keep the vehicle to a standstill, a noise may
be heard. This is not a malfunction.
HOW TO ACTIVATE/DEACTIVATE
THE AUTOMATIC BRAKE HOLD
FUNCTION
For additional information on activating
and deactivating the automatic brake hold
function, refer to the instructions outlined
in this section.
How to activate the automatic
brake hold function
1. With the ignition switch in the ON posi- tion, push the automatic brake hold
switch
�1. The indicator light on the au-
tomatic brake hold switch
�2illumi-
nates.
2. When the automatic brake hold func- tion goes into standby, the automatic
brake hold indicator light (white) illumi-
nates.
To use the automatic brake hold function,
the following conditions need to be met: ∙ The driver’s seat belt is fastened.
∙ The electronic parking brake is re- leased.
∙ The shif t lever is not in the P (Park) posi- tion.
∙ The vehicle is not parked on a steep hill.
NOTE:
The automatic brake hold function re-
sets to OFF every time the ignition
switch is switched from the OFF position
to the ON position.
Page 289 of 592
∙When the vehicle stops, but the brake
force is not automatically applied, de-
press the brake pedal firmly until the
automatic brake hold indicator light
(green) illuminates.
The TSR system provides the driver with
information about the most recently de-
tected speed limit. The system captures
the road sign information with the multi-
sensing front camera unit
�1located on
the windshield in front of the inside rear-
view mirror and displays the detected
signs in the vehicle information display. For
vehicles equipped with a navigation sys-
tem, the speed limit displayed is based on a
combination of navigation system data
and live camera recognition. TSR informa-
tion is always displayed at the top of the
vehicle information display, and optionally
in the main central area of the display
screen.
Page 290 of 592
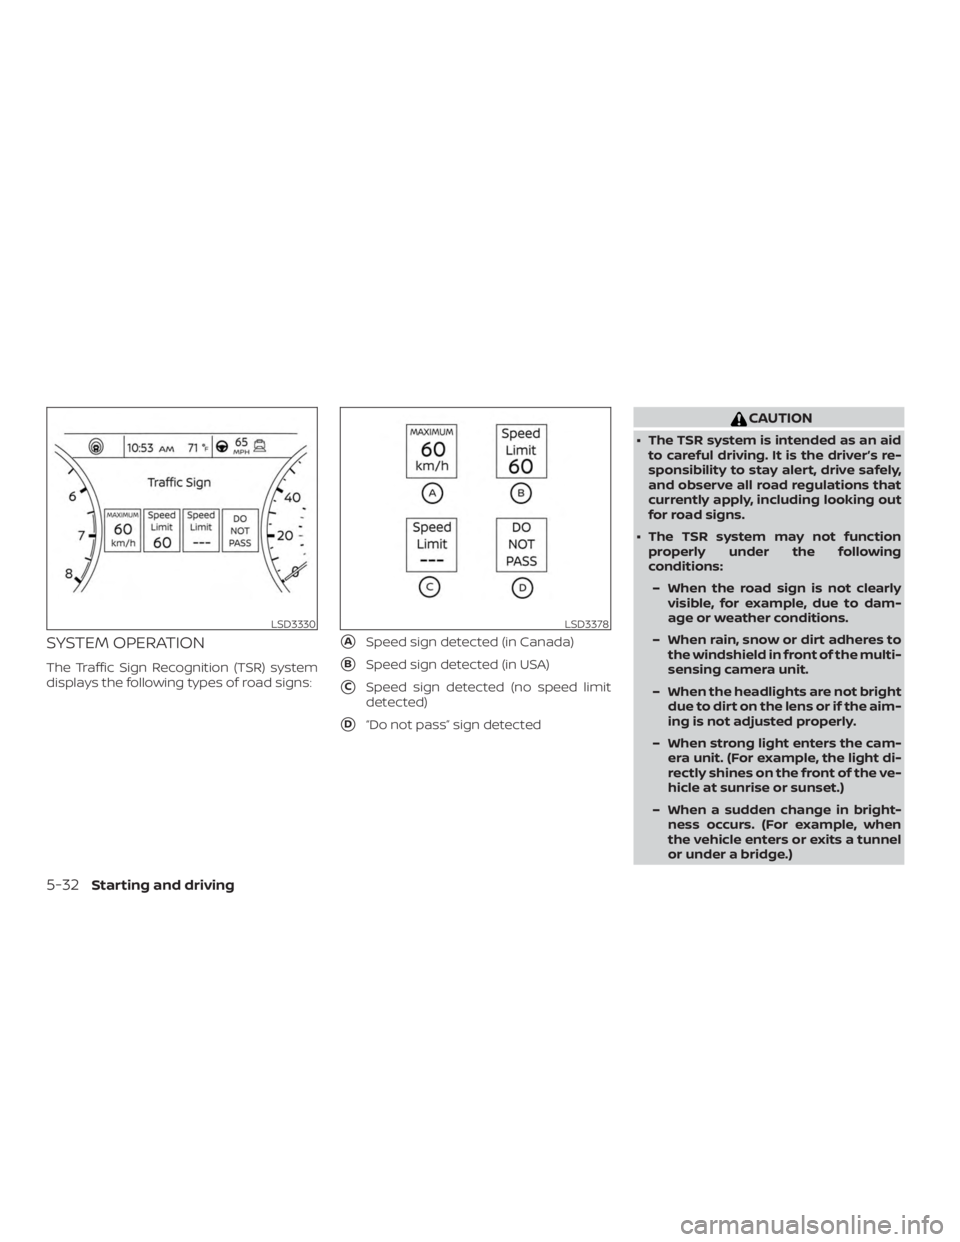
SYSTEM OPERATION
The Traffic Sign Recognition (TSR) system
displays the following types of road signs:
�ASpeed sign detected (in Canada)
�BSpeed sign detected (in USA)
�CSpeed sign detected (no speed limit
detected)
�D“Do not pass” sign detected
Page 295 of 592
.
– When driving on slippery roads, such as on ice or snow.")
∙ Do not use the LDW system under thefollowing conditions as it may not
function properly:
– During bad weather (rain, fog, snow, etc.).
– When driving on slippery roads, such as on ice or snow.
– When driving on winding or un- even roads.
– When there is a lane closure due to road repairs.
– When driving in a makeshif t or temporary lane.
– When driving on roads where the lane width is too narrow.
– When driving without normal tire conditions (for example, tire wear,
low tire pressure, installation of
spare tire, tire chains, nonstandard
wheels).
– When the vehicle is equipped with non-original brake parts or sus-
pension parts.
– When you are towing a trailer or other vehicle. ∙ The system may not function prop-
erly under the following conditions:
– On roads where there are multiple parallel lane markers; lane mark-
ers that are faded or not painted
clearly; yellow painted lane mark-
ers; non-standard lane markers; or
lane markers covered with water,
dirt, snow, etc.
– On roads where the discontinued lane markers are still detectable.
– On roads where there are sharp curves.
– On roads where there are sharply contrasting objects, such as shad-
ows, snow, water, wheel ruts,
seams or lines remaining af ter
road repairs. (The LDW system
could detect these items as lane
markers.)
– On roads where the traveling lane merges or separates.
– When the vehicle’s traveling direc- tion does not align with the lane
marker. – When traveling close to the vehicle
in front of you, which obstructs the
lane camera unit detection range.
– When rain, snow, dirt or an object adheres to the windshield in front
of the lane camera unit.
– When the headlights are not bright due to dirt on the lens or if the aim-
ing is not adjusted properly.
– When strong light enters the lane camera unit. (For example, the light
directly shines on the front of the
vehicle at sunrise or sunset.)
– When a sudden change in bright- ness occurs. (For example, when
the vehicle enters or exits a tunnel
or under a bridge.)
SYSTEM TEMPORARILY
UNAVAILABLE
If the vehicle is parked in direct sunlight
under high temperature conditions (over
approximately 104°F [40°C]) and then
started, the LDW system may be deacti-
vated automatically and the following
message will appear in the vehicle infor-
mation display: “Unavailable: High Cabin
Temperature.”
Starting and driving5-37
 climate controlbutton / temperature control dial
(drivers side)
2. Display screen
3.")
 illuminates.
The TSR system provide")