Page 160 of 592
∙ If the alert is enabled when a driver exitsthe vehicle, a message will appear in the
vehicle information display that states
“Check Back Seat for All Articles.”
If “Horn & Alert” setting is selected:
∙ An audible horn sound will occur af- ter a short time unless a rear door is
opened and closed within a short
time to deactivate the alert.
∙ If the doors are locked before the alert is deactivated by opening a rear
door, the horn will sound.
∙ If the trunk is opened before a rear door is opened, the horn will be de-
layed until af ter the trunk is closed.
NOTE:
If “Alert Only ” setting is selected, the
message alert will still be shown in the
vehicle information display but the horn
will not sound.
Page 185 of 592

Lockout protection
With the Intelligent Key lef t in the vehicle
and any door open, all doors will unlock
automatically and a chime will sound af ter
the door is closed.
These functions help to prevent the Intelli-
gent Key from being accidentally locked
inside the vehicle.
AUTOMATIC DOOR LOCKS (if so
equipped)
∙ All doors lock automatically when thevehicle speed reaches 15 mph
(24 km/h).
∙ All doors unlock automatically when the transmission is placed in the P (Park)
position or when the ignition switch is
placed in the OFF position.
NOTE:
The automatic door unlock function can
be changed using the “Vehicle Settings”
of the vehicle information display. For
additional information, refer to “Vehicle
information display ” in the “Instruments
and controls” section of this manual.
CHILD SAFETY REAR DOOR LOCK
Child safety locks help prevent the rear
doors from being opened accidentally, es-
pecially when small children are in the ve-
hicle.
The child safety lock levers are located on
the edge of the rear doors.
When the lever is in the unlock position
�2,
the door can be opened from the outside
or the inside.
When the lever is in the LOCK position
�1,
the door can be opened only from the
outside.
Page 186 of 592

CAUTION
∙ Be sure to carry the Intelligent Keywith you when operating the vehicle.
∙ Never leave the Intelligent Key in the vehicle when you leave the vehicle.
The Intelligent Key is always communicat-
ing with the vehicle as it receives radio
waves. The Intelligent Key transmits weak
radio waves. Environmental conditions
may interfere with the operation of the In-
telligent Key under the following operating
conditions: ∙ When operating near a location where strong radio waves are transmitted,
such as a TV tower, power station and
broadcasting station.
∙ When in possession of wireless equip- ment, such as a cellular telephone,
transceiver or a CB radio.
∙ When the Intelligent Key is in contact with or covered by metallic materials.
∙ When any type of radio wave remote control is used nearby.
∙ When the Intelligent Key is placed near an electric appliance such as a personal
computer. ∙ When the vehicle is parked near a park-
ing meter.
In such cases, correct the operating condi-
tions before using the Intelligent Key func-
tion or use the mechanical key.
Although the life of the battery varies de-
pending on the operating conditions, the
battery’s life is approximately two years. If
the battery is discharged, replace it with a
new one.
When the Intelligent Key battery is low, an
indicator illuminates in the vehicle informa-
tion display. For additional information, re-
fer to “Vehicle information display” in the
“Instruments and controls” section of this
manual.
Since the Intelligent Key is continuously re-
ceiving radio waves, if the key is lef t near
equipment which transmits strong radio
waves, such as signals from a TV and per-
sonal computer, the battery life may be-
come shorter.
For additional information, refer to “Battery
replacement” in the “Do-it-yourself ” section
of this manual. As many as four Intelligent Keys can be
registered and used with one vehicle. For
information about the purchase and use of
additional Intelligent Keys, it is recom-
mended that you visit a NISSAN dealer.
Page 189 of 592
 posi-tion, place the ignition switch in the
LOCK position and make sure you carry
the Intelligent Key with you.
2. Close all doors.
3. Push any d")
Locking doors
1. Move the shif t lever to the P (Park) posi-tion, place the ignition switch in the
LOCK position and make sure you carry
the Intelligent Key with you.
2. Close all doors.
3. Push any door handle request switch
�1while carrying the Intelligent Key
with you.
4. All doors and the trunk will lock.
5. The hazard warning lights flash twice and the outside chime sounds twice. NOTE:
∙ Request switches for all doors and trunk can be deactivated when the “Ext.
Door Switch” setting is switched to OFF
in the vehicle settings of the vehicle in-
formation display. For additional infor-
mation, refer to “Vehicle information
display” in the “Instruments and con-
trols” section of this manual.
∙ Doors lock with the door handle re- quest switch while the ignition switch is
not in the LOCK position. ∙ Doors do not lock by pushing the door
handle request switch while any door is
open. However, doors lock with the me-
chanical key even if any door is open.
∙ Doors do not lock with the door handle request switch with the Intelligent Key
inside the vehicle and a beep sounds to
warn you. However, when an Intelligent
Key is inside the vehicle, doors can be
locked with another Intelligent Key.
Page 204 of 592
NOTE:
Request switches for all doors and trunk
can be deactivated when the I-Key Door
Lock setting is switched to OFF in the
“Vehicle Settings” of the vehicle informa-
tion display. For additional information,
refer to “Vehicle information display ” in
the “Instruments and controls” section
of the manual.
INTERIOR TRUNK LID RELEASE
Page 207 of 592
To remove the fuel-filler cap:1. Turn the fuel-filler cap counterclock- wise to remove.
2. Put the fuel-filler cap on the cap holder
�1while refueling.
To install the fuel-filler cap: 1. Insert the fuel-filler cap straight into the fuel-filler tube.
2. Turn the fuel-filler cap clockwise until a single click is heard.
Loose Fuel Cap warning
The Loose Fuel Cap warning�Aappears in
the vehicle information display when the
fuel-filler cap is not tightened correctly af-
ter the vehicle has been refueled. It may
take a few driving trips for the message to
be displayed. To turn off the warning, per-
form the following:
1. Remove and install the fuel-filler cap as soon as possible. For additional infor-
mation, refer to “Fuel-filler cap” in this
section.
2. Tighten the fuel-filler cap until it clicks.
Page 218 of 592
WARNING
∙ Failure to follow the warnings and in-structions for proper use of the Rear-
View Monitor system could result in
serious injury or death.
∙ RearView Monitor is a convenience feature and is not a substitute for
proper backing. Always turn and look
out the windows and check mirrors to
be sure that it is safe to move before
operating the vehicle. Always back up
slowly.
∙ The system is designed as an aid to the driver in showing large stationary
objects directly behind the vehicle, to
help avoid damaging the vehicle.
∙ The distance guide lines and the ve- hicle width lines should be used as a
reference only when the vehicle is on a
level paved surface. The distance
viewed on the monitor is for reference
only and may be different than the
actual distance between the vehicle
and displayed objects.
Page 221 of 592
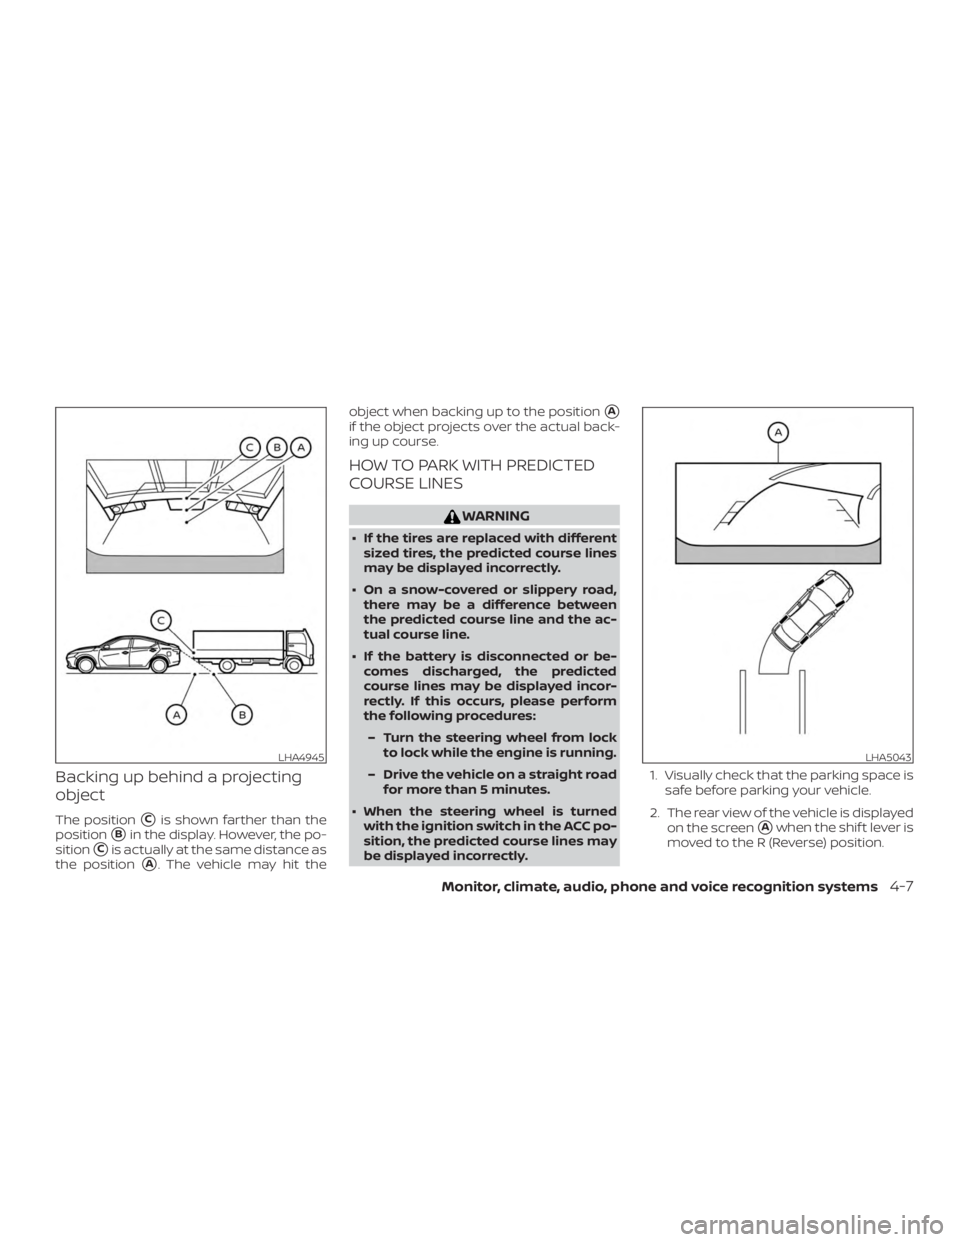
Backing up behind a projecting
object
The position�Cis shown farther than the
position
�Bin the display. However, the po-
sition
�Cis actually at the same distance as
the position
�A. The vehicle may hit the object when backing up to the position
�A
if the object projects over the actual back-
ing up course.
HOW TO PARK WITH PREDICTED
COURSE LINES