2019 NISSAN 370Z ROADSTER charging
[x] Cancel search: chargingPage 78 of 460

When the engine oil temperature is
high, the engine protection mode,
which helps reduce the chance of en-
gine damage, could activate and auto-
matically decrease engine power.
Voltmeter
When the ignition switch is placed in the
ON position, the volt meterindicates
the battery voltage. When the engine is
running, it indicates the generator vol-
tage.
While cranking the engine, the volts drop
below the normal range. If the needle is
not in the normal range (11 to 15 volts)
while the engine is running, it may
indicate that the charging system is not
functioning properly. Have the system
checked. It is recommended you visit a
NISSAN dealer for this service.
Clock
If necessary, adjust the clockon the
vehicle information display. (See “Clock”
(P.2-27).)
If the power supply is disconnected, the
clock will not indicate the correct time.
Readjust the time.
Instruments and controls2-9
Page 81 of 460
2-12Instruments and controls
system checked, and if necessary re-
paired. It is recommended you visit a
NISSAN dealer for this service. (See “Anti-
lock Braking System (ABS) warning light”
(P.2-11).)
WARNING
.Your brake system may not be
working properly if the warning
light is on. Driving could be dan-
gerous. If you judge it to be safe,
drive carefully to the nearest
service station for repairs. Other-
wise, have your vehicle towed
because driving it could be dan-
gerous.
. Pressing the brake pedal with the
engine stopped and/or low brake
fluid level may increase your
stopping distance and braking
will require greater pedal effort
as well as pedal travel.
. If the brake fluid level is below the
minimum or MIN mark on the
brake fluid reservoir, do not drive
until the brake system has been
checked. It is recommended you
visit a NISSAN dealer for this
service.
Charge warning light
If the light comes on while the engine is
running, it may indicate the charging
system is not functioning properly. Turn
the engine off and check the alternator
belt. If the belt is loose, broken, missing or
if the light remains on, have your vehicle
serviced immediately. It is recommended
you visit a NISSAN dealer for this service.
CAUTION
Do not continue driving if the alter-
nator belt is loose, broken or miss-
ing.
Engine oil pressure warning
light
This light warns of low engine oil pres-
sure. If the light flickers or comes on
during normal driving, pull off the road in
a safe area, stop the engine immediately
and call a NISSAN dealer or other author-
ized repair shop.
The engine oil pressure warning light is
not designed to indicate a low oil level.
Use the dipstick to check the oil level.
(See “Engine oil” (P.8-6).)
CAUTION
Running the engine with the engine
oil pressure warning light on could
cause serious damage to the engine
almost immediately. Such damage is
not covered by warranty. Turn off the
engine as soon as it is safe to do so.
Intelligent Key system warn-
ing light
After the ignition switch is pushed to the
ON position, this light comes on for about
2 seconds and then turns off.
This light warns of a malfunction with the
Intelligent Key system.
If the light comes on while the engine is
stopped, it may be impossible to start the
engine. If the light comes on while the
engine is running, you can drive the
vehicle. However in these cases, it is
recommended you visit a NISSAN dealer
for repair as soon as possible.
Page 111 of 460
2-42Instruments and controls
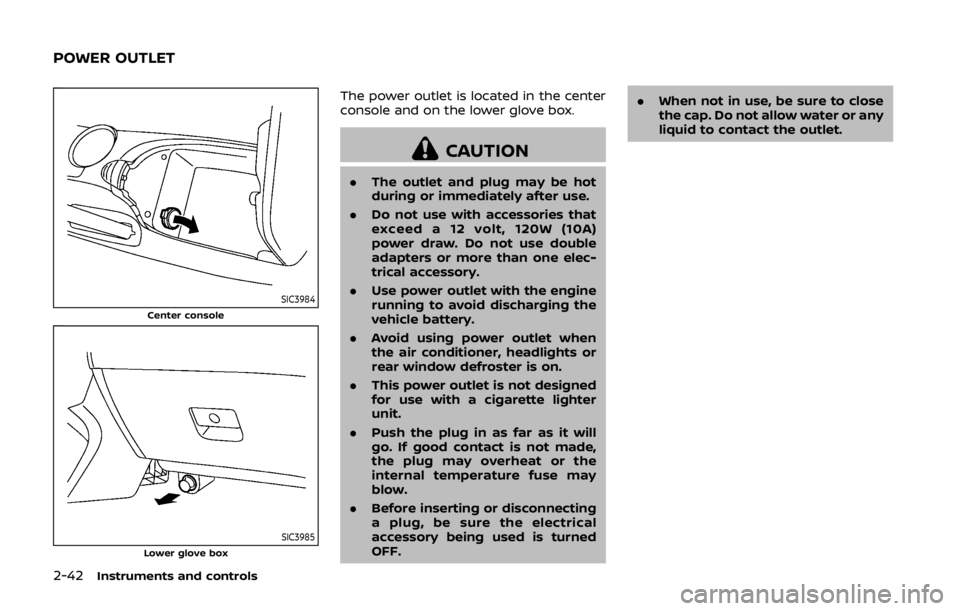
SIC3984Center console
SIC3985Lower glove box
The power outlet is located in the center
console and on the lower glove box.
CAUTION
.The outlet and plug may be hot
during or immediately after use.
. Do not use with accessories that
exceed a 12 volt, 120W (10A)
power draw. Do not use double
adapters or more than one elec-
trical accessory.
. Use power outlet with the engine
running to avoid discharging the
vehicle battery.
. Avoid using power outlet when
the air conditioner, headlights or
rear window defroster is on.
. This power outlet is not designed
for use with a cigarette lighter
unit.
. Push the plug in as far as it will
go. If good contact is not made,
the plug may overheat or the
internal temperature fuse may
blow.
. Before inserting or disconnecting
a plug, be sure the electrical
accessory being used is turned
OFF. .
When not in use, be sure to close
the cap. Do not allow water or any
liquid to contact the outlet.
POWER OUTLET
Page 203 of 460
4-36Center display, heater, air conditioner, audio, phone and voice recognition systems
OPERATING TIPS
When the engine coolant temperature
and outside air temperature are low, the
air flow from the foot outlets may not
operate. This is not a malfunction. After
the coolant temperature warms up, air
will flow normally from the foot outlets.
The sensors
andon the instrument
panel helps maintain a constant tem-
perature. Do not put anything on or
around this sensor.
IN-CABIN MICROFILTER
The air conditioning system is equipped
with an in-cabin microfilter which collects
dirt, pollen, dust, etc. To make sure the air
conditioner heats, defogs, and ventilates
efficiently, replace the filter in accordance
with the specified maintenance intervals
listed in the “9. Maintenance and sche-
dules” section. It is recommended to see a
NISSAN dealer to replace the filter.
The filter should be replaced if air flow
is extremely decreased or when win-
dows fog up easily when operating
heater or air conditioning system.
SERVICING AIR CONDITIONER
The air conditioning system in your
NISSAN is charged with a refrigerant
designed with the environment in mind.
This refrigerant will not harm the
earth’s ozone layer. However, special
charging equipment and lubricant are
required when servicing your NISSAN air
conditioner. Using improper refrigerants
or lubricants will cause severe damage to
your air conditioning system. (See “Capa-
cities and recommended fluids/lubri-
cants” (P.10-2) for air conditioning
system refrigerant and lubricant recom-
mendations.)
Your NISSAN dealer will be able to service
your environmentally friendly air condi-
tioning system.
WARNING
The system contains refrigerant un-
der high pressure. To avoid personal
injury, any air conditioner service
should be done only by an experi-
enced technician with the proper
equipment.
AUDIO OPERATION PRECAUTIONS
Radio
Push the ignition switch to the ACC or ON
position and push the radio band select
button to turn on the radio. If you listen to
the radio with the engine not running, the
ignition switch should be pushed to the
ACC position.
Radio reception is affected by station
signal strength, distance from radio
transmitter, buildings, bridges, mountains
and other external influences. Intermit-
tent changes in reception quality nor-
mally are caused by these external
influences.
Using a cellular phone in or near the
vehicle may influence radio reception
quality.
Radio reception:
Your NISSAN radio system is equipped
with state-of-the-art electronic circuits to
enhance radio reception. These circuits
are designed to extend reception range,
and to enhance the quality of that recep-
tion.
However there are some general charac-
teristics of both FM and AM radio signals
that can affect radio reception quality in a
moving vehicle, even when the finest
equipment is used. These characteristics
AUDIO SYSTEM
Page 251 of 460

4-84Center display, heater, air conditioner, audio, phone and voice recognition systems
LAN (Wi-Fi) when using the Bluetooth®
functions.
. Set up the wireless connection be-
tween a compatible cellular phone
and the in-vehicle phone module be-
fore using the Bluetooth® Hands-Free
Phone System.
. Some Bluetooth® enabled cellular
phones may not be recognized by
the in-vehicle phone module. Please
visit
www.nissanusa.com/bluetooth for a
recommended phone list.
. You will not be able to use a hands-
free phone under the following condi-
tions:
— Your vehicle is outside of the tele-
phone service area.
— Your vehicle is in an area where it is difficult to receive radio waves;
such as in a tunnel, in an under-
ground parking garage, behind a
tall building or in a mountainous
area.
— Your cellular phone is locked in order not to be dialed.
. When the radio wave condition is not
ideal or ambient sound is too loud, it
may be difficult to hear the other
person’s voice during a call. .
Immediately after the ignition switch
is pushed to the ON position, it may be
impossible to receive a call for a short
period of time.
. Do not place the cellular phone in an
area surrounded by metal or far away
from the in-vehicle phone module to
prevent tone quality degradation and
wireless connection disruption.
. While a cellular phone is connected
through the Bluetooth® wireless con-
nection, the battery power of the
cellular phone may discharge quicker
than usual.
. If the Bluetooth® Hands-Free Phone
System seems to be malfunctioning,
please visit www.nissanusa.com/blue-
tooth for troubleshooting help.
. Some cellular phones or other devices
may cause interference or a buzzing
noise to come from the audio system
speakers. Storing the device in a
different location may reduce or elim-
inate the noise.
. Refer to the cellular phone Owner’s
Manual regarding the telephone pair-
ing procedure specific to your phone,
battery charging, cellular phone an-
tenna, etc.
. The antenna display on the monitor
will not coincide with the antenna
display of some cellular phones. .
Keep the interior of the vehicle as
quiet as possible to hear the caller’s
voice clearly as well as to minimize its
echoes.
. If reception between callers is unclear,
adjusting the incoming or outgoing
call volume may improve the clarity.
REGULATORY INFORMATION
FCC Regulatory information
.CAUTION: To maintain compliance
with FCC’s RF exposure guidelines,
use only the supplied antenna. Un-
authorized antenna, modification, or
attachments could damage the trans-
mitter and may violate FCC regula-
tions.
. Operation is subject to the following
two conditions:
1. this device may not cause interfer- ence and
2. this device must accept any interfer- ence, including interference that may
cause undesired operation of the
device
Page 262 of 460

Bluetooth® and the wireless LAN func-
tions at the same time may slow down
or disconnect the communication and
cause undesired noise. It is recom-
mended that you turn off the wireless
LAN (Wi-Fi) when using the Bluetooth®
functions.
. Set up the wireless connection be-
tween a compatible cellular phone
and the in-vehicle phone module be-
fore using the Bluetooth® Hands-Free
Phone System.
. Some Bluetooth® enabled cellular
phones may not be recognized by
the in-vehicle phone module. Please
visit www.nissanusa.com/bluetooth
for a recommended phone list and
connecting.
. You will not be able to use a hands-
free phone under the following condi-
tions:
— Your vehicle is outside of the tele-
phone service area.
— Your vehicle is in an area where it is difficult to receive radio waves;
such as in a tunnel, in an under-
ground parking garage, near a tall
building or in a mountainous area.
— Your cellular phone is locked to prevent it from being dialed. .
When the radio wave condition is not
ideal or ambient sound is too loud, it
may be difficult to hear the other
person’s voice during a call.
. Immediately after the ignition switch
is pushed to the ON position, it may be
impossible to receive a call for a short
period of time.
. Do not place the cellular phone in an
area surrounded by metal or far away
from the in-vehicle phone module to
prevent tone quality degradation and
wireless connection disruption.
. While a cellular phone is connected
through the Bluetooth® wireless con-
nection, the battery power of the
cellular phone may discharge quicker
than usual. The Bluetooth® Hands-
Free Phone System cannot charge
cellular phones.
. If the Bluetooth® Hands-Free Phone
System seems to be malfunctioning, it
is recommended to contact a NISSAN
dealer.
. Some cellular phones or other devices
may cause interference or a buzzing
noise to come from the audio system
speakers. Storing the device in a
different location may reduce or elim-
inate the noise.
. Refer to the cellular phone Owner’s
Manual regarding battery charging, cellular phone antenna, etc.
. This wireless hands free car kit is
based on Bluetooth® technology,
— Frequency: 2402 MHz - 2480 MHz
— Output Power: 4.14 dBm E.I.R.P
— Modulation: FHSS GFSK 8DPSK, π/
4DQPSK
— Number of Channel: 79
— This wireless equipment can’t be used for any services related to
safety because there is the possibi-
lity of radio interference.
REGULATORY INFORMATION
FCC Regulatory information
. CAUTION: To maintain compliance
with FCC’s RF exposure guidelines,
use only the supplied antenna. Un-
authorized antenna, modification, or
attachments could damage the trans-
mitter and may violate FCC regula-
tions.
. Operation is subject to the following
two conditions:
1. this device may not cause interfer- ence and
2. this device must accept any interfer- ence, including interference that may
cause undesired operation of the
device
Center display, heater, air conditioner, audio, phone and voice recognition systems4-95
Page 351 of 460
6-16In case of emergency
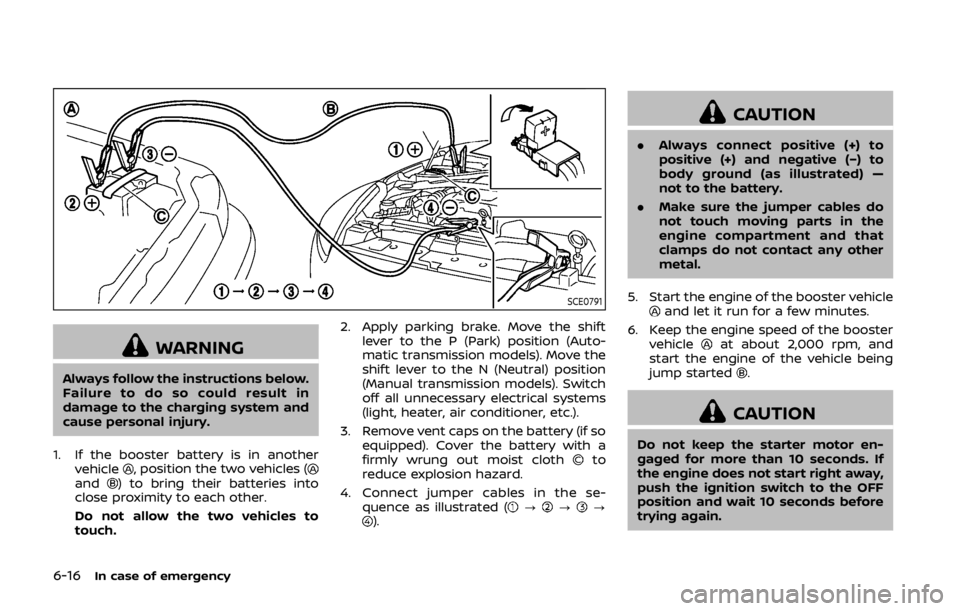
SCE0791
WARNING
Always follow the instructions below.
Failure to do so could result in
damage to the charging system and
cause personal injury.
1. If the booster battery is in another vehicle
, position the two vehicles (and) to bring their batteries into
close proximity to each other.
Do not allow the two vehicles to
touch. 2. Apply parking brake. Move the shift
lever to the P (Park) position (Auto-
matic transmission models). Move the
shift lever to the N (Neutral) position
(Manual transmission models). Switch
off all unnecessary electrical systems
(light, heater, air conditioner, etc.).
3. Remove vent caps on the battery (if so equipped). Cover the battery with a
firmly wrung out moist cloth
to
reduce explosion hazard.
4. Connect jumper cables in the se- quence as illustrated (
???).
CAUTION
.Always connect positive (+) to
positive (+) and negative (−) to
body ground (as illustrated) —
not to the battery.
. Make sure the jumper cables do
not touch moving parts in the
engine compartment and that
clamps do not contact any other
metal.
5. Start the engine of the booster vehicle
and let it run for a few minutes.
6. Keep the engine speed of the booster vehicle
at about 2,000 rpm, and
start the engine of the vehicle being
jump started
.
CAUTION
Do not keep the starter motor en-
gaged for more than 10 seconds. If
the engine does not start right away,
push the ignition switch to the OFF
position and wait 10 seconds before
trying again.
Page 380 of 460
Recommended fluid is Genuine NISSAN
Windshield Washer Concentrate Cleaner
& Antifreeze or equivalent.
CAUTION
.Do not substitute engine anti-
freeze coolant for window
washer solution. This may result
in damage to the paint.
. Do not fill the window washer
reservoir tank with washer fluid
concentrates at full strength.
Some methyl alcohol based
washer fluid concentrates may
permanently stain the grille if
spilled while filling the window
washer reservoir tank.
. Pre-mix washer fluid concen-
trates with water to the manu-
facturer’s recommended levels
before pouring the fluid into the
window washer reservoir tank. Do
not use the window washer re-
servoir tank to mix the washer
fluid concentrate and water. .
Keep the battery surface clean and
dry. Clean the battery with a solution
of baking soda and water.
. Make certain the terminal connec-
tions are clean and securely tightened.
. If the vehicle is not to be used for 30
days or longer, disconnect the nega-
tive (−) battery terminal cable to pre-
vent discharging it.
NOTE:
Care should be taken to avoid situations
that can lead to potential battery dis-
charge and potential no-start condi-
tions such as:
1. Installation or extended use of elec-
tronic accessories that consume
battery power when the engine is
not running (Phone chargers, GPS,
DVD players, etc.)
2. Vehicle is not driven regularly and/
or only driven short distances.
In these cases, the battery may need to
be charged to maintain battery health.
CAUTION
When the battery cable is removed
from the battery terminal, do not
close either of front doors. The auto-
matic window adjusting function will
not work, and the side roof panel may be damaged.
To disconnect the negative (−) battery
terminal, perform the procedure in the
following order. Otherwise, the window
and the side roof panel may contact and
be damaged.
1. Close the windows.
2. Open the hood.
3. Close and lock all the doors.
4. Disconnect the negative (−) battery terminal.
5. Securely close the hood.
To connect the negative (−) battery term-
inal, perform the procedure in the follow-
ing order. Otherwise, the window and the
side roof panel may contact and be
damaged.
1. Unlock and open the driver side door. Do not close the door.
2. Open the hood.
3. Connect the negative (−) battery term- inal. Then close the hood.
4. Fully open the driver side door win- dow.
5. Close the driver side door and the window.
Do-it-yourself8-11
BATTERY