2019 MITSUBISHI ECLIPSE CROSS System
[x] Cancel search: SystemPage 46 of 423

Head restraints
Seat and restraint systems 4-9
4
Each time the switch is pressed, the mode changes to the next one in the following sequence: OFF
HI
LO
OFF.
N00404301640
Head restraints can reduce the risk of a whip- lash injury if your vehicle is hit from the rear.The head restraints are equipped in the illus- trated position. To maximize the effectiveness of the headrestraints, adjust the seatback to the upright position, and the head
restraint to the proper
position. Sit back against the seatback withyour head close to the head restraint.
2 (OFF) - Heater off 3 (LO) - Heater low (to keep the seat-
warm)
For the rear outboard seats
OFF - Heater offHI - Heater high (for quick heating) LO - Heater low (to keep the seat warm)
NOTE
The rear seat switch will automatically return to “OFF” after the engine is stopped.
Head restraints
WA R N I N G Driving without the head restraints in place can cause you and your passengers serious injury or death in an accident. To reduce the risk of injury in an accident, always make sure the head restraints areinstalled and properly positioned when the seat is occupied. In order to minimize the risk of a neck injury due to a rear impact, the seatback must be adjusted to the upright positionand the head restraint must be adjusted to the proper position before vehicle opera- tion. The driver should never adjust theseat while the vehicle is in motion. Never place a cushion or similar device on the seatback. This can adversely affect head restraint performance by increasing the distance between your head and therestraint.
BK0266800US.bo
ok 9 ページ 2018年6月27日 水曜日 午後5時6分
Page 47 of 423

Head restraints 4-10 Seat and restraint systems
4
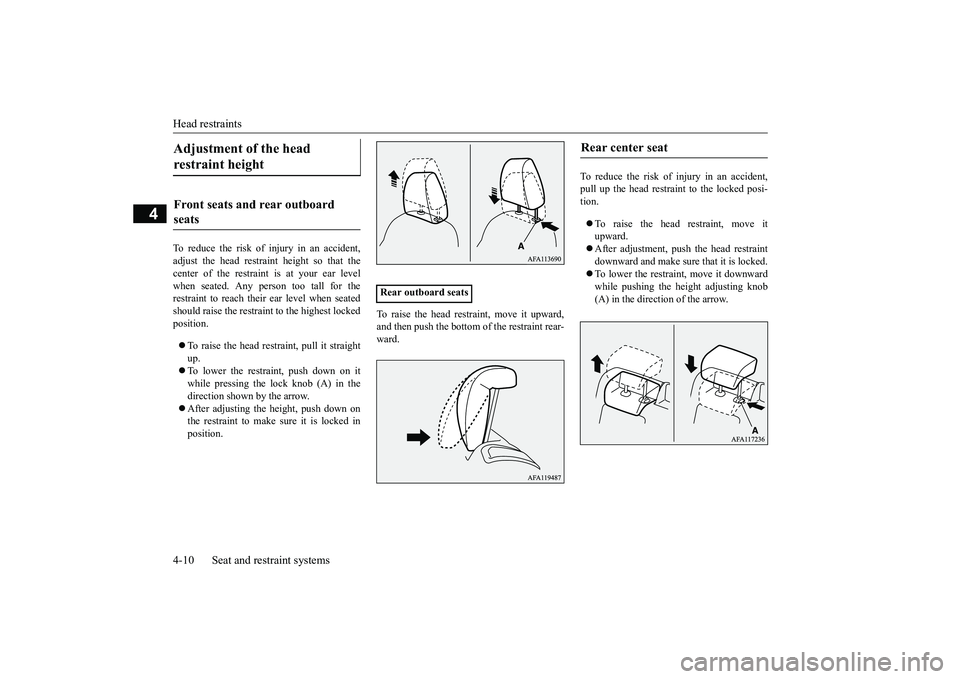
To reduce the risk of injury in an accident, adjust the head restraint height so that thecenter of the restraint is at your ear levelwhen seated. Any person too tall for the restraint to reach their ear level when seated should raise the restraint to the highest lockedposition. To raise the head restraint, pull it straight up. To lower the restraint, push down on it while pressing the lock knob (A) in the direction shown by the arrow. After adjusting the height, push down on the restraint to make sure it is locked in position.
To raise the head restraint, move it upward, and then push the bottom of the restraint rear-ward.
To reduce the risk of injury in an accident, pull up the head restraint to the locked posi-tion. To raise the head restraint, move it upward. After adjustment, push the head restraint downward and make sure that it is locked. To lower the restraint, move it downward while pushing the height adjusting knob (A) in the direction of the arrow.
Adjustment of the head restraint height Front seats and rear outboard seats
Rear outboard seats
Rear center seat
BK0266800US.bo
ok 10 ページ 2018年6月27日 水曜日 午後5時6分
Page 48 of 423

Head restraints
Seat and restraint systems 4-11
4
Press the lock knob (A) in the direction shown by the arrows. Then pull the head restraint up and out of the seatback.
First check that the head restraint stalk with the notches (B) is positioned toward the holewith the lock knob (A), and then insert the head restraint into the seatback. And then insert it into the seatback. Push thehead restraint down while pressing the lock knob (A) until the restraint locks into place.
To remove
WA R N I N G To help minimize the risk of neck injury in the event of an accident, the head restraints must be properly installed and positioned to proper height before vehicleoperation.
WA R N I N G When a person sits in the rear seating position, pull up the head restraint to a height at which it locks in position. Be sure to make this adjustment before start- ing to drive. Serious injuries could other-wise be suffered in th
e result of an impact.
NOTE
If a front seat head restraint contacts the headliner and cannot be removed, tilt the seatback rearward slightly.Refer to “To adjust the seatbacks” on page 4-5. To remove the head restraint from the left or right rear seat, tilt the seatback forward slightly. Refer to “Rear seats” on page 4-6.
To install
NOTE
Before installing the head restraint to the left or right rear seat, tilt the seatback forward slightly. Refer to “Rear seats” on page 4-6.
BK0266800US.bo
ok 11 ページ 2018年6月27日 水曜日 午後5時6分
Page 49 of 423

Making a cargo area 4-12 Seat and restraint systems
4
N00405501131
N00405701162
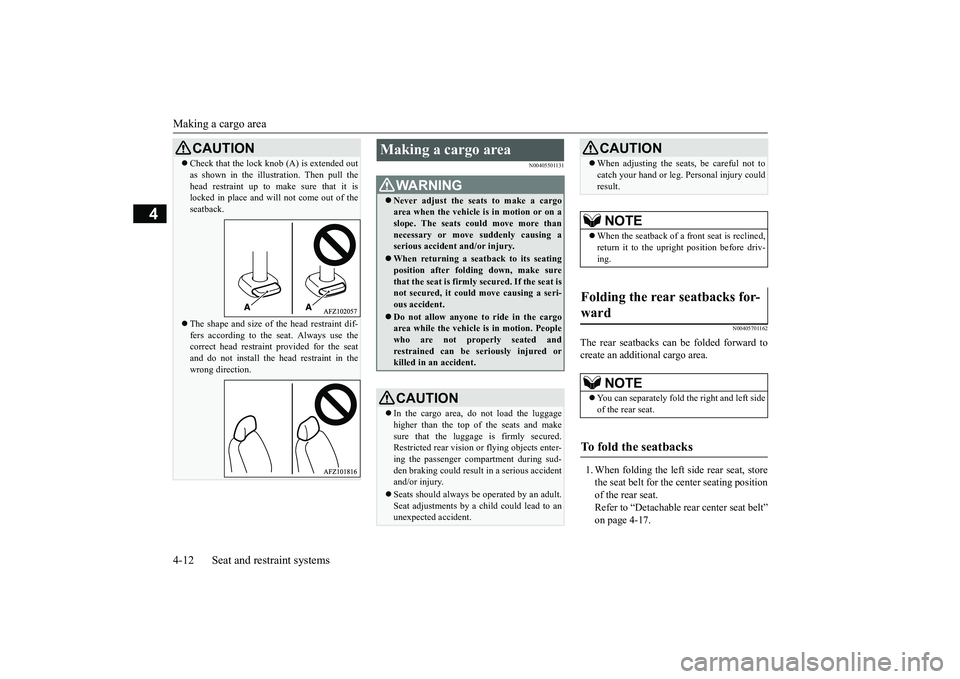
The rear seatbacks can be folded forward to create an additional cargo area. 1. When folding the left side rear seat, store the seat belt for the
center seating position
of the rear seat. Refer to “Detachable rear center seat belt” on page 4-17.
CAUTION Check that the lock knob (A) is extended out as shown in the illustration. Then pull the head restraint up to make sure that it is locked in place and will not come out of the seatback. The shape and size of the head restraint dif- fers according to the seat. Always use the correct head restraint provided for the seatand do not install the head restraint in the wrong direction.
Making a cargo area
WA R N I N G Never adjust the seats to make a cargo area when the vehicle is in motion or on a slope. The seats could move more than necessary or move suddenly causing aserious accident and/or injury. When returning a seatback to its seating position after folding down, make sure that the seat is firmly secured. If the seat is not secured, it could move causing a seri-ous accident. Do not allow anyone to ride in the cargo area while the vehicle is in motion. People who are not properly seated and restrained can be seriously injured orkilled in an accident.CAUTION In the cargo area, do not load the luggage higher than the top of the seats and makesure that the luggage is firmly secured. Restricted rear vision or flying objects enter- ing the passenger compartment during sud- den braking could result in a serious accident and/or injury. Seats should always be operated by an adult. Seat adjustments by a child could lead to anunexpected accident.
When adjusting the seats, be careful not to catch your hand or leg. Personal injury could result.NOTE
When the seatback of a front seat is reclined, return it to the upright position before driv- ing.
Folding the rear seatbacks for- ward
NOTE
You can separately fold the right and left side of the rear seat.
To fold the seatbacks
CAUTION
BK0266800US.bo
ok 12 ページ 2018年6月27日 水曜日 午後5時6分
Page 50 of 423

Seat belts
Seat and restraint systems 4-13
4
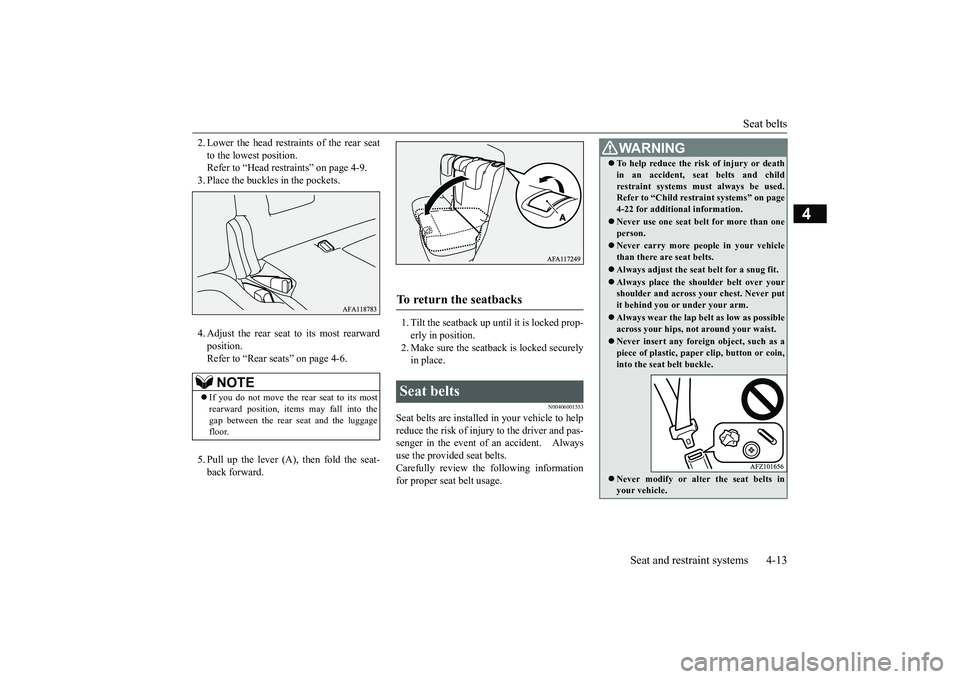
2. Lower the head restraints of the rear seat to the lowest position. Refer to “Head restraints” on page 4-9. 3. Place the buckles in the pockets. 4. Adjust the rear seat to its most rearward position. Refer to “Rear seats” on page 4-6. 5. Pull up the lever (A), then fold the seat- back forward.
1. Tilt the seatback up until it is locked prop- erly in position.2. Make sure the seatback is locked securely in place.
N00406001553
Seat belts are installed in your vehicle to help reduce the risk of injury to the driver and pas- senger in the event of an accident. Always use the provided seat belts.Carefully review the following information for proper seat belt usage.
NOTE
If you do not move the rear seat to its most rearward position, items may fall into the gap between the rear seat and the luggagefloor.
To return the seatbacks Seat belts
WA R N I N G To help reduce the risk of injury or death in an accident, seat belts and child restraint systems must always be used. Refer to “Child restraint systems” on page 4-22 for additional information. Never use one seat belt for more than one person. Never carry more people in your vehicle than there are seat belts. Always adjust the seat belt for a snug fit.Always place the shoulder belt over your shoulder and across your chest. Never put it behind you or under your arm. Always wear the lap belt as low as possible across your hips, not around your waist. Never insert any foreign object, such as a piece of plastic, paper clip, button or coin,into the seat belt buckle. Never modify or alter the seat belts in your vehicle.
BK0266800US.bo
ok 13 ページ 2018年6月27日 水曜日 午後5時6分
Page 51 of 423

Seat belts 4-14 Seat and restraint systems
4
N00406201542
All seats are equipped with a seat belt which uses one combined lap-and-shoulder belt with an emergency locking retractor. This system is designed to provide both com- fort and safety. It permits full extension and automatic retraction of the belts during nor- mal vehicle operation. A sensing device
inside the belt retractor is designed to lock the retractor in the event of a sudden change in the vehicle’s motion.
To reduce the risk to the driver of serious injury or death during deployment of the driver’s airbag, always properly wear the seat belt and adjust the driver’s seat as far back as possible while maintaining a posi-tion that still enables you to fully apply the pedals, easily control the steering wheel, and safely operate the vehicle. To reduce the risk to a front seat passen- ger of serious injury or death from adeploying airbag, make sure the passenger always wears the seat belt properly, remains seated all the way back andupright in their seat, and moves the seat as far back as possible. Refer to “Supplemen- tal Restraint System (SRS) - airbag” onpage 4-30 for additional information. Never hold an infant or child in your arms or on your lap when riding in this vehicle even when you are wearing your seat belt. Never place any part of the seat belt youare wearing around an infant or child. Failure to follow these simple instructions creates a risk of serious injury or death toyour child in the event of an accident or sudden stop.WA R N I N G
Children 12 years old and under should always ride in the rear seat and be prop- erly restrained. This reduces their risk of serious injury or death in an accident, especially due to a deploying front passen-ger’s airbag. Refer to “Child restraint sys- tems” on page 4-22 for additional information. Any child who is too small to properly wear a seat belt must be properlyrestrained in an appropriate child restraint system. Infants MUST be placed in a rear-facing child safety seat and positioned in the rear seat. In the event of an accident, all seat belt assemblies, including retractors andattachment hardware, should be inspected by an authorized Mitsubishi Motors dealer to determine whether replacementis necessary.
Seat belt instructions
WA R N I N G
NOTE
For instructions on installing a child restraint system using a seat belt, refer to “Installing a child restraint system using the seat belt” on page 4-27.
BK0266800US.bo
ok 14 ページ 2018年6月27日 水曜日 午後5時6分
Page 52 of 423

Seat belts
Seat and restraint systems 4-15
4
1. Occupants should always sit back in their seats with their backs against the upright seatback. To reduce the risk of serious injury or death during deployment of theairbag, adjust the driver’s seat as far back as possible while maintaining a position that still enables you to fully apply thepedals, easily control the steering wheel, and safely operate the vehicle. The front passenger seat should also be moved asfar back as possible. Refer to “Supple-mental Restraint System (SRS) - airbag” on page 4-30. Also refer to “To adjust the seat forward or backward” on page 4-4.
2. Before using the rear center seat belt, make sure that the detachable anchor is securely latched and the seat belt is nottwisted. For details, refer to page 4-17.
3. Grasp the latch plate and slide it up the webbing so that it easily pulls across your body. 4. Pull the seat belt out slowly while holding the latch plate. Push the latch plate into the buckle until you hear a “click”. Pull up on the belt to be sure the latch plate islocked securely in the buckle.
WA R N I N G To reduce the risk of serious injury or death in the event of an accident or sud- den stop, all seatbacks should be kept in the upright position while the vehicle is in motion. Seat belt performance during an accident can be adversely affected if the seatbacksare reclined. The more a seatback is reclined, the more likely seat belt perfor- mance will be adversely affected. If theseat belt is not properly positioned against the body during an accident, there is increased risk you will slide under the beltand receive serious injury or death.
BK0266800US.bo
ok 15 ページ 2018年6月27日 水曜日 午後5時6分
Page 53 of 423

Seat belts 4-16 Seat and restraint systems
4
5. The lap part of the belt must always be worn low and snug across the hips. Pull up on the shoulder portion of the belt totake up any slack in the lap belt.
6. To release the belt, press the button on the buckle and allow the belt to retract. If the belt does not retract smoothly, pull it out and check for kinks or twists in thewebbing. Then make sure it remains untwisted as it retracts.
NOTE
If the seat belt locks up and cannot be pulled out, pull it once with force and let it retract all the way. Then, pull the belt out slowly once again.
NOTE
With the exception of the seat belt for the driver, the seat belts in all other seating posi- tions are equipped with an Automatic Lock- ing Retractor (ALR) function. If you pull the seat belt fully out of the retractor, the retrac-tor will switch to its ALR child restraint installation function (see page 4-27). When the ALR function has been activated,the seat belt will only retract. If this happens, let the belt fully retract, then pull the seat belt back out, repeating steps 1 through 4.WA R N I N G Be sure the lap belt portion fits snugly and is worn as low as possible across the hips, not around the waist. Failure to follow thisinstruction will increase the risk of serious injury or death in the
event of an accident.
Be sure the seat belt webbing is not twisted when worn. Twisted webbing may adversely affect seat belt performance.
NOTE
If the seat belt (A) or ring (B) becomes dirty, the belt may not retract smoothly. If the seat belt and ring are dirty, clean them with amild soap or detergent solution.
BK0266800US.bo
ok 16 ページ 2018年6月27日 水曜日 午後5時6分