2019 MITSUBISHI ECLIPSE CROSS heater
[x] Cancel search: heaterPage 334 of 423

Automatic air conditioning (if so equipped)
Comfort controls 7-13
7
N00731801170
Blower speed and vent mode may be con- trolled manually by setting the blower speed selection switch and the MODE switch to the desired positions. To return to automaticoperation, press the AUTO switch.
N00732401623
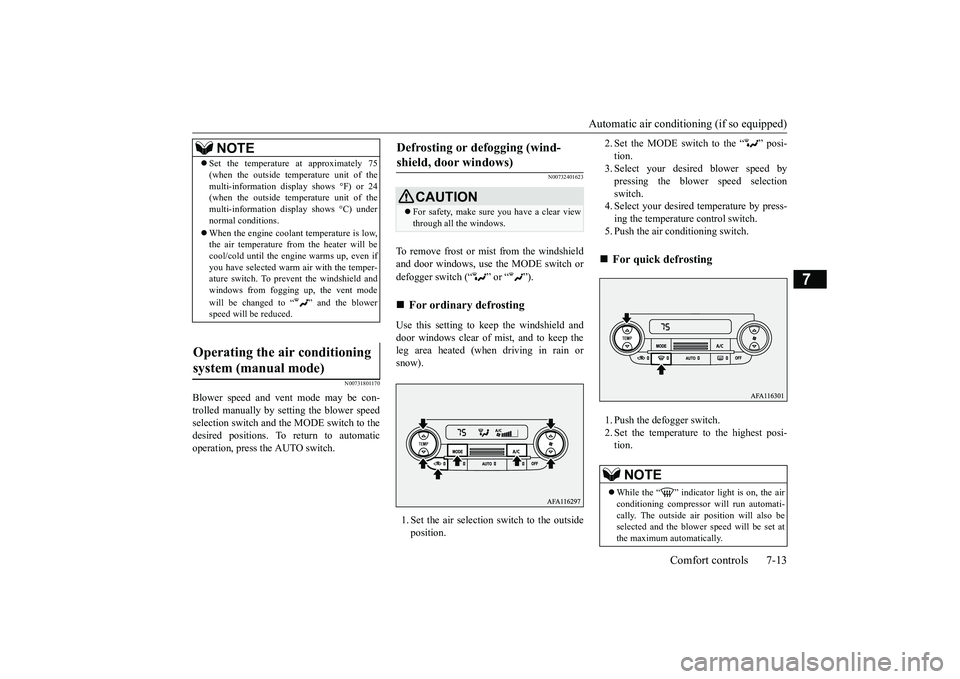
To remove frost or mist from the windshield and door windows, use the MODE switch or defogger switch (“ ” or “ ”). Use this setting to keep the windshield and door windows clear of mist, and to keep the leg area heated (when driving in rain or snow). 1. Set the air selection switch to the outside position.
2. Set the MODE switch to the “ ” posi- tion. 3. Select your desired blower speed by pressing the blower speed selectionswitch. 4. Select your desired temperature by press- ing the temperature control switch.5. Push the air conditioning switch. 1. Push the defogger switch. 2. Set the temperature to the highest posi- tion.
NOTE
Set the temperature at approximately 75 (when the outside temperature unit of the multi-information display shows °F) or 24 (when the outside temperature unit of the multi-information display shows °C) undernormal conditions. When the engine coolant temperature is low, the air temperature from the heater will be cool/cold until the engine warms up, even if you have selected warm air with the temper-ature switch. To prevent the windshield and windows from fogging up, the vent mode will be changed to “ ” and the blower speed will be reduced.
Operating the air conditioning system (manual mode)
Defrosting or defogging (wind- shield, door windows)
CAUTION For safety, make sure you have a clear view through all the windows.
For ordinary defrosting
For quick defrosting NOTE
While the “ ” indicator light is on, the air conditioning compressor will run automati- cally. The outside air position will also beselected and the blower speed will be set at the maximum automatically.
BK0266800US.bo
ok 13 ページ 2018年6月27日 水曜日 午後5時6分
Page 338 of 423

Dual-zone automatic climate control
air conditioning (if so equipped)
Comfort controls 7-17
7
The above indicates the factory settings. You can personalize the air selection switch and
air conditioning switch to match your per- sonal preferences. Contact your authorized Mitsubishi Motors dealer or a repair facility of your choice forassistance. Refer to “Personalizing the air conditioning switch (Changing the function setting)” onpage 7-20. Refer to “Personalizing the air selection (Changing the function setting)” on page7-19. When the indicator light (A) goes off by pressing the passenger’s side temperature control switch (B) or the SYNC switch, thedriver’s side and the passenger’s side temper- ature can be controlled independently of each other.
When the engine coolant temperature is low, the air temperature from the heater will be cool/cold until the engine warms up, even if you have selected warm air with the switch. To prevent the windshield and windows fromfogging up, the vent mode will be changed to “ ” and the blower speed will be reduced while the system is operating in the AUTOmode. When you feel that it is hotter or colder than the set temperature, you may adjust it to your preference. For further information, we recommend youconsult an authorized Mitsubishi Motors dealer or a repair facility of your choice. When the temperature is set to the highest or the lowest setting, the air selection and the air conditioning will be automaticallychanged as follows. Also, if the air selection is operated manually after an automatic changeover, manual oper-ation will be selected. • Quick Heating (When the temperature is set to the highest setting) Outside air will be introduced and the air conditioning will stop. • Quick Cooling (When the temperature is set to the lowest setting) Inside air will be recirculated and the air conditioning will operate.NOTE
To control the driver’s side and the passenger’s side temperature inde-pendently
NOTE
When the indicator light (A) comes on by pressing the SYNC switch, the passenger’s side temperature will be controlled to the same setting temperature as the driver’s side.When the indicator light (A) illuminates, if the driver’s side temperature control switch is pressed, the passenger’s side setting tem-perature will be synchronized to the driver’s side.
BK0266800US.bo
ok 17 ページ 2018年6月27日 水曜日 午後5時6分
Page 343 of 423

Dual-zone automatic climate contro
l air conditioning (if so equipped)
7-22 Comfort controls
7
N00731801125
Blower speed and vent mode may be con- trolled manually by setting the blower speed selection switch and the MODE switch to the desired positions. To return to automaticoperation, press the AUTO switch.
N00732401636
To remove frost or mist from the windshield and door windows, use the MODE switch or defogger switch (“ ” or “ ”). Use this setting to keep the windshield and door windows clear of mist, and to keep the leg area heated (when driving in rain orsnow).
1. Set the air selection switch to the outside position. 2. Set the MODE switch to the “ ” posi- tion.3. Select your desired blower speed by pressing the blower speed selection switch.4. Select your desired temperature by press- ing the temperature control switch. 5. Push the air conditioning switch. 1. Push the defogger switch. 2. Set the temperature to the highest posi-tion.
NOTE
Set the temperature at approximately 75 (when the outside temperature unit of the multi-information display shows °F) or 24 (when the outside temperature unit of the multi-information display shows °C) undernormal conditions. When the engine coolant temperature is low, the air temperature from the heater will be cool/cold until the engine warms up, even if you have selected warm air with the temper-ature switch. To prevent the windshield and windows from fogging up, the vent mode will be changed to “ ” and the blower speed will be reduced.
Operating the air conditioning system (manual mode)
Defrosting or defogging (wind- shield, door windows)
CAUTION For safety, make sure you have a clear view through all the windows.
For ordinary defrosting
For quick defrosting
BK0266800US.bo
ok 22 ページ 2018年6月27日 水曜日 午後5時6分
Page 350 of 423

Jump-starting the engine For emergencies 8-3
8
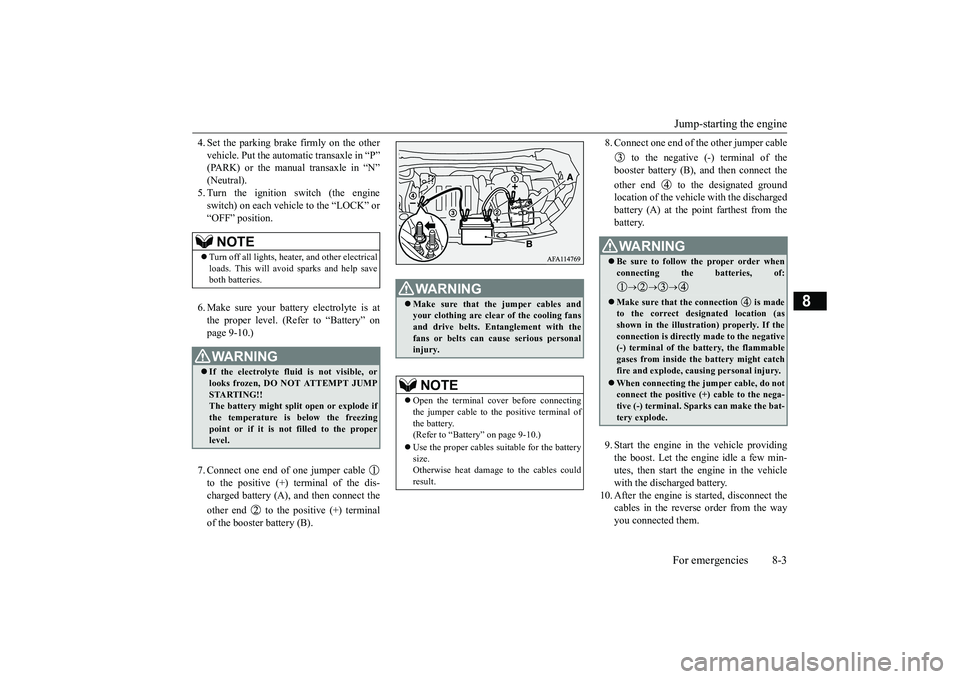
4. Set the parking brake firmly on the other vehicle. Put the automatic transaxle in “P” (PARK) or the manual transaxle in “N” (Neutral).5. Turn the ignition switch (the engine switch) on each vehicle to the “LOCK” or “OFF” position. 6. Make sure your battery electrolyte is at the proper level. (Refer to “Battery” on page 9-10.) 7. Connect one end of one jumper cable to the positive (+) terminal of the dis- charged battery (A), and then connect the other end to the positive (+) terminal of the booster battery (B).
8. Connect one end of the other jumper cable
to the negative (-) terminal of the booster battery (B), and then connect the other end to the designated ground location of the vehicle with the discharged battery (A) at the point farthest from thebattery. 9. Start the engine in the vehicle providing the boost. Let the engine idle a few min- utes, then start the engine in the vehicle with the discharged battery.
10. After the engine is started, disconnect the
cables in the reverse order from the way you connected them.
NOTE
Turn off all lights, heater, and other electrical loads. This will avoid sparks and help save both batteries.WA R N I N G If the electrolyte fluid is not visible, or looks frozen, DO NOT ATTEMPT JUMP STARTING!! The battery might split open or explode ifthe temperature is below the freezing point or if it is not filled to the proper level.
WA R N I N G Make sure that the jumper cables and your clothing are clear of the cooling fans and drive belts. Entanglement with the fans or belts can cause serious personalinjury.NOTE
Open the terminal cover before connecting the jumper cable to the positive terminal ofthe battery. (Refer to “Battery” on page 9-10.) Use the proper cables suitable for the battery size. Otherwise heat damage to the cables couldresult.
WA R N I N G Be sure to follow the proper order when connecting the batteries, of:
Make sure that the connection is made to the correct designated location (as shown in the illustration) properly. If the connection is directly made to the negative(-) terminal of the battery, the flammable gases from inside the battery might catch fire and explode, causing personal injury. When connecting the jumper cable, do not connect the positive (+) cable to the nega-tive (-) terminal. Sparks can make the bat- tery explode.
BK0266800US.bo
ok 3 ページ 2018年6月27日 水曜日 午後5時6分
Page 385 of 423

Fuses 9-24 Vehicle care and maintenance
9
* : Fusible link Some fuses may not be installed on your vehicle, depending on the vehicle model or specifications. The table above shows the main equip- ment corresponding to each fuse.
Passenger compartment fuse loca- tion table No.
Sym- bol
Electrical system
Capac-ity
1
Power window con-
trol
30 A
*
2 Defogger 30 A
*
3 Heater 30 A 4 Windshield wipers 30 A 5 Door locks 25 A 6— — — 7 12 V power outlet 15 A
8 Rear window wiper 15 A 9 Sunroof 20 A 10 Ignition switch 10 A 11 Option 10 A 12
Hazard warning
flasher
15 A
13 4-wheel drive system 10 A14
Stop lights (Brake lights)
15 A
15 Gauges 10 A 16 SRS airbag 7.5 A 17 Radio 15 A 18 Control unit relay 7.5 A 19
Interior lights (Room lights)
15 A
20 Back-up lights 7.5 A21
Heated outside rearview mirrors
7.5 A
22
Outside rearview
mirrors
10 A
23
Cigarette lighter/ 12 V power outlet
15 A
No.
Sym- bol
Electrical system
Capac-ity
Engine compartment fuse location table Behind the fuse block cover Fuse block
BK0266800US.bo
ok 24 ページ 2018年6月27日 水曜日 午後5時6分