2019 MERCEDES-BENZ SLC ROADSTER towing
[x] Cancel search: towingPage 265 of 306

Tow
ingand tow-starti ng Impo
rtant safety notes G
WA
RNING
Wh entow ingortow -sta rtingano therveh icle
and itsweight isgre atertha nthe permi ssi-
bl e gro sswe ight ofyour veh icle, the :
R the towingeyecou ldde tach itself
R the vehicle/tra iler comb inationcou ldrol l-
ove r.
The reisaris kof an acc ident.
Wh entow ingortow -sta rtingano therveh i-
cle ,its weight sho uld not begre atertha n
the permi ssible gro sswe ight ofyour veh icle.
Deta ils on the permi ssible gro ssveh iclewe ight
of your veh iclecan befou ndonthe vehicle
id enti ficati on plate (Ypage 297 ).
! Wh
enActiv eBra keAssi st,Activ eDis tance
Assi stDISTR ONICor the HOLD functio nis
acti vated ,the vehiclebra kes automa tically
in certa insitua tions.
To avoid da ma getothe vehicle, de acti vate
the sesystem sin the followi ng orsimil arsit-
ua tio ns:
R wh en tow ingthe vehicle
R in the carwash
! Onl
ysec urethe tow ropeor tow barat the
tow ingeyes. Othe rwise, the vehiclecou ldbe
da ma ged.
! Do
not usethe towingeyefor reco very,
thi scou ldda ma gethe vehicle. Ifin do ubt,
reco verthe vehiclewi th acra ne.
! Wh
entow ing,pu llaw ay slow lyand
smo othly.Ifthe tractiv epo we ris too high,
the vehicles cou ldbe dama ged.
! Do
not tow with sling -typ eeq uipme nt.This
cou ldda ma gethe vehicle.
! Wh
entow ingaway veh icles with KEYL ESS-
GO ,us ethe key instea dof the Star t/Stop
bu tton. Theautoma tictransmi ssion may
othe rwise shi ftto positio n005D when you
op en the driver 'sor fro nt-pa ssenge rdo or,
wh ich cou ldda ma gethe transmi ssion. !
Ma
kesure tha tthe electri cpa rkin gbra ke
is rel eased .If the electri cpa rkin gbra keis
fa ulty, visitaqu alifi ed speci alistwo rksh op.
! Yo
uma ytow thevehiclefor ama xim um
di sta nce of30 miles(50 kilome ters).A tow -
ing spee dof 30 mph (50km/h )mu stnot be
exce eded.
For towingdista nces over30 miles
(50 kilome ters),the entireveh iclemu stbe
ra ised and transp orte d.
! Wh
enyouar etow -sta rtingor tow ing
ano therveh icle, its weight mu stnot exce ed
the maxim um permi ssible gro sswe ight of
yo ur veh icle.
It is be tter tohave the vehicletra nsp orte d
tha nto have ittow edaway.
The automa tictransmi ssion mu stbe inpo si-
tio n005C when the vehicleis be ing tow edaway.
The battery mustbe conne ctedandcharged.
Othe rwise, you:
R canno ttur nthe Sma rtKeyto positio n0048 in
the igniti onlock
R canno tshi ftthe automa tictransmi ssion to
po sitio n005C
Dea ctivate the automa ticlocking feature
be for ethe vehicleis tow ed(Ypage 178 ).Yo u
cou ldothe rwise be locked outwh en pushi ng
or tow ingthe vehicle. In
stal ling /re mov ingthe towingey e
In stal ling the towingey e G
WA
RNING
The exhaust tai lpi pe maybe veryhot. There
is aris kof burns when rem oving the rear
cove r.
Do not touchthe exhaust pipe .Ta ke partic u-
la rcar ewh en rem oving the rearcove r. Tow
ingand tow-starti ng
263Break downass istanc e Z
Page 266 of 306

The
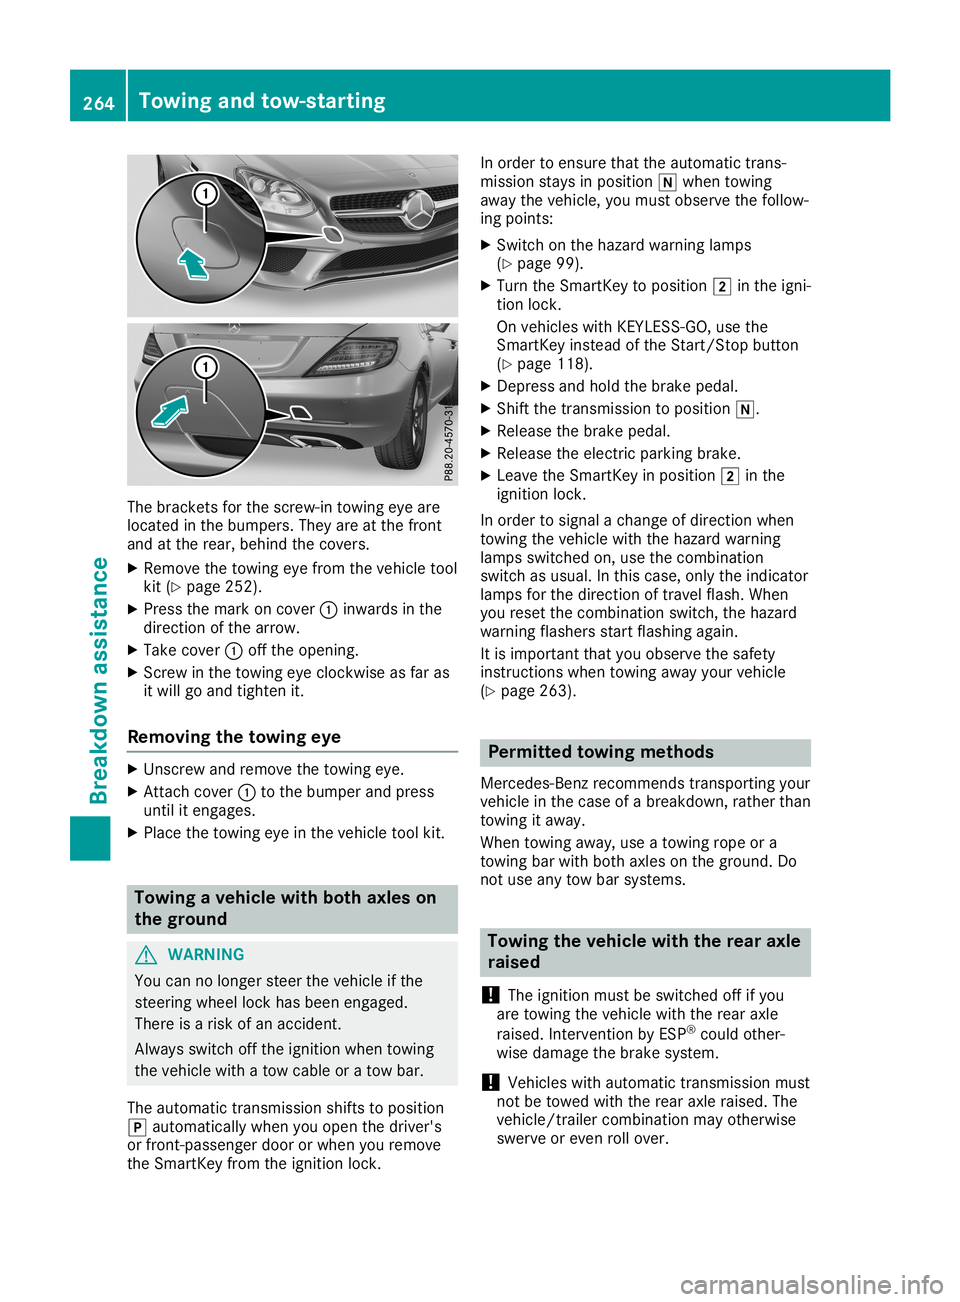
bracket sfor the screw-in towingeyeare
located inthe bumpers. Theyareatthe front
and atthe rear, behind thecovers.
X Remove thetowing eyefrom thevehicle tool
kit (Ypage 252).
X Press themark oncover 0043inwards inthe
direction ofthe arrow.
X Take cover 0043offthe opening.
X Scr ew inthe towing eyeclock wiseasfar as
it will goand tighten it.
Removing thetowing eye X
Unsc rewand remove thetowing eye.
X Attach cover 0043tothe bumper andpress
until itengages.
X Place thetowing eyeinthe vehicle toolkit. Towing
avehicle withboth axles on
the ground G
WARNIN
G
You cannolonger steerthevehicle ifthe
steerin gwheel lockhasbeen engaged.
There isarisk ofan accident .
Always switchoffthe ignition whentowing
the vehicle withatow cable oratow bar.
The automatic transmission shiftstoposition
005D automatically whenyouopen thedriver's
or front -passenger doororwhen youremove
the Smart Keyfrom theignition lock. In
order toensure thattheautomatic trans-
mission staysinposition 005Cwhen towing
away thevehicle, youmust observe thefollow-
ing points:
X Switch onthe hazard warning lamps
(Y page 99).
X Turn theSmart Keytoposition 0048inthe igni-
tion lock.
On vehicles withKEYLE SS-GO, usethe
Smart Keyinstead ofthe Start /Stopbutton
(Y page 118).
X Depress andhold thebrake pedal.
X Shift thetrans mission toposition 005C.
X Release thebrake pedal.
X Release theelectric parking brake.
X Leave theSmart Keyinposition 0048inthe
ignition lock.
In order tosignal achange ofdirection when
towing thevehicle withthehazard warning
lamps switched on,use thecombinat ion
switch asusual. Inthis case, onlytheindicator
lamps forthe direction oftravel flash.When
you reset thecombinat ionswitch, thehazard
warning flashersstartflashing again.
It is important thatyouobserve thesafety
instr uctions whentowing awayyourvehicle
(Y page 263). Permit
tedtowing methods
Mercedes- Benzrecomm endstransportin gyour
vehicle inthe case ofabreakdown, ratherthan
towing itaway .
When towing away,use atowing ropeora
towing barwith both axles onthe ground. Do
not use anytow barsystems. Towing
thevehicle withtherear axle
raised
! The
ignition mustbeswitched offifyou
are towing thevehicle withtherear axle
raised. Intervent ionbyESP ®
could other-
wise damage thebrake system.
! Vehicles
withautomatic transmission must
not betowed withtherear axle raised. The
vehicle/t railercombinat ionmay otherwise
swerve oreven rollover. 264
Towing
andtow-sta rtingBr eakdown assistance
Page 267 of 306

Trans
portingthe vehic le
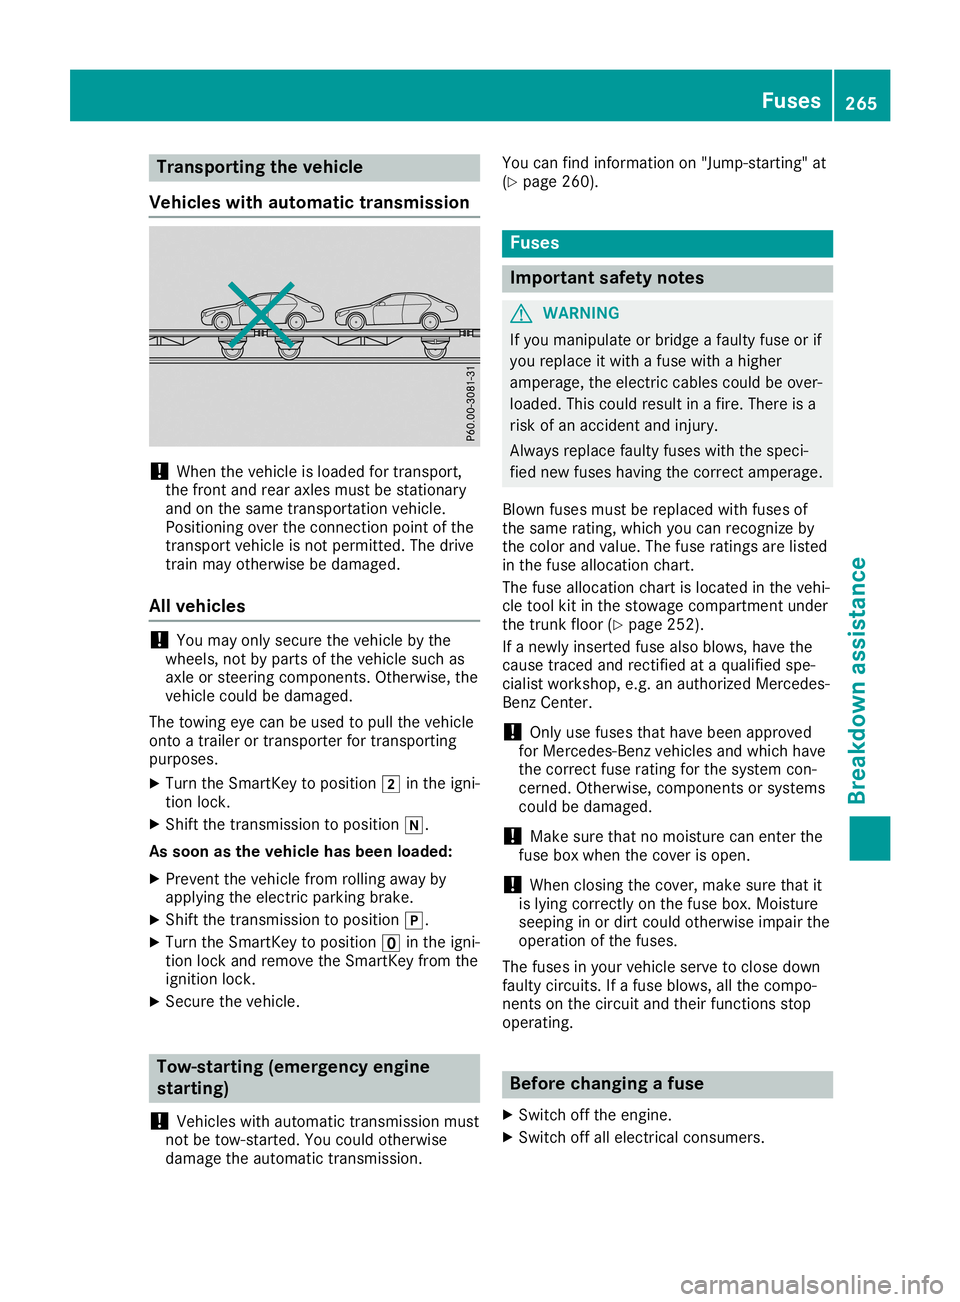
Veh icle swi th auto matic transmission !
Wh
enthe vehicleis load ed for transp ort,
the frontand rearaxl es mu stbe stationar y
and onthe same transp orta tionveh icle.
Po sitio ning overthe conne ctionpo int ofthe
tra nsp ortveh icleis not permi tted .The drive
tra inma yothe rwise be dama ged.
Al lve hic les !
Yo
uma yonl ysec urethe vehicleby the
wh eels,not byparts ofthe vehiclesu ch as
axl eor stee ringcomp onents. Othe rwise, the
veh iclecou ldbe dama ged.
The towingeyecan beused topullthe vehicle
onto atra iler or tra nsp orte rfor transp orting
pu rpo ses .
X Tu rn the Sma rtKeyto positio n0048 inthe igni-
tio nlock.
X Shi ftthe transmi ssion topositio n005C.
As soon asthe vehic lehas been loade d:
X Pre vent thevehiclefro mrol ling away by
ap plying the electri cpa rkin gbra ke.
X Shi ftthe transmi ssion topositio n005D.
X Tu rn the Sma rtKeyto positio n0092 inthe igni-
tio nlock and remove theSma rtKeyfro mthe
ig niti onlock.
X Secu rethe vehicle. Tow
-starti ng(emerg ency engine
starti ng)
! Veh
icles with automa tictransmi ssion mu st
not betow -sta rted .Yo ucou ldothe rwise
da ma gethe automa tictransmi ssion. Yo
ucan find informa tionon "Jum p-starting "at
(Y page 260 ). Fu
ses Impo
rtant safety notes G
WA
RNING
If yo uma nipulate orbridgeafa ulty fuse orif
yo urep lace itwi th afu se with ahighe r
am perage ,the electri ccab lescou ldbe ove r-
lo ad ed .Thi scou ldres ultin afir e. The reisa
ris kof an acc ident and injury.
Alw aysrep lace faulty fuses with the speci -
fie dnew fuses havin gthe corr ectamperage .
Blo wn fuses mustbe rep laced with fuses of
the same rating ,wh ich youcan reco gnizeby
the colorand value. The fuse rating sar elisted
in the fuse allo cati oncha rt.
The fuse allo cati oncha rtis locate din the vehi-
cle tool kitinthe stow agecomp artment under
the trunk floor (Y page 252 ).
If anew lyins erte dfu se also blow s,ha ve the
cau setraced and recti fiedat aqu alifi ed spe-
cia list wo rksh op,e.g .an author izedMe rced es-
Benz Center.
! Onl
yus efu ses thatha ve been appro ved
for Merced es-Benz vehicles and which have
the corr ectfuse rating forthe system con-
cern ed.Othe rwise, comp onents orsystem s
cou ldbe dama ged.
! Ma
kesure tha tno moi sturecan ente rthe
fu se boxwh en the cove ris op en.
! Wh
enclosing the cove r,ma kesure tha tit
is lying corr ectlyon the fuse box.Moi sture
see ping inor dirt cou ldothe rwise imp airthe
op era tionof the fuses .
The fuses inyour veh icleser vetoclo sedown
fa ulty cir cui ts. Ifafu se blow s,allthe comp o-
nents onthe circui tand theirfunctio nsstop
op era ting . Bef
ore chang ingafus e
X Swi tch offthe engine.
X Swi tch offallel ectri calcons umers. Fu
ses
265Break downass istanc e Z
Page 296 of 306

When
usinganemergen cyspare wheel or
spare wheel ofadifferen tsize, youmust not
exceed themaximum speedof50 mph
(80 km/ h).
Sno wchains mustnotbemount edon emer-
gency sparewheels. General
notes
You canaskforinform ationregarding permit-
ted emergen cyspare wheels atan authorized
Mercedes- BenzCenter .
You should regularly checkthepressure ofthe
emergen cyspare wheel, particularly priorto
long trips, andcorrectthe pressure asneces -
sary (Ypage 270). Thevalue onthe wheel is
valid.
An emergen cyspare wheel mayalsobemoun-
ted against thedirect ionofrotat ion.Observe
the time restriction onuse aswell asthe
speed limitation specifiedonthe emergen cy
spare wheel.
Replace thetires after sixyears atthe latest,
regardless ofwear. Thisalso applies tothe
emergen cyspare wheel.
When youaredriving withthecollapsible
spare wheel mounted,the tire pressure loss
warning systemorthe tire pressure monitor
cann otfunct ionreliably. Onlyrestart thetire
pressure losswarning systemortire pressure
monit orwhen thedefect ivewheel hasbeen
replaced withanew wheel.
Vehicles withtirepressu remonitor :after
mount inganemergen cyspare wheel, thesys-
tem may stilldisplay thetire pressure ofthe
removed wheelforafew minutes .The value
displayed forthe mount edemergen cyspare
wheel isnot thesame asthe curren ttire pres-
sure ofthe emergen cyspare wheel. Removing
theemergency spare
wheel
Vehicles withacollapsible spare
wheel The
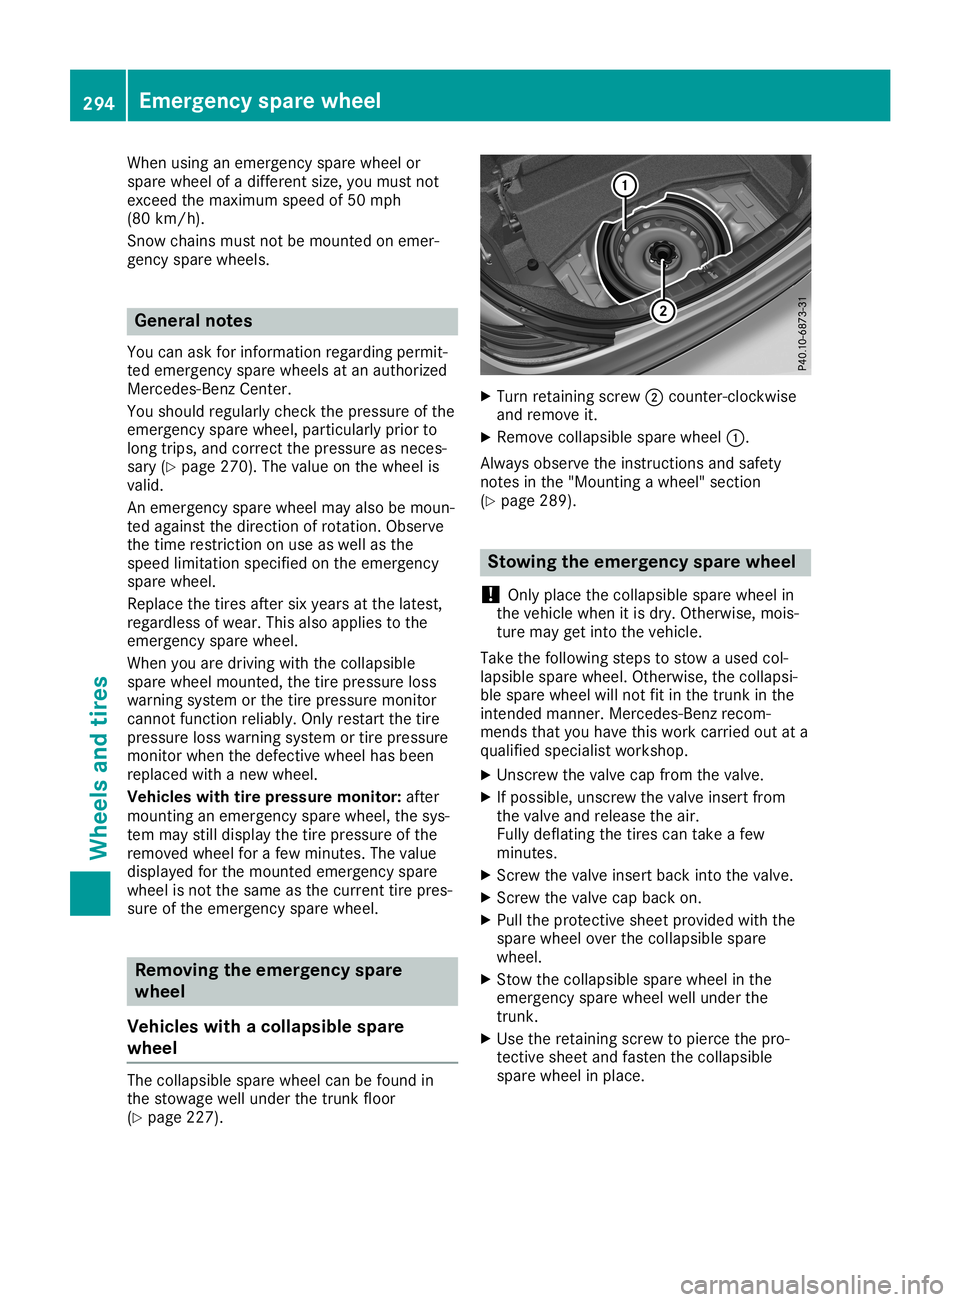
collapsible sparewheel canbefound in
the stowage wellunder thetrun kfloor
(Y page 227). X
Turn retainin gscrew 0044count er-clockwise
and remove it.
X Remove collapsible sparewheel 0043.
Always observe theinstruction sand safety
not esinthe "Mountin gawheel" section
(Y page 289). Stowing
theemergency sparewheel
! Only
place thecollapsible sparewheel in
the vehicle whenitis dry. Other wise, mois-
ture may getinto thevehicle.
Take thefollowing stepstostow aused col-
lapsible sparewheel. Otherwise, thecollapsi-
ble spare wheel willnotfitinthe trun kin the
inten dedmann er.Mercedes- Benzrecom-
mends thatyouhave thiswork carried outata
qualified specialist workshop.
X Unsc rewthevalve capfrom thevalve.
X Ifpossible, unscrewthe valve insert from
the valve andrelease theair.
Fully deflating thetires cantake afew
minutes .
X Scr ew the valve insert backintothevalve.
X Scr ew the valve capback on.
X Pull theprotec tivesheet provided withthe
spare wheel overthecollapsible spare
wheel.
X Stow the collapsible sparewheel inthe
emergen cyspare wheel wellunder the
trun k.
X Use theretainin gscrew topierce thepro-
tect ivesheet andfasten thecollapsible
spare wheel inplace. 294
Emergency
sparewheelWheels andtires