2019 MERCEDES-BENZ SLC weight
[x] Cancel search: weightPage 20 of 306

Technical data
Capacities ...................................... 298
Emergency spare wheel ................. 294
Information .................................... 296
Tires/wheels ................................. 292
Vehicle data ................................... 303
TELEAID
Call priority .................................... 233
Emergency call .............................. 231
General notes ................................ 230
MB info call button ........................233
Roadside Assistance button .......... 232
Self-test ......................................... 230
System .......................................... 230
Vehicle Health Check .................... 233
Telephone
Accepting a call (multifunction
steering wheel) .............................. 174
Authorizing a mobile phone (con-
necting) ......................................... 221
Authorizing a mobile phone via
the device manager (connecting) ... 222
Connecting a mobile phone
(device manager) ........................... 222
Connecting a mobile phone (gen-
eral information) ............................ 221
Display message ............................ 205
Menu (on-board computer) ............ 173
Number from the phone book ........174
Redialing ........................................ 174
Rejecting/ending a call ................. 174
see also Digital Operator's Man-
ual ..................................................217
Temperature
Coolant .......................................... 168
Coolant (on-board computer,
Mercedes-AMG SLC 43) ................ 179
Engine oil (on-board computer,
Mercedes-AMG SLC 43) ................ 179
Outside temperature ......................167
Setting (climate control) ................ 111
Transmission oil (on-board com-
puter, Mercedes-AMG SLC 43) ...... 179
Timing (RACETIMER)......................... 180
Tire pressure
Calling up (on-board computer) ..... 274
Checking manually ........................ 273
Display message ............................ 201
Maximum ....................................... 273
Not reached (TIREFIT) .................... 256
Notes ............................................. 272
Reached (TIREFIT) .......................... 256
Recommended ............................... 270
Tire pressure loss warning sys-
tem
General notes ................................ 273
Important safety notes .................. 274
Restarting ...................................... 274
Tire pressure monitor
Checking the tire pressure elec-
tronically ........................................ 276
Function/notes .............................274
General notes ................................ 274
Important safety notes .................. 275
Radio type approval for the tire
pressure monitor ........................... 278
Restarting ...................................... 277
Warning lamp ................................. 216
Warning message .......................... 276
Tire-change tool kit........................... 252
TIREFIT kit.......................................... 254
Important safety notes .................. 254
Storage location ............................ 252
Tire pressure not reached .............. 256
Tire pressure reached .................... 256
Tires
Aspect ratio (definition) ................. 287
Average weight of the vehicle
occupants (definition) .................... 286
Bar (definition) ............................... 286
Changing a wheel .......................... 288
Characteristics .............................. 286
Checking ........................................ 267
Curb weight (definition) ................. 287
Definition of terms ......................... 286
Direction of rotation...................... 289
Display message ............................ 201
Distribution of the vehicle occu-
pants (definition) ............................ 288
DOT (Department of Transporta-
tion) (definition) ............................. 286
DOT, Tire Identification Number
(TIN) ............................................... 285
GAWR (Gross Axle Weight Rat-
ing) (definition) .............................. 287
18Index
Page 21 of 306
GVW (Gross Vehicle Weight) (def-
inition) ...........................................287
GVWR (Gross Vehicle Weight
Rating) (definition) ......................... 287
Important safety notes .................. 267
Increased vehicle weight due to
optional equipment (definition) ...... 286
Information on driving .................... 267
Kilopascal (kPa) (definition) ........... 287
Labeling (overview)........................ 283
Load bearing index (definition) ...... 288
Load index ..................................... 285
Load index (definition) ................... 287
M+S tires....................................... 269
Maximum load on a tire (defini-
tion) ............................................... 287
Maximum loaded vehicle weight
(definition) ..................................... 287
Maximum permissible tire pres-
sure (definition) ............................. 287
Maximum tire load ......................... 285
Maximum tire load (definition) ....... 287
MOExtended tires.......................... 269
Optional equipment weight (defi-
nition) ............................................ 288
Overview ........................................ 267
PSI (pounds per square inch)
(definition) ..................................... 287
Replacing ....................................... 288
Service life ..................................... 268
Sidewall (definition) ....................... 288
Speed rating (definition) ................ 287
Storing ........................................... 289
Structure and characteristics
(definition) ..................................... 286
Summer tires ................................. 269
Temperature .................................. 282
TIN (Tire Identification Number)
(definition) ..................................... 288
Tire bead (definition) ...................... 288
Tire pressure (definition) ................ 287
Tire pressures (recommended) ...... 286
Tire size (data)............................... 292
Tire size designation, load-bear-
ing capacity, speed rating .............. 283
Tire tread ....................................... 268
Tire tread (definition) ..................... 288
Total load limit (definition) ............. 288
Traction ......................................... 282
Traction (definition) ....................... 288
Tread wear ..................................... 282
Uniform Tire Quality Grading
Standards ...................................... 281
Uniform Tire Quality Grading
Standards (definition) .................... 286
Wear indicator (definition) ............. 288
Wheel and tire combination ........... 292
Wheel rim (definition) .................... 287
see Flat tire
Tow-starting
Emergency engine starting ............ 265
Important safety notes .................. 263
Towing
Permitted towing methods ............ 264
Towing away
Important safety guidelines ........... 263
Installing the towing eye ................ 263
Removing the towing eye ............... 264
Transporting the vehicle ................ 265
With both axles on the ground ....... 264
With the rear axle raised ................ 264
Traffic reports
see also Digital Operator's Man-
ual .................................................. 217
Transmission
Overview of transmission posi-
tions .............................................. 125
Selector lever ................................ 125
see Automatic transmission
Transmission position display......... 125
Transporting the vehicle.................. 265
Trip computer (on-board com-
puter).................................................. 170
Trip odometer
Calling up ....................................... 170
Resetting (on-board computer) ...... 171
Trunk
Emergency release .......................... 74
Important safety notes .................... 73
Locking separately ........................... 74
Opening/closing (manually from
outside) ............................................ 74
Overview .......................................... 73
Trunk lid
Display message ............................ 204
Opening dimensions ...................... 303
Index19
Page 25 of 306
Protecting the environment
General notes
HEnvironmental note
Daimler's declared policy is one of compre-
hensive environmental protection.
The objectives are for the natural resources
that form the basis of our existence on this
planet to be used sparingly and in a manner
that takes the requirements of both nature
and humanity into account.
You too can help to protect the environment
by operating your vehicle in an environmen-
tally responsible manner.
Fuel consumption and the rate of engine,
transmission, brake and tire wear are affec-
ted by these factors:
Roperating conditions of your vehicle
Ryour personal driving style
You can influence both factors. You should
bear the following in mind:
Operating conditions:
Ravoid short trips as these increase fuel
consumption.
Ralways make sure that the tire pressures
are correct.
Rdo not carry any unnecessary weight.
Rremove roof racks once you no longer
need them.
Ra regularly serviced vehicle will contribute
to environmental protection. You should
therefore adhere to the service intervals.
Ralways have service work carried out at a
qualified specialist workshop.
Personal driving style:
Rdo not depress the accelerator pedal
when starting the engine.
Rdo not warm up the engine when the vehi-
cle is stationary.
Rdrive carefully and maintain a safe dis-
tance from the vehicle in front.
Ravoid frequent, sudden acceleration and
braking.
Rchange gear in good time and use each
gear only up to�
Page 29 of 306

ing interference that may cause undesiredoperation of the device."
Diagnostics connection
The diagnostics connection is used for con-necting diagnostic equipment at a qualifiedspecialist workshop.
GWARNING
If you connect equipment to a diagnostics
connection in the vehicle, it may affect the
operation of vehicle systems. As a result,
the operating safety of the vehicle could be
affected. There is a risk of an accident.
Only connect equipment to a diagnostics
connection in the vehicle, which is approved
for your vehicle by Mercedes-Benz.
GWARNING
Objects in the driver's footwell may restrict
the clearance around the pedals or block a
depressed pedal. This jeopardizes the oper-
ating and road safety of the vehicle. There is
a risk of an accident.
Stow all objects securely in the vehicle so
that they do not get into the driver's foot-
well. When using floormats or carpets, make
sure that they are properly secured so that
they do not slip or obstruct the pedals. Do
not place several floormats or carpets on
top of one another.
!If the engine is switched off and equip-ment on the diagnostics connection is used,the starter battery may discharge.
Connecting equipment to the diagnostics con-nection can lead to emissions monitoringinformation being reset, for example. This maylead to the vehicle failing to meet the require-ments of the next emissions test during themain inspection.
Qualified specialist workshop
An authorized Mercedes-Benz Center is aqualified specialist workshop. It has the neces-sary specialist knowledge, tools and qualifica-tions to correctly carry out the work required
on your vehicle. This is especially the case forwork relevant to safety.
Observe the notes in the Maintenance Book-let.
Always have the following work carried out atan authorized Mercedes-Benz Center:
Rwork relevant to safety
Rservice and maintenance work
Rrepair work
Ralterations, installation work and modifica-tions
Rwork on electronic components
Correct use
If you remove any warning stickers, you or oth-ers could fail to recognize certain dangers.Leave warning stickers in position.
Observe the following information when driv-ing your vehicle:
Rthe safety notes in this manual
Rtechnical data for the vehicle
Rtraffic rules and regulations
Rlaws and safety standards pertaining tomotor vehicles
Information about the REACH regula-
tion
The REACH regulation (Regulation (EC) no.1907/2006, Article 33) lays down an informa-tion obligation for substances of very high con-cern (SVHC).
Daimler AG acts in good faith to avoid usingthese SVHCs and to allow the customer tohandle these substances safely. In accordancewith supplier information and internal productinformation from Daimler AG, SVHCs thataccount for more than 0.1 percent by weightof individual products in this vehicle areknown.
More detailed information can be found at thefollowing addresses:
Rhttp://www.daimler.com/reach(Germanversion)
Rhttp://www.daimler.com/reach/en(English version)
Operating safety27
Introduction
Z
Page 43 of 306
If a child younger than twelve years old andunder 5 ft (1.50m)in height is traveling in thevehicle:
Ralways secure the child in a child restraintsystem suitable for this Mercedes-Benzvehicle. The child restraint system must beappropriate to the age, weight and size ofthe child.
Ralways observe the instructions and safetynotes on "Children in the vehicle"(Ypage 53) in addition to the childrestraint system manufacturer's installationand operating instructions
Ralways observe the instructions and safetynotes on the "Occupant Classification Sys-tem (OCS)" (Ypage 46)
GWARNING
The seat belts may not perform their inten-
ded protective function if:
Rthey are damaged, modified, extremely
dirty, bleached or dyed
Rthe seat belt buckle is damaged or
extremely dirty
Rthe Emergency Tensioning Devices, belt
anchorages or inertia reels have been
modified.
Seat belts may be damaged in an accident,
although the damage may not be visible, e.g.
due to splinters of glass. Modified or dam-
aged seat belts may tear or fail, e.g. in an
accident. Modified Emergency Tensioning
Devices could accidentally trigger or fail to
deploy when necessary. This poses an
increased risk of injury or even fatal injury.
Never modify the seat belts, Emergency Ten-
sioning Devices, belt anchorages and inertia
reels. Make sure that the seat belts are
undamaged, not worn out and clean. Follow-
ing an accident, have the seat belts checked
immediately at a qualified specialist work-
shop.
Only use seat belts that have been approvedfor your vehicle by Mercedes-Benz.
Proper use of the seat belts
Observe the safety notes on the seat belt(Ypage 40).
Every vehicle occupant must observe the fol-lowing notes to ensure a properly worn seatbelt can provide full protection. Also makesure that all vehicle occupants are alwayswearing the seat belt correctly while the vehi-cle is in motion.
When fastening the seat belt, always makesure that:
Rthe seat belt buckle tongue is inserted onlyinto the belt buckle belonging to that seat
Rthe seat belt is pulled tight across your body
Avoid wearing bulky clothing, e.g. a wintercoat.
Rthe seat belt is not twisted
Only then can the forces which occur be dis-tributed over the area of the belt.
Rthe shoulder section of the belt is routedacross the center of your shoulder
The shoulder section of the seat belt shouldnot touch your neck or be routed under yourarm or behind your back.
Rthe lap belt is taut and passes across yourlap as low down as possible
The lap belt must always be routed acrossyour hip joints and not across your abdo-men. This applies particularly to pregnantwomen. If necessary, push the lap belt downto your hip joint and pull it tight using theshoulder section of the belt.
Rthe seat belt is not routed across sharp,pointed or fragile objects
If you have such items located on or in yourclothing, e.g. pens, keys or eyeglasses,store these in a suitable place.
Ronly one person is using a seat belt
Infants and children must never travel sit-ting on the lap of a vehicle occupant. In theevent of an accident, they could be crushedbetween the vehicle occupant and seat belt.
Robjects are never secured with a seat belt ifthe seat belt is also being used by one ofthe vehicle's occupants
Also ensure that there are never objectsbetween a person and the seat, e.g. cush-ions.
Seat belts are only intended to secure andrestrain vehicle occupants. Always observe thenotes in the "Stowage options/compartments"
Occupant safety41
Safety
Z
Page 46 of 306
Before commencing your journey, ensure that:
Rthere are no people, animals or objectsbetween the vehicle occupants and an air-bag
Rthere are no objects between the seat, doorand B-pillar
Rno accessories, such as cup holders, areattached to the vehicle within the deploy-ment area of an airbag, e.g. to doors or sidewindows
Rno heavy, sharp-edged or fragile objects arein the pockets of your clothing. Store suchobjects in a suitable place
GWARNING
If you modify the cover of an air bag or affix
objects such as stickers to it, the air bag
can no longer perform its intended function.
There is an increased risk of injury.
Never modify the cover of an air bag or affix
objects to it.
GWARNING
Sensors to control the air bags are located
in the doors. Modifications or work not per-
formed correctly to the doors or door panel-
ing, as well as damaged doors, can lead to
the function of the sensors being impaired.
The air bags might therefore not function
properly anymore. Consequently, the air
bags cannot protect vehicle occupants as
they are designed to do. There is an
increased risk of injury.
Never modify the doors or parts of the
doors. Always have work on the doors or
door paneling carried out at a qualified spe-
cialist workshop.
Front air bags
!Do not place heavy objects on the front-passenger seat. This could cause the sys-tem to identify the seat as being occupied.In the event of an accident, the restraintsystems on the front-passenger side may betriggered and have to be replaced.
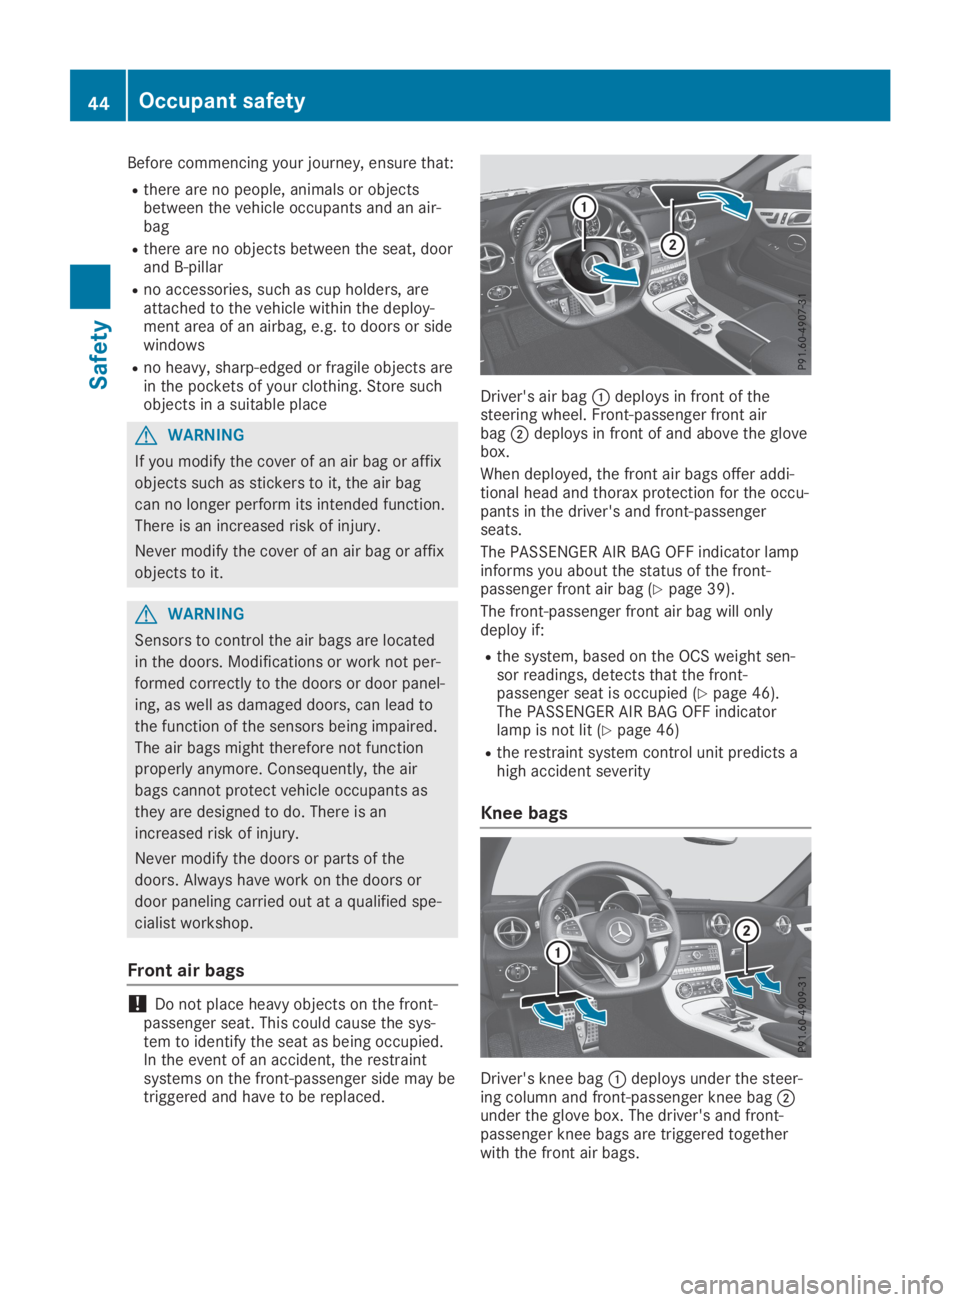
Driver's air bag�Cdeploys in front of thesteering wheel. Front-passenger front airbag�Ddeploys in front of and above the glovebox.
When deployed, the front air bags offer addi-tional head and thorax protection for the occu-pants in the driver's and front-passengerseats.
The PASSENGER AIR BAG OFF indicator lampinforms you about the status of the front-passenger front air bag (Ypage 39).
The front-passenger front air bag will onlydeploy if:
Rthe system, based on the OCS weight sen-sor readings, detects that the front-passenger seat is occupied (Ypage 46).The PASSENGER AIR BAG OFF indicatorlamp is not lit (Ypage 46)
Rthe restraint system control unit predicts ahigh accident severity
Knee bags
Driver's knee bag�Cdeploys under the steer-ing column and front-passenger knee bag�Dunder the glove box. The driver's and front-passenger knee bags are triggered togetherwith the front air bags.
44Occupant safety
Safety
Page 48 of 306
Occupant Classification System
(OCS)
Introduction
The Occupant Classification System (OCS) cat-egorizes the person in the front-passengerseat. Depending on that result, the front-passenger front air bag and front-passengerknee bag are either enabled or deactivated.
The system does not deactivate:
Rthe side impact air bag
Rthe headbag
Rthe Emergency Tensioning Devices
Requirements
To be classified correctly, the front passengermust sit:
Rwith the seat belt fastened correctly
Rin an almost upright position with their backagainst the seat backrest
Rwith their feet resting on the floor, if possi-ble
If the front passenger does not observe theseconditions, OCS may produce a false classifi-cation, e.g. because the front passenger:
Rtransfers their weight by supporting them-selves on a vehicle armrest
Rsits in such a way that their weight is raisedfrom the seat cushion
If you install a child restraint system on thefront-passenger seat, be sure to observe thecorrect positioning of the child restraint sys-tem. Never place objects under or behind thechild restraint system, e.g. a cushion. Theentire base of the child restraint system mustalways rest on the seat cushion of the front-passenger seat. The backrest of the forward-facing child restraint system must lie as flat aspossible against the backrest of the front-passenger seat.
The child restraint system must not touch theroof or be subjected to a load by the headrestraint. Adjust the angle of the seat backrestand the head restraint position accordingly.
Only then can OCS be guaranteed to functioncorrectly. Always observe the child restraintsystem manufacturer's installation and operat-ing instructions.
Occupant Classification System opera-
tion (OCS)
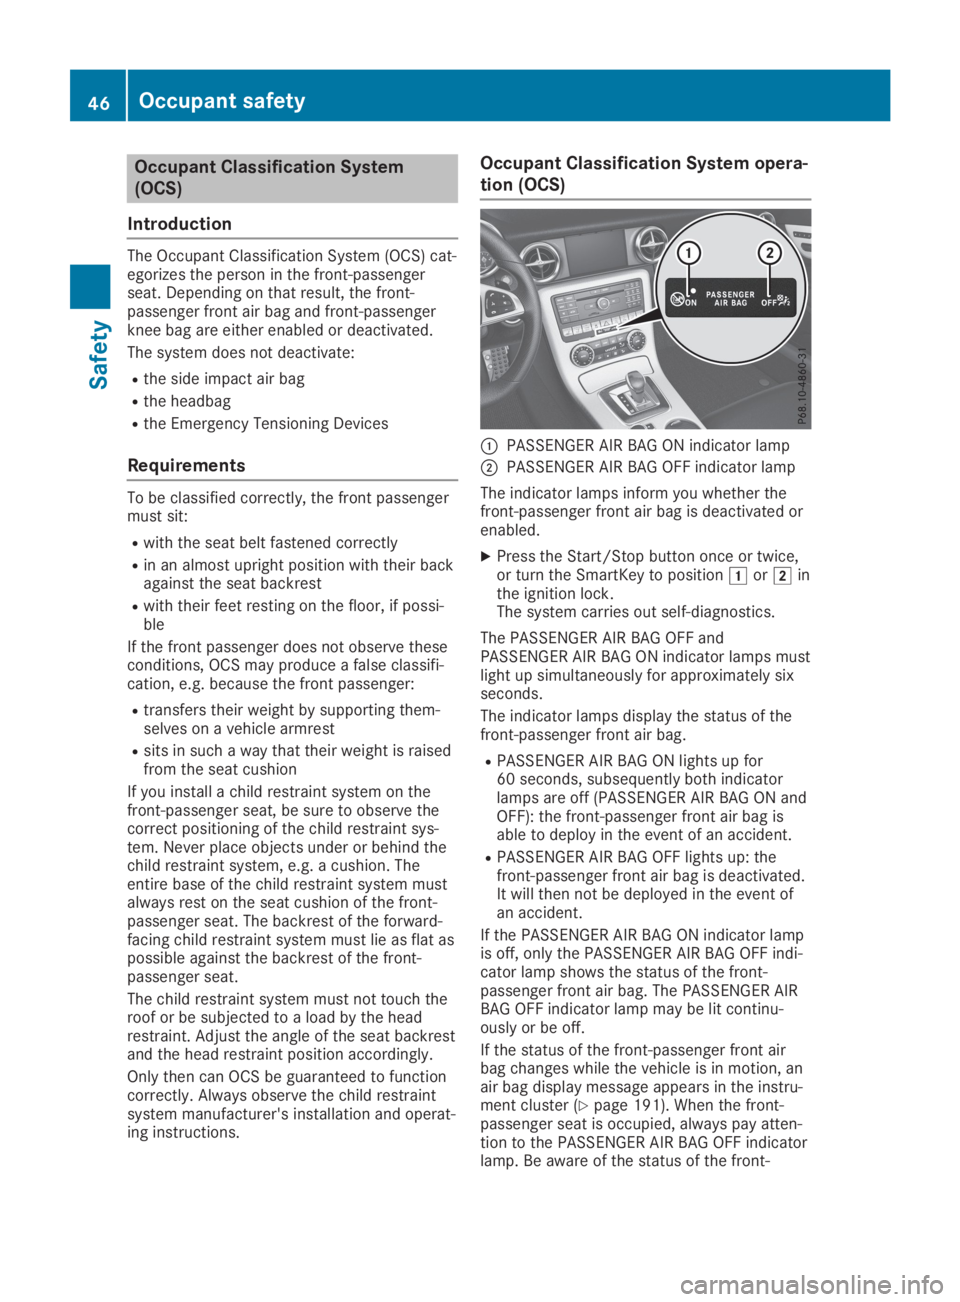
�CPASSENGER AIR BAG ON indicator lamp
�DPASSENGER AIR BAG OFF indicator lamp
The indicator lamps inform you whether thefront-passenger front air bag is deactivated orenabled.
XPress the Start/Stop button once or twice,or turn the SmartKey to position�Gor�Hinthe ignition lock.The system carries out self-diagnostics.
The PASSENGER AIR BAG OFF andPASSENGER AIR BAG ON indicator lamps mustlight up simultaneously for approximately sixseconds.
The indicator lamps display the status of thefront-passenger front air bag.
RPASSENGER AIR BAG ON lights up for60 seconds, subsequently both indicatorlamps are off (PASSENGER AIR BAG ON andOFF): the front-passenger front air bag isable to deploy in the event of an accident.
RPASSENGER AIR BAG OFF lights up: thefront-passenger front air bag is deactivated.It will then not be deployed in the event ofan accident.
If the PASSENGER AIR BAG ON indicator lampis off, only the PASSENGER AIR BAG OFF indi-cator lamp shows the status of the front-passenger front air bag. The PASSENGER AIRBAG OFF indicator lamp may be lit continu-ously or be off.
If the status of the front-passenger front airbag changes while the vehicle is in motion, anair bag display message appears in the instru-ment cluster (Ypage 191). When the front-passenger seat is occupied, always pay atten-tion to the PASSENGER AIR BAG OFF indicatorlamp. Be aware of the status of the front-
46Occupant safety
Safety
Page 52 of 306
ProblemPossible causes/consequences and�P�PSolutions
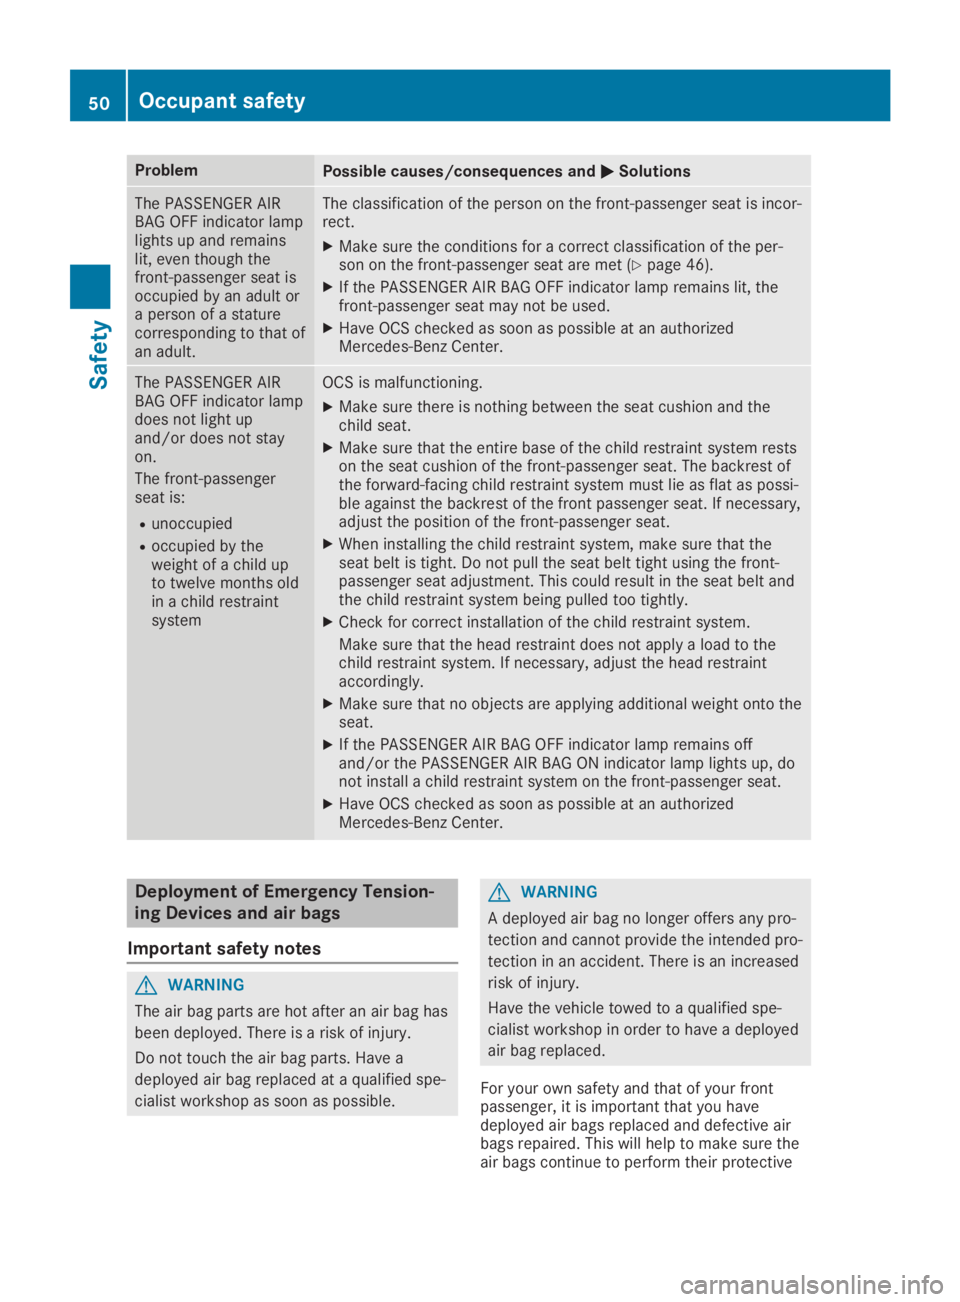
The PASSENGER AIRBAG OFF indicator lamplights up and remainslit, even though thefront-passenger seat isoccupied by an adult ora person of a staturecorresponding to that ofan adult.
The classification of the person on the front-passenger seat is incor-rect.
XMake sure the conditions for a correct classification of the per-son on the front-passenger seat are met (Ypage 46).
XIf the PASSENGER AIR BAG OFF indicator lamp remains lit, thefront-passenger seat may not be used.
XHave OCS checked as soon as possible at an authorizedMercedes-Benz Center.
The PASSENGER AIRBAG OFF indicator lampdoes not light upand/or does not stayon.
The front-passengerseat is:
Runoccupied
Roccupied by theweight of a child upto twelve months oldin a child restraintsystem
OCS is malfunctioning.
XMake sure there is nothing between the seat cushion and thechild seat.
XMake sure that the entire base of the child restraint system restson the seat cushion of the front-passenger seat. The backrest ofthe forward-facing child restraint system must lie as flat as possi-ble against the backrest of the front passenger seat. If necessary,adjust the position of the front-passenger seat.
XWhen installing the child restraint system, make sure that theseat belt is tight. Do not pull the seat belt tight using the front-passenger seat adjustment. This could result in the seat belt andthe child restraint system being pulled too tightly.
XCheck for correct installation of the child restraint system.
Make sure that the head restraint does not apply a load to thechild restraint system. If necessary, adjust the head restraintaccordingly.
XMake sure that no objects are applying additional weight onto theseat.
XIf the PASSENGER AIR BAG OFF indicator lamp remains offand/or the PASSENGER AIR BAG ON indicator lamp lights up, donot install a child restraint system on the front-passenger seat.
XHave OCS checked as soon as possible at an authorizedMercedes-Benz Center.
Deployment of Emergency Tension-
ing Devices and air bags
Important safety notes
GWARNING
The air bag parts are hot after an air bag has
been deployed. There is a risk of injury.
Do not touch the air bag parts. Have a
deployed air bag replaced at a qualified spe-
cialist workshop as soon as possible.
GWARNING
A deployed air bag no longer offers any pro-
tection and cannot provide the intended pro-
tection in an accident. There is an increased
risk of injury.
Have the vehicle towed to a qualified spe-
cialist workshop in order to have a deployed
air bag replaced.
For your own safety and that of your frontpassenger, it is important that you havedeployed air bags replaced and defective airbags repaired. This will help to make sure theair bags continue to perform their protective
50Occupant safety
Safety