2019 MERCEDES-BENZ SLC fuel type
[x] Cancel search: fuel typePage 17 of 306
Operation ......................................... 53
Protection against theft
ATA (Anti-Theft Alarm system) ......... 64
Immobilizer ...................................... 64
Protection of the environment
General notes ..................................23
Pulling away
Automatic transmission ................. 120
General notes ................................ 120
Q
QR code
Mercedes-Benz Guide App ................. 1
Rescue card .....................................28
Qualified specialist workshop........... 27
R
RACE TIMER (on-board computer,
Mercedes-AMG vehicles).................. 180
Radio
Selecting a station .........................173
see Digital Operator's Manual
Radio mode
see also Digital Operator's Man-
ual ..................................................217
Radio-wave reception/transmis-
sion in the vehicle
Declaration of conformity ................ 26
REACH Regulation............................... 27
Reading lamp..................................... 101
Rear fog lamp
Display message ............................ 193
Switching on/off .............................. 98
Rear lamps
see Lights
Rear view camera
Cleaning instructions ..................... 250
Display in the multimedia system .. 160
Function/notes .............................159
Switching on/off ........................... 159
Rear window defroster
General notes ................................ 113
Problem (malfunction) ................... 114
Switching on/off ........................... 113
Rear-view mirror
Anti-glare (manual) .......................... 92
Dipping (automatic) ......................... 93
Refrigerant (air-conditioning sys-
tem)
Important safety notes .................. 303
Refueling
Fuel gauge ....................................... 32
Important safety notes .................. 132
Refueling process .......................... 133
see Fuel
Remote control
Programming (garage door
opener) .......................................... 235
Replacing bulbs
High-beam headlamps ................... 103
Important safety notes .................. 101
Installing/removing the cover
(front wheel arch) .......................... 102
Low-beam headlamps .................... 102
Overview of bulb types .................. 102
Reporting safety defects.................... 28
Rescue card......................................... 28
Reserve (fuel tank)
see Fuel
Reserve fuel
Display message ............................ 197
Warning lamp ................................. 213
Residual heat (climate control)........114
Restraint system
Display message ............................ 189
Introduction ..................................... 38
Warning lamp ................................. 212
Warning lamp (function) ................... 39
Reverse gear
Engaging (automatic transmis-
sion) ............................................... 126
Reversible floor panel (trunk).......... 227
Reversing feature
Side windows ................................... 75
Reversing lamps (display mes-
sage)................................................... 193
Roadside Assistance (breakdown).... 25
Roof
Display message ............................ 205
Important safety notes .................... 78
Opening/closing (with roof
switch) ............................................. 79
Opening/closing (with SmartKey) .... 80
Index15
Page 22 of 306
Trunk partition
Display message ............................ 205
General notes .................................. 80
Opening/closing .............................. 81
Turn signals
Display message ............................ 193
Switching on/off .............................. 99
Two-way radio
Frequencies ................................... 296
Installation ..................................... 296
Transmission output (maximum) .... 296
Type identification plate
see Vehicle identification plate
U
Unlocking
Emergency unlocking ....................... 73
From inside the vehicle (central
unlocking button) ............................. 72
Upshift indicator
(on-board computer, Mercedes-
AMG SLC 43) ................................. 179
USB devices
Connecting to the Media Inter-
face ...............................................224
V
Vehicle
Correct use ...................................... 27
Data acquisition ............................... 28
Display message ............................ 203
Electronics ..................................... 296
Equipment ....................................... 24
Individual settings .......................... 176
Limited Warranty .............................28
Loading .......................................... 279
Locking (in an emergency) ............... 73
Locking (SmartKey) .......................... 66
Lowering ........................................ 292
Maintenance .................................... 25
Parking for a long period ................ 137
Pulling away................................... 120
Raising ........................................... 290
REACH Regulation ........................... 27
Reporting problems ......................... 28
Securing from rolling away ............ 289
Tow-starting ................................... 263
Towing away .................................. 263
Transporting .................................. 265
Unlocking (in an emergency) ........... 73
Unlocking (SmartKey)...................... 66
Vehicle data ................................... 303
Vehicle battery
see Battery (vehicle)
Vehicle data....................................... 303
Vehicle dimensions........................... 303
Vehicle emergency locking................ 73
Vehicle identification number
see VIN
Vehicle identification plate.............. 297
Vehicle tool kit.................................. 252
Video
Operating the DVD ......................... 173
see also Digital Operator's Man-
ual .................................................. 217
VIN
Seat ............................................... 298
Type plate ...................................... 297
W
Warning and indicator lamps
ABS ................................................ 210
Active Brake Assist ........................ 215
Brake Assist ................................... 215
Brakes ........................................... 210
Check Engine ................................. 213
Coolant .......................................... 213
Distance warning ........................... 215
ESP®.............................................. 211
ESP®OFF ....................................... 212
Fuel tank ........................................ 213
General notes ................................ 208
Parking brake ................................ 212
PASSENGER AIR BAG ...................... 39
Reserve fuel................................... 213
Restraint system ............................ 212
Seat belt ........................................ 208
SPORT handling mode................... 212
Tire pressure monitor .................... 216
Warranty.............................................. 24
Washer fluid
Display message ............................ 206
20Index
Page 141 of 306
economical driving. A higher level indicates amore economical driving style. If the threeouter areas are completely filled at the sametime, the driver has adopted the most eco-nomical driving style for the selected settingsand prevailing conditions. The ECO displayborder lights up.
The ECO display does not indicate the actualfuel consumption. The additionally achievedrange displayed underBonus fr. startBonus fr. startdoesnot indicate a fixed consumption reduction.
In addition to driving style, the actual con-sumption is affected by other factors, such as:
Rload
Rtire pressure
Rcold start
Rchoice of route
Ractive electrical consumers
These factors are not included in the ECO dis-play.
An economical driving style specially requiresdriving at moderate engine speeds.
Achieving a higher value in the categories"Acceleration" and "Constant":
Robserve the gearshift recommendations.
Rdrive the vehicle in drive programCorE.
In urban traffic and stop-start traffic, drive pro-gramCis recommended.
On long journeys at a constant speed, e.g. onthe highway, only the outer area for "constant"will change.
The ECO display summarizes the driving stylefrom the start of the journey to its completion.Therefore, there are more marked changes inthe outer areas at the start of a journey. Onlonger journeys, there are fewer changes. Formore marked changes, perform a manual rest(Ypage 171).
Further information on the ECO display(Ypage 170).
Braking
Important safety notes
GWARNING
If you shift down on a slippery road surface
in an attempt to increase the engine's brak-
ing effect, the drive wheels could lose their
grip. There is an increased danger of skid-
ding and accidents.
Do not shift down for additional engine brak-
ing on a slippery road surface.
Downhill gradients
!On long, steep gradients, you must reducethe load on the brakes. To use engine brak-ing, shift to a lower gear in good time. Thishelps you to avoid overheating the brakesand wearing them out excessively.
When making use of the engine brakingeffect, it is possible that a drive wheel maynot turn for some time, e.g. in the case ofsuddenly changing or slippery road surfaceconditions. This could cause damage to thedrive train. This type of damage is not cov-ered by the Mercedes-Benz warranty.
Change into a lower gear in good time on longand steep downhill gradients. This is especiallyimportant if the vehicle is laden.
This also applies if you have activated cruisecontrol or Active Distance Assist DISTRONIC.
Heavy and light loads
GWARNING
If you rest your foot on the brake pedal
while driving, the braking system can over-
heat. This increases the stopping distance
and can even cause the braking system to
fail. There is a risk of an accident.
Never use the brake pedal as a footrest.
Never depress the brake pedal and the
accelerator pedal at the same time.
!Depressing the brake pedal constantlyresults in excessive and premature wear tothe brake pads.
If the brakes have been subjected to a heavyload, do not stop the vehicle immediately, butdrive on for a short while. This allows the air-flow to cool the brakes more quickly.
Wet roads
If you have driven for a long time in heavy rainwithout braking, there may be a delayed reac-tion from the brakes when braking for the first
Driving tips139
Driving and parking
Z
Page 249 of 306
XThoroughly hose down the vehicle with agentle jet of water.
XDo not point the water jet directly towardsthe air inlet or the edges of decorative foils.
XUse plenty of water and rinse out thesponge frequently.
XRinse the vehicle with clean water and drythoroughly with a chamois.
XDo not let the cleaning agent dry on thepaintwork or the decorative foils.
Carefully remove all deposits of road salt assoon as possible when driving in winter.
Power washers
GWARNING
The water jet from a circular jet nozzle (dirt
blasters) can cause invisible exterior dam-
age to the tires or chassis components.
Components damaged in this way may fail
unexpectedly. There is a risk of an accident.
Do not use power washers with circular jet
nozzles to clean the vehicle. Have damaged
tires or chassis components replaced imme-
diately.
!Vehicles with decorative film: parts of yourvehicle are covered with decorative film.Maintain a distance of at least 27.5 in(70 cm) between the film-covered parts ofthe vehicle and the nozzle of the powerwasher.
Information about the correct distance isavailable from the equipment manufacturer.
Move the power washer nozzle around whencleaning your vehicle.
The water temperature of the power washermust not exceed 140 ‡ (60 †).
!Always maintain a distance of at least12 in (30 cm) between the vehicle and thepower washer nozzle. Information about thecorrect distance is available from the equip-ment manufacturer.
Move the power washer nozzle around whencleaning your vehicle.
Do not aim directly at any of the following:
RTires
RDoor gaps, roof gaps, joints, etc.
RElectrical components
RBattery
RPlug-type couplings
RLight bulbs
RSeals
RTrim elements
RVentilation slots
Damaged seals or electrical componentscan lead to leaks or failures.
!If you clean the tank filler recess when it isopen, do not use a power washer. This cancause damage to the seals or other compo-nents.
Cleaning the paintwork
!Do not affix:
Rstickers
Rfilms
Rmagnetic plates or similar items
to painted surfaces. You could otherwisedamage the paintwork.
Scratches, corrosive deposits, areas affectedby corrosion and damage caused by inade-quate care cannot always be completelyrepaired. In such cases, visit a qualified spe-cialist workshop.
XRemove dirt immediately, where possible,while avoiding rubbing too hard.
XSoak insect remains with insect removerand rinse off the treated areas afterwards.
XSoak bird droppings with water and rinse offthe treated areas afterwards.
XRemove tree resin, oils, fuels and greases byrubbing gently with a cloth soaked in petro-leum ether or lighter fluid
XRemove coolant and brake fluid with a moistcloth and clear water.
XUse tar remover to remove tar stains.
XUse silicone remover to remove wax.
If water no longer forms "beads" on the paintsurface, use the paint care products recom-mended and approved by Mercedes-Benz. Thisis the case approximately every three to fivemonths, depending on the climate conditionsand the care product used.
If dirt has penetrated the paint surface or ifthe paint has become dull, the paint cleanerrecommended and approved by Mercedes-Benz should be used.
Care247
Maintenance and care
Z
Page 281 of 306
CountryRadio type approval number
IC: 2546A-MC34MA4
Loading the vehicle
Instruction labels for tires and loads
GWARNING
Overloaded tires can overheat, causing a
blowout. Overloaded tires can also impair
the steering and driving characteristics and
lead to brake failure. There is a risk of acci-
dent.
Observe the load rating of the tires. The load
rating must be at least half of the GAWR of
your vehicle. Never overload the tires by
exceeding the maximum load.
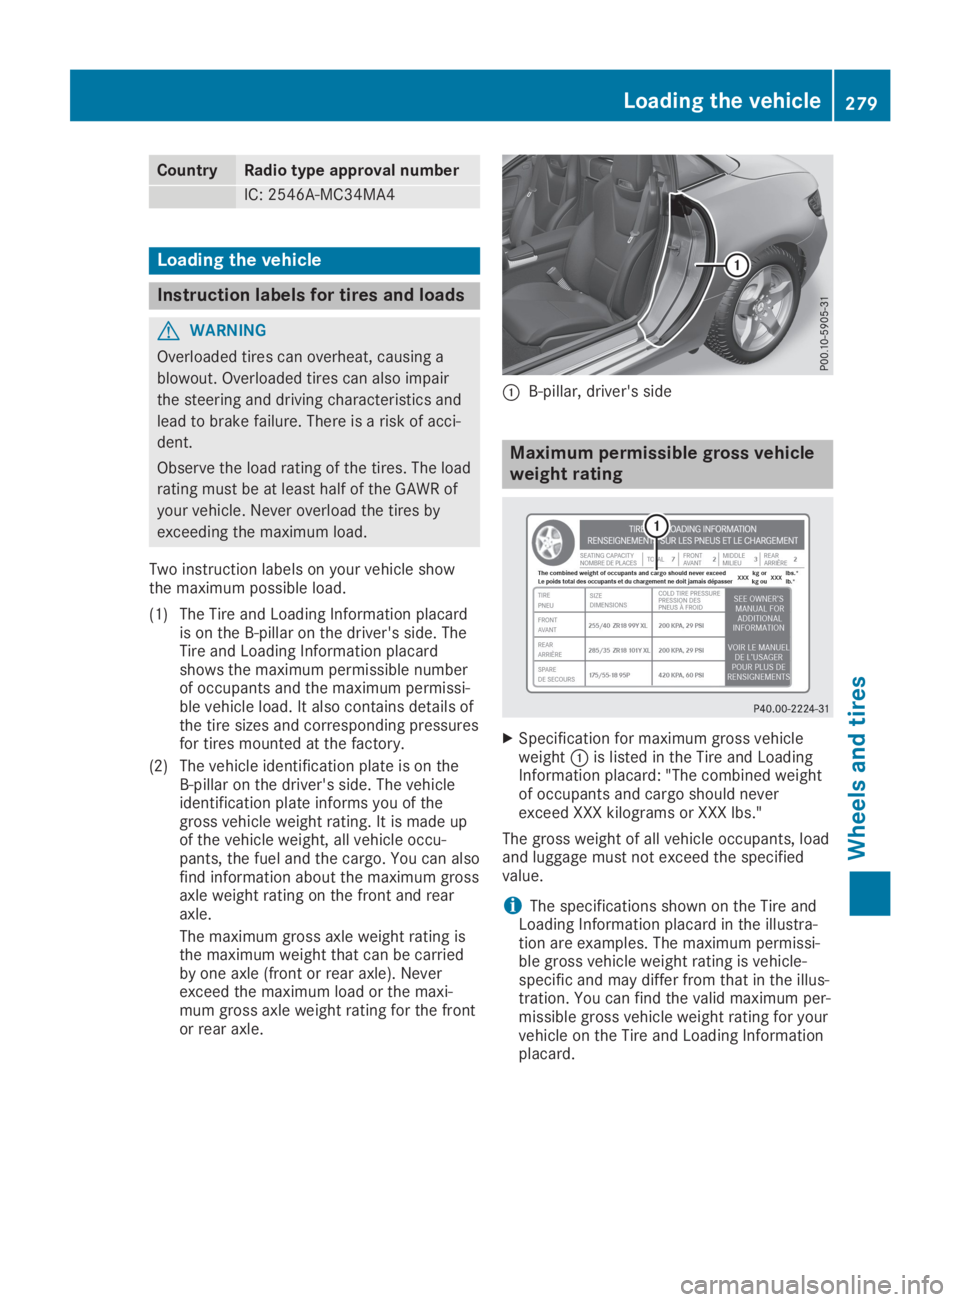
Two instruction labels on your vehicle showthe maximum possible load.
(1) The Tire and Loading Information placardis on the B-pillar on the driver's side. TheTire and Loading Information placardshows the maximum permissible numberof occupants and the maximum permissi-ble vehicle load. It also contains details ofthe tire sizes and corresponding pressuresfor tires mounted at the factory.
(2) The vehicle identification plate is on theB-pillar on the driver's side. The vehicleidentification plate informs you of thegross vehicle weight rating. It is made upof the vehicle weight, all vehicle occu-pants, the fuel and the cargo. You can alsofind information about the maximum grossaxle weight rating on the front and rearaxle.
The maximum gross axle weight rating isthe maximum weight that can be carriedby one axle (front or rear axle). Neverexceed the maximum load or the maxi-mum gross axle weight rating for the frontor rear axle.
�CB-pillar, driver's side
Maximum permissible gross vehicle
weight rating
XSpecification for maximum gross vehicleweight�Cis listed in the Tire and LoadingInformation placard: "The combined weightof occupants and cargo should neverexceed XXX kilograms or XXX lbs."
The gross weight of all vehicle occupants, loadand luggage must not exceed the specifiedvalue.
iThe specifications shown on the Tire andLoading Information placard in the illustra-tion are examples. The maximum permissi-ble gross vehicle weight rating is vehicle-specific and may differ from that in the illus-tration. You can find the valid maximum per-missible gross vehicle weight rating for yourvehicle on the Tire and Loading Informationplacard.
Loading the vehicle279
Wheels and tires
Z
Page 295 of 306
These tires have been specially adapted foruse with the control systems, such as ABS
or ESP®, and are marked as follows:
RMO = Mercedes-Benz Original
RMOE = Mercedes-Benz Original Extended(tires featuring run-flat characteristics)
RMO1 = Mercedes-Benz Original (only cer-tain AMG tires)
Mercedes-Benz Original Extended tires mayonly be used on wheels that have been spe-cifically approved by Mercedes-Benz.
Only use tires, wheels or accessories testedand approved by Mercedes-Benz. Certaincharacteristics, e.g. handling, vehicle noiseemissions or fuel consumption, may other-wise be adversely affected. In addition,when driving with a load, tire dimension var-iations could cause the tires to come intocontact with the bodywork and axle compo-nents. This could result in damage to thetires or the vehicle.
Mercedes-Benz accepts no liability for dam-age resulting from the use of tires, wheelsor accessories other than those tested andapproved.
Information on tires, wheels and approvedcombinations can be obtained from anyqualified specialist workshop.
!Retreaded tires are neither tested nor rec-ommended by Mercedes-Benz, since previ-ous damage cannot always be detected onretreaded tires. As a result, Mercedes-Benzcannot guarantee vehicle safety if retreadedtires are mounted. Do not mount used tiresif you have no information about their previ-ous usage.
The recommended pressures for various oper-ating conditions can be found:
Ron the Tire and Loading Information placardon the B-pillar on the driver's side
Rin the tire pressure table on the fuel fillerflap
Observe the notes on recommended tire pres-sures under various operating conditions(Ypage 270).
Check tire pressures regularly, and only whenthe tires are cold. Comply with the mainte-nance recommendations of the tire manufac-turer in the vehicle document wallet.
Notes on the vehicle equipment – alwaysequip the vehicle:
Rwith tires of the same size on a given axle(left and right)
Rwith the same type of tires at a given time(summer tires, winter tires, MOExtendedtires)
Exception: it is permissible to mount a dif-ferent type or make in the event of a flattire. Observe the "MOExtended tires (tireswith run-flat characteristics)" section(Ypage 253).
Vehicles equipped with MOExtended tires arenot equipped with a TIREFIT kit at the factory.It is therefore recommended that you addition-ally equip your vehicle with a TIREFIT kit if youmount tires that do not feature run-flat charac-teristics, e.g. winter tires. A TIREFIT kit may beobtained from a qualified specialist workshop.
Emergency spare wheel
Important safety notes
GWARNING
The wheel or tire size as well as the tire type
of the spare wheel or emergency spare
wheel and the wheel to be replaced may dif-
fer. Mounting an emergency spare wheel
may severely impair the driving characteris-
tics. There is a risk of an accident.
To avoid hazardous situations:
Radapt your driving style accordingly and
drive carefully.
Rnever mount more than one spare wheel
or emergency spare wheel that differs in
size.
Ronly use a spare wheel or emergency
spare wheel of a different size briefly.
Rdo not switch ESP®off.
Rhave a spare wheel or emergency spare
wheel of a different size replaced at the
nearest qualified specialist workshop.
Observe that the wheel and tire dimen-
sions as well as the tire type must be cor-
rect.
Emergency spare wheel293
Wheels and tires
Z