2019 MERCEDES-BENZ SLC tow
[x] Cancel search: towPage 249 of 306
XThoroughly hose down the vehicle with agentle jet of water.
XDo not point the water jet directly towardsthe air inlet or the edges of decorative foils.
XUse plenty of water and rinse out thesponge frequently.
XRinse the vehicle with clean water and drythoroughly with a chamois.
XDo not let the cleaning agent dry on thepaintwork or the decorative foils.
Carefully remove all deposits of road salt assoon as possible when driving in winter.
Power washers
GWARNING
The water jet from a circular jet nozzle (dirt
blasters) can cause invisible exterior dam-
age to the tires or chassis components.
Components damaged in this way may fail
unexpectedly. There is a risk of an accident.
Do not use power washers with circular jet
nozzles to clean the vehicle. Have damaged
tires or chassis components replaced imme-
diately.
!Vehicles with decorative film: parts of yourvehicle are covered with decorative film.Maintain a distance of at least 27.5 in(70 cm) between the film-covered parts ofthe vehicle and the nozzle of the powerwasher.
Information about the correct distance isavailable from the equipment manufacturer.
Move the power washer nozzle around whencleaning your vehicle.
The water temperature of the power washermust not exceed 140 ‡ (60 †).
!Always maintain a distance of at least12 in (30 cm) between the vehicle and thepower washer nozzle. Information about thecorrect distance is available from the equip-ment manufacturer.
Move the power washer nozzle around whencleaning your vehicle.
Do not aim directly at any of the following:
RTires
RDoor gaps, roof gaps, joints, etc.
RElectrical components
RBattery
RPlug-type couplings
RLight bulbs
RSeals
RTrim elements
RVentilation slots
Damaged seals or electrical componentscan lead to leaks or failures.
!If you clean the tank filler recess when it isopen, do not use a power washer. This cancause damage to the seals or other compo-nents.
Cleaning the paintwork
!Do not affix:
Rstickers
Rfilms
Rmagnetic plates or similar items
to painted surfaces. You could otherwisedamage the paintwork.
Scratches, corrosive deposits, areas affectedby corrosion and damage caused by inade-quate care cannot always be completelyrepaired. In such cases, visit a qualified spe-cialist workshop.
XRemove dirt immediately, where possible,while avoiding rubbing too hard.
XSoak insect remains with insect removerand rinse off the treated areas afterwards.
XSoak bird droppings with water and rinse offthe treated areas afterwards.
XRemove tree resin, oils, fuels and greases byrubbing gently with a cloth soaked in petro-leum ether or lighter fluid
XRemove coolant and brake fluid with a moistcloth and clear water.
XUse tar remover to remove tar stains.
XUse silicone remover to remove wax.
If water no longer forms "beads" on the paintsurface, use the paint care products recom-mended and approved by Mercedes-Benz. Thisis the case approximately every three to fivemonths, depending on the climate conditionsand the care product used.
If dirt has penetrated the paint surface or ifthe paint has become dull, the paint cleanerrecommended and approved by Mercedes-Benz should be used.
Care247
Maintenance and care
Z
Page 253 of 306
Where will I find...?
Reflective safety jacket
Removing/replacing reflective safety
jackets
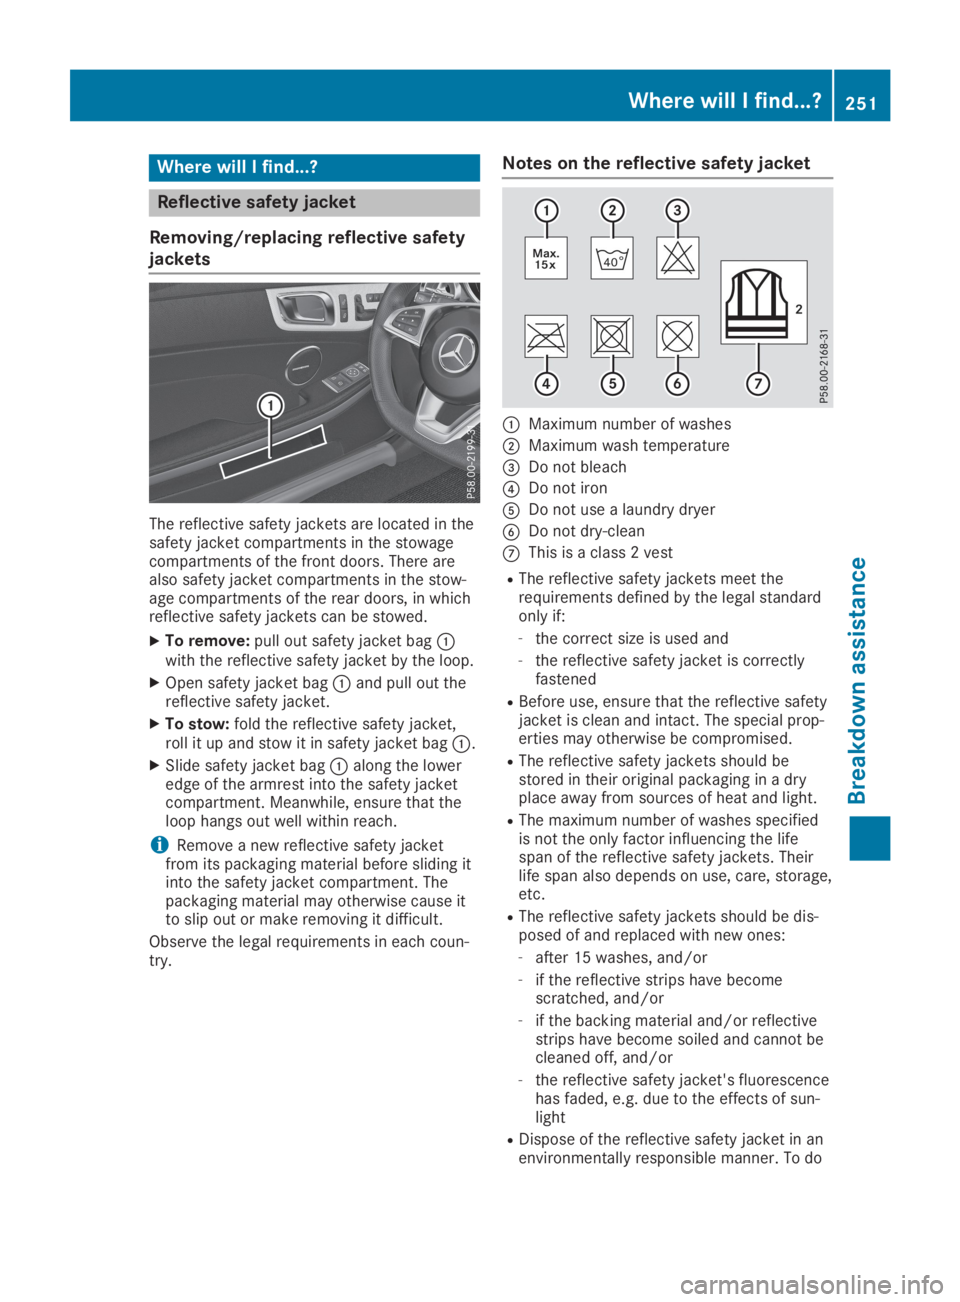
The reflective safety jackets are located in thesafety jacket compartments in the stowagecompartments of the front doors. There arealso safety jacket compartments in the stow-age compartments of the rear doors, in whichreflective safety jackets can be stowed.
XTo remove:pull out safety jacket bag�Cwith the reflective safety jacket by the loop.
XOpen safety jacket bag�Cand pull out thereflective safety jacket.
XTo stow:fold the reflective safety jacket,roll it up and stow it in safety jacket bag�C.
XSlide safety jacket bag�Calong the loweredge of the armrest into the safety jacketcompartment. Meanwhile, ensure that theloop hangs out well within reach.
iRemove a new reflective safety jacketfrom its packaging material before sliding itinto the safety jacket compartment. Thepackaging material may otherwise cause itto slip out or make removing it difficult.
Observe the legal requirements in each coun-try.
Notes on the reflective safety jacket
�CMaximum number of washes
�DMaximum wash temperature
�
Page 254 of 306
so, contact your local waste disposal com-pany.
Vehicle tool kit
General notes
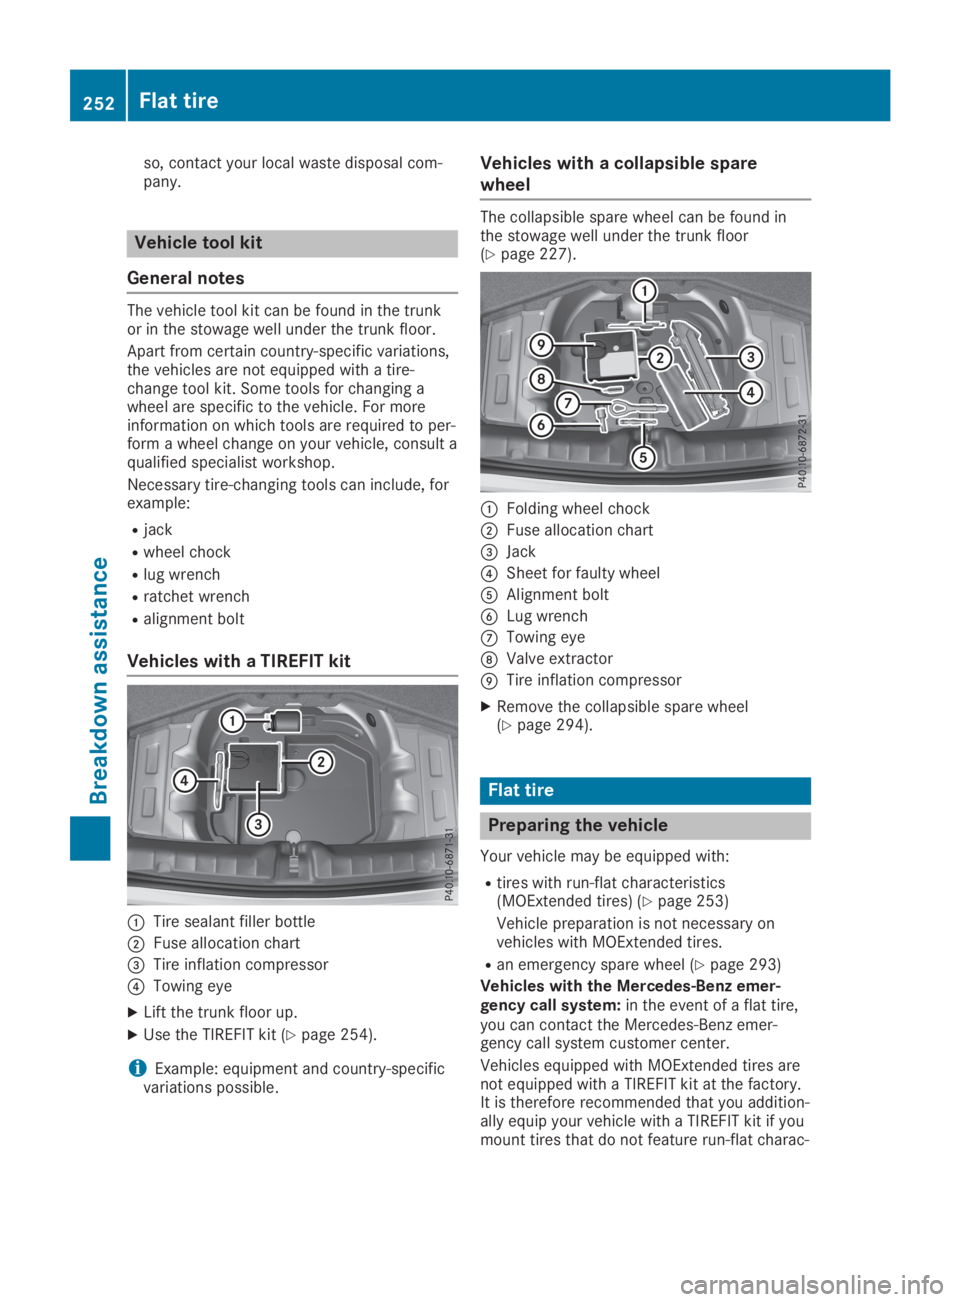
The vehicle tool kit can be found in the trunkor in the stowage well under the trunk floor.
Apart from certain country-specific variations,the vehicles are not equipped with a tire-change tool kit. Some tools for changing awheel are specific to the vehicle. For moreinformation on which tools are required to per-form a wheel change on your vehicle, consult aqualified specialist workshop.
Necessary tire-changing tools can include, forexample:
Rjack
Rwheel chock
Rlug wrench
Rratchet wrench
Ralignment bolt
Vehicles with a TIREFIT kit
�CTire sealant filler bottle
�DFuse allocation chart
�
Page 257 of 306
Using the TIREFIT kit
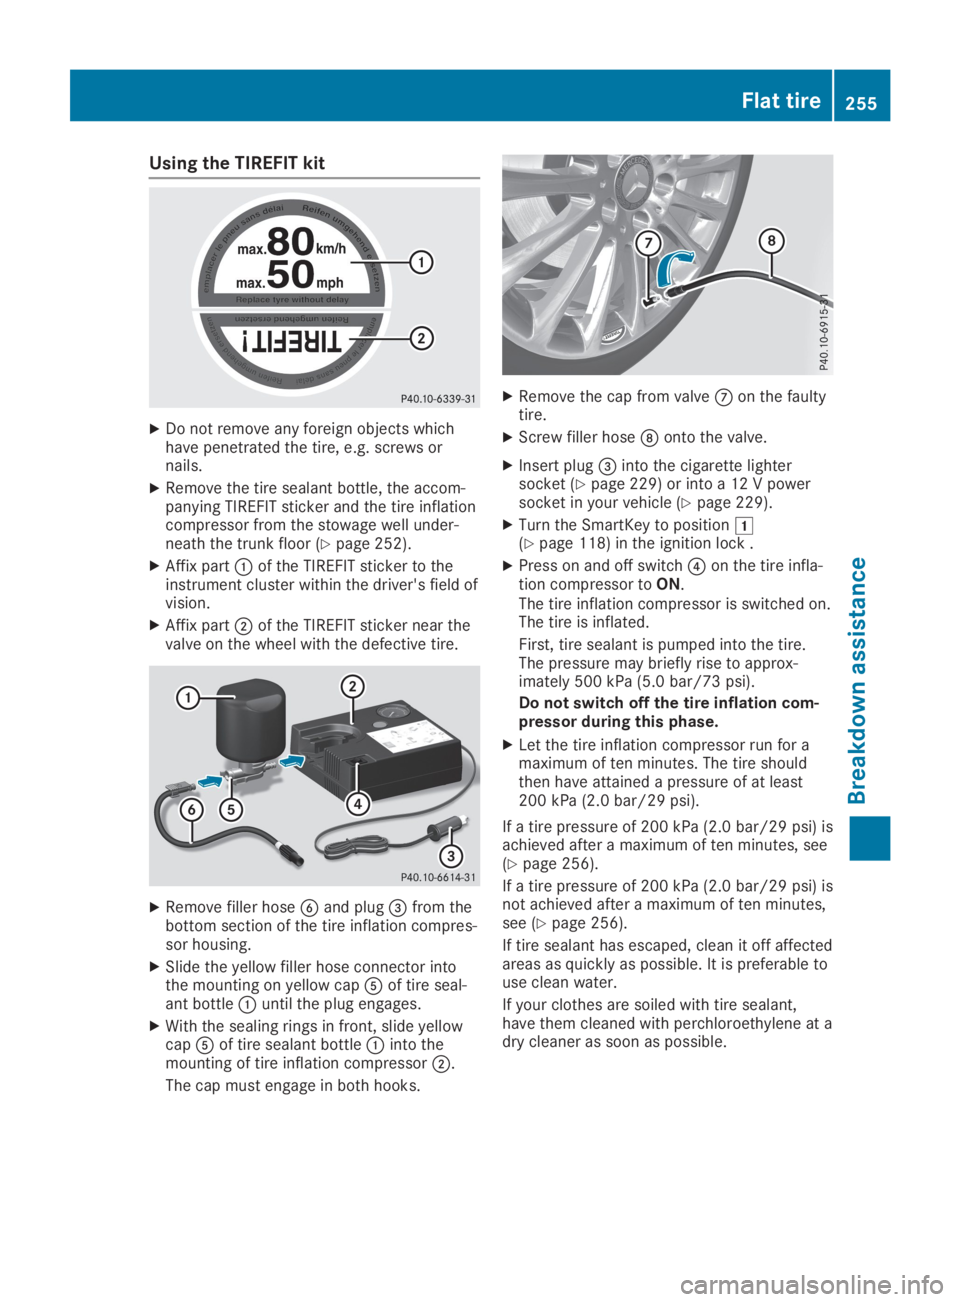
XDo not remove any foreign objects whichhave penetrated the tire, e.g. screws ornails.
XRemove the tire sealant bottle, the accom-panying TIREFIT sticker and the tire inflationcompressor from the stowage well under-neath the trunk floor (Ypage 252).
XAffix part�Cof the TIREFIT sticker to theinstrument cluster within the driver's field ofvision.
XAffix part�Dof the TIREFIT sticker near thevalve on the wheel with the defective tire.
XRemove filler hose�
Page 258 of 306
Tire pressure not reached
If a tire pressure of 200 kPa (2.0 bar/29 psi)has been achieved after ten minutes:
XSwitch off the tire inflation compressor.
XUnscrew the filler hose from the valve of thefaulty tire.
Note that tire sealant may escape when youunscrew the filler hose.
XVery slowly drive forwards or reverseapproximately 30 ft (10 m).
XPump up the tire again.
After a maximum of ten minutes, the tirepressure must be at least 200 kPa (2.0 bar/29 psi).
GWARNING
If the required tire pressure is not reached
after the specified time, the tire is too badly
damaged. The tire sealant cannot repair the
tire in this instance. Damaged tires and a
tire pressure that is too low can significantly
impair the vehicle's braking and driving
characteristics. There is a risk of accident.
Do not continue driving. Contact a qualified
specialist workshop.
Tire pressure reached
GWARNING
A tire temporarily sealed with tire sealant
impairs the vehicle's driving characteristics
and is not suitable for driving at higher
speeds. There is a risk of an accident.
Adapt your driving style accordingly and
drive carefully. Do not exceed the maximum
permissible speed for a tire sealed with tire
sealant.
The maximum permissible speed for a tiresealed with tire sealant is 50 mph (80 km/h).The upper part of the TIREFIT sticker must beaffixed to the instrument cluster in the driver'sfield of vision.
!Residue from the tire sealant may comeout of the filler hose after use. This couldcause stains.
Therefore, place the filler hose in the plasticbag which contained the TIREFIT kit.
HEnvironmental note
Have the used tire sealant bottle disposed
of professionally, e.g. at a qualified special-
ist workshop.
If tire pressure of 200 kPa (2.0 bar/29 psi)has been achieved after a maximum period often minutes:
XSwitch off the tire inflation compressor.
XUnscrew the filler hose from the valve of thefaulty tire.
XStow the tire sealant bottle and the tireinflation compressor.
XPull away immediately.
XStop after driving for approximately tenminutes and check the tire pressure withthe tire inflation compressor.The tire pressure must now be at least130 kPa (1.3 bar/19 psi).
GWARNING
If the required tire pressure is not reached
after driving for a short period, the tire is too
badly damaged. The tire sealant cannot
repair the tire in this instance. Damaged
tires and a tire pressure that is too low can
significantly impair the vehicle's braking and
driving characteristics. There is a risk of
accident.
Do not continue driving. Contact a qualified
specialist workshop.
iIn cases such as the one mentionedabove, contact an authorized Mercedes-Benz Center. Or call 1-800-FOR-MERCedes(in the USA) or 1-800-387-0100 (in Canada).
XCorrect the tire pressure if it is still at least130 kPa (1.3 bar/19 psi). See the Tire andLoading Information placard on the driver'sside B-pillar or the tire pressure table in thefuel filler flap for values.
XTo increase the tire pressure:switch onthe tire inflation compressor.
256Flat tire
Breakdown assistance
Page 265 of 306
Towing and tow-starting
Important safety notes
GWARNING
When towing or tow-starting another vehicle
and its weight is greater than the permissi-
ble gross weight of your vehicle, the:
Rthe towing eye could detach itself
Rthe vehicle/trailer combination could roll-
over.
There is a risk of an accident.
When towing or tow-starting another vehi-
cle, its weight should not be greater than
the permissible gross weight of your vehicle.
Details on the permissible gross vehicle weightof your vehicle can be found on the vehicleidentification plate (Ypage 297).
!When Active Brake Assist, Active DistanceAssist DISTRONIC or the HOLD function isactivated, the vehicle brakes automaticallyin certain situations.
To avoid damage to the vehicle, deactivatethese systems in the following or similar sit-uations:
Rwhen towing the vehicle
Rin the car wash
!Only secure the tow rope or tow bar at thetowing eyes. Otherwise, the vehicle could bedamaged.
!Do not use the towing eye for recovery,this could damage the vehicle. If in doubt,recover the vehicle with a crane.
!When towing, pull away slowly andsmoothly. If the tractive power is too high,the vehicles could be damaged.
!Do not tow with sling-type equipment. Thiscould damage the vehicle.
!When towing away vehicles with KEYLESS-GO, use the key instead of the Start/Stopbutton. The automatic transmission mayotherwise shift to position�]when youopen the driver's or front-passenger door,which could damage the transmission.
!Make sure that the electric parking brakeis released. If the electric parking brake isfaulty, visit a qualified specialist workshop.
!You may tow the vehicle for a maximumdistance of 30 miles (50 kilometers). A tow-ing speed of 30 mph (50 km/h) must not beexceeded.
For towing distances over 30 miles(50 kilometers), the entire vehicle must beraised and transported.
!When you are tow-starting or towinganother vehicle, its weight must not exceedthe maximum permissible gross weight ofyour vehicle.
It is better to have the vehicle transportedthan to have it towed away.
The automatic transmission must be in posi-tion�\\when the vehicle is being towed away.
The battery must be connected and charged.Otherwise, you:
Rcannot turn the SmartKey to position�Hinthe ignition lock
Rcannot shift the automatic transmission toposition�\\
Deactivate the automatic locking featurebefore the vehicle is towed (Ypage 178). Youcould otherwise be locked out when pushingor towing the vehicle.
Installing/removing the towing eye
Installing the towing eye
GWARNING
The exhaust tail pipe may be very hot. There
is a risk of burns when removing the rear
cover.
Do not touch the exhaust pipe. Take particu-
lar care when removing the rear cover.
Towing and tow-starting263
Breakdown assistance
Z
Page 266 of 306
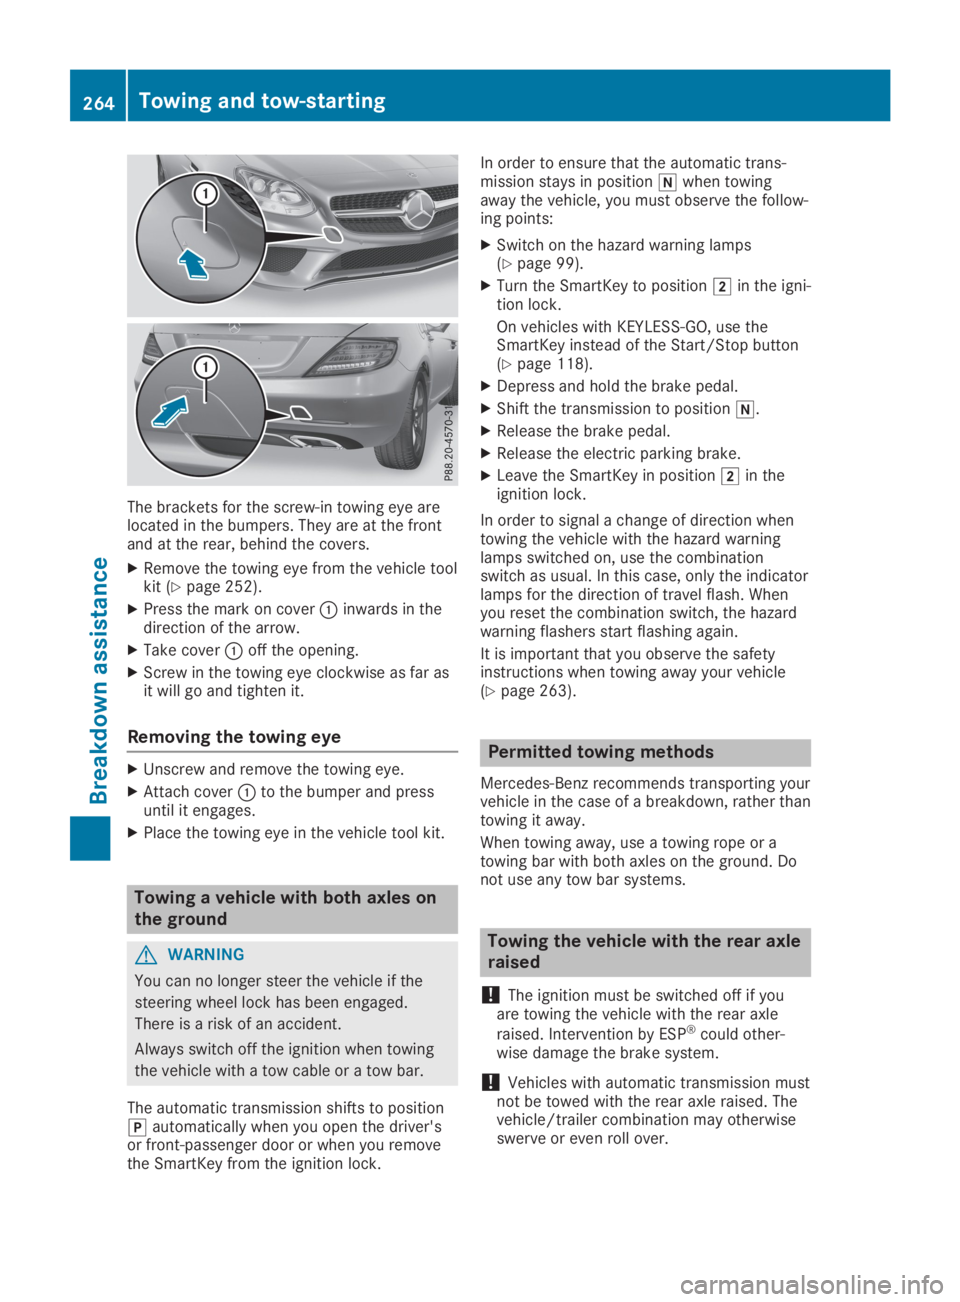
The brackets for the screw-in towing eye arelocated in the bumpers. They are at the frontand at the rear, behind the covers.
XRemove the towing eye from the vehicle toolkit (Ypage 252).
XPress the mark on cover�Cinwards in thedirection of the arrow.
XTake cover�Coff the opening.
XScrew in the towing eye clockwise as far asit will go and tighten it.
Removing the towing eye
XUnscrew and remove the towing eye.
XAttach cover�Cto the bumper and pressuntil it engages.
XPlace the towing eye in the vehicle tool kit.
Towing a vehicle with both axles on
the ground
GWARNING
You can no longer steer the vehicle if the
steering wheel lock has been engaged.
There is a risk of an accident.
Always switch off the ignition when towing
the vehicle with a tow cable or a tow bar.
The automatic transmission shifts to position�]automatically when you open the driver'sor front-passenger door or when you removethe SmartKey from the ignition lock.
In order to ensure that the automatic trans-mission stays in position�\\when towingaway the vehicle, you must observe the follow-ing points:
XSwitch on the hazard warning lamps(Ypage 99).
XTurn the SmartKey to position�Hin the igni-tion lock.
On vehicles with KEYLESS-GO, use theSmartKey instead of the Start/Stop button(Ypage 118).
XDepress and hold the brake pedal.
XShift the transmission to position�\\.
XRelease the brake pedal.
XRelease the electric parking brake.
XLeave the SmartKey in position�Hin theignition lock.
In order to signal a change of direction whentowing the vehicle with the hazard warninglamps switched on, use the combinationswitch as usual. In this case, only the indicatorlamps for the direction of travel flash. Whenyou reset the combination switch, the hazardwarning flashers start flashing again.
It is important that you observe the safetyinstructions when towing away your vehicle(Ypage 263).
Permitted towing methods
Mercedes-Benz recommends transporting yourvehicle in the case of a breakdown, rather thantowing it away.
When towing away, use a towing rope or atowing bar with both axles on the ground. Donot use any tow bar systems.
Towing the vehicle with the rear axle
raised
!The ignition must be switched off if youare towing the vehicle with the rear axle
raised. Intervention by ESP®could other-wise damage the brake system.
!Vehicles with automatic transmission mustnot be towed with the rear axle raised. Thevehicle/trailer combination may otherwiseswerve or even roll over.
264Towing and tow-starting
Breakdown assistance
Page 267 of 306
Transporting the vehicle
Vehicles with automatic transmission
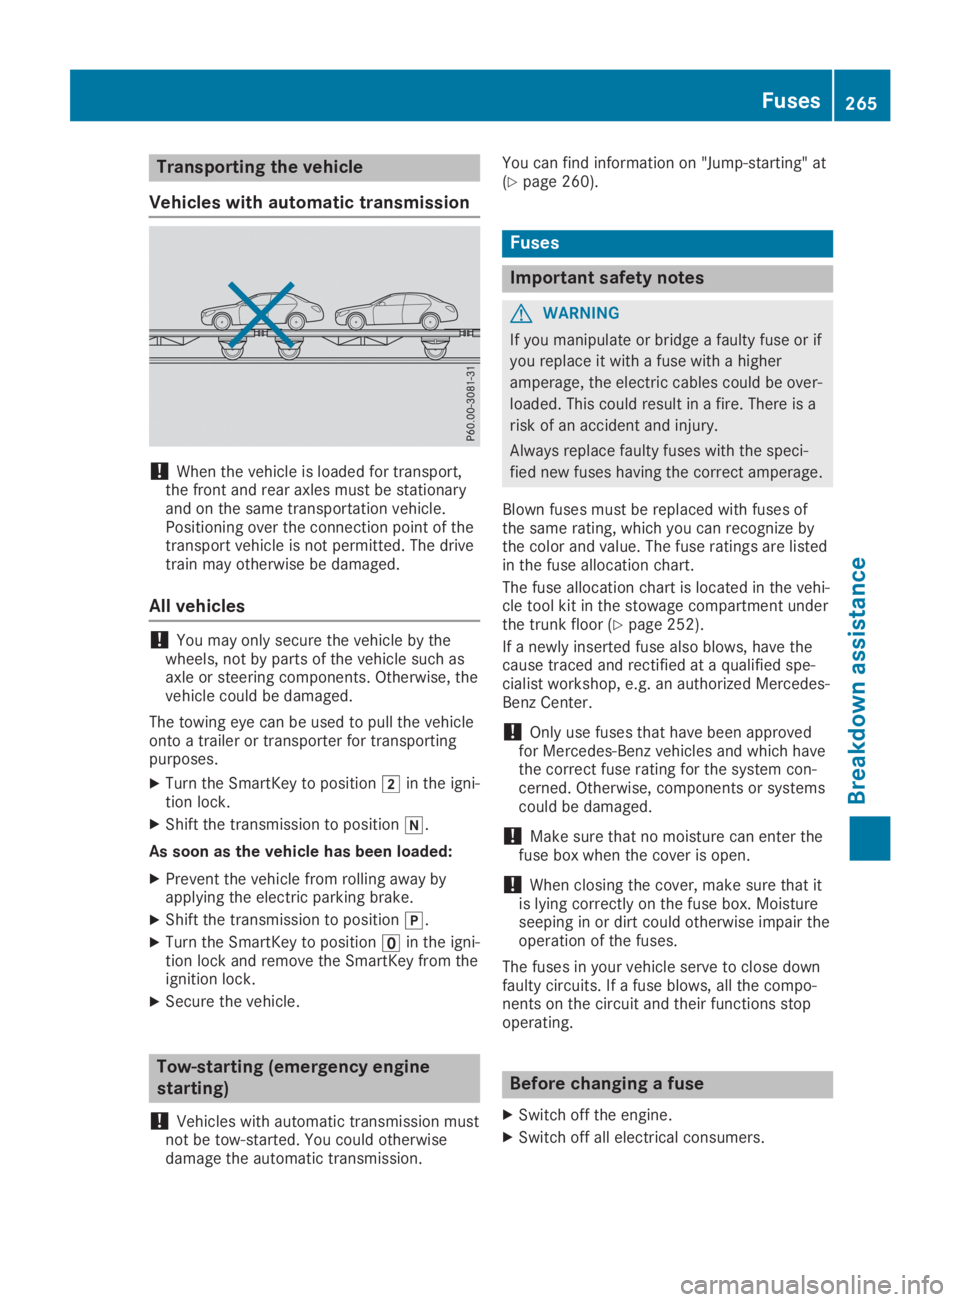
!When the vehicle is loaded for transport,the front and rear axles must be stationaryand on the same transportation vehicle.Positioning over the connection point of thetransport vehicle is not permitted. The drivetrain may otherwise be damaged.
All vehicles
!You may only secure the vehicle by thewheels, not by parts of the vehicle such asaxle or steering components. Otherwise, thevehicle could be damaged.
The towing eye can be used to pull the vehicleonto a trailer or transporter for transportingpurposes.
XTurn the SmartKey to position�Hin the igni-tion lock.
XShift the transmission to position�\\.
As soon as the vehicle has been loaded:
XPrevent the vehicle from rolling away byapplying the electric parking brake.
XShift the transmission to position�].
XTurn the SmartKey to position�