2019 MERCEDES-BENZ SL ROADSTER flat tire
[x] Cancel search: flat tirePage 301 of 330

Overinflated
tiresmay:
R increase thebraking distance
R adversely affecthandling
R wear excessively and/orunevenly
R have anadverse effectonride comfort
R be more susceptible todamage
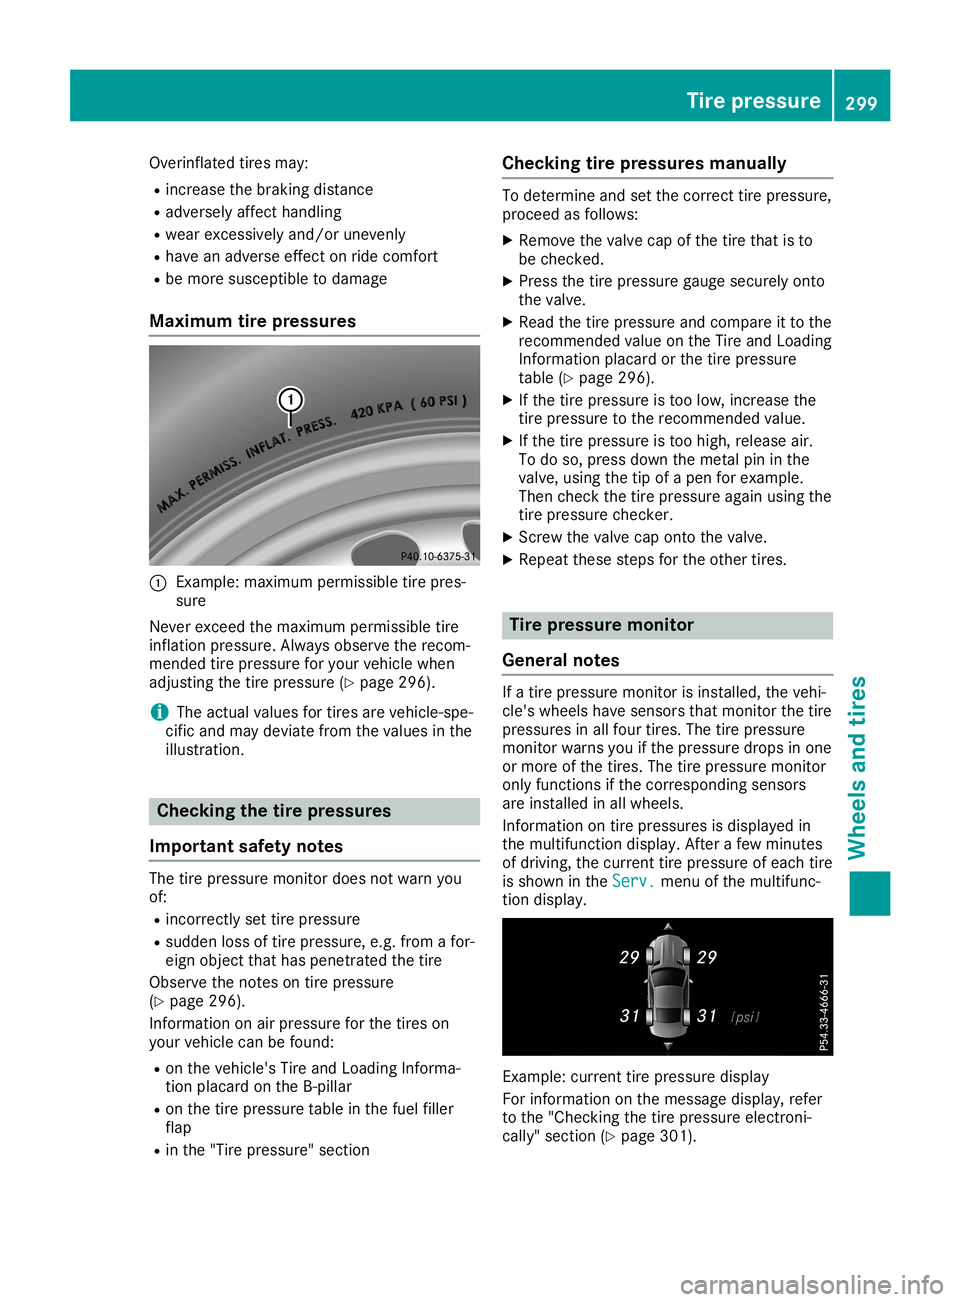
Maximum tirepressures 0043
Example: maximum permissibletire pres-
sure
Never exceed themaximum permissibletire
inflation pressure. Alwaysobserve therecom-
mended tirepressure foryour vehicle when
adjusting thetire pressure (Ypage 296).
i The
actual valuesfor tires arevehicle-spe-
cific andmay deviate fromthevalue sin the
illu stration. Checki
ngthe tire pressures
Importa ntsafety notes The
tirepressure monitordoesnotwarn you
of:
R incorrect lyset tire pressure
R sudden lossoftire pressure, e.g.from afor-
eign object thathaspenetrated thetire
Observe thenotes ontire pressure
(Y page 296).
Information onair pressure forthe tires on
your vehicle canbefound:
R on the vehicle's TireandLoading Informa-
tion placard onthe B-pillar
R on the tire pressure tableinthe fuel filler
flap
R in the "Tire pressure" section Checki
ngtire pressures manually To
determine andsetthe correct tirepressure,
proceed asfollows:
X Remove thevalve capofthe tire that isto
be checked.
X Press thetire pressure gaugesecurely onto
the valve.
X Read thetire pressure andcompare itto the
recommended valueonthe Tire andLoading
Information placardorthe tire pressure
table (Ypage 296).
X Ifthe tire pressure istoo low, increase the
tire pressure tothe recommended value.
X Ifthe tire pressure istoo high, release air.
To do so, press downthemetal pininthe
valve, usingthetipofapen forexample.
Then check thetire pressure againusing the
tire pressure checker.
X Screw thevalve caponto thevalve.
X Repea tthese stepsforthe other tires. Tire
pressure monitor
General notes If
atire pressure monitorisinstalled, thevehi-
cle's wheels havesensors thatmonitor thetire
pressures inall four tires. Thetirepressure
monitor warnsyouifthe pressure dropsinone
or more ofthe tires. Thetirepressure monitor
only functions ifthe corresponding sensors
are installed inall wheels.
Information ontire pressures isdispla yedin
the multifunction display.After afew minutes
of driving, thecurrent tirepressure ofeach tire
is shown inthe Serv. Serv.
menuofthe multifunc-
tion displa y. Example:
currenttirepressure display
For information onthe message display,refer
to the "Checking thetire pressure electroni-
cally "section (Ypage 301). Tire
pressur e
299Wheels andtires Z
Page 302 of 330

Imp
ortant safety notes G
WAR
NING
Eac htire, includin gth espar e(if pro vide d),
sho uld bechecke dat least once amon th
when cold and inflat ed tothepre ssur erec -
omm ended bytheveh icleman ufactureron
th eTir eand Load ingInfor mat ionplac ardon
th edriv er'sdoor B-pillar orthetire pre ssur e
label ontheins ide ofthefuel filler flap .If
your vehiclehas tires ofadif fer entsiz eth an
th esiz eind icat edon theTir eand Load ing
In for mat ionplac ardorthetire pre ssur e
label, youshould determ inethepro per tire
pre ssur efor those tires .
As anadded safetyfeat ure, your vehiclehas
been equipp edwithatire pre ssur emon itor-
ing syst em(TPM S)that illum inatesa low tire
pre ssur ete lltale when oneor mor eof your
ti res are sign ificant lyund erinflat ed. Accord-
ing ly,when thelow tire pre ssur ete lltale illu-
min ates,you should stop and checkyour
ti res assoo nas pos sible ,and inflat eth em to
th epro per pressur e.Drivin gon asign ifi-
can tly und erin flatedtire caus esthetire to
ove rheatand canlead totire failur e.Un der -
inf lat ion also reduce sfuel efficien cy and tire
tr ead life,and may affectth eveh icle's han -
dlin gand stoppi ngabilit y.
Pleas eno te that theTPM Sis no ta subs ti-
tut efor proper tire main tenan ce,and itis
th edriv er'sres pon sibil ity to main tainco r-
rec ttire pre ssur e,eve nif und erinflat ion has
no treac hedthelev elto trigge rillum ination
of theTPM Slow tire pre ssur ete lltale.
US Aon ly:
Your vehiclehas also been equipp edwitha
TPM Smalf unction indicat ortoind icat eif th e
syst emisno toper ating pro perly.The TPM S
malf unction indicat orisco mbin edwithth e
low tire pre ssur ete lltale. When thesyst em
det ects amalf unction ,th ewarn inglamp will
flas hfor appr oximat elyamin ute and then
rem aincontinuo usly illum inated. This
seque ncewill berep eatedeve rytime the
veh icleis start ed aslon gas themalf unction
ex ist s. When
themalf unction indicat orisillum ina-
te d, thesyst emmay notbe able todet ector
sign allow tire pre ssur eas intended. TPMS
malf unction smay occur foravar ietyof rea-
son s,inc ludin gth emoun ting ofinc omp ati-
ble replace men tor altern ate tires orwhee ls
on theveh icleth at pre ven tth eTPM Sfrom
fun ction ing properly.Alw ays checkth e
TPM Smalf unction telltale afterrep laci ng
on eor mor etires orwhee lson your vehicle
to ensur eth at therep lace men tor altern ate
ti res and whee lsallow theTPM Sto continue
to fun ction properly.
It is thedriv er'sres pon sibil ity to set thetire
pre ssur eto that rec omm ended forcold tires
whic his suit able fortheoper ating situati on
(Y page 296). Not eth at theco rrec ttire pre s-
sur efor thecur ren toper ating situati onmust
fir st be taug ht-in tothetire pre ssur emon itor.
If asubs tantial loss ofpre ssur eoc cur s,the
warn ingthres hold forthewarn ingmes sage is
align edtothetaug ht-in refere ncevalue s.
Rest artthetire pre ssur emon itor afteradj ust -
ing thepre ssur eof theco ld tires
(Y page 301). The curren tpre ssur esare
sav edasnewref ere ncevalue s.As ares ult,a
warn ingmes sage willappear ifth etire pre s-
sur edro pssign ificant ly.
The tire pre ssur emon itor does notwarn youof
an incorrectly set tire pre ssur e.Obs erveth e
no teson therec omm ended tire pre ssur e
(Y page 296).
The tire pre ssur emon itor isno table towarn
you ofasudde nloss ofpre ssur e,e.g. ifth e
ti re ispen etrat ed byafor eign object.In the
eve ntofasudde nloss ofpre ssur e,brin gth e
veh icleto ahalt bybrak ingcareful ly.Avoid
abrup tst eer ing mov eme nts.
The tire pre ssur emon itor has ayellow warning
lamp intheins trumen tclus terfor indicat ing
pre ssur eloss oramalf unction .Whet herthe
warn inglamp flashes orligh tsup indicat es
whet heratire pre ssur eis toolow orthetire
pre ssur emon itor ismalf unction ing :
R ifth ewarn inglamp islit continuo usly, the
ti re pre ssur eon oneor mor etires issign ifi-
can tly to olow. Thetire pre ssur emon itor is
no tmalf unction ing .
R ifth ewarn inglamp flashes forappr ox-
imat elyamin ute and then rem ainslit con- 300
Ti
re pressu reWheels andtire s
Page 309 of 330

surfaces
thatarenot icyorcovered withsnow.
Take appropria tecare when driving.
Temper ature G
WARNING
The temperature gradeforthis tireisestab-
lished foratire that isproperly inflatedand
not overloaded .Exc essive speed, underinfla-
tion, orexcessive loading,either separately
or incombination, cancause excessive heat
buil d-up andpossible tirefailu re.
The temperature gradesareA(the highest), B,
and C,representing thetire's resistance tothe
generation ofheat anditsabil itytodissipa te
heat when tested undercontrolled conditions
on aspecified indoorlaboratorytestwheel.
Sustained hightemperature cancause the
material ofthe tire todegenerate andreduce
tire life, and excessive temperature canlead to
sudden tirefailu re.The grade Ccorresponds
to alevel ofperformance whichallpassenger
car tires must meet under theFederal Motor
Vehicle SafetyStandard No.109. Grades B
and Arepresent higherlevelsofperformance
on the labora torytestwheel thantheminimum
required bylaw. Tire
labeli ng
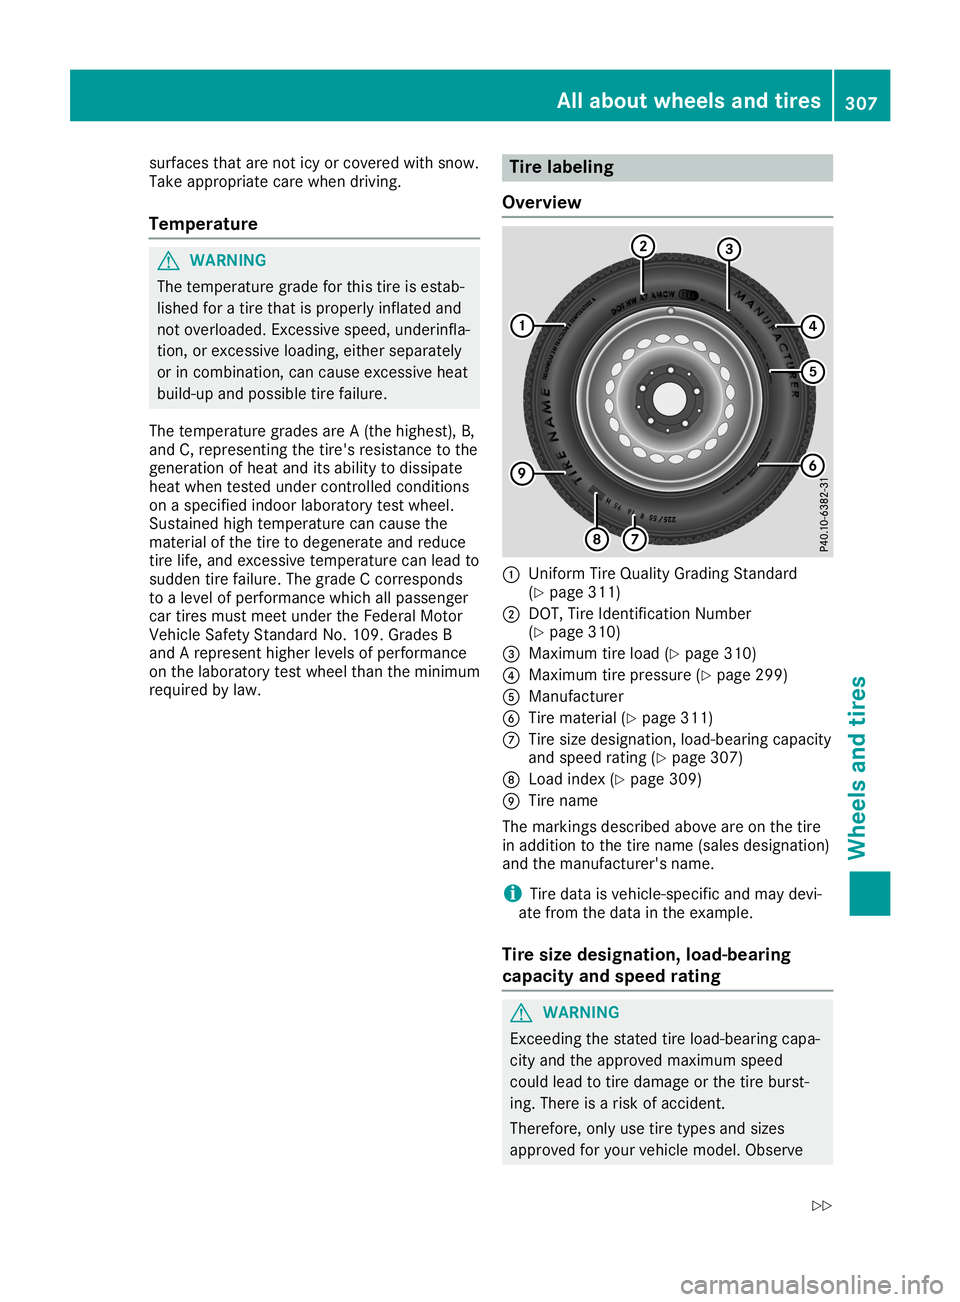
Overview 0043
Uniform TireQuali tyGradi ngStandard
(Y page 311)
0044 DOT, TireIdentification Number
(Y page 310)
0087 Maximum tireload (Ypage 310)
0085 Maximum tirepressure (Ypage 299)
0083 Manufacturer
0084 Tire material (Ypage 311)
006B Tire size designation, load-bearingcapacity
and speed rating(Ypage 307)
006C Load index (Ypage 309)
006D Tire name
The markings described aboveareonthe tire
in addition tothe tire name (sales designation)
and themanufacturer's name.
i Tire
data isvehicle-specific andmay devi-
ate from thedata inthe example.
Tire size designation, load-bearing
capacity andspeed rating G
WARNING
Exc eeding thestated tireload-bea ringcapa-
city and theapproved maximum speed
could leadtotire damage orthe tire burst-
ing. There isarisk ofaccident.
Therefore, onlyusetiretypes andsizes
approved foryour vehicle model.Observe All
about wheelsand tires
307Wheels andtires
Z
Page 317 of 330

R
The jack must beplaced onafirm, flatand
non- slipsurface. Onaloose surface, alarge,
flat, load-bearing underlaymustbeused. On
a slippery surface, anon- slipunderlay must
be used, e.g.rubber mats.
R Do not use wooden blocksorsimilar objects
as ajack underlay. Otherwise, thejack will
not beable toachieve itsload-bearing capa-
city due tothe restr icted height.
R Make surethatthedistance between the
underside ofthe tires andtheground does
not exceed 1.2in(3 cm).
R Never placeyourhands andfeet under the
raised vehicle.
R Do not lieunder thevehicle.
R Do not start theengine whenthevehicle is
raised.
R Do not open orclose adoor orthe trunk lid
when thevehicle israised.
R Make surethatnopersons arepresent in
the vehicle whenthevehicle israised.
Vehicles withalloy wheels andhub caps:
the wheel boltsarecovered byahub cap.
Before youcan unscrew thewheel bolts,you
must remove thehub cap. Twodifferent var-
iants canbeinstalled. X
To remove: takesocket 0044and lugwrench
0087 from thevehicle toolkit(Ypage 277).
X Position socket0044onhub cap0043.
X Position lugwrench 0087onsocket 0044.
X Using lugwrench 0087,turn hubcap0043coun-
ter- clock wiseandremove it.
X To install: beforeinstalling, checkhub
cap 0043and thewheel areaforsoiling and
clean ifnecessary.
X Put hub cap0043inposition andturn until itis
in the right position. X
Position socket0044onhub cap0043.
X Attach lugwrench 0087tosocket 0044and
tighten hubcap0043.
The tighten ingtorque mustbe
18 lb-ft (25Nm).
i Note
thatthehub capshould betight-
ened tothe specified torqueof18 lb-ft
(25 Nm). Mercedes- Benzrecomm endsthat
you have thehub capinstalled ataqualified
specialist workshop. X
Using lugwrench 0087,loosen thebolts on
the wheel youwish tochange byabout one
full turn. Donot unscrew thebolts com-
pletely. The
jackingpoints arelocated justbehind the
front wheel housings andjust infront ofthe
rear wheel housings (arrows).
Mercedes-AMG vehiclesandvehicles with
AMG equipm ent:toprotec tthe vehicle body,
the vehicle hascovers installed nexttothe
jack ingpoints onthe outer sills. Changing
awheel
315Wheels andtires Z