Page 128 of 578
Overview ofthe parcel net hooks
Observethefollowing notes:
RSecurethe load usingthe parcel net hooks.
RDo not use elasticstraps or netstosecure aload. These are intended only as anti-slip pro‐tectionfor light loads.
RDo notroute tie downs across sharp edgesor corners.
RPad sharp edgesfor protection.
There are uptofour parcel net hooks inthetrunk depending onthe equipment installed.
1Parcel net hooks
EASY-PACKtrunk box
Adjusting the height of the EASY-PACK trunkboxtoany position
&WARNINGRisk of becoming trappedand injured when movingthefloor up
Whenthefloor moves up,your hands maybecome trapped onthe frame ofthe EASY-PACK trunk box and objects may bethrownup.
#Whenthefloor moves up, make surethatyour hands are not withinthesweep ofthefloor.
#If someone becomes trapped, carefullypushthe center ofthefloor downward.
#Removeall objects fromthefloorbefore moving it up.
12 6Seats andstowing
Page 129 of 578

&WARNINGRisk of becoming trappedwhen pressingthe EASY-PACK trunk boxin
Whenthe EASY-PACK trunk box is pressedintotheretracted position,your hands maybecome trapped. Children, in particular, mayinjurethemselves when doing so.
#When pressingthe EASY-PACK trunkbox in, make surethatyour hands arenot withinthe sweep ofthe EASY-PACKtrunk box.
#When leavingthevehicle, alwaystakethe SmartKeywithyou and lockthevehicle.
#Never leavechildren unattended inthevehicle.
*NOTEDamagetotheextended EASY-PACK trunk box
The EASY-PACK trunk box may be damagedwhen it isextended.
#Do not place any objects on or pressdown onthe EASY-PACK trunk boxframe.
#Do not closethe trunk lid whentheEASY-PACK trunk box isextended.
*NOTEDamagetothe EASY-PACK trunkboxbyobjects
Objects which are sharp-edged, pointed,fragile,rounded or heavy and objectsthatroll can damagethe EASY-PACK trunk boxand bethrown out.
#Do not transport objects which aresharp-edged, pointed,rounded or frag‐ile and objectsthatroll inthe EASY-PACK trunk box.
#Alwaysstowand secure such objectsoutside ofthe box inthe trunk.
#Always observethe maximum permittedload ofthe EASY-PACK trunk box.
#Do not usethe EASY-PACK trunk boxwhentherear seats arefoldedfor‐wards.
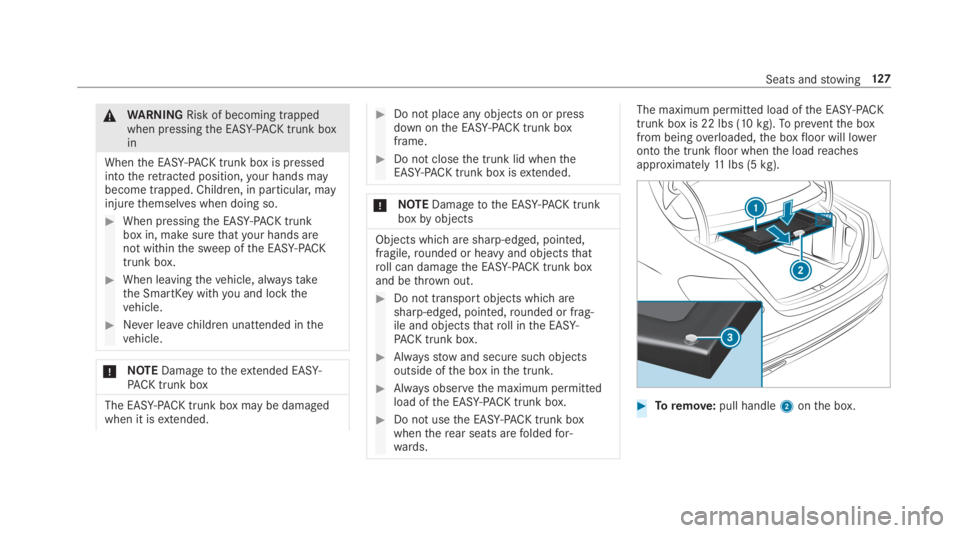
The maximum permitted load ofthe EASY-PACKtrunk box is 22 lbs (10kg).Topreventthe boxfrom beingoverloaded,the boxfloor will lowerontothe trunkfloor whenthe loadreachesapproximately11lbs (5kg).
#Toremove:pull handle2onthe box.
Seats andstowing127
Page 133 of 578

#Securetheroofracktothe anchorage pointsunder covers1.
#Comply withtheroofrackmanufacturer'sinstallation instructions.
#Securethe load ontheroofrack.
Cup holder
Installingthe cup holder in orremoving itfrom the center console
&WARNING‑ Risk of accident or injurywhen usingthe cup holder whilethevehicle is moving
The cup holder cannot secure containerswhilethevehicle is moving.
Ifyou use a cup holder whilethevehicle ismoving,the container may beflung aroundand liquids may be spilled. Thevehicle occu‐pants may come into contact withthe liquidand if it is hot,theycould be scalded.Yo ucould be distracted from traffic conditionsandyou may lose control ofthevehicle.
#Only usethe cup holder whenthevehi‐cle isstationary.
#Only usethe cup holderfor containersoftheright size.
#Closethe container, particularlyiftheliquid is hot.
Observethefollowingfor Mercedes-Maybachvehicles equipped withchampagneflutes:
Rdo not usethechampagneflutes whilethevehicle is in motion
Rdo not usechampagneflutes made of break‐ableglass, andstorethem inthe trunk if pos‐sible
#Toremove:slide catch2forwards and pullout cup holder1.
#Toinstall:insert cup holder1and slideback catch2.
%The cup holderrubber mat can beremovedfor cleaning, e.g. using clean, lukewarmwater.
%Observethe notes on loadingthevehicle(→page121).
Seats andstowing131
Page 134 of 578
Openingthe cup holder intherear armrest(vehicles withrear benchseat)
*NOTEDamagetothe cup holder
Whentherear armrest isfolded backthe cupholder could become damaged.
#Onlyfoldtherear armrest back whenthe cup holder is closed.
#Toopen:press cup holder1or2.
#Place a container in orremovea containerfrom cup holder1or2.
Opening or closingthe cup holder inthereararmrest (vehicles withelectrically adjustablerear seats)
#Toopen:press down cup holder base2inthe middle until it engages.
#Toclose:press closing button1.
%The cup holder insert can beremovedforcleaning, e.g. using clean, lukewarmwater.
Removing and installingthe cup holderinsert intherear armrest (vehicles withelec‐trically adjustablerear seats)
Removing the insert
*NOTEDamagetothewooden trim
Thewooden trim can be damagedbypullingoutthe cup holder insert.
#Do not pullthe cup holder insert outfromtherear armrest anyfartherthan0.6 in (15 mm).
13 2Seats andstowing
Page 135 of 578
#Press down cup holder base3inthe middleuntil it engages.
#Press bothretaining clips2and pullthecup holder insertupwards approximately0.6 in (15 mm).
#Press button1.Cup holder base3raises.
#Removethe insert fromtherear armrestcompletely.
Installingthe insert
*NOTEDamagetothewooden trim
Thewooden trim can be damagedbyinsert‐ingthe cup holder insert.
#Make surethatthe cup holder inserthas been inserted intotherecess cor‐rectly.
#Makesurethat cup holder base2is intheupper position.
#Placethe cup holder insert intotherecess intherear armrest suchthat button1isfacingforwards.
#Pressthe cup holder insert down.
#Press outerring3ofthe cup holder insertuntilthe cup holder insert engages audibly.
Switchingthe cooling or heating functionforthetemperature-controlled cup holder on oroff
Whenthe heating function is used,the metalinsertofthe cup holder is heated.Forthisrea‐son,you must notreach intothe cup holderinsert.
Seats andstowing13 3
Page 136 of 578
#Toswitch on:press button2repeatedlyuntilthe blue (keep cool) orred (keepwarm)indicator lamp onthe button lights up.
#Toswitch off:press button2repeatedlyuntilthe indicator lamp onthe button goesout.
%Cleantheremovablerubber mat only withclear, lukewarmwater,and clean cup holder1only witha soft cloth.
Ashtray and cigarettelighter
Usingthe ashtrayinthe front center console
#Toopen:briefly press marking4.
#Toremovethe insert:gripthe sides ofinsert1, push itforward and pull it upwards2.
#Tore-installthe insert:press insert1intothe drawer until it engages.
#Toclose:pressstowage compartment3closed until it locks.
Usingthe ashtrayintherear door
Tousethe ashtray,you can place it in a cupholder or hold it inyour hand.
#Fold lid2upwards.
Ifyou are not usingthe ashtray,close it andplace it inretainer1intherear door.
134Seats andstowing
Page 144 of 578

RDepending onthevehicle equipment,themobile phone is connectedtothevehicle'sexterior antenna viathecharging module.
RThecharging function and wireless connec‐tion ofthe mobile phonetothevehicle'sexterior antenna are onlyavailable ifthe igni‐tion is switched on.
RSmall mobile phones may not be abletobecharged inevery position ofthe mobilephonestowage compartment.
RLargemobile phones which do notrestflat inthe mobile phonestowage compartment maynot be abletobecharged or connected withthevehicle'sexterior antenna.
RThe mobile phone may heat up duringthecharging process. This depends onthe appli‐cations (apps) currentlyrunning.
RToensure more efficientcharging and con‐nection withthevehicle'sexterior antenna,removethe protective cover fromthe mobilephone. Protective coverswhich are designedfor wirelesscharging areexcluded.
RWhencharging,the mat should be used ifpossible.
Wirelesscharging ofthe mobile phone inthefront
Requirements:RThe mobile phone must be suitablefor wire‐lesscharging (Qi-compatible mobile phone).You canfind a listof Qi-compatible mobilephones at:
http://www.mercedes-benz.com/connect
Example:vehicles without arear passenger com‐partment air conditioning system
#Placethe mobile phone as closetothe cen‐ter of mat1as possible withthe displayfacing upwards.Whenthecharging symbol is shown inthemultimedia system,the mobile phone isbeingcharged.
Malfunctions duringthecharging process areshown inthe multimedia system display.
%The mat can beremovedfor cleaning, e.g.using clean, lukewarmwater.
Wirelesscharging of a mobile phone intherear passenger compartment
Requirements:RThe mobile phone must be suitablefor wire‐lesscharging (Qi-compatible mobile phone).You canfind a listof Qi-compatible mobilephones at:
http://www.mercedes-benz.com/connect
14 2Seats andstowing
Page 145 of 578

Example:vehicles with individualrear seats
#Placethe mobile phone as closetothe cen‐ter of mat1as possible withthe displayfacing upwards.Whenthe indicator lamp atthe front ofthemobile phone system lights up,the mobilephone is beingcharged.
%The mat can beremovedfor cleaning, e.g.using clean, lukewarmwater.
Installing andremoving thefloor mats
&WARNINGRisk of accident duetoobjects inthe driver'sfootwell
Objects inthe driver'sfootwell may impedepedal travel or block a depressed pedal.
This jeopardizesthe operating androadsafety ofthevehicle.
#Stowall objects inthevehicle securelysothattheycannotgetintothe driver'sfootwell.
#Always installthefloor mats securelyand as prescribed in ordertoensurethatthere is always sufficientroomforthe pedals.
#Do not use loosefloor mats and do notplacefloor mats ontop of one another.
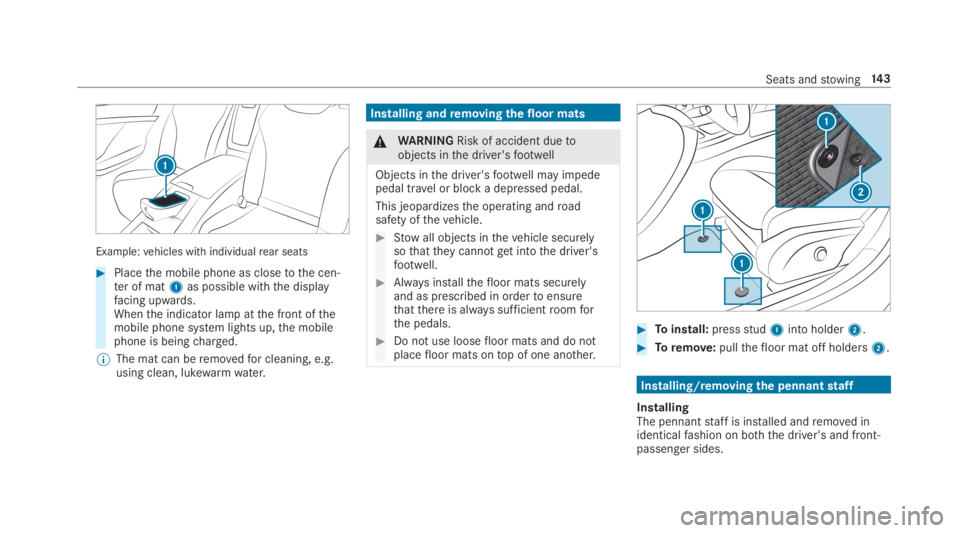
#Toinstall:pressstud1into holder2.
#Toremove:pullthefloor mat off holders2.
Installing/removingthe pennantstaff
InstallingThe pennantstaff is installed andremoved inidenticalfashion on both the driver's and front-passenger sides.
Seats andstowing14 3