2019 MERCEDES-BENZ METRIS change wheel
[x] Cancel search: change wheelPage 246 of 318
Useful information
This Operator's Manual describes all models as
well as standard and optional equipment of your
vehicle that were available at the time of going
to print. Country-specific variations are possi-
ble. Note that your vehicle may not be equipped
with all of the described functions. This also
applies to systems and functions relevant to
safety.
Read the information on qualified specialist
workshops (
Ypage 31).
Loading guidelines
Important safety notes
GWARNING
When objects are unsecured or inadequately
secured, they can slip, turn over or be thrown
about, striking vehicle occupants. This also
applies to:
Rluggage or loads
Rseats which have been removed and are
being transported in the vehicle in an
exceptional case.
There is a risk of injury, particularly in the
event of a braking maneuver or abrupt change
in direction.
Always stow objects in such a way that they
cannot be tossed about. Before traveling,
secure objects, luggage or loads to prevent
them slipping or tipping over. If you remove a
seat, store it preferably outside the vehicle.
GWARNING
As a result of improperly placed or unevenly
distributed loads, the center of gravity of the
load being transported may be too high or too
far back. This can significantly impair handling
as well as steering and braking characteris-
tics. There is a risk of an accident.
Always make sure that the center of gravity of
the load is:
Rbetween the axles
and
Ras low as possible, near the rear axle.
GWARNING
When the permissible wheel loads, axle loads
and/or the maximum permissible gross vehi-
cle weight are exceeded, driving safety is
compromised. The handling as well as steer-
ing and braking characteristics may be signif-
icantly impaired. Overloaded tires may over-
heat, causing them to burst. There is a risk of
an accident.
When transporting a load, always observe the
permissible wheel loads, axle loads and the
maximum permissible gross vehicle weight
for the vehicle (including occupants).
!If you are using a roof carrier, observe the
maximum roof load and maximum roof carrier
load.
RDo not stack luggage or loads higher than the
backrests.
RObjects to be transported should preferably
be stowed in the cargo compartment.
RWhen transporting luggage, always use the
cargo tie-down rings for securing loads and a
cargo net, if installed.
RUse cargo tie-down rings and fasteners which
are suitable for the weight and size of the
load.
When using suitable load securing aids and tie
downs, always follow the manufacturer's oper-
ating instructions, in particular the notes on dis-
card criteria contained therein.
Load securing aids or tie downs must not be
used if:
Ridentification marks are missing or illegible
Rthere are yarn breakages, damage to bearing seams or other signs of tearing
Rthere are signs of shearing, deformation,
pinching or other damage
Rthere is damage to clamping or connecting
elements
Load securing aids and tie downs in this condi-
tion are ready for discard and must be replaced.
If you use load securing aids or tie downs which are worn out, the load may not be sufficiently
secured and could cause damage to property.
244Loading guidelines
Transporting loads
Page 249 of 318

Also observe the safety information in the load-
ing directions (Ypage 244).
XFill spaces between the load and the cargo
compartment walls or wheel housings (form-
locking). Use rigid load securing aids, such as
wedges, wooden fixings or padding.
XAttach secured and stabilized loads in all
directions to the cargo tie-down rings and the
guide rails in the rear.
Only use tie downs, such as lashing nets and
lashing straps, that have been tested in
accordance with current standards.
When securing a load, always use the closest cargo tie-down rings and pad sharp edges for
protection.
Cargo tie-down points (example: Cargo Van)
Fixed cargo tie-down points on the floor
:
Guide/load rails
;Cargo tie-down rings
If your vehicle is equipped with guide/loading
rails :in the floor, you can place lashing rods
directly in front of and behind the load. The lash-
ing rods directly absorb the potential shifting
forces.
Securing loads on the cargo compartment floor
by lashing them down is only recommended for lightweight loads. Place non-slip mats (anti-slip
mats) under the load to increase load security.
Lashing straps
Important safety notes
GWARNING
If you attach the tie-down incorrectly when
securing the load, the following may occur in
the event of abrupt changes in direction, brak- ing maneuvers or an accident:
Rthe cargo tie-down rings may become
detached or the tie-down may tear if the
permissible load is exceeded
Rthe load may not be restrained.
This may cause the load to slip, tip over or be
tossed about, striking vehicle occupants.
There is a risk of an accident and injury.
Always tension the tie-downs in the proper
manner and only between the described
cargo tie-down rings. Always use tie-downs
designed specifically for the loads.
!Observe the information on the maximum
loading capacity of the individual cargo tie-
down points.
If you use several cargo tie-down points to
secure a load, you must always take the max-
imum loading capacity of the weakest cargo
tie-down point into account.
If you brake hard, for example, the forces act-
ing could be up to several times the weight
force of the load. Always use multiple cargo
tie-down points in order to distribute the force absorption. Load the anchorages evenly.
Always observe the operating instructions or the
notes of the la shing strap ma
nufacturer for the
operation of the lashing strap.
Securing loads on the cargo compartment floor
by lashing them down is only recommended for
lightweight loads. Place non-slip mats (anti-slip
mats) under the load to increase load security.
Lashing straps247
Transporting loads
Z
Page 274 of 318
Useful information
This Operator's Manual describes all models as
well as standard and optional equipment of your
vehicle that were available at the time of going
to print. Country-specific variations are possi-
ble. Note that your vehicle may not be equipped
with all of the described functions. This also
applies to systems and functions relevant to
safety.
Read the information on qualified specialist
workshops (
Ypage 31).
Where will I find...?
Vehicle tool kit
General notes
Depending on the equipment version of the vehi- cle, the vehicle tool kit is:
Rin the seat base of the left front seat
Rin the rear stowage compartment
Rin the tool holder in the cargo compartment
Apart from some country-specific variants, vehi-
cles without a spare wheel are not equipped
with tire-changing tools. If your vehicle is equip-
ped with tire-changing tools, these are in the
vehicle tool kit. If the vehicle tool kit is stowed in
the driver's seat base, the jack is in a separate
holder in the cargo compartment on the right-
hand side of the vehicle next to the tailgate/rear door (
Ypage 274).
Some tools for changing a wheel are specific to
the vehicle. For more information on which tools are required and approved to perform a wheel
change on your vehicle, consult a qualified spe-
cialist workshop.
Necessary tire-changing tools can include, for
example:
Rjack
Rlug wrench
Rratchet wrench
iThe jack has a maximum weight of 7.5 kg
depending on the vehicle's equipment.
The maximum payload of the jack can be
found on the sticker on the jack itself.
The jack is maintenance-free. In the event of a malfunction, please contact a qualified spe-
cialist workshop.
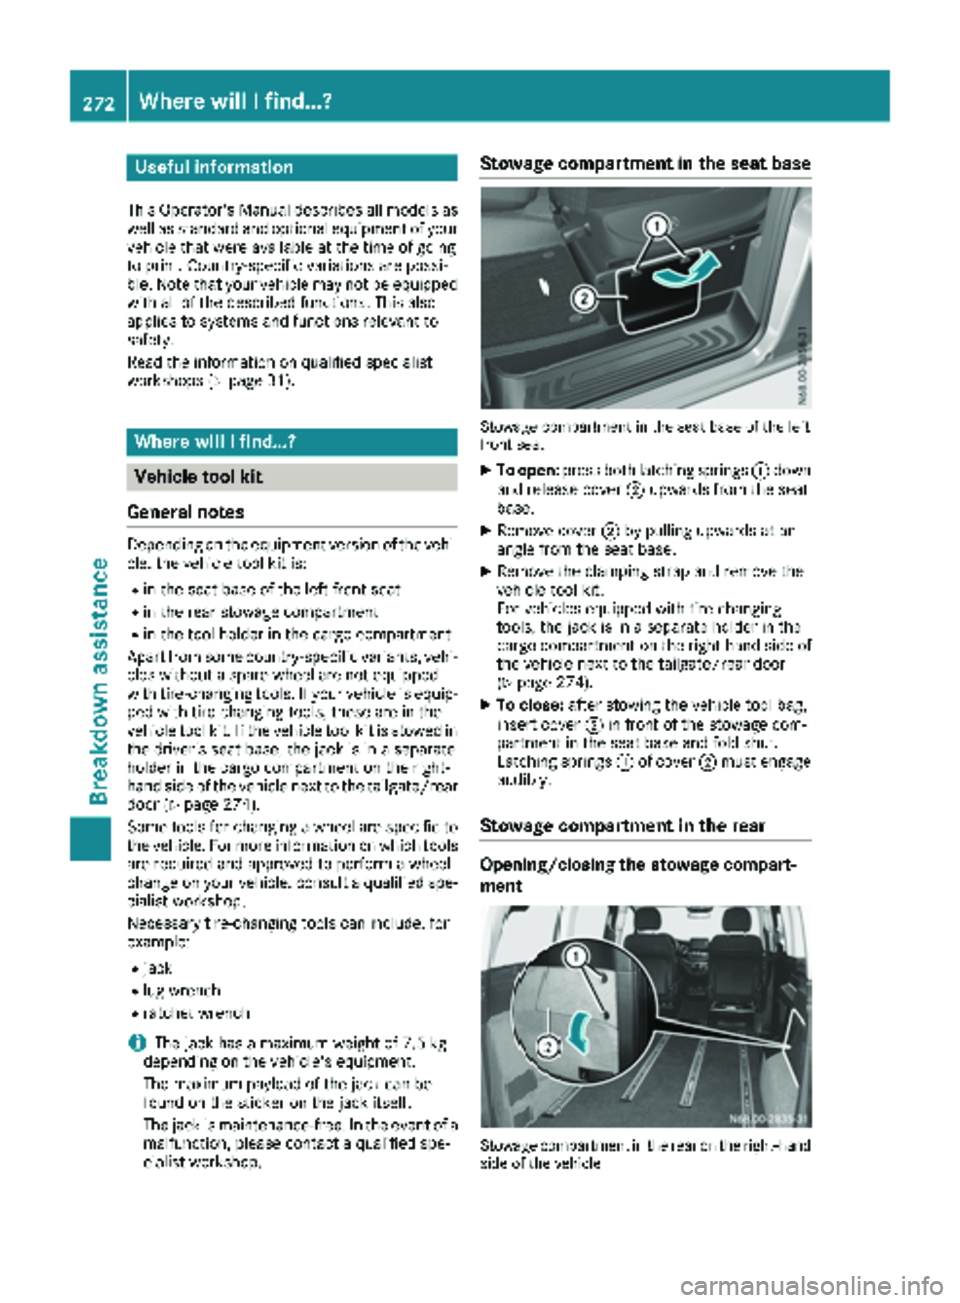
Stowage compartment in the seat base
Stowage compartment in the seat base of the left
front seat
XTo open: press both latching springs :down
and release cover ;upwards from the seat
base.
XRemove cover ;by pulling upwards at an
angle from the seat base.
XRemove the clamping strap and remove the
vehicle tool kit.
For vehicles equipped with tire-changing
tools, the jack is in a separate holder in the
cargo compartment on the right-hand side of
the vehicle next to the tailgate/rear door
(
Ypage 274).
XTo close: after stowing the vehicle tool bag,
insert cover ;in front of the stowage com-
partment in the seat base and fold shut.
Latching springs :of cover ;must engage
audibly.
Stowage compartment in the rear
Opening/closing the stowage compart-
ment
Stowage compartment in the rear on the right-hand
side of the vehicle
272Where will I find...?
Breakdown assistance
Page 283 of 318

RDo not drive with tires which have too little
tread depth, as this significantly reduces the
traction on wet roads (hydroplaning).
RReplace the tires after six years at the latest,
regardless of wear. This also applies to the
spare wheel.
Operation in winter
General notes
Have your vehicle winterproofed at a qualified
specialist workshop at the onset of winter.
Only use wheels with tire sizes approved by
Mercedes-Benz.
Prior to the onset of winter, ensure that snow
chains are stowed in the vehicle (
Ypage 282).
Snow chains cannot be mounted on all wheel/
tire combinations. Observe the restrictions on
the use of snow chains under "Wheel/tire com-
binations" (
Ypage 302).
Also observe the notes in the "Changing a
wheel" section (
Ypage 298).
Driving with summer tires
At temperatures below 45 ‡ (+7 †), summer
tires lose elasticity and therefore traction and
braking power. Change the tires on your vehicle
to M+S tire s. Usingsu mmer tires at very cold
temperatures could cause tears to form,
thereby damaging the tires permanently.
Mercedes-Benz cannot accept responsibility for
this type of damage.
M+S tires
GWARNING
Wheel and tire dimensions as well as the type of tire can vary between the spare wheel and
the wheel to be replaced. When the spare
wheel is mounted, driving characteristics may be severely affected. There is a risk of an acci-
dent.
In order to reduce risks:
Ryou should therefore adapt your driving
style and drive carefully.
Rnever mount more than one spare wheel
that differs from the wheel to be replaced.
Ronly use a spare wheel that differs from the
wheel to be replaced for a short time.
Rhave a spare wheel that differs from the
wheel that has been changed replaced at
the nearest qualified specialist workshop.
You must observe the correct wheel and
tire dimensions as well as the wheel type.
GWARNING
M+S tires with a tire tread depth of less than
ã in (4 mm) are not suitable for use in winter
and do not provide sufficient traction. There is
a risk of an accident.
M+S tires with a tread depth of less than ãin
(4 mm) must be replaced immediately.
Use winter tires or all-season tires at tempera-
tures below 45 ‡ (+7 †). Both types of tire are
identified by the M+S marking.
Only winter tires bearing the isnowflake
symbol in addition to the M+S marking provide
the best possible grip in wintry road conditions.
Only these tires will allow driving safety systems
such as ABS and ESP
®to function optimally in
winter. These tires have been developed specif-
ically for driving in snow.
For safe driving, use M+S tires of the same make
and tread pattern on all wheels.
Always observe the maximum permissible
speed specified for the M+S tires you have
mounted.
If you mount M+S tires that have a lower maxi-
mum permissible speed than the maximum
design speed of the vehicle, affix a correspond- ing warning label in the driver's field of vision.
You can obtain this at a qualified specialist work-
shop.
Once you have mounted the winter tires:
XCheck the tire pressure (Ypage 282).
XRestart the tire pressure monitor
(Ypage 289).
Operation in winter281
Wheels and tires
Z
Page 285 of 318
Follow recommended tire inflation pressures
and check the pressure of all the tires includ-
ing the spare wheel:
Rmonthly, at least
Rif the load changes
Rbefore beginning a long journey
Runder different operating conditions, e.g.
off-road driving
If necessary, correct the tire pressure.
GWARNING
If you fit unsuitable accessories onto tire
valves, the tire valves may be overloaded and
malfunction, which can cause tire pressure
loss. Due to their design, retrofitted tire pres- sure monitors keep the tire valve open. This
can also result in tire pressure loss. There is a
risk of an accident.
Only screw the standard valve cap or other
valve caps approved by Mercedes-Benz for
your vehicle onto the tire valve.
!The pressure difference between tires on
any one axle must be no greater than 10 kPa
(0.1 bar/1.5 psi).
iThe specifications shown on the sample Tire
and Loading Information placard and tire
pressure table are examples. Tire pressure
data are vehicle-specific and may deviate
from the data illustrated here. The tire pres-
sure specifications that are valid for your vehi-
cle can be found on the Tire and Loading
Information placard and the tire pressure
table on the vehicle.
HEnvironmental note
Check the tire pressure regularly, at least
every 14 days.
General notes
You will find information on tire pressure for the vehicle's factory-mounted tires on the plates
described here.
The recommended tire pressure for various
operating conditions can be found on the Tire
and Loading Information placard on the B-pillar
on the driver's side of the vehicle or on the tire
pressure table inside the fuel filler flap. Further information on tire pressure can be
obtained at a qualified specialist workshop.
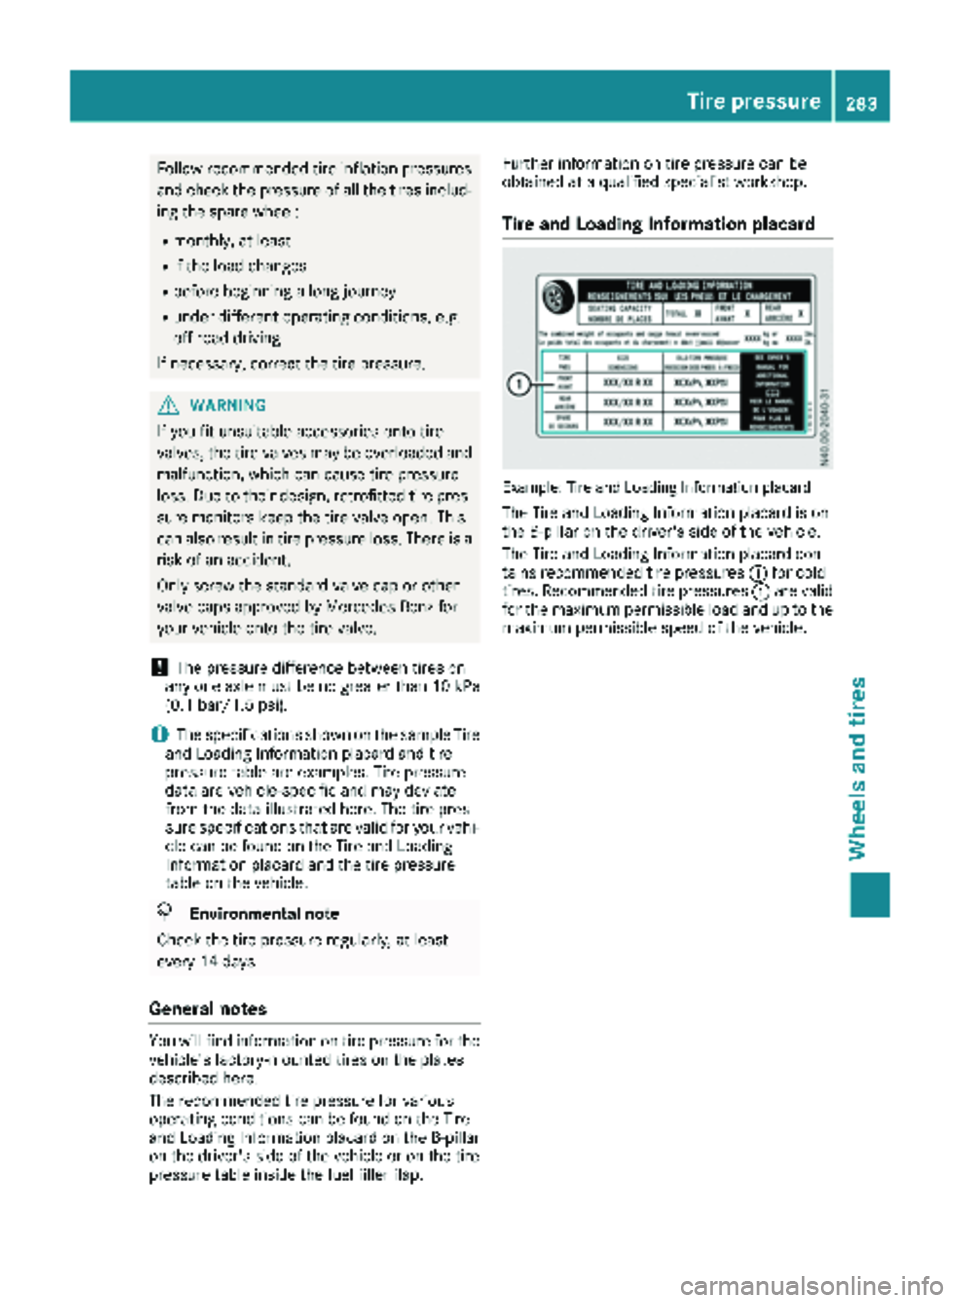
Tire and Loading Information placard
Example: Tire and Loading Information placard
The Tire and Loading Information placard is on
the B-pillar on the driver's side of the vehicle.
The Tire and Loading Information placard con-
tains recommended tire pressures
:for cold
tires. Recommended tire pressures :are valid
for the maximum permissible load and up to the
maximum permissible speed of the vehicle.
Tire pressure283
Wheels and tires
Z
Page 287 of 318
Important notes on tire pressure
GWARNING
If th etire pressur edrops repeatedly, th e
wheel, valv eor tire may be damaged. Tir e
pressur ethat is to olow may result in atire
blow-out .Ther eis aris kof an accident.
RChec kth etire for foreign objects .
RCheckwhether th ewhee lis losing air or th e
valv eis leaking .
If you are unable to rectify th edamage, con-
tac t a qualified specialist workshop.
Use asuitable pressur egauge to chec kth etire
pressure. The outer appearanc eof atire does
no tpermit any reliable conclusio nabout th etire
pressure. On vehicles equipped wit hth eelec -
tronic tire pressur emonitor, th etire pressur e
can be checke dusin gth eon-board computer.
The tire temperature and pressur eincreas e
when th evehicl eis in motion .This is dependen t
on th edriving spee dand th eload.
Therefore, you should only correc ttire pressur e
when th etires are cold.
The tires are cold:
Rif th evehicl ehas been parked for at least
three hour swithout direct sunligh ton th e
tires ,and
Rif th evehicl ehas no tbeen driven further than
1 mile (1. 6km)
Tir etemperature changes depending on th e
ambien ttemperature, driving spee dand tire
load. If th etire temperature changes by 18 ‡
(10 †), th etire pressur echa
nges by approx
-
imately 10 kP a(0.1 ba r/1.5psi) . Take this into
account when checking the pressure of warm
tires. Only correct the tire pressure if it is too low
for the current operating conditions. If you
check the tire pressure when the tires are warm,
it results in a higher value than when the tires
are cold. This is normal. Do not under any cir-
cumstances release the air in order to adjust the pressure to the prescribed value for cold tires.
The tire pressure would otherwise be too low.
Observe the recommended tire pressure for
cold tires on the tire pressure table in the fuel
filler flap. Driving with tire pressure that is too high or too
low can:
Rshorten the service life of the tires
Rcause increased tire damage
Rhave a negative effect on handling character-
istics and thus the driving safety (e.g. hydro-
planing)
Underinflated or overinflated tires
Underinflated tires:
GWARNING
Tires with pressure that is too low can over-
heat and burst as a consequence. In addition, they also suffer from excessive and/or irreg-
ular wear, which can severely impair the brak-
ing properties and the driving characteristics.
There is a risk of an accident.
Avoid tire pressures that are too low in all the
tires, including the spare wheel.
Underinflated tires can:
Rfail from being overheated
Radversely affect handling
Rwear excessively and/or unevenly
Rhave an adverse effect on fuel consumption
Overinflated tires
GWARNING
Tires with excessively high pressure can burst
because they are damaged more easily by
road debris, potholes etc. In addition, they
also suffer from irregular wear, which can
severely impair the braking properties and the driving characteristics. There is a risk of an
accident.
Avoid tire pressures that are too high in all the
tires, including the spare wheel.
Overinflated tires can:
Rincrease the braking distance
Radversely affect handling
Rwear excessively and/or unevenly
Radversely affect ride comfort
Rbe more susceptible to damage
Tire pressure285
Wheels and tires
Z
Page 291 of 318

Vehicles with steering wheel buttons:if the
wheel positions on the vehicle are rotated, the
tire pressures may be displayed for the wrong
positions for a short time. This is rectified after a
few minutes of driving; the tire pressures are
then displayed for the correct positions.
Restarting the tire pressure monitor
General notes
When you restart the tire pressure monitor, all
existing warning messages are deleted and the
warning lamp goes out. The monitor uses the
currently set tire pressures as the reference val-
ues for monitoring. In most cases, the tire pres-
sure monitor will automatically detect the new
reference values after you have changed the tire
pressure. However, you can also set reference
values manually as described here. The tire
pressure monitor then monitors the new tire
pressure values.
Vehicles without steering wheel buttons
The vehicle must be stationary. Use the buttons
in the instrument cluster.
XTurn the key to position 2in the ignition
lock.
XUsing Èselect the Tire Pressuremenu.
XPress3to confirm.
The display shows the Monitoring Active
message.
XPress3to confirm.
The display shows the Tire Pressure OK?
message.
If you wish to confirm the restart:
XPress the fbutton.
The display shows the distance menu.
After you have driven for a few minutes, the
system checks whether the current tire pres-
sures are within the specified range. The new tire pressure levels are then accepted as ref-
erence values and monitored.
If you wish to cancel the restart:
XPress the gbutton.
The display shows the tire pressure menu.
The tire pressure values stored at the last
restart will continue to be monitored.
Vehicles with steering wheel buttons
Using the steering wheel buttons
XMake sure that the tire pressure of all four
wheels is set correctly for the current oper-
ating conditions. When doing so, observe the
notes under "Tire pressure" (
Ypage 282).
XTurn the key to position 2in the ignition
lock.
XPress the =or; button to select the
Servicemenu.
XSelect the Tire Pressuresubmenu with
9 or:.
XPress ato confirm.
The display shows either the current tire pres-
sure for the individual tires, or the Tire
pressure will be displayed afterdriving a few minutesmessage.
XPress the:button.
The display shows the Use Current Pres‐
sures as New Reference Values:mes-
sage.
If you wish to confirm the restart:
XPress the abutton.
The display shows the Tire Press. Moni‐
tor Restartedmessage.
After you have driven for a few minutes, the
system checks whether the current tire pres-
sures are within the specified range. The new
tire pressure levels are then accepted as ref-
erence values and monitored.
If you wish to cancel the restart:
XPress the %button.
The tire pressure values stored at the last
restart will continue to be monitored.
Tire pressure289
Wheels and tires
Z
Page 300 of 318
TIN (Tire Identification Number)
A unique identification number which can be
used by a tire manufacturer to identify tires, for
example for a product recall, and thus identify
the purchasers. The TIN is composed of the
manufacturer identification code, tire size, tire
model code and manufacturing date.
Load bearing index
The load bearing index (also load index) is a code
that contains the maximum load bearing capa-
city of a tire.
Traction
Traction is the result of friction between the tires
and the road surface.
TWR (permissible trailer drawbar load)
The TWR is the maximum permissible weight
that may act on the ball coupling of the trailer
tow hitch.
Wear indicator
Narrow bars (tread wear bars) that are distrib-
uted over the tire tread. If the tire tread is level
with the bars, the wear limit of áin (1.6 mm)
has been reached.
Distribution of the vehicle occupants
The distribution of vehicle occupants over des-
ignated seat positions in a vehicle.
Maximum permissible payload weight
Nominal load and goods/luggage load plus
68 kg (150 lb s)multiplied by the number of
seats in the vehicle.
Changing wheels
Rotating the wheels
GWARNING
Interchanging the front and rear wheels may
severely impair the driving characteristics if
the wheels or tires have different dimensions. The wheel brakes or suspension components
may also be damaged. There is a risk of acci-
dent.
Rotate front and rear wheels only if the wheels and tires are of the same dimensions.
!On vehicles equipped with a tire pressure
monitor, electronic components are located
in the wheel.
Tire-mounting tools should not be used near
the valve. This could damage the electronic
components.
Only have tires changed at a qualified spe-
cialist workshop.
Always observe the instructions and safety
notes under "Mounting a wheel" (
Ypage 299).
The wear patterns on the front and rear tires
differ, depending on the operating conditions.
Rotate the wheels before a clear wear pattern
has formed on the tires. Front tires typically
wear more on the shoulders and the rear tires in the center.
If your vehicle's tire configuration allows, you
can rotate the tires according to the intervals in
the tire manufacturer's warranty book in your
vehicle documents. If no warranty book is avail-
able, the tires should be rotated every 3,000 to
6,000 miles (5,000 to 10,000 km) or earlier if
tire wear requires. Do not change the direction
of rotation.
Clean the contact surfaces of the wheel and the
brake disc thoroughly every time a wheel is rota-
ted. Avoid oily or greasy cleaning agents.
Check the tire pressure and reactivate the tire
pressure monitor if necessary.
Direction of rotation
Tires with a specified direction of rotation have
additional benefits, e.g. if there is a risk of hydro-
planing. You will only gain these benefits if the
correct direction of rotation is observed.
An arrow on the sidewall of the tire indicates its
correct direction of rotation.
You may mount a spare wheel against the direc-tion of rotation. Observe the time restriction on
use as well as the speed limitation specified on
the spare wheel.
Storing wheels
Store wheels that are not being used in a cool,
dry and preferably dark place. Protect the tires
from contact with oil, grease and fuel.
298Changing wheels
Wheels and tires