2019 MERCEDES-BENZ METRIS seats
[x] Cancel search: seatsPage 248 of 318

XAlways transport loads in the cargo compart-
ment and with the seat backrests folded up
and properly locked in position.
XAlways place the load against the backrests ofthe front or rear seats.
XMove large and heavy loads as far towards thefront of the vehicle as possible against the
front or rear seats. Stow the load flush with
the rear or front seats.
XAlways additionally secure the load with suit-
able load-securing aids or tie downs.
Observe the following notes:
RDo not stack loads higher than the upper edge
of the backrests.
RTransport loads behind seats that are not
occupied.
RIf the rear bench seat is not occupied, insert
the seat belts crosswise into the buckle of the
opposite seat belt.
Cargo compartment variations
You can vary the cargo compartment according
to your transportation requirements as follows:
Rby folding the seat backrests forward to the
table position.
Rby removing the rear bench seat.
You will find information about rear bench seats in the "Rear bench seats" section (
Ypage 87).
Securing loads
Important safety notes
GWARNING
If you attach the tie-down incorrectly when
securing the load, the following may occur in
the event of abrupt changes in direction, brak- ing maneuvers or an accident:
Rthe cargo tie-down rings may become
detached or the tie-down may tear if the
permissible load is exceeded
Rthe load may not be restrained.
This may cause the load to slip, tip over or be
tossed about, striking vehicle occupants.
There is a risk of an accident and injury.
Always tension the tie-downs in the proper
manner and only between the described
cargo tie-down rings. Always use tie-downs
designed specifically for the loads.
!Observe the information on the maximum
loading capacity of the individual cargo tie-
down points.
If you use several cargo tie-down points to
secure a load, you must always take the max-
imum loading capacity of the weakest cargo
tie-down point into account.
If you brake hard, for example, the forces act- ing could be up to several times the weight
force of the load. Always use multiple cargo
tie-down points in order to distribute the force
absorption. Load the anchorages evenly.
Spread the load evenly across the cargo tie-
down points/cargo tie-down rings. You will find information on the maximum loading capacity of
the cargo tie-down points under "Cargo tie-
down points and carrier systems" (
Ypage 314).
Do not attempt to modify or repair the cargo tie-
down points/cargo tie-down rings or tie downs.
Read the information on qualified specialist
workshops: (
Ypage 31).
As the driver, you are responsible for ensuring
that:
RThe load is secured against slipping, tipping,
rolling or falling off in normal traffic condi-
tions, should the vehicle swerve to avoid an
obstacle, in the event of full brake application
and on poor road surfaces.
RThe applicable requirements and guidelines
relating to load-securing practices must be
met.
If this is not the case, this may constitute a
punishable offense, depending on local legis-
lation and any ensuing consequences.
Always observe the legal requirements for the country you are currently in.
Make sure that the load is secure before every
journey and at regular intervals during a long
journey. Correct an incorrectly or inadequately
secured load if necessary.
Always observe the operating instructions or the
notes of the lashing strap manufacturer for the
operation of the lashing strap.
You can obtain information about securing the
load correctly from the manufacturer of the load
securing aids or tie down for securing the load.
246Securing loads
Transporting loads
Page 252 of 318

GWARNING
If vehicle occupants are seated behind a load
protection net, they may be squeezed up
against the load protection net. There is a risk
of injury, particularly in the event of braking
maneuvers or abrupt changes in direction.
Never allow vehicle occupants to sit behind
the load protection net.
The load protection net borders the cargo com- partment. It protects vehicle occupants from
light objects and/or luggage slipping or tipping
over. Always observe the notes on securing
loads (
Ypage 246).
You can install the load protection net at an
angle behind the front seats or behind the first
row of back seats.
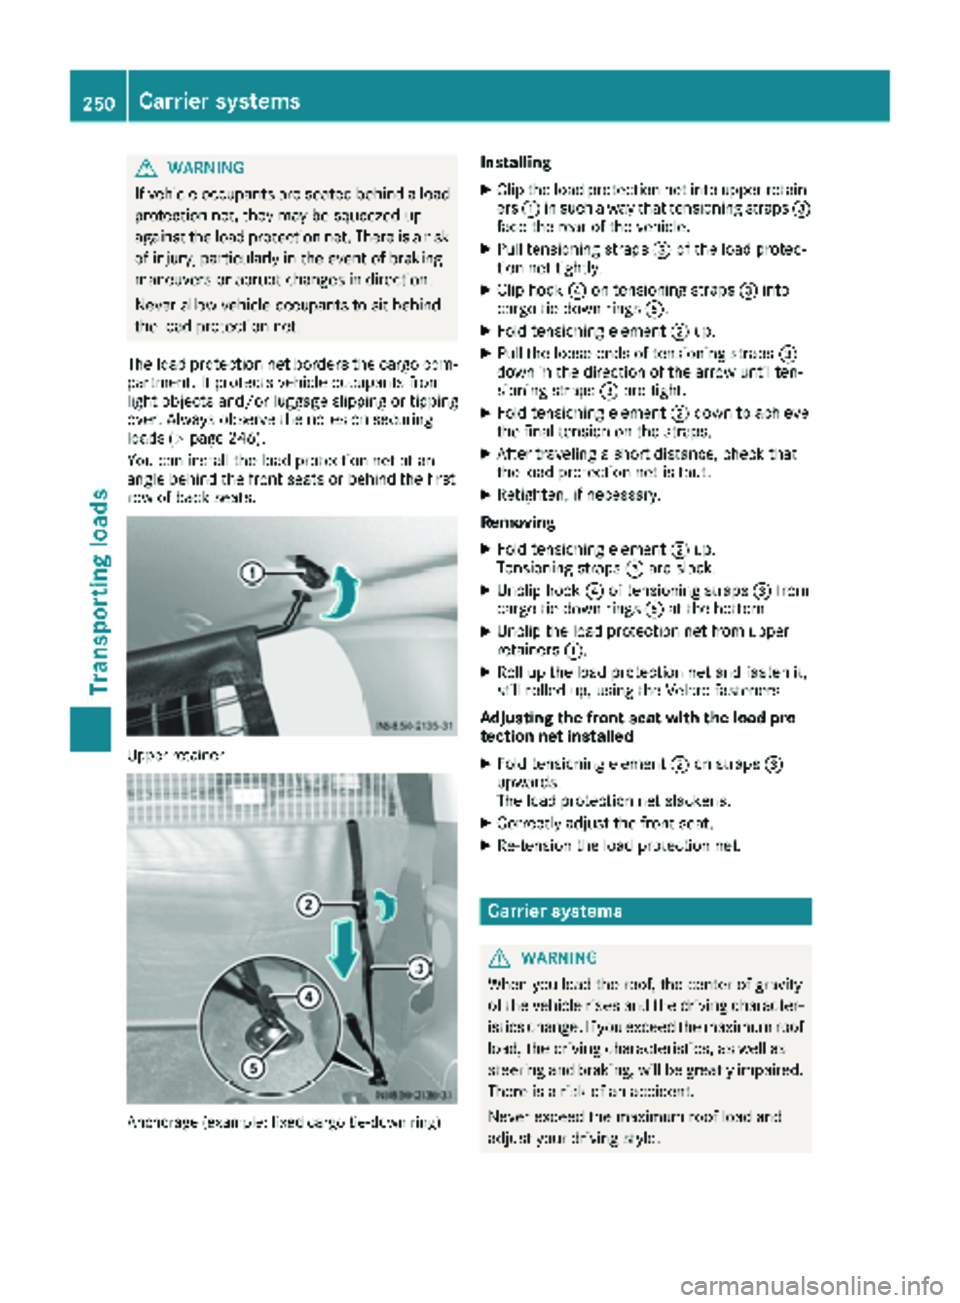
Upper retainer
Anchorage (example: fixed cargo tie-down ring)
Installing
XClip the load protection net into upper retain-
ers :in such a way that tensioning straps =
face the rear of the vehicle.
XPull tensioning straps =of the load protec-
tion net tightly.
XClip hook ?on tensioning straps =into
cargo tie-down rings A.
XFold tensioning element ;up.
XPull the loose ends of tensioning straps =
down in the direction of the arrow until ten-
sioning straps =are tight.
XFold tensioning element ;down to achieve
the final tension on the straps.
XAfter traveling a short distance, check that
the load protection net is taut.
XRetighten, if necessary.
Removing
XFold tensioning element ;up.
Tensioning straps =are slack.
XUnclip hook ?of tensioning straps =from
cargo tie-down rings Aat the bottom.
XUnclip the load protection net from upper
retainers :.
XRoll up the load protection net and fasten it,
still rolled up, using the Velcro fasteners.
Adjusting the front seat with the load pro-
tection net installed
XFold tensioning element ;on straps =
upwards.
The load protection net slackens.
XCorrectly adjust the front seat.
XRe-tension the load protection net.
Carrier systems
GWARNING
When you load the roof, the center of gravity
of the vehicle rises and the driving character-
istics change. If you exceed the maximum roof
load, the driving characteristics, as well as
steering and braking, will be greatly impaired.
There is a risk of an accident.
Never exceed the maximum roof load and
adjust your driving style.
250Carrier systems
Transporting loads
Page 273 of 318

Benz. You can obtain these from a qualified
specialist workshop.
iPlease keep in mind that:
Rleather covers are a natural product and, as
such, are subject to a natural aging proc-
ess. Leather may react differently, e.g.
increased wrinkling, to certain environmen-
tal influences (such as high humidity or
intense heat).
Rregular care is essential to make sure that
the appearance and comfort of the covers
are retained over time.
To clean genuine leather covers:
XRemove any dust, crumbs etc. If necessary,
carefully vacuum-clean the seat covers.
XCarefully wipe the leather seat covers with a
damp cloth.
XWipe over again with a dry cloth.
Make sure that the leather does not become
soaked, especially perforated parts.
XThen treat the leather seats with a leather
care foam.
Only use leather care agents that have been
tested and approved by Mercedes-Benz.
Observe the manufacturer's instructions.
Cleaning the seat belts
GWARNING
Seat belts can become severely weakened if
bleached or dyed. This could cause the seat
belts to tear or fail, for instance, in the event of an accident. This poses an increased risk of
injury or fatal injury.
Never bleach or dye the seat belts.
!Do not clean the seat belts using chemical
cleaning agents. Do not dry the seat belts by
heating at temperatures above 176 ‡(80 †)
or in direct sunlight.
Remove any stains or dirt immediately. This will
avoid residue or damage.
XUse clean, lukewarm water and soap solution.
Cleaning the headliner and carpets
XHeadliner: if it is very dirty, use a soft brush or
dry shampoo.
XCarpets: use the carpet and textile cleaning
agents recommended and approved by
Mercedes-Benz.
Care271
Maintenance and care
Z
Page 286 of 318

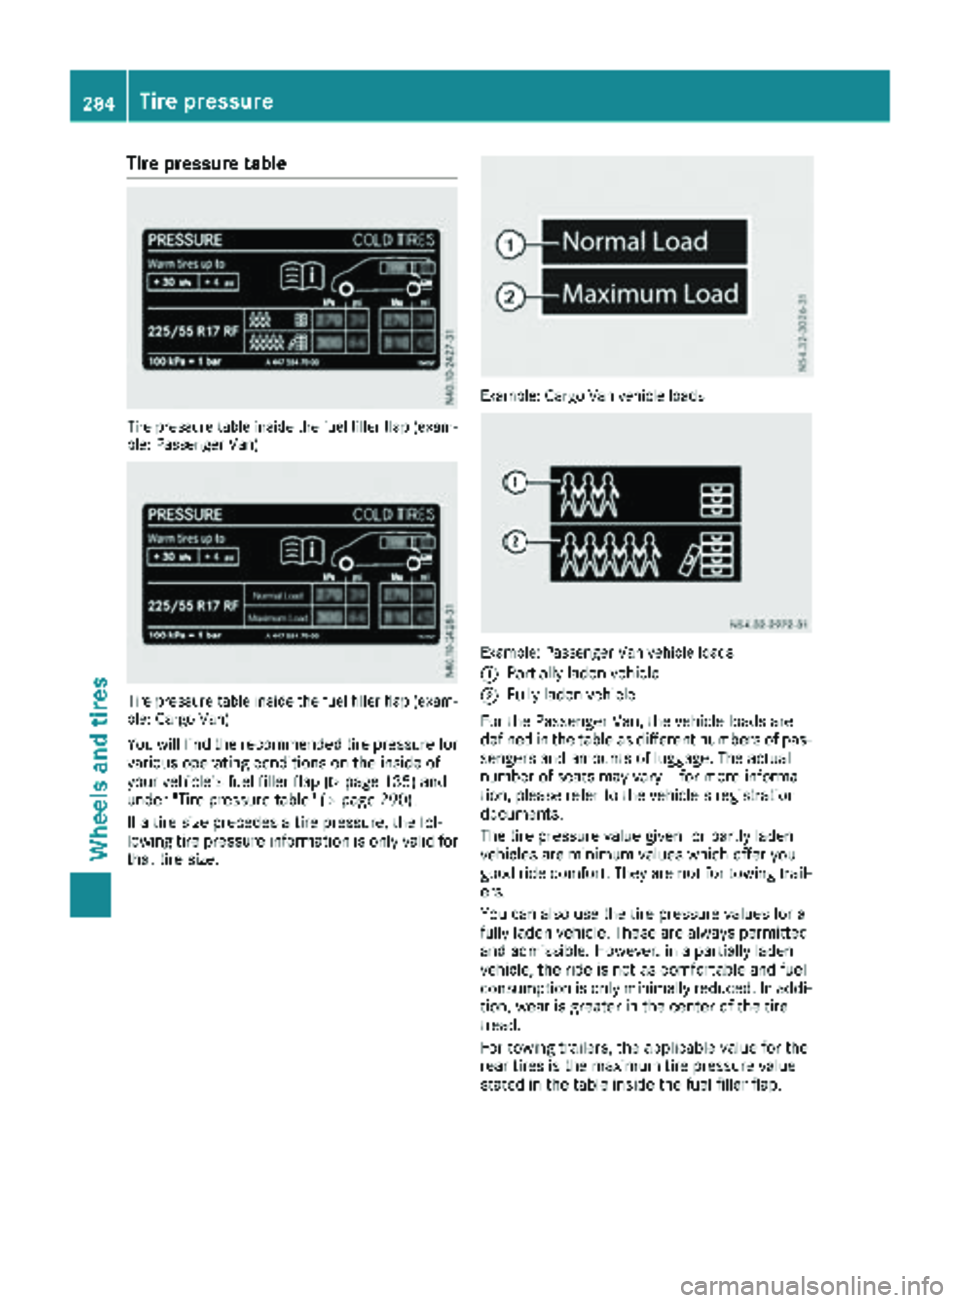
Tire pressure table
Tire pressure table inside the fuel filler flap (exam-
ple: Passenger Van)
Tire pressure table inside the fuel filler flap (exam-
ple: Cargo Van)
You will find the recommended tire pressure for
various operating conditions on the inside of
your vehicle's fuel filler flap (
Ypage 135) and
under "Tire pressure table" (Ypage 290).
If a tire size precedes a tire pressure, the fol-
lowing tire pressure information is only valid for
that tire size.
Example: Cargo Van vehicle loads
Example: Passenger Van vehicle loads
:
Partially laden vehicle
;Fully laden vehicle
For the Passenger Van, the vehicle loads are
defined in the table as different numbers of pas-
sengers and amounts of luggage. The actual
number of seats may vary – for more informa-
tion, please refer to the vehicle's registration
documents.
The tire pressure value given for partly laden
vehicles are minimum values which offer you
good ride comfort. They are not for towing trail-
ers.
You can also use the tire pressure values for a
fully laden vehicle. These are always permitted
and admissible. However, in a partially laden
vehicle, the ride is not as comfortable and fuel
consumption is only minimally reduced. In addi- tion, wear is greater in the center of the tire
tread.
For towing trailers, the applicable value for the
rear tires is the maximum tire pressure value
stated in the table inside the fuel filler flap.
284Tire pressure
Wheels and tires
Page 293 of 318

Tire and Loading Information placard
Maximum permissible gross weight
:Maximum number of seats
;Maximum permissible gross weight
XSpecification for maximum permissible gross
weight ;is listed in the Tire and Loading
Information placard: "The gross weight of
occupants and luggage must not exceed XXX
kilograms or XXX lbs."
The gross weight of all vehicle occupants, cargo,
luggage and trailer load/noseweight (if applica-
ble) must not exceed the specified value.
iThe details on the Tire and Loading Infor-
mation placard illustration are only an exam-
ple. The maximum permissible gross weight is
vehicle-specific and may deviate from the
data shown here. The maximum permissible
gross weight that applies to your vehicle can
be found on your vehicle's Tire and Loading
Information placard.
Number of seats
:Maximum number of seats
;Maximum permissible gross weight Maximum number of seats
:determines the
maximum number of occupants allowed to
travel in the vehicle. This information can be
found on the Tire and Loading Information plac- ard.
iThe details on the Tire and Loading Infor-
mation placard illustration are only an exam-
ple. The number of seats is vehicle-specific
and can differ from the details shown. The
number of seats in your vehicle can be found
on the Tire and Loading Information placard.
Determining the maximum load
Individual steps
The following steps have been developed as
required of all manufacturers under Title 49,
Code of U.S. Federal Regulations, Part 575 in
accordance with the "National Traffic and Motor
Vehicle Safety Act of 1966".
XStep 1: Locate the statement "The combined
weight of occupants and cargo should never
exceed XXX kg or XXX lbs." on your vehicle's
Tire and Loading Information placard.
XStep 2: Determine the combined weight of
the driver and passengers that will be travel-
ing in your vehicle.
XStep 3: Subtract the combined weight of the
driver and passengers from XXX kilograms or
XXX lbs.
XStep 4: The resulting figure equals the avail-
able amount of cargo and luggage load capa-
city. For example, if the "XXX" amount equals
1400 lbs and there will be five 150-pound
passengers in your vehicle, the amount of
available cargo and luggage load capacity is
650 lbs (1400 Ò750 (5 x 150) = 650 lbs).
XStep 5: Determine the combined weight of
luggage and cargo being loaded on the vehi-
cle. For reasons of safety, that weight must
not exceed the available cargo and luggage
cargo capacity calculated in step 4.
XStep 6 (if applicable): If your vehicle is tow-
ing a trailer, load from the trailer will be trans-
ferred to your vehicle. Please consult the Tire
and Loading Information placard, to deter-
mine how this reduces the available cargo and
luggage load capacity of your vehicle.
Loading the vehicle291
Wheels and tires
Z
Page 300 of 318

TIN (Tire Identification Number)
A unique identification number which can be
used by a tire manufacturer to identify tires, for
example for a product recall, and thus identify
the purchasers. The TIN is composed of the
manufacturer identification code, tire size, tire
model code and manufacturing date.
Load bearing index
The load bearing index (also load index) is a code
that contains the maximum load bearing capa-
city of a tire.
Traction
Traction is the result of friction between the tires
and the road surface.
TWR (permissible trailer drawbar load)
The TWR is the maximum permissible weight
that may act on the ball coupling of the trailer
tow hitch.
Wear indicator
Narrow bars (tread wear bars) that are distrib-
uted over the tire tread. If the tire tread is level
with the bars, the wear limit of áin (1.6 mm)
has been reached.
Distribution of the vehicle occupants
The distribution of vehicle occupants over des-
ignated seat positions in a vehicle.
Maximum permissible payload weight
Nominal load and goods/luggage load plus
68 kg (150 lb s)multiplied by the number of
seats in the vehicle.
Changing wheels
Rotating the wheels
GWARNING
Interchanging the front and rear wheels may
severely impair the driving characteristics if
the wheels or tires have different dimensions. The wheel brakes or suspension components
may also be damaged. There is a risk of acci-
dent.
Rotate front and rear wheels only if the wheels and tires are of the same dimensions.
!On vehicles equipped with a tire pressure
monitor, electronic components are located
in the wheel.
Tire-mounting tools should not be used near
the valve. This could damage the electronic
components.
Only have tires changed at a qualified spe-
cialist workshop.
Always observe the instructions and safety
notes under "Mounting a wheel" (
Ypage 299).
The wear patterns on the front and rear tires
differ, depending on the operating conditions.
Rotate the wheels before a clear wear pattern
has formed on the tires. Front tires typically
wear more on the shoulders and the rear tires in the center.
If your vehicle's tire configuration allows, you
can rotate the tires according to the intervals in
the tire manufacturer's warranty book in your
vehicle documents. If no warranty book is avail-
able, the tires should be rotated every 3,000 to
6,000 miles (5,000 to 10,000 km) or earlier if
tire wear requires. Do not change the direction
of rotation.
Clean the contact surfaces of the wheel and the
brake disc thoroughly every time a wheel is rota-
ted. Avoid oily or greasy cleaning agents.
Check the tire pressure and reactivate the tire
pressure monitor if necessary.
Direction of rotation
Tires with a specified direction of rotation have
additional benefits, e.g. if there is a risk of hydro-
planing. You will only gain these benefits if the
correct direction of rotation is observed.
An arrow on the sidewall of the tire indicates its
correct direction of rotation.
You may mount a spare wheel against the direc-tion of rotation. Observe the time restriction on
use as well as the speed limitation specified on
the spare wheel.
Storing wheels
Store wheels that are not being used in a cool,
dry and preferably dark place. Protect the tires
from contact with oil, grease and fuel.
298Changing wheels
Wheels and tires