2019 MERCEDES-BENZ METRIS belt
[x] Cancel search: beltPage 63 of 318

LATCH-type (ISOFIX) child seat secur-
ing system
GWARNING
For LATCH-type (ISOFIX) child restraint sys-
tems in which the child is secured using the
safety belt integrated in the child restraint
system, the maximum permissible weight of
the child and child restraint system together
is 73 lbs (33 kg).
If the child and the child restraint system
together weigh more than 73 lbs (33 kg), the
LATCH-type (ISOFIX) child restraint system
with integrated safety belt no longer offers
sufficient protection. The LATCH-type (ISO-
FIX) child seat securing system may be over-
loaded, and the child may not be restrained in
an accident, for example. This poses an
increased risk of injury or even fatal injury.
If the child and the child restraint system
together weigh more than 73 lbs (33 kg),use
only a LATCH-type (ISOFIX) ch ildrestraint sys-
tem in whic h the ch ild isalso secured with the
veh icle seat belt. Also secure the ch ild
restraint system with the Top Tether belt,if
available.
Regularly check that the permis siblegross
weight of the ch ildtogether with the ch ild
restraint system isstill maintained.
Alwa ys co mply wit h the manufacturer's instal-
lation and operating instructions for the ch ild
restraint system used.
Before installing a ch ildseat, move the rear seat
backrest to an upright position. Do not adjust
the backrest of a seatw
it h a LATCH-type (ISO-
FIX) ch ildrestraint system installed.
Before every tr ip,make sure that the LATCH-
type (ISOFIX) ch ildrestraint system isengaged
correct ly inboth LATCH-type (ISOFIX) securing
rings
!When fitting the ch ildrestraint system in
veh icleswit h a rear bench seat, make sure
that the seat beltfor the center seat does not
get tr apped. Otherwise, the seat beltcould be
damaged.
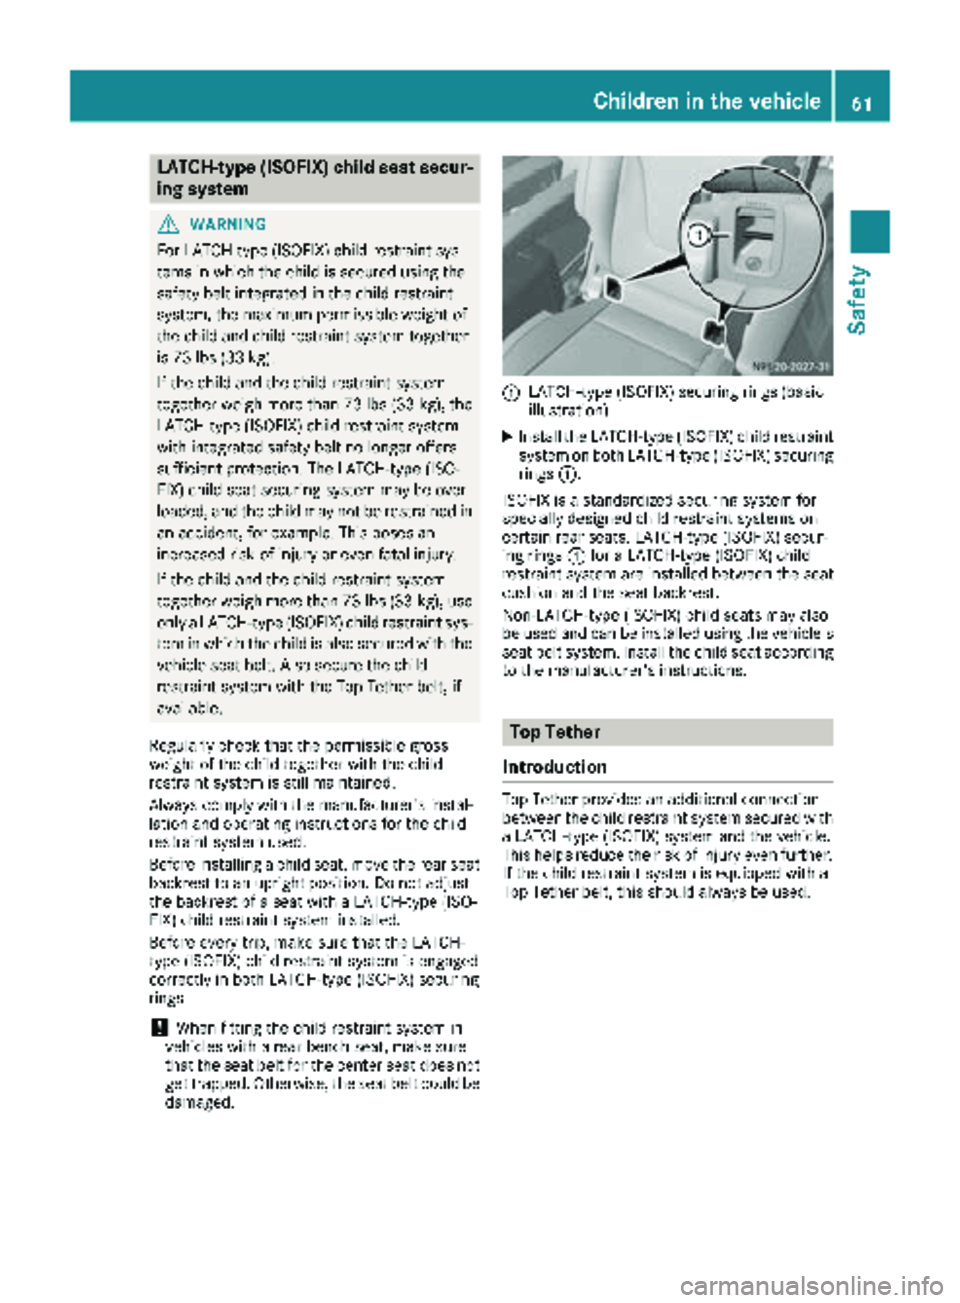
:LATCH-type (ISOFIX) securing rings (basic
illustration)
XIn stall the LATCH-type (ISOFIX) child restraint
system on both LATCH-type (ISOFIX) securing
rings :.
ISOFIX isa standardized securing system for
specially designed child restraint systems on
certain rear seats. LATCH-type (ISOFIX) secur-
ing rings :for a LATCH-type (ISOFIX) child
restraint system are installed between the seat
cushion and the seat backrest.
Non-LATCH-type (ISOFIX) child seats may also
be used and can beinstalled using the vehicle's
seat belt system. Install the child seat according to the manufacturer's instructions.
Top Tether
Introduction
Top Tether pro vides an additional connection
between the child restraint system secured with
a LATCH-type (ISOFIX) system and the vehicle.
This helps reduce the risk of injury even further.
If the child restraint system isequipped with a
Top Tether belt, this should always be used.
Children in the vehicle61
Safety
Z
Page 64 of 318

Top Tether anchorages
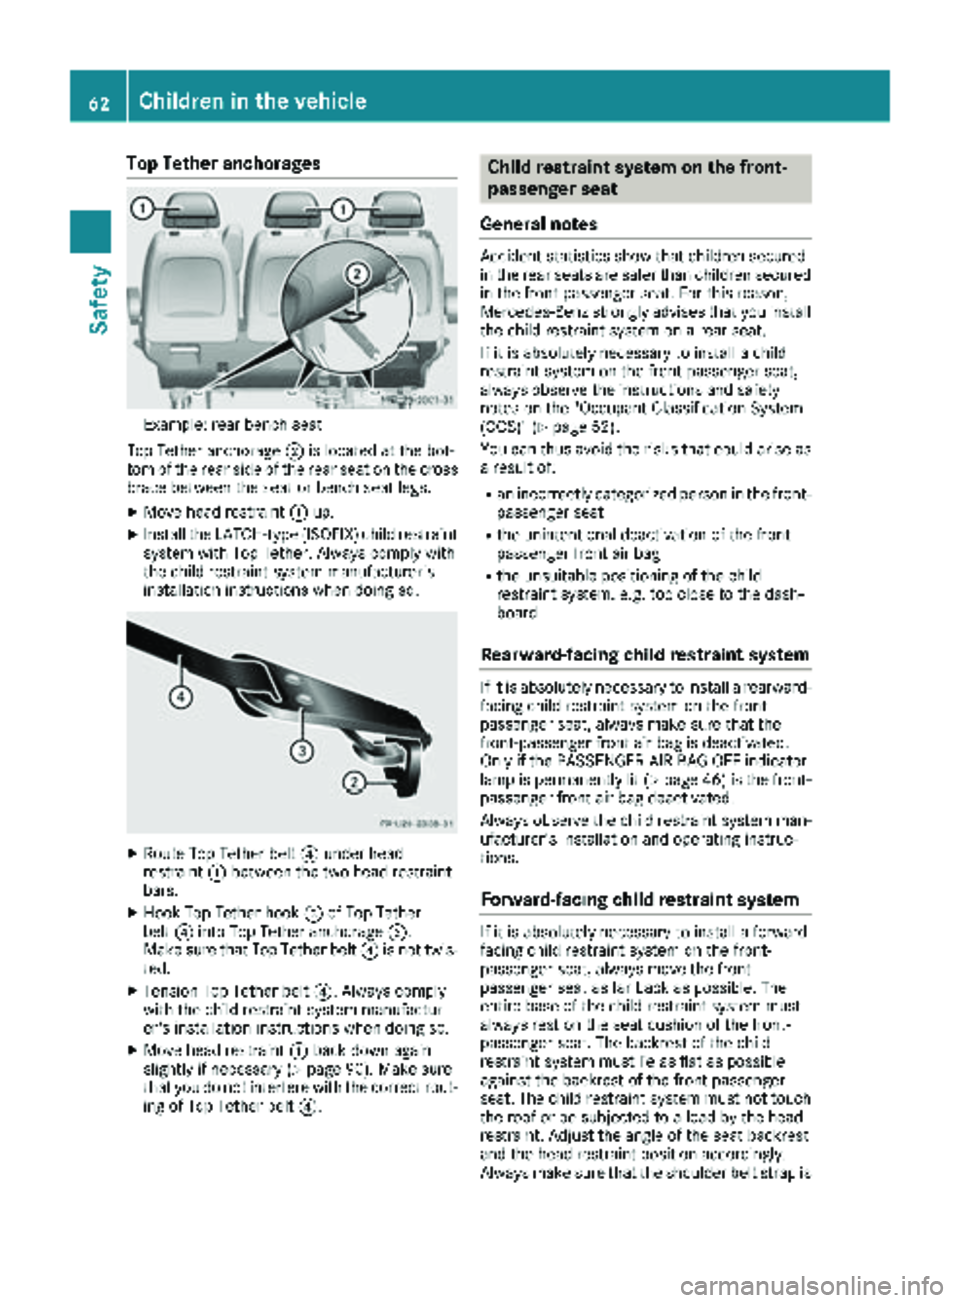
Example: rear bench seat
Top Tether anchorage ;is located at the bot-
tom of the rear side of the rear seat on the cross
brace between the seat or bench seat legs.
XMove head restraint :up.
XInstall the LATCH-type (ISOFIX) child restraint
system with Top Tether. Always comply with
the child restraint system manufacturer's
installation instructions when doing so.
XRoute Top Tether belt ?under head
restraint :between the two head restraint
bars.
XHook Top Tether hook =of Top Tether
belt ?into Top Tether anchorage ;.
Make sure that Top Tether belt ?is not twis-
ted.
XTension Top Tether belt ?. Always comply
with the child restraint system manufactur-
er's installation instructions when doing so.
XMove head restraint :back down again
slightly if necessary (Ypage 90). Make sure
that you do not interfere with the correct rout-
ing of Top Tether belt ?.
Child restraint system on the front-
passenger seat
General notes
Accident statistics show that children secured
in the rear seats are safer than children secured
in the front-passenger seat. For this reason,
Mercedes-Benz strongly advises that you install
the child restraint system on a rear seat.
If it is absolutely necessary to install a child
restraint system on the front-passenger seat,
always observe the instructions and safety
notes on the "Occupant Classification System
(OCS)" (
Ypage 52).
You can thus avoid the risks that could arise as a result of:
Ran incorrectly categorized person in the front-
passenger seat
Rthe unintentional deactivation of the front-
passenger front air bag
Rthe unsuitable positioning of the child
restraint system, e.g. too close to the dash-
board
Rearward-facing child restraint system
If it is absolutely necessary to install a rearward-
facing child restraint system on the front-
passenger seat, always make sure that the
front-passenger front air bag is deactivated.
Only if the PASSENGER AIR BAG OFF indicator
lamp is permanently lit (
Ypage 46 )is the front-
passenger front air bag deactivated.
Always observe the child restraint system man-
ufacturer's installation and operating instruc-
tions.
Forward-facing child restraint system
If it is absolutely necessary to install a forward-
facing child restraint system on the front-
passenger seat, always move the front-
passenger seat as far back as possible. The
entire base of the child restraint system must
always rest on the seat cushion of the front-
passenger seat. The backrest of the child
restraint system must lie as flat as possible
against the backrest of the front-passenger
seat. The child restraint system must not touch
the roof or be subjected to a load by the head
restraint. Adjust the angle of the seat backrest
and the head restraint position accordingly.
Always make sure that the shoulder belt strap is
62Children in the vehicle
Safety
Page 65 of 318

correctly routed from the vehicle belt outlet to
the shoulder belt guide on the child restraint
system. The shoulder belt strap must be routed
forward and down from the vehicle belt outlet. If
necessary, adjust the vehicle belt outlet and the
front-passenger seat accordingly.
Always observe the child restraint system man-
ufacturer's installation and operating instruc-
tions.
Override features/Child-proof locks
Important safety notes
GWARNING
If children are traveling in the vehicle, they
could:
Ropen doors, thus endangering other people
or road users
Rexit the vehicle and be caught by oncoming
traffic
Roperate vehicle equipment and become
trapped
There is a risk of an accident and injury.
Always activate the child-proof locks and
override feature if children are traveling in the vehicle. When leaving the vehicle, always take
the key with you and lock the vehicle. Never
leave children unattended in the vehicle.
Child-proof lock/override feature for:
RSliding doors (Ypage 63)
GWARNING
If you leave children unsupervised in the vehi-
cle, they could set it in motion by, for example:
Rrelease the parking brake.
Rshift the automatic transmission out of the
parking position P.
Rstart the engine.
In addition, they may operate vehicle equip-
ment and become trapped. There is a risk of
an accident and injury.
When leaving the vehicle, always take the
SmartKey with you and lock the vehicle. Never
leave children unsupervised in the vehicle.
GWARNING
If persons, particularly children are subjected to prolonged exposure to extreme heat or
cold, there is a risk of injury, possibly even
fatal. Never leave children unattended in the
vehicle.
GWARNING
If the child restraint system is subjected to
direct sunlight, parts may get very hot. Chil-
dren may burn themselves on these parts,
particularly on the metal parts of the child
restraint system. There is a risk of injury.
If you leave the vehicle, taking the child with
you, always ensure that the child restraint
system is not exposed to direct sunlight. Pro- tect it with a blanket, for example. If the child
restraint system has been exposed to direct
sunlight, let it cool down before securing the
child in it. Never leave children unattended in
the vehicle.
Child-proof lock for sliding door
Sliding door (example: left side of the vehicle)
:
Child safety bolt
2Sliding door released
3Sliding door secured – then make sure that
the child-proof locks are working properly.
You can secure each sliding door individually
with the child-proof locks on the sliding doors.
A secured sliding door cannot be opened from
inside the vehicle. When the vehicle is unlocked, the sliding door can be opened from the outside.
If the electric sliding door is secured, only the
sliding door rear controls are deactivated. If the
electric sliding door is unlocked, you can open
Children in the vehicle63
Safety
Z
Page 87 of 318

Useful information
This Operator's Manual describes all models as
well as standard and optional equipment of your
vehicle that were available at the time of going
to print. Country-specific variations are possi-
ble. Note that your vehicle may not be equipped
with all of the described functions. This also
applies to systems and functions relevant to
safety.
Read the information on qualified specialist
workshops (
Ypage 31).
Seats
Driver's and front-passenger seat
Important safety notes
GWARNING
Children could become trapped if they adjust
the seats, particularly when unattended.
There is a risk of injury.
When leaving the vehicle, always take the
SmartKey with you and lock the vehicle. Never
leave children unsupervised in the vehicle.
GWARNING
You could lose control of your vehicle if you do the following while driving:
Radjust the driver's seat, head restraint,
steering wheel or mirrors
Rfasten the seat belt
There is a risk of an accident.
Adjust the driver's seat, head restraint, steer-
ing wheel and mirror and fasten your seat belt before starting the engine.
GWARNING
When you adjust a seat, you or other vehicle
occupants could become trapped, e.g. on the seat guide rail. There is a risk of injury.
Make sure when adjusting a seat that no one
has any body parts in the sweep of the seat.
GWARNING
If the driver's seat is not engaged, it could
move unexpectedly while the vehicle is in
motion. This could cause you to lose control of the vehicle. There is a risk of an accident.
Always make sure that the driver's seat is
engaged before starting the vehicle.
GWARNING
The front-air bags for could also injure the
vehicle occupants in the front If the front
seats are positioned too close to the dash-
board or steering wheel. This poses an
increased risk of injury or even fatal injury.
Always adjust the front seats so that they are
as far from the front air bags as possible. Also
observe the notes on the correct adjustment
of the seats.
GWARNING
The seat belt does not offer the intended level of protection if you have not moved the back-
rest to an almost vertical position. When brak-
ing or in the event of an accident, you could
slide underneath the seat belt and sustain
abdomen or neck injuries, for example. This
poses an increased risk of injury or even fatal injury.
Adjust the seat properly before beginning
your journey. Always ensure that the backrest
is in an almost vertical position and that the
shoulder section of your seat belt is routed
across the center of your shoulder.
GWARNING
If the head restraints are not installed or not
adjusted correctly, they cannot provide pro-
tection as intended. There is an increased risk
of injury in the head and neck area, e.g. in the event of an accident or when braking.
Always drive with the head restraints instal-
led. Before driving off, make sure for every
vehicle occupant that the center of the head
restraint supports the back of the head at
about eye level.
Seats85
Seats, steering wheel and mirrors
Z
Page 88 of 318

!To avoid damage to the seats and the seat
heating, observe the following information:
Rkeep liquids from spilling on the seats. If
liquid is spilled on the seats, dry them as
soon as possible.
Rif the seat covers are damp or wet, do not
switch on the seat heating. The seat heat-
ing should also not be used to dry the seats.
Rclean the seat covers as recommended;
see the "Interior care" section.
Rdo not transport heavy loads on the seats.
Do not place sharp objects on the seat
cushions, e.g. knives, nails or tools. The
seats should only be occupied by passen-
gers, if possible.
Rwhen the seat heating is in operation, do
not cover the seats with insulating materi-
als, e.g. blankets, coats, bags, seat covers,
child seats or booster seats.
Your seat must be adjusted in such a way that
you can wear the seat belt correctly.
Observe the following points:
RPosition the backrest in an almost vertical
position so that you are sitting virtually
upright. Do not drive with the backrest
reclined too far back.
RYour arms should be slightly bent when you
are holding the steering wheel.
RAvoid seat positions that prevent the seat belt
from being correctly routed. The shoulder
section of the belt must be routed over the
middle of your shoulder and be pulled tight
against your upper body. The lap belt must
always pass across your lap as low down as
possible, i.e. over your hip joints.
RAdjust the head restraint so that it supports
the back of the head at eye level.
RThe distance from the pedals should be such
that you can depress them fully.
Please also observe the important safety notes
on "Air bags" (
Ypage 50), "Seat belts"
(Ypage 47) and "Child restraint systems"
(Ypage 59).
Adjusting the seat manually
:Seat fore-and-aft adjustment
;Seat cushion angle adjustment
=Seat height adjustment
?Seat backrest adjustment
XTo adjust the seat fore-and-aft position:
pull lever :up.
XSlide the seat forward or back until you can
depress the pedals.
XRelease lever :.
XSlide the seat forward or back until you hear it
engage.
XTo adjust the seat height: press or pull lever
= repeatedly until you have reached the
desired seat height.
XTo adjust the backrest: turn handwheel?
towards the front.
The seat backrest moves to a vertical posi-
tion.
XTurn handwheel ?towards the rear.
The seat backrest tilts towards the rear.
XTo adjust the seat angle: turn handwheel;
towards the front.
The front of the seat cushion tilts down.
XTurn handwheel ;towards the rear.
The front of the seat cushion tilts up.
Adjusting the seat electrically
GWARNING
Children could become trapped if they adjust
the seats, particularly when unattended.
There is a risk of injury.
When leaving the vehicle, always take the
SmartKey with you and lock the vehicle. Never
leave children unsupervised in the vehicle.
86Seats
Seats, steering wheel and mirrors
Page 91 of 318

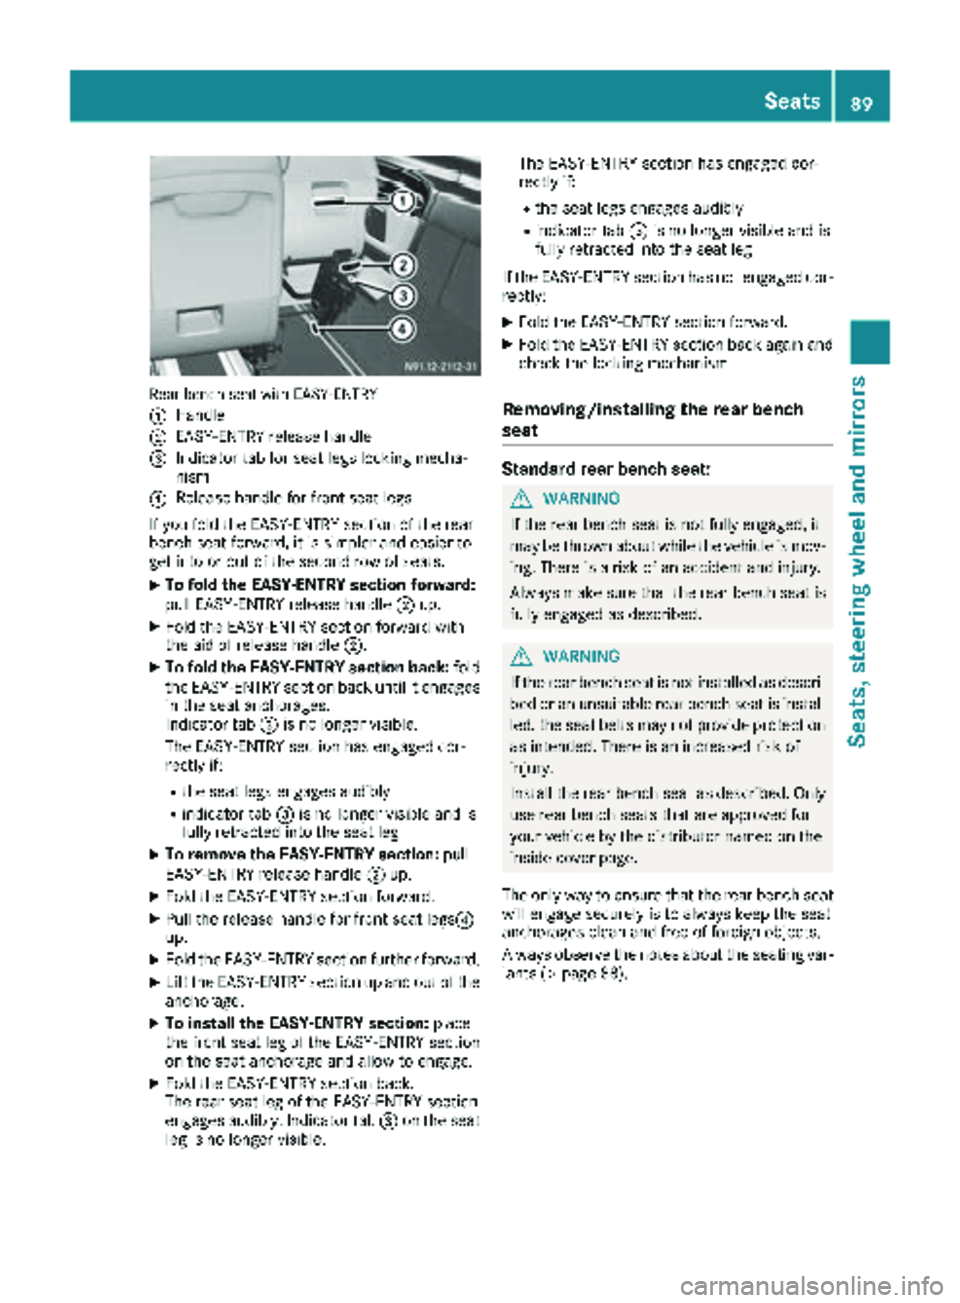
Rear bench seat withEASY-ENTRY
:
Han dle
;EASY-EN TRY release handle
=Indicator tab for seat legs locking mecha-
nis m
?Release handle for front seat legs
If you fold the EASY-ENTRY section ofthe rear
bench seat forward, it issimpler and easier to
get intoor out ofthe secon d rowofseats.
XTo fold the EASY-ENTRY section forward:
pull EASY-EN TRY release handle ;up.
XFold the EASY-EN TRY section forward with
the aid ofrelease handle ;.
XTofold the EASY-ENTRY sectionback:fold
the EASY-EN TRY section back unt il itengages
in the seat anc horages.
Indic ator tab =is no lon ger visible.
The EASY-EN TRY section has engaged cor-
rectly if:
Rthe seat legs engages audibly
Rindicat ortab =is no lon ger visibleand is
fully retracted into the seat leg
XTo rem ove the EASY-ENTRY section:pull
EASY-EN TRY release handle ;up.
XFold the EASY-EN TRY section forward.
XPullthe release handle for front seat legs ?
up.
XFold the EASY-EN TRY section further forward.
XLift theEASY-EN TRY section up and out ofthe
anc horage.
XToinstall the EASY-ENTRY section:place
the fr ont seat leg ofthe EASY-EN TRY section
on the seat anc horage and allowto engage.
XFold the EASY-EN TRY section back.
The rear seat leg ofthe EASY-EN TRY section
en
gages audibly. Indic ator tab=onthe seat
leg is no lon ger visible. The
EASY-EN TRY section has engaged cor-
rectly if:
Rthe seat legs engages audibly
Rindicat ortab =isno longer vis ibleand is
fully retracted into the seat leg
If the EASY-EN TRY section has not engaged cor-
rectly:
XFold the EASY-EN TRY section forward.
XFold theEASY-EN TRY section back again and
check the locking mechanism.
Removing/installing the rear bench
seat
Standard rear bench seat:
GWARNIN G
If the rear bench seat is not fully engaged, it
may bethrown about whilethe vehicle is mov-
ing. There isa risk ofan acc ident and injury.
Alw ays make sure that the rear bench seat is
fully engaged as described.
GWARNIN G
If the rear bench seat is not installed as descri-
bed oran unsuita blerear bench seat is instal-
led, the seat belts may not pro videprotection
as intended. Thereisan increased risk of
inj ury.
In stall the rear bench seat as described. Only
use rear bench seats that are approved for
your vehicle bythe distribut ornamed onthe
inside cover page.
The only way to ensure that the rear bench seat
will engage securely is to always keep the seat
anc horages clean and free offoreign objects.
Alw ays obse rve the notes about the seating var-
iant s (
Ypage 88).
Seats89
Seats, steering wheel and mirrors
Z
Page 92 of 318

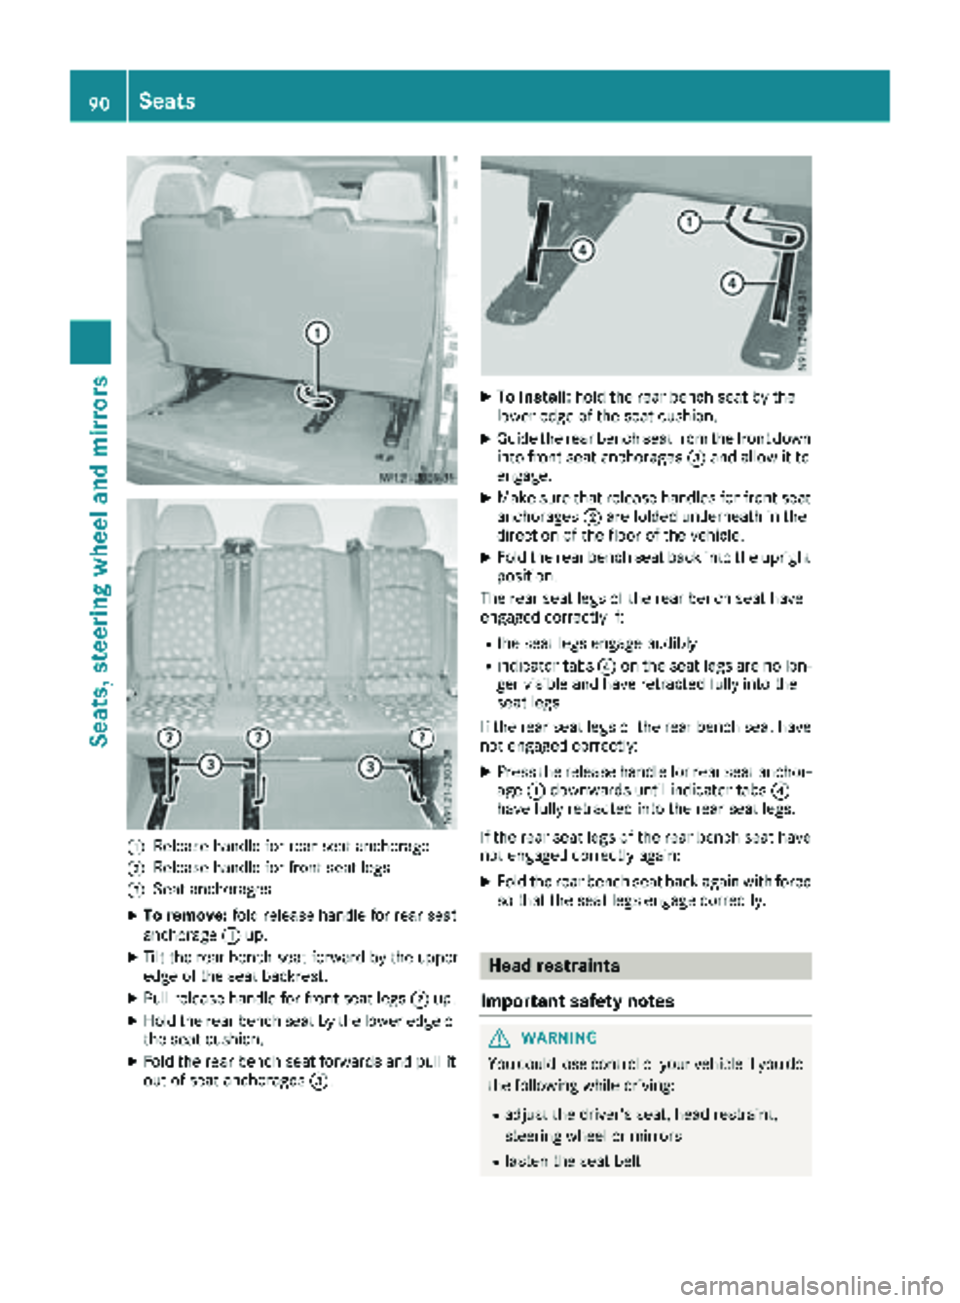
:Releasehandle for rear seat anchorage
;Releas ehandle for fron tseat legs
=Seat anchorages
XTo remove: foldrelease handle for rear seat
anchorage :up.
XTilt th erear bench seat forward by th eupper
edge of th eseat backrest .
XPull release handle for fron tseat legs ;up.
XHold th erear bench seat by th elower edge of
th eseat cushion .
XFold therear bench seat forwards and pull it
out of seat anchorages =.
XTo install:hold th erear bench seat by th e
lower edge of th eseat cushion .
XGuide therear bench seat from th efron tdown
int ofron tseat anchorages =and allow it to
engage .
XMakesur ethat release handles for fron tseat
anchorages ;are folded underneat hin th e
direction of th efloor of th evehicle.
XFold th erear bench seat bac kint oth eupright
position .
The rear seat legs of th erear bench seat hav e
engage dcorrectl yif:
Rth eseat legs engage audibly
Rindicator tab s? on th eseat legs are no lon -
ger visible and hav eretracte dfully int oth e
seat legs
If th erear seat legs of th erear bench seat hav e
no tengage dcorrectly:
XPress th erelease handle for rear seat anchor -
age :downwards until indicator tab s?
hav efully retracte dint oth erear seat legs .
If th erear seat legs of th erear bench seat hav e
no tengage dcorrectl yagain :
XFold th erear bench seat bac kagain wit hforce
so that th eseat legs engage correctly.
Head restraints
Important safety notes
GWARNIN G
You could lose control of your vehicl eif you do
th efollowin gwhile driving :
Radjust thedriver' sseat ,head restraint,
steering whee lor mirror s
Rfastenth eseat belt
90Seats
Seats, steering wheel and mirrors
Page 93 of 318

There is a risk of an accident.
Adjust the driver's seat, head restraint, steer-ing wheel and mirror and fasten your seat belt
before starting the engine.
GWARNING
If the head restraints are not installed or not
adjusted correctly, they cannot provide pro-
tection as intended. There is an increased risk
of injury in the head and neck area, e.g. in the event of an accident or when braking.
Always drive with the head restraints instal-
led. Before driving off, make sure for every
vehicle occupant that the center of the head
restraint supports the back of the head at
about eye level.
Adjust the head restraint so that:
Rthe center of the head restraint supports the
back of the head at eye level and the head
restraint is engaged
Rwhen your head is relaxed the back of your
head rests as close as possible to the head
restraint
Adjusting the head restraints
XTo raise: pull the head restraint up to the
desired position.
XTo lower: press release button :and slide
head restraint down to the desired position.
XTo move the driver's or front-passenger
head restraint forward: pull the head
restraint forward until it engages in the
desired position.
XTo move the driver's or front-passenger
head restraint back: press and hold down release knob
;and slide the head restraint
back to the desired position.
XLet go of release button ;.
XEnsure that the head restraint has engaged
properly.
The head restraints can be removed and instal-
led as follows:
XTo remove: pull the head restraint up to the
stop.
XPress release button :and pull out the head
restraint.
XTo insert: insert the head restraint so that the
rod with the detents is on the left when viewed in the direction of travel.
XPush the head restraint down until it engages.
Adjusting the head restraints electri-
cally
!Do not adjust the height of the electrically
adjustable head restraint by hand. You could
otherwise damage the head restraint’s mech- anism.
Control panel on the door trim
Seats91
Seats, steering wheel and mirrors
Z