2019 MERCEDES-BENZ GLS SUV fuel
[x] Cancel search: fuelPage 90 of 729
#
Ifth ere are persons in theve hicle, do
not activate the additional door loc k.The additional door lock is automatically activa‐
te d in thefo llowing situations:
R The vehicle is loc ked using thekey.
R The vehicle is loc ked using KEYLESS-GO.
If th eve hicle has been loc ked via Mercedes me
connect, the additional door lock is not activa‐
te d.
If th e additional door lock is activated, the doors
cann otbe opened from the inside.
% After locking you can issue a signal with the
horn.
Yo u can pr eventthe additional door lock from
being activated bydeactivating interior pr otec‐
tion before locking theve hicle (/ page111). Un
locking/opening the doors from the inside #
United Kingdom onl y:obser vethe no tes on
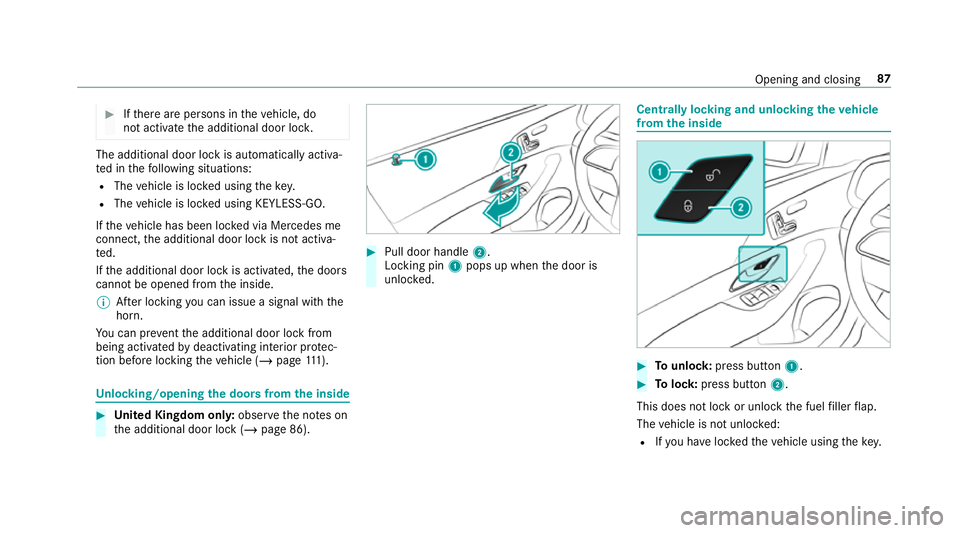
th e additional door lock (/ page 86). #
Pull door handle 2.
Locking pin 1pops up when the door is
unloc ked. Centrally locking and unlocking
theve hicle
from the inside #
Tounlo ck:press button 1. #
Tolock: press button 2.
This does not lock or unlock the fuel filler flap.
The vehicle is not unloc ked:
R Ifyo u ha veloc kedth eve hicle using thekey. Opening and closing
87
Page 185 of 729
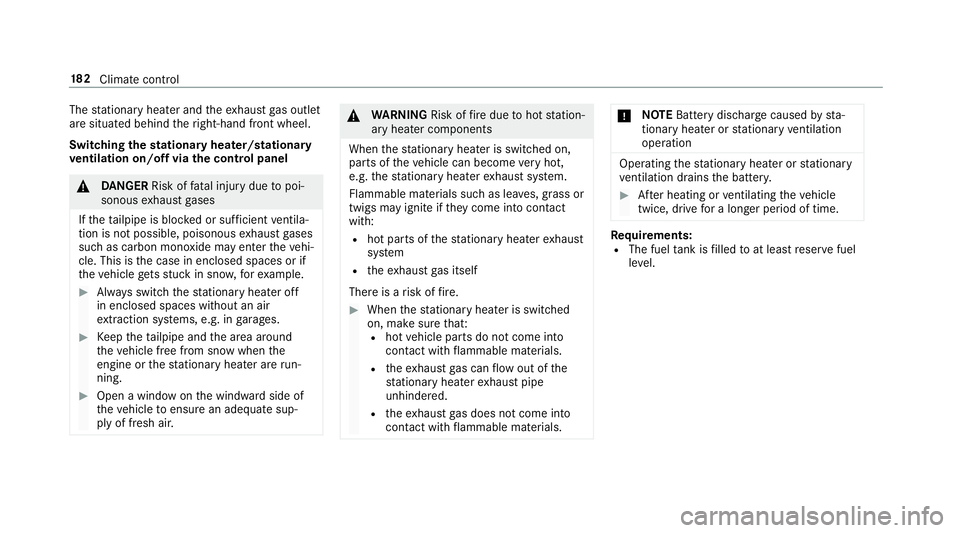
The
stationary heater and theex haust gas outlet
are situated behind theright-hand front wheel.
Switching thest ationary heater/stationary
ve ntilation on/off via the control panel &
DANG ER Risk of fata l injury due topoi‐
sonous exhaust gases
If th eta ilpipe is bloc ked or suf ficient ventila‐
tion is not possible, poisonous exhaust gases
such as carbon monoxide may enter theve hi‐
cle. This is the case in enclosed spaces or if
th eve hicle getsst uck in sn ow,fo rex ample. #
Alw ays switch thest ationary heater off
in enclosed spaces without an air
ex traction sy stems, e.g. in garage s. #
Keep theta ilpipe and the area around
th eve hicle free from snow when the
engine or thest ationary heater are run‐
ning. #
Open a window on the windward side of
th eve hicle toensure an adequate sup‐
ply of fresh air. &
WARNING Risk offire due tohot station‐
ary heater components
When thest ationary heater is swit ched on,
parts of theve hicle can become very hot,
e.g. thest ationary heater exhaust sy stem.
Flammable materials such as lea ves, grass or
twigs may ignite if they come into contact
wi th:
R hot parts of thest ationary heater exhaust
sy stem
R theex haust gas itself
There is a risk of fire. #
When thest ationary heater is swit ched
on, make sure that:
R hot vehicle parts do not come into
contact with flammable materials.
R theex haust gas can flow out of the
st ationary heater exhaust pipe
unhindered.
R theex haust gas does not come into
contact with flammable materials. *
NO
TEBattery discharge caused bysta‐
tionary heater or stationary ventilation
operation Ope
rating thest ationary heater or stationary
ve ntilation drains the batter y. #
After heating or ventilating theve hicle
twice, drive for a longer period of time. Re
quirements:
R The fuel tank is filled toat least reser vefuel
le ve l. 18 2
Climate cont rol
Page 186 of 729
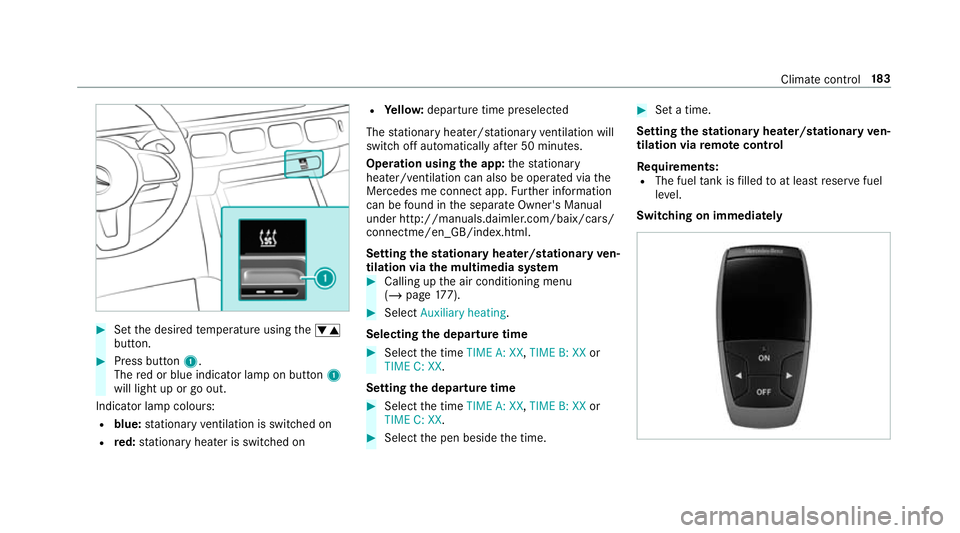
#
Set the desired temp erature using thew
button. #
Press button 1.
The red or blue indicator lamp on button 1
will light up or go out.
Indicator lamp colours: R blue: stationary ventilation is switched on
R red: stationary heater is swit ched on R
Yello w: departure time preselected
The stationary heater/ stationary ventilation will
switch off au tomatically af ter 50 minutes.
Operation using the app: thest ationary
heater/ ventilation can also be operated via the
Mercedes me connect app. Further information
can be found in the separate Owner's Manual
under http://manuals.daimler.com/baix/cars/
connectme/en_GB/index.html.
Setting thest ationary heater/stationary ven‐
tilation via the multimedia sy stem #
Calling up the air conditioning menu
(/ page 177). #
Select Auxiliary heating.
Selecting the departu retime #
Select the time TIME A: XX, TIME B: XXor
TIME C: XX.
Setting the departu retime #
Select the time TIME A: XX, TIME B: XXor
TIME C: XX. #
Select the pen beside the time. #
Set a time.
Setting thest ationary heater/stationary ven‐
tilation via remo tecont rol
Re quirements:
R The fuel tank is filled toat least reser vefuel
le ve l.
Switching on immedia tely Climate cont
rol18 3
Page 189 of 729
Problems with
there mo tecont rolfo r the stationary heater/stationary ventilation Problem
Possible causes/consequences and M
MSolutions
FA IL¨ The signal transmission between
the transmit ter and theve hicle is faulty. #
Chan geyour position in relation totheve hicle, moving closer if necessar y.
FA IL Thestar ter battery is not suf ficiently charge d. #
Char gethest ar ter batter y.
The fuel tank content is below there ser vefuel le vel. #
Refuel at the nearest filling station.
FA IL¯ The
stationary heater is malfunctioning. #
Have thest ationary heater checked at a qualified specialist workshop. Air
vents Ad
justing the front air vents &
WARNING ‑ Risk of bu rns/frostbite due
to not maintaining a su fficient dis tance
to the air vents
Ve ry hot or very cold air can flow from the air
ve nts. This could
result in burns or frostbite in the
immediate vicinity of the air vents. #
Alw ays ensure that all vehicle occu‐
pants maintain a suf ficient di stance to
th e air vents. #
If necessa ry,re direct the air flow to
ano ther area of theve hicle interior. To
guarantee theflow of fresh air thro ugh the air
ve nts into theve hicle interior, comply with the
fo llowing:
R Alw ayske ep theve nts and theve ntilation
grille in theve hicle interior free.
R Keep the air inlet free of deposits
(/ page 538).
R Optimum climate comfort is achie ved with
th e air vents in the cent reposition. 18 6
Climate cont rol
Page 195 of 729
St
arting theve hicle in emer gency operation
mode
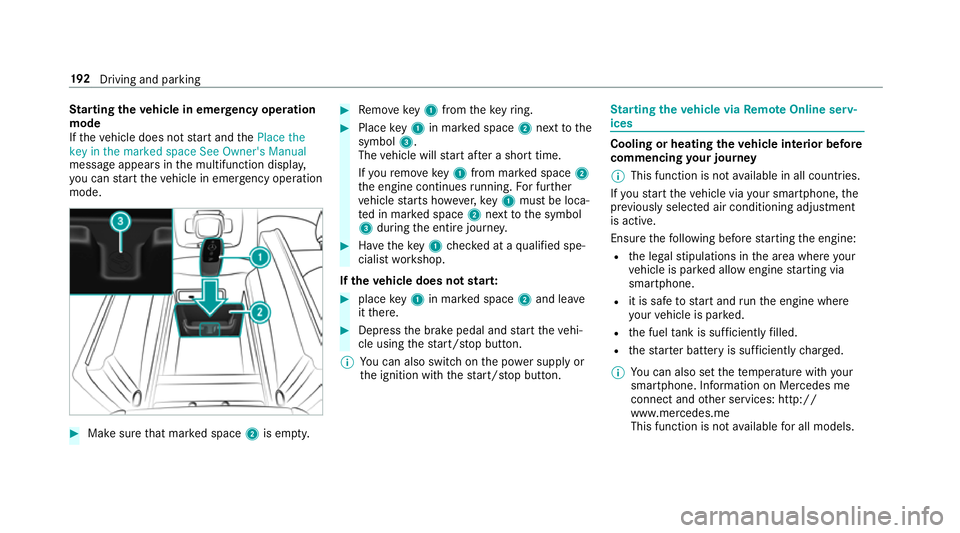
If th eve hicle does not start and thePlace the
key in the marked space See Owner's Manual
message appears in the multifunction displa y,
yo u can start theve hicle in emer gency operation
mode. #
Makesure that mar ked space 2is em pty. #
Remo vekey1 from theke yring. #
Place key1 in mar ked space 2next tothe
symbol 3.
The vehicle will start af ter a short time.
If yo ure mo vekey1 from mar ked space 2
th e engine continues running. For fur ther
ve hicle starts ho wever,ke y1 must be loca‐
te d in mar ked space 2next tothe symbol
3 during the entire journe y. #
Have theke y1 checked at a qualified spe‐
cialist workshop.
If th eve hicle does not star t: #
place key1 in mar ked space 2and lea ve
it th ere. #
Depress the brake pedal and start theve hi‐
cle using thest art/ stop button.
% You can also swit chon the po wer supp lyor
th e ignition with thest art/ stop button. St
arting theve hicle via Remo teOnline serv‐
ices Cooling or heating
theve hicle interior before
commencing your journey
% This function is not available in all countries.
If yo ustart theve hicle via your smartphone, the
pr ev iously selec ted air conditioning adjustment
is active.
Ensure thefo llowing before starting the engine:
R the legal stipulations in the area where your
ve hicle is par ked allow engine starting via
smartphone.
R it is safe tostart and runth e engine where
yo ur vehicle is par ked.
R the fuel tank is su fficiently filled.
R thest ar ter battery is suf ficiently charge d.
% You can also set thete mp erature with your
smartphone. In form ation on Mercedes me
connect and other services: http://
www.mercedes.me
This function is not available for all models. 19 2
Driving and pa rking
Page 198 of 729
#
Touse braking ef fect of the engine,
shift toa lo werge ar in good time. *
NO
TEDama getothe driv etra in and
engine when pulling away #
Do not warm upthe engine while the
ve hicle is stationar y.Pull away immedi‐
atel y. #
Avoid high engine speeds and driving at
full thro ttle until the engine has reached
its operating temp erature. *
NO
TEDama getothe catalytic con verter
due tonon-combu sted fuel The engine is not
running smo othly and is
misfiring.
Non-combus ted fuel may get into the cata‐
lytic con verter. #
Only depress the accelera tor pedal
slightl y. #
Have the cause rectified immediately at
a qu alified specialist workshop. Limited braking ef
fect on salt-trea tedro ads:
R due tosalt build-up on the brake disks and
brakepads, the braking dis tance can increase
conside rably or result in braking only on one
side
R maintain a much greater safe dis tance tothe
ve hicle in front
To preve nt salt build-up:
R brake occasionally while paying attention to
th e tra ffic conditions
R carefully depress the brake pedal at the end
of the journey and when starting the next
journey Note
s on off-road driving &
WARNING Risk of accident if you do not
ke ep toline of fall on inclines
If yo u drive at an angle or turn on an incline,
th eve hicle could slip side ways, tip and roll‐
ove r. #
Alw ays drive on inclines in the line of
fa ll (straight up or down) and do not
turn. &
WARNING Risk offire due toflammable
materials on hot parts of theex haust
sy stem
Flammable material such as lea ves, grass or
twigs may ignite if they come into contact
wi th hot parts of theex haust sy stem. #
When driving on unpa vedro ads or off-
ro ad, regular lych eck theve hicle under‐
side. #
Remo vetrapped plants or other flam‐
mable material, in particular. #
Ifth ere is damage, consult a qualified
specialist workshop immediately. When driving off-road, subs
tances su chas sand,
mud and water orwate r mixed with oil may get
into the brakes. This may lead toare duction in
braking ef fect or total brake failure as a result of
increased wear. The braking characteristics will
va ry depending on the material that has entered Driving and parking
19 5
Page 199 of 729
th
e sy stem. Clean the brakes af ter driving off-
ro ad. If youth en notice reduced braking ef fect
or hear scraping noises, ha vethe brake sy stem
ch ecked at a qualified specialist workshop.
Ad just your driving style to thech anged braking
ch aracteristics.
* NO
TEDama gecaused bydriving over
obs tacles The
vehicle can be damaged by:
R driving up on high kerbs or unpa ved
ro ads.
R quickly driving over obs tacles su chas
ke rbs, speed bumps or po tholes.
R heavy objects hitting the underbody or
ch assis components. #
Do not drive over obs tacles that could
damage theve hicle. #
Check theve hicle regular lyfor dama ge
during off-road driving. #
Adjust theve hicle speed tosuit the
ro ad sur face conditions. #
Ifth ere is damage, consult a qualified
specialist workshop immediately. +
ENVIRONMENTAL
NOTEEnvironmental
dama gedue tonon-obser vance of pro‐
hibition signs Environmental pr
otection has priority. Treat
nature with respect. #
Be sure toobser veprohibition signs. Checklist before driving off-road
Check
thefo llowing points before driving off-
ro ad:
R Fuel le vel
R Vehicles with a diesel engine: AdBlue ®
le vel
R Engine oil le vel:fill engine oil up tothe maxi‐
mum le velto ensure full gradeability
(/ page 534).
R Tyre-change tool kit and spare wheel
R Tyres and wheels %
Information about special all-ter rain tyres for
re trofitting is available from any qualified
specialist workshop.
Off-road driving
Re ad this section before driving your vehicle off-
ro ad. Practise bydriving over more gentle off-
ro ad terrain firs t.
R Obse rveth e no tes on the cross-country ABS
(/ page 229).
R If necessar y,select theF orG drive
program (vehicles with an Off-road pac kage)
before driving off-road (/ page 204).
R Before driving off-road, shift the transfer
case totheLO W RANGE off-roadgear (vehi‐
cles with an Offroad pac kage ) (/ page 211).
R Select a vehicle le vel suitable for off-road ter‐
ra in (/ page 265). Toavo id damaging the
ve hicle, make sure there is alw ays suf ficient
ground clearance.
R Alw ayske ep the engine running and in gear
when driving on downhill gradients and
slopes. Obse rveth e no tes on driving in
mountainous terrain. 19 6
Driving and pa rking
Page 204 of 729
The lettering in
the segment will light up brightl y,
th e outer edge will light up and the segment will
fi ll up where thefo llowing driving style is adop‐
te d:
R 1 steady speed
R 2 gentle deceleration and rolling
R 3 moderate acceleration
The lettering in the segment will be gr ey,the
outer edge will be dark and the segment will
em pty where thefo llowing driving style is adop‐
te d:
R 1 fluctuations in speed
R 2 heavy braking
R 3 sporty acceleration
The ECO displ aywill show you when you ha ve
driven economically:
R theth re e segments fill up comple tely at the
same time
R the edge around all thre e segments lights up
The additional range achi eved as a result of your
driving style in comparison with a driver with a ve
ry sporty driving style is shown in the cent re
of the display 4. Therange displ ayed does not
indicate a fixe dre duction in consum ption. ECO Assist function
Ve
hicles with a 48 V on-board electrical sys‐
te m (EQ Boo sttech nology):
% ECO Assist is available on lyforve hicles with
CO MAND Online.
ECO Assist analyses data forth eve hicle's expec‐
te dro ute. This allo wsthe sy stem tooptimally
adjust the driving style fo rth ero ute ahead, sa ve
fuel and recuperate. If the sy stem de tects an
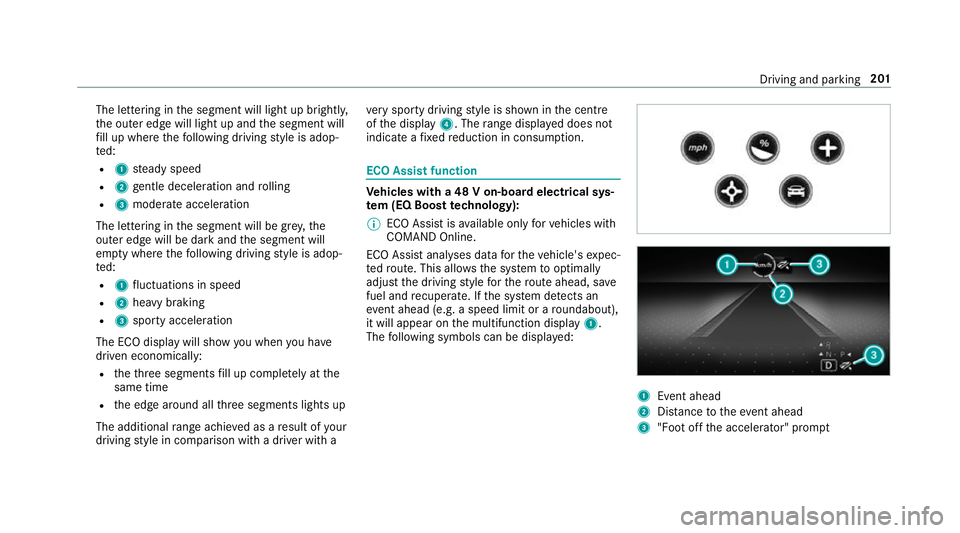
eve nt ahead (e.g. a speed limit or a roundabout),
it will appear on the multifunction display 1.
The following symbols can be displa yed: 1
Event ahead
2 Distance totheeve nt ahead
3 "Foot off the accelerator" prom pt Driving and pa
rking 201