2019 MERCEDES-BENZ GLS SUV engine
[x] Cancel search: enginePage 118 of 398
.
If the eng")
The daytime running lamps improve the visibility
of your vehicle during the day. To do this, the
daytime running lamps function must be
switched on using the on-board computer
(Y page 240).
If the engine is running and you turn the light
switch to 0060or0058, the manual settings
take precedence over the daytime running
lamps.
Low-beam headlamps
Even if the light sensor does not detect that it is dark, the parking lamps and low-beam head-
lamps switch on when the ignition is switched on and the light switch is set to the 0058position.
This is a particularly useful function in the event
of rain and fog.
X To switch on the low-beam headlamps:
turn the SmartKey to position
0048in the igni-
tion lock or start the engine.
X Turn the light switch to 0058.
The green 0058indicator lamp in the instru-
ment cluster lights up.
Rear fog lamp
The rear fog lamp improves visibility of your
vehicle for the traffic behind in the event of thick fog. Please take note of the country-specific
regulations for the use of rear fog lamps.
X To switch on the rear fog lamp: turn the
SmartKey to position 0048in the ignition lock or
start the engine.
X Turn the light switch to 0058or0071.
X Press the 005Ebutton.
The yellow 005Eindicator lamp in the instru-
ment cluster lights up.
X To switch off the rear fog lamp: press the
005E button.
The yellow 005Eindicator lamp in the instru-
ment cluster goes out.
Parking lamps ! If the battery charge is very low, the parking
lamps or standing lamps are automatically
switched off to enable the next engine start.
Always park your vehicle safely and in a well lit area, in accordance with the relevant legal
stipulations. Avoid using the 0060parking
lamps over a period of several hours. If pos-
sible, switch on the right-hand 0064or left-
hand 0063 standing lamps. X
To switch on: turn the light switch to 0060.
The green 0060indicator lamp in the instru-
ment cluster lights up.
Standing lamps Switching on the standing lamps ensures the
corresponding side of the vehicle is illuminated.X To switch on the standing lamps: the
SmartKey should not be in the ignition lock or in key position 0092in the ignition lock.
X Turn the light switch to 0063(left-hand side of
the vehicle) or 0064(right-hand side of the
vehicle).
Vehicles towing a trailer: both the right-hand
and left-hand standing lamps (tail lamps) are
always illuminated on the trailer. Combination switch
0043
High-beam headlamps
0044 Turn signal, right
0087 High-beam flasher
0085 Turn signal, left
X To indicate briefly: press the combination
switch briefly to the pressure point in the
direction of arrow 0044or0085.
The corresponding turn signal flashes three
times.
X To indicate: press the combination switch
beyond the pressure point in the direction of
arrow 0044or0085.
X To switch on the high-beam headlamps:
turn the light switch to 0058or0058.
X Press the combination switch beyond the
pressure point in the direction of arrow 0043.
In the 0058position, the high-beam head-
lamps are only switched on when it is dark and
the engine is running. 116
Exterior lightingLights and windshield wipers
Page 126 of 398

X
Position new wiper blade 0043in the retainer on
the wiper arm and slide it into place in the
direction of the arrow.
The wiper blade audibly engages.
X Make sure that the wiper blade is seated cor-
rectly.
X Fold the wiper arm back onto the windshield.
Changing the rear window wiper blade Removing a wiper blade X
Remove the SmartKey from the ignition lock.
X Fold wiper arm 0043away from the rear window
until it engages.
X Position wiper blade 0044at a right angle to
wiper arm 0043.
X Hold wiper arm 0043and press wiper blade 0044
in the direction of the arrow until it releases.
X Remove wiper blade 0044.
Installing a wiper blade
X Place new wiper blade 0044onto wiper arm 0043.
X Hold wiper arm 0043and press wiper blade 0044
in the opposite direction to the arrow until it
engages.
X Make sure that wiper blade 0044is seated cor-
rectly.
X Position wiper blade 0044parallel to wiper
arm 0043.
X Fold wiper arm 0043back onto the rear window. Problems with the windshield wipers
Problem
Possible causes/consequences and
0050 0050Solutions The windshield wipers
are jammed. Leaves or snow, for example, may be obstructing the windshield wiper
movement. The wiper motor has been deactivated.
X For safety reasons, you should remove the SmartKey from the igni-
tion lock.
or X Switch off the engine using the Start/Stop button and open the
driver's door.
X Remove the cause of the obstruction.
X Switch the windshield wipers back on. The windshield wipers
fail completely. The windshield wiper drive is malfunctioning.
X Select another wiper speed on the combination switch.
X Have the windshield wipers checked at a qualified specialist work-
shop. 124
Windshield wipersLights and windshield wipers
Page 127 of 398

Overview of climate control systems
General notes
Observe the settings recommended on the fol-
lowing pages. The windows could otherwise fog up.
To prevent the windows from fogging up:
R Switch off climate control only briefly
R Switch on air-recirculation mode only briefly
R Switch on the cooling with air dehumidifica-
tion function
R Activate the "Windshield defrosting" function
briefly, if required
Climate control regulates the temperature and
the humidity in the vehicle interior and filters
undesirable substances out of the air.
The residual heat function can only be activated or deactivated with the ignition switched off
(Y page 135).
i Ventilate the vehicle for a brief period during
warm weather, e.g. using the convenience
opening feature (Y page 90). This will speed
up the cooling process and the desired inte-
rior temperature will be reached more
quickly. If you start the engine using your smartphone,
the last selected climate control setting is reac-
tivated (Y page 142).
i The integrated filter filters out most parti-
cles of dust and soot and completely filters
out pollen. It also reduces gaseous pollutants and odors. A clogged filter reduces the
amount of air supplied to the vehicle interior.
Depending on the operating conditions and
environmental influences, the interval for
replacing the filter may be shorter than speci-
fied.
i Vehicles with ionization of the interior
air with air filter: in addition to ionization,
the vehicle has an air filter with anti-allergenic properties that contribute to improved air fil-
tration.
i It is possible that under certain circumstan-
ces the residual heat function may be activa-
ted automatically an hour after the SmartKey has been removed in order to dry the auto-
matic climate control. The vehicle is then ven-tilated for 30 minutes. Control panel for dual-zone automatic climate control
USA only
Front control panel
0043 Sets the temperature, left (Y page 132)
0044 Defrosts the windshield (Y page 133) Overview of climate control systems
125Climate control
Page 133 of 398

007A Reduces the airflow (Y page 133)Optimum use of automatic climate
control
The following contains notes and recommenda-
tions on optimum u")
0079
Switches the rear climate control on/off (Y page 131)
007A Reduces the airflow (Y page 133)Optimum use of automatic climate
control
The following contains notes and recommenda-
tions on optimum use of the dual-zone auto-
matic climate control or 3-zone automatic cli-
mate control.
R You can switch on climate control by using the
0058 and005A or0058 and0056 buttons.
The indicator lamps in the 0058and
005A buttons or the 0058and0056 buttons
light up.
R Vehicles with 3-zone automatic climate
control: in automatic mode, you can also use
the 00F0 button to set a climate mode
(FOCUS/MEDIUM/DIFFUSE). The MEDIUM
level is recommended.
R Set the temperature to 72 ‡ (22 †).
R Only use the "Windshield defrosting" function
briefly until the windshield is clear again.
R Only use air-recirculation mode briefly, e.g. if
there are unpleasant outside odors or when in a tunnel. The windows could otherwise fog up,
since no fresh air is drawn into the vehicle in
air-recirculation mode.
R Vehicles with 3-zone automatic climate
control: use the ZONE function to adopt the
temperature settings on the driver's side for
the front-passenger side and the rear com-
partment as well. The indicator lamp above
the 00D6 button goes out.
R Vehicles with 3-zone automatic climate
control: use the "residual heat" function if
you want to heat or ventilate the vehicle inte- rior when the ignition is switched off. The
residual heat function can only be activated or
deactivated with the ignition switched off.
R If you change the settings of the climate con-
trol system, the climate status display
appears for approximately three seconds at
the bottom of the screen in the multimedia
system display. You will see the current set-
tings of the various climate control functions.
During automatic engine switch-off, the climate
control system only operates at a reduced capa-
city. If you require the full climate control output, you can switch off the ECO start/stop function
by pressing the ECO button (Y page 145). Operating the climate control sys-
tems
Activating/deactivating climate con-
trol
General notes When the climate control is switched off, the air
supply and air circulation are also switched off.
The windows could fog up. Therefore, switch off
climate control only briefly
Activate climate control primarily using the
0058 button (Y page 132).
In the rear compartment, you can also switch
climate control on and off using the 0058and
0078 buttons.
Activating/deactivating X
Turn the SmartKey to position 0048in the igni-
tion lock (Y page 140).
X To activate: press the0058button.
The indicator lamp in the 0058button lights
up. Airflow and air distribution are set to auto-
matic mode.
X To deactivate: press the0078button.
The indicator lamp in the 0078button lights
up. Switching cooling with air dehumidi-
fication on/off
Activating/deactivating X
To activate: press the005Aor0056 button.
The indicator lamp in the 005Aor0056 button
lights up.
X To deactivate: press the005Aor0056 but-
ton.
The indicator lamp in the 005Aor0056 button
goes out. The "Cooling with air dehumidifica-
tion" function has a delayed switch-off fea-
ture. Operating the climate control systems
131Climate control
Page 136 of 398
.
X To activate: press the0064button.
The indicator lamp in the 0064button lights
up.
The climate control")
Activating/deactivating
X
Turn the SmartKey to position 0048in the igni-
tion lock (Y page 140).
X To activate: press the0064button.
The indicator lamp in the 0064button lights
up.
The climate control system switches to the
following settings:
R high airflow
R high temperature
R air distribution to the windshield and front
side windows
R air-recirculation mode off
X To deactivate: press the0064button.
The indicator lamp in the 0064button goes
out. The previously selected settings are
restored. Air-recirculation mode remains
deactivated. MAX COOL maximum cooling
The MAX COOL function is only available in vehi-
cles for the USA.
MAX COOL is only operational when the engine is running.
X To activate: press the00C9button.
The indicator lamp in the 00C9button lights
up.
X To deactivate: press the00C9button.
The indicator lamp in the 00C9button goes
out. The previously selected settings are
restored.
When you activate MAX COOL, climate control
switches to the following functions: R maximum cooling
R maximum airflow
R air-recirculation mode on Removing condensation from the win-
dows
Windows fogged up on the inside X
Activate the 005Aor0056 cooling with air
dehumidification function.
X Activate automatic mode 0058.
X If the windows continue to fog up, activate the
"windshield defrosting" function
(Y page 133).
i You should only select this setting until the
windshield is clear again.
Windows fogged up on the outside X
Activate the windshield wipers.
X Press the 008Fbutton repeatedly until the
009C or009B symbol appears in the display.
i You should only select this setting until the
windshield is clear again.
i If you clean the windows regularly, they do
not fog up so quickly. Rear window defroster
General notes The rear window defroster has a high current
draw. You should therefore switch it off as soon
as the rear window is clear. Otherwise, the rear
window defroster switches off automatically
after several minutes.
If the battery voltage is too low, the rear window defroster may switch off.
Activating/deactivating X
Turn the SmartKey to position 0048in the igni-
tion lock (Y page 140).
X Press the 006Cbutton.
The indicator lamp in the 006Cbutton lights
up or goes out. 134
Operating the climate control systemsClimate cont
rol
Page 137 of 398

Problems with the rear window defroster
Problem
Possible causes/consequences and
0050
0050Solutions The rear window
defroster has deactiva-
ted prematurely or can-
not be activated. The battery has not been sufficiently charged.
X Switch off any consumers that are not required, e.g. reading lamps,
interior lighting or the seat heating.
When the battery is sufficiently charged, the rear window defroster can be activated again. Switching air-recirculation mode
on/off
General notes You can deactivate the flow of fresh air if
unpleasant odors are entering the vehicle from
outside. The air already inside the vehicle will
then be recirculated.
If you switch on air-recirculation mode, the win-
dows can fog up more quickly, in particular at
low temperatures. Only use air-recirculation
mode briefly to prevent the windows from fog-
ging up.
Activating/deactivating X
Turn the SmartKey to position 0048in the igni-
tion lock (Y page 140).
X To activate: press the0089button.
The indicator lamp in the 0089button lights
up.
i In the event of high pollution levels (3-zone
automatic climate control only) or at high out-
side temperatures, air-recirculation mode is
automatically activated. When air-recircula-
tion mode is activated automatically, the indi-
cator lamp in the 0089button is not lit.
Outside air is added after about 30 minutes.
X To deactivate: press the0089button.
The indicator lamp in the 0089button goes
out.
i Air-recirculation mode deactivates auto-
matically:
R after approximately five minutes at outside
temperatures below approximately 41 ‡
(5 †)
R after approximately five minutes if cooling
with air dehumidification is deactivated
R after approximately 30 minutes at outside
temperatures above approximately 41 ‡ (5 †) if the "Cooling with air dehumidifi-
cation" function is activated Switching the residual heat on or off
General notes The residual heat function is only available on
vehicles for Canada.
It is possible to make use of the residual heat of
the engine to continue heating the stationary
vehicle for up to 30 minutes after the engine has been switched off. The heating time depends on
the set interior temperature.
Activating/deactivating X
To activate: press the004Bor0056 button.
The indicator lamp in the 004Bor0056 button
lights up.
i The blower will run at a low speed regardless
of the airflow setting.
i If you activate the residual heat function at
high temperatures, only the ventilation will be
activated. The blower runs at medium speed.
X To deactivate: press the004Bor0056 but-
ton.
The indicator lamp in the 004Bor0056 button
goes out.
Residual heat is deactivated automatically:
R after approximately 30 minutes
R when the ignition is switched on
R if the battery voltage drops Ionization
Ionization is used to purify the air in the vehicle interior and attain an improved interior climate. Operating the climate control systems
135Climate control
Page 138 of 398
The ionization of the interior air is odorless and
cannot be perceived directly in the vehicle inte- rior.
You can switch ionization on and off via the mul-
timedia system (see the Digital Operator's Man-
ual).
Ionization can only be operated when the auto-
matic climate control is switched on. The side air vent on the driver's side must be open. Setting the air vents
Important safety notes
G
WARNING
Very hot or very cold air can flow from the air vents. This could result in burns or frostbite in the immediate vicinity of the air vents. There
is a risk of injury.
Make sure that all vehicle occupants always
maintain a sufficient distance to the air out-
lets. If necessary, redirect the airflow to
another area of the vehicle interior.
In order to ensure the direct flow of fresh air
through the air vents into the vehicle interior,
please observe the following notes:
R keep the air inlet grille on the hood and in the
engine compartment on the front-passenger
side free of blockages, such as ice, snow or
leaves.
R never cover the air vents or air intake grilles in
the vehicle interior.
i For virtually draft-free ventilation, adjust the
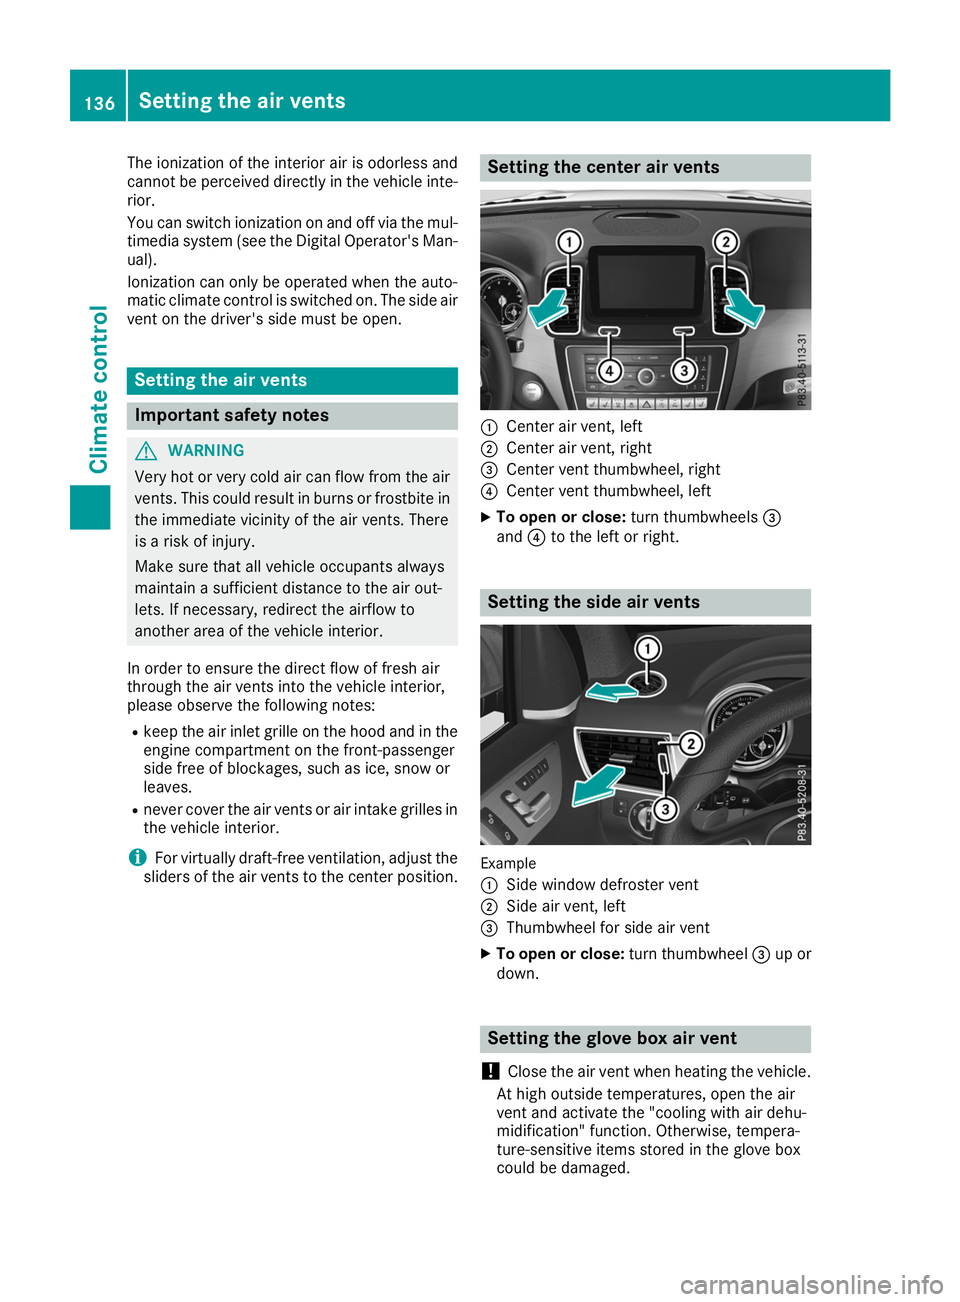
sliders of the air vents to the center position. Setting the center air vents
0043
Center air vent, left
0044 Center air vent, right
0087 Center vent thumbwheel, right
0085 Center vent thumbwheel, left
X To open or close: turn thumbwheels0087
and 0085to the left or right. Setting the side air vents
Example
0043
Side window defroster vent
0044 Side air vent, left
0087 Thumbwheel for side air vent
X To open or close: turn thumbwheel0087up or
down. Setting the glove box air vent
! Close the air vent when heating the vehicle.
At high outside temperatures, open the air
vent and activate the "cooling with air dehu-
midification" function. Otherwise, tempera-
ture-sensitive items stored in the glove box
could be damaged. 136
Setting the air ventsClimate control
Page 141 of 398

Notes on breaking-in a new vehicle
Important safety notes
The sensor system of some driving and driving
safety systems adjusts automatically while a
certain distance is being driven after the vehicle has been delivered or after repairs. Full system
effectiveness is not reached until the end of this
teach-in procedure.
New and replaced brake pads and discs only
reach their optimum braking effect after several hundred kilometers of driving. Compensate for
this by applying greater force to the brake pedal. The first 1000 miles (1500 km)
The more you look after the engine when it is
new, the more satisfied you will be with its per-
formance in the future. R You should therefore drive at varying vehicle
and engine speeds for the first 1000 miles
(1500 km).
R Avoid heavy loads, e.g. driving at full throttle,
during this period.
R Change gear in good time, before the tach-
ometer needle is 00C3of the way to the red area
of the tachometer.
R Do not manually shift to a lower gear to brake
the vehicle.
R Try to avoid depressing the accelerator pedal
beyond the point of resistance (kickdown).
Additional breaking-in notes for Mercedes-AMG
vehicles:
R Do not drive faster than 85 mph (140 km/h)
for the first 1,000 miles (1,500 km).
R Only allow the engine to reach a maximum
engine speed of 4,500 rpm briefly.
R Change gear in good time.
R Ideally, for the first 1,000 miles (1,500 km),
drive in the Comfortdrive program.
After 1000 mile s(1500 km), you can increase
the engine speed gradually and accelerate the
vehicle to full speed.
You should also observe these notes on break-
ing in if the engine or parts of the drive train on your vehicle have been replaced.
Always observe the maximum permissible
speed. Driving
Important safety notes
G
WARNING
Objects in the driver's footwell can restrict the pedal travel or obstruct a depressed pedal.
The operating and road safety of the vehicle is
jeopardized. There is a risk of an accident.
Make sure that all objects in the vehicle are
stowed correctly, and that they cannot enter
the driver's footwell. Install the floormats
securely and as specified in order to ensure
sufficient clearance for the pedals. Do not use loose floormats and do not place floormats on
top of one another. G
WARNING
Unsuitable footwear can hinder correct usage of the pedals, e.g.:
R shoes with thick soles
R shoes with high heels
R slippers
There is a risk of an accident.
Wear suitable footwear to ensure correct
usage of the pedals. G
WARNING
If you switch off the ignition while driving,
safety-relevant functions are only available
with limitations, or not at all. This could affect, for example, the power steering and the brake
boosting effect. You will require considerably
more effort to steer and brake. There is a risk of an accident.
Do not switch off the ignition while driving. G
WARNING
If the parking brake has not been fully
released when driving, the parking brake can:
R overheat and cause a fire
R lose its hold function.
There is a risk of fire and an accident. Release
the parking brake fully before driving off. Driving
139Driving and pa rking Z