2019 MERCEDES-BENZ GLS SUV mirror
[x] Cancel search: mirrorPage 213 of 398
or overhanging loads. Following an accident or
in the event of damage to the bumpers, have the
function of the radar sensors checked at a quali-
fied specialist workshop. Active Blind Spot
Assist may otherwise no longer work properly.
Monitoring area G
WARNING
Active Blind Spot Assist does not detect all
traffic situations and road users. There is a
risk of an accident.
Always make sure that there is sufficient dis-
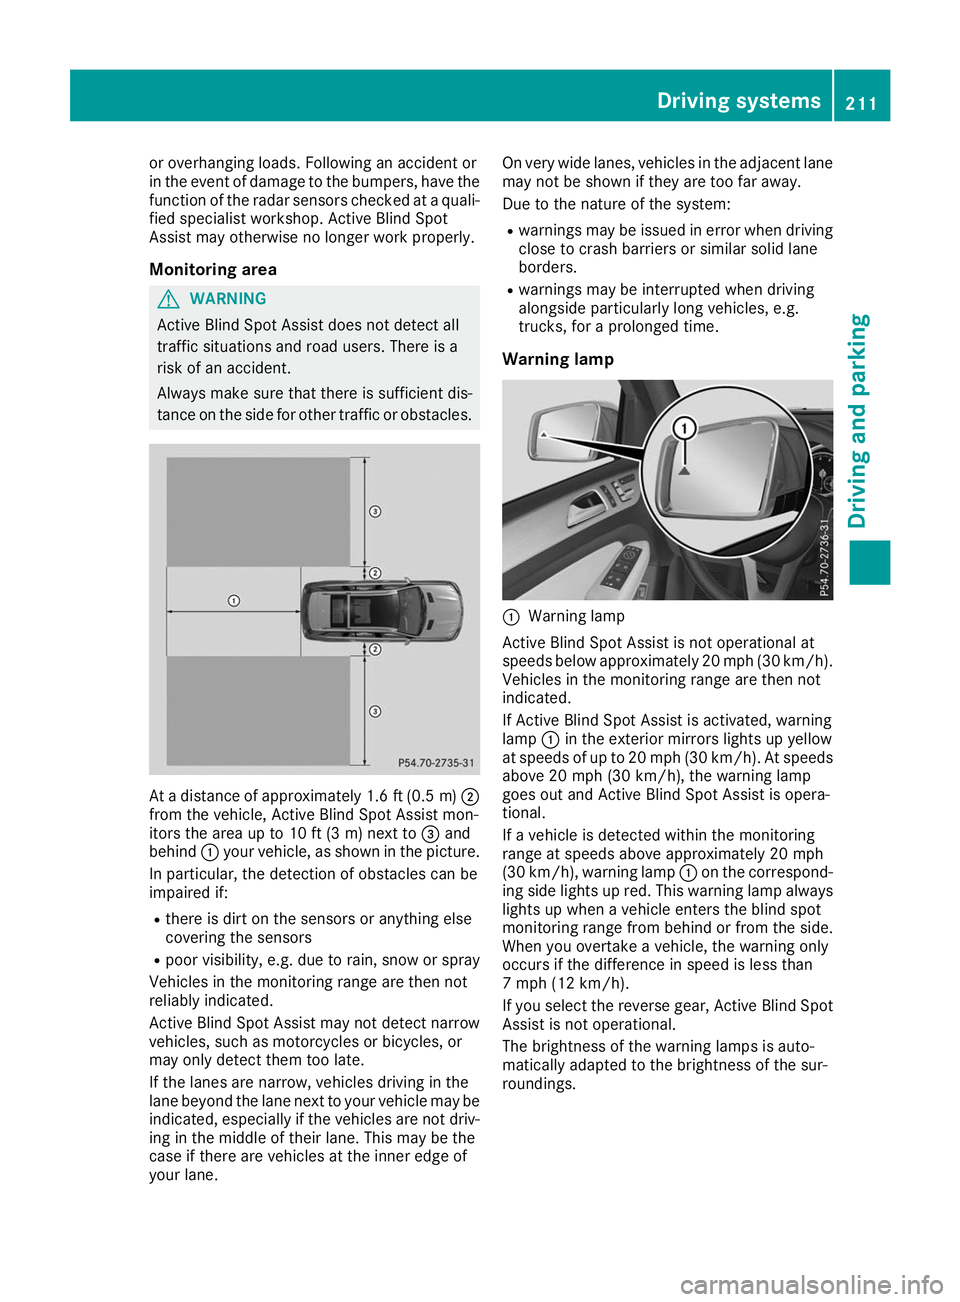
tance on the side for other traffic or obstacles. At a distance of approximately 1.6 ft (0.5
m)0044
from the vehicle, Active Blind Spot Assist mon-
itors the area up to 10 ft (3 m) next to 0087and
behind 0043your vehicle, as shown in the picture.
In particular, the detection of obstacles can be
impaired if:
R there is dirt on the sensors or anything else
covering the sensors
R poor visibility, e.g. due to rain, snow or spray
Vehicles in the monitoring range are then not
reliably indicated.
Active Blind Spot Assist may not detect narrow
vehicles, such as motorcycles or bicycles, or
may only detect them too late.
If the lanes are narrow, vehicles driving in the
lane beyond the lane next to your vehicle may be
indicated, especially if the vehicles are not driv- ing in the middle of their lane. This may be the
case if there are vehicles at the inner edge of
your lane. On very wide lanes, vehicles in the adjacent lane
may not be shown if they are too far away.
Due to the nature of the system:
R warnings may be issued in error when driving
close to crash barriers or similar solid lane
borders.
R warnings may be interrupted when driving
alongside particularly long vehicles, e.g.
trucks, for a prolonged time.
Warning lamp 0043
Warning lamp
Active Blind Spot Assist is not operational at
speeds below approximately 20 mph (30 km/h). Vehicles in the monitoring range are then not
indicated.
If Active Blind Spot Assist is activated, warning
lamp 0043in the exterior mirrors lights up yellow
at speeds of up to 20 mph (30 km/h). At speeds
above 20 mph (30 km/h), the warning lamp
goes out and Active Blind Spot Assist is opera-
tional.
If a vehicle is detected within the monitoring
range at speeds above approximately 20 mph
(30 km/h), warning lamp 0043on the correspond-
ing side lights up red. This warning lamp always lights up when a vehicle enters the blind spot
monitoring range from behind or from the side.
When you overtake a vehicle, the warning only
occurs if the difference in speed is less than
7 mph (12 km/h).
If you select the reverse gear, Active Blind Spot Assist is not operational.
The brightness of the warning lamps is auto-
matically adapted to the brightness of the sur-
roundings. Driving systems
211Driving and parking Z
Page 214 of 398
Visual and acoustic collision warning
If you switch on the turn signals to change lanes
and a vehicle is detected in the side monitoring range, you receive a visual and acoustic collision
warning. You then hear a double warning tone
and red warning lamp 0043flashes. If the turn sig-
nal remains on, detected vehicles are indicated
by the flashing of red warning lamp 0043. There are
no further warning tones.
Course-correcting brake application If Active Blind Spot Assist detects a risk of a lat-
eral collision in the monitoring range, a course-
correcting brake application is carried out. This is meant to assist you in avoiding a collision. G
WARNING
A course-correcting brake application cannot always prevent a collision. There is a risk of an
accident.
Always steer, brake or accelerate yourself,
especially if Active Blind Spot Assist warns
you or makes a course-correcting brake appli-
cation. Always maintain a safe distance at the sides.
If a course-correcting brake application occurs, red warning lamp 0043flashes in the exterior mir-
ror and a double warning tone sounds. In addi-
tion, a display underlining the danger of a side
collision appears in the multifunction display.
In very rare cases, the system may make an
inappropriate brake application. A course-cor-
recting brake application may be interrupted at
any time by countersteering slightly or acceler-
ating.
The course-correcting brake application is avail-
able in the speed range between 20 mph
(30 km/h) and 120 mph (200 km/h).
Either no braking application, or a course-cor-
recting brake application adapted to the driving situation occurs if:
R there are vehicles or obstacles, e.g. crash
barriers, located on both sides of your vehicle.
R a vehicle approaches you too closely at the
side.
R you have adopted a sporty driving style with
high cornering speeds.
R you clearly brake or accelerate.
R a driving safety system intervenes, e.g. ESP ®
or PRE-SAFE ®
Brake. R
ESP ®
is switched off.
R the offroad program is activated (vehicles
without the Offroad Engineering package).
R the Offroad or Offroad Plus drive program is
activated (vehicles with the Off-Road Engi-
neering package).
R the LOW RANGE offroad gear is activated
(vehicles with the Offroad Engineering pack-
age).
R a loss of tire pressure or a defective tire is
detected.
Switching on Active Blind Spot Assist
X Make sure that Active Blind Spot Assist
(Y page 239) is activated in the on-board
computer.
X Turn the SmartKey to position 0048in the igni-
tion lock.
Warning lamps 0043in the exterior mirrors light
up red for approximately 1.5 seconds and
then turn yellow.
Towing a trailer
When you attach a trailer, make sure you have
correctly established the electrical connection.
This can be accomplished by checking the trailer
lighting. Active Blind Spot Assist is then deacti-
vated. The indicator lamp lights up yellow in the
exterior mirrors and the Active Blind Spot
Active Blind Spot
Asst. Not Available When Towing a Asst. Not Available When Towing a
Trailer See Operator's Manual
Trailer See Operator's Manual message
appears in the multifunction display.
Active Lane Keeping Assist General notes
Active Lane Keeping Assist monitors the area in
front of your vehicle by means of multifunction
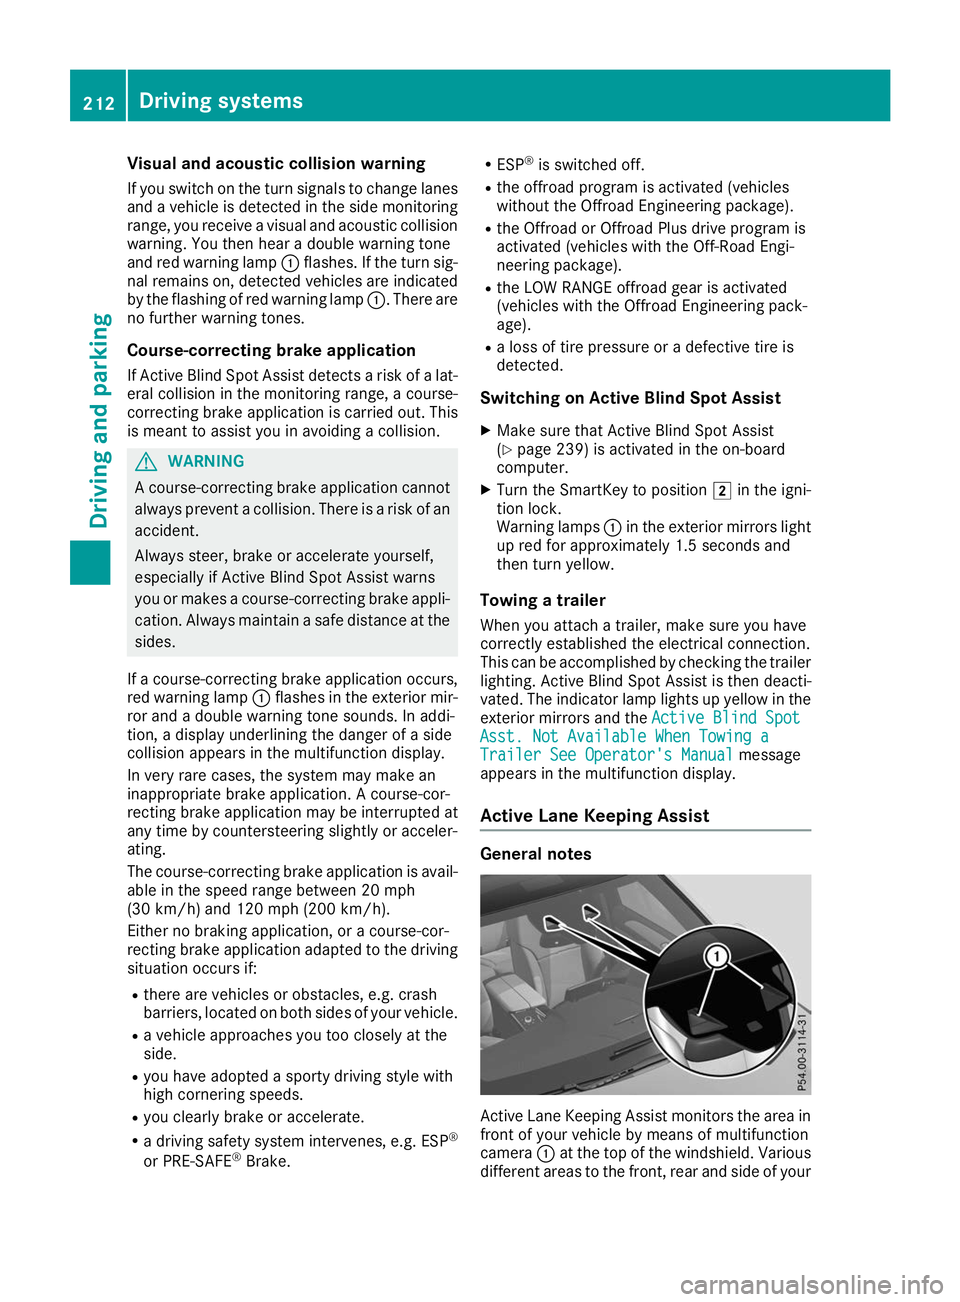
camera 0043at the top of the windshield. Various
different areas to the front, rear and side of your 212
Driving systemsDriving and parking
Page 227 of 398
Most U.S. states and all Canadian provinces
require by law:
R Safety chains between the towing vehicle and
the trailer. The chains should be cross-woundunder the trailer drawbar. They must be fas-
tened to the vehicle's trailer coupling, not to
the bumper or the axle.
Leave enough play in the chains to make tight
cornering possible.
R A separate brake system for certain types of
trailer.
R Safety switch for braked trailers. Check the
specific legal requirements applicable to your
state.
If the trailer becomes detached from the tow-
ing vehicle, the safety feature triggers the
trailer brakes. Towing a trailer
There are numerous legal requirements con-
cerning the towing of a trailer, e.g. speed restric-
tions. Make sure that your car/trailer combina- tion complies with the local regulations:
R in your place of residence
R in the location to which you are driving
The police and local authorities can provide reli-
able information.
Observe the following when towing a trailer:
R To gain driving experience and to become
accustomed to the new handling characteris-
tics, you should practice the following in a
traffic-free location:
- cornering
- stopping
- backing up
R Before driving, check:
- trailer tow hitch
- safety switch for braked trailers
- safety chains
- electrical connections
- lights
- wheels
R Adjust the exterior mirrors to provide an
unobstructed view of the rear section of the
trailer.
R If the trailer has electronically controlled
brakes, pull away carefully. Brake manually using the brake controller and check whether
the brakes function correctly.
R Secure any objects on the trailer to prevent
the cargo from slipping when the vehicle is in
motion.
R When you couple up a trailer, check at regular
intervals that the load is firmly secured. If the trailer is equipped with trailer lights and
brakes, check the trailer to ensure that these
are working.
R Bear in mind that the handling will be less
stable when towing a trailer than when driving
without one. Avoid sudden steering move-
ments.
R The vehicle/trailer combination is heavier,
accelerates more slowly, has a decreased
gradient climbing capability and a longer
braking distance.
It is more susceptible to side winds and
requires more careful steering.
R If possible, do not brake suddenly, but instead
depress the brake pedal moderately at first sothat the trailer can activate its brakes. Then
increase the pressure on the brake pedal.
R If the automatic transmission repeatedly
shifts between gears on uphill or downhill gra-
dients, shift to a lower gear using the left-hand
steering wheel paddle shifter.
A lower gear and lower speed reduce the risk of engine failure.
R When driving downhill, shift to a lower gear to
utilize the engine's braking effect.
Avoid continuous brake application as this
may overheat the vehicle brakes and, if instal- led, the trailer brakes.
R If the coolant temperature increases dramat-
ically while the air-conditioning system is
switched on, switch off the air-conditioning
system.
Coolant heat can also be dissipated by open-
ing the windows and switching the ventilation blower and the interior temperature to the
highest level.
R When overtaking, pay particular attention to
the extended length of your vehicle/trailer
combination.
Due to the length of the vehicle/trailer com-
bination, you require additional road space in
relation to the vehicle you are overtaking
before you can change back to the original
lane. Towing a trailer
225Driving and parking Z
Page 244 of 398
For further information on belt adjustment, see
(Y page 48).
Switching the fold-in mirrors when lock-
ing feature on/off
This function is only available when the vehicle is
equipped with the electrical fold-in function.
When you activate the Auto.
Auto. Mirror Mirror Folding
Folding
function, the exterior mirrors are folded in when
the vehicle is locked. The exterior mirrors fold
out automatically again as soon as you unlock
the vehicle.
X Press the 0059or0065 button on the steering
wheel to select the Sett.
Sett. menu.
X Press the 0064or0063 button to select the
Convenience
Convenience submenu.
X Press 0076to confirm.
X Press the 0064or0063 button to select the
Auto. Mirror Folding
Auto. Mirror Folding function.
If the Auto. Mirror Folding Auto. Mirror Folding function is
switched on, the multifunction display shows the exterior mirror in orange.
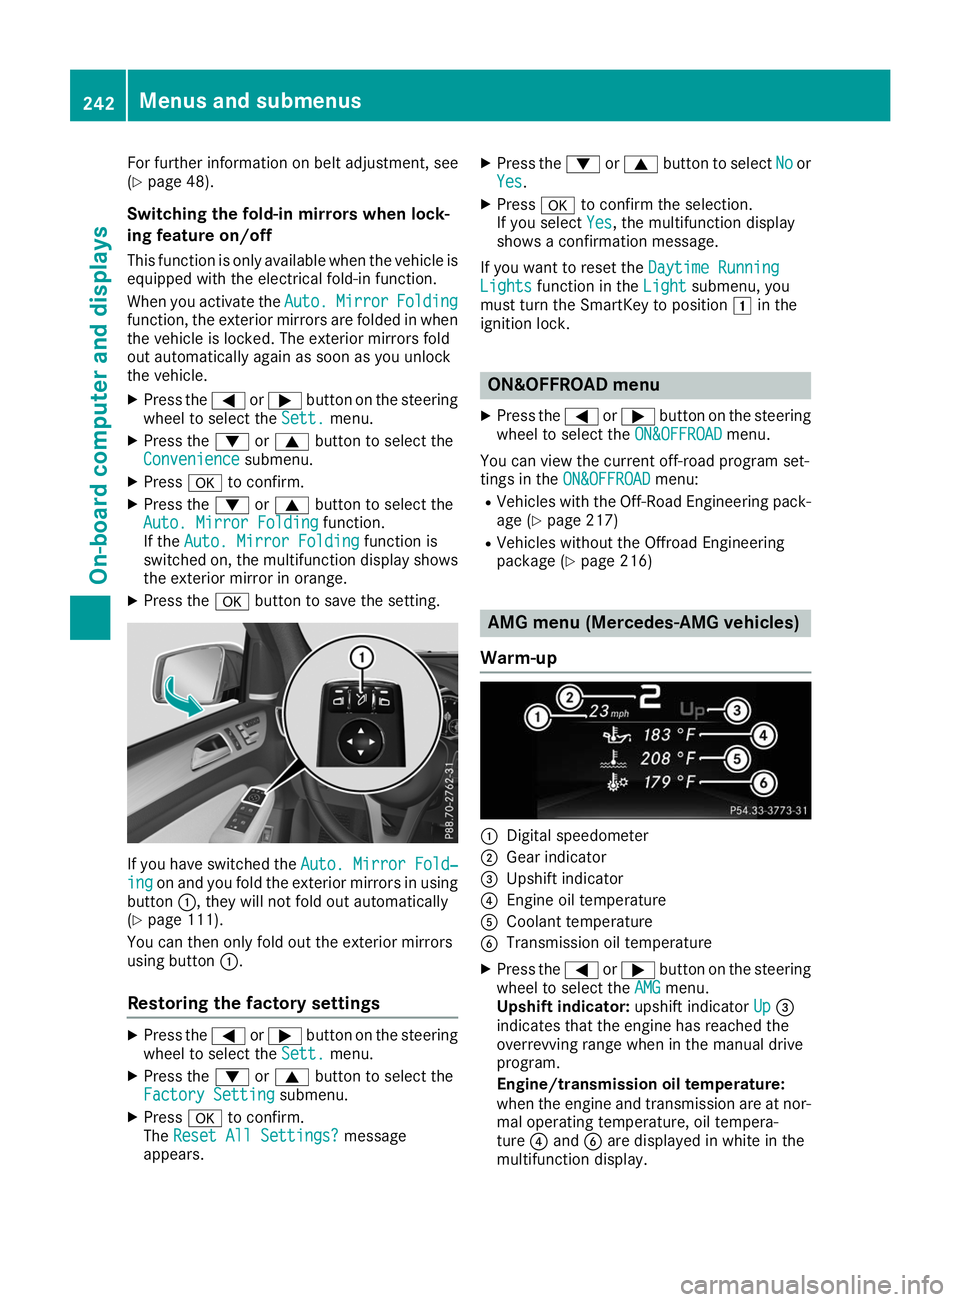
X Press the 0076button to save the setting. If you have switched the
Auto. Mirror Fold‐
Auto. Mirror Fold‐
ing
ing on and you fold the exterior mirrors in using
button 0043, they will not fold out automatically
(Y page 111).
You can then only fold out the exterior mirrors
using button 0043.
Restoring the factory settings X
Press the 0059or0065 button on the steering
wheel to select the Sett.
Sett. menu.
X Press the 0064or0063 button to select the
Factory Setting Factory Setting submenu.
X Press 0076to confirm.
The Reset All Settings?
Reset All Settings? message
appears. X
Press the 0064or0063 button to select No Noor
Yes Yes.
X Press 0076to confirm the selection.
If you select Yes
Yes, the multifunction display
shows a confirmation message.
If you want to reset the Daytime Running
Daytime Running
Lights
Lights function in the Light
Lightsubmenu, you
must turn the SmartKey to position 0047in the
ignition lock. ON&OFFROAD menu
X Press the 0059or0065 button on the steering
wheel to select the ON&OFFROAD
ON&OFFROADmenu.
You can view the current off-road program set-
tings in the ON&OFFROAD
ON&OFFROAD menu:
R Vehicles with the Off-Road Engineering pack-
age (Y page 217)
R Vehicles without the Offroad Engineering
package (Y page 216) AMG menu (Mercedes-AMG vehicles)
Warm-up 0043
Digital speedometer
0044 Gear indicator
0087 Upshift indicator
0085 Engine oil temperature
0083 Coolant temperature
0084 Transmission oil temperature
X Press the 0059or0065 button on the steering
wheel to select the AMG AMGmenu.
Upshift indicator: upshift indicatorUp
Up0087
indicates that the engine has reached the
overrevving range when in the manual drive
program.
Engine/transmission oil temperature:
when the engine and transmission are at nor-
mal operating temperature, oil tempera-
ture 0085and 0084are displayed in white in the
multifunction display. 242
Menus and submenusOn-board computer and displays
Page 267 of 398
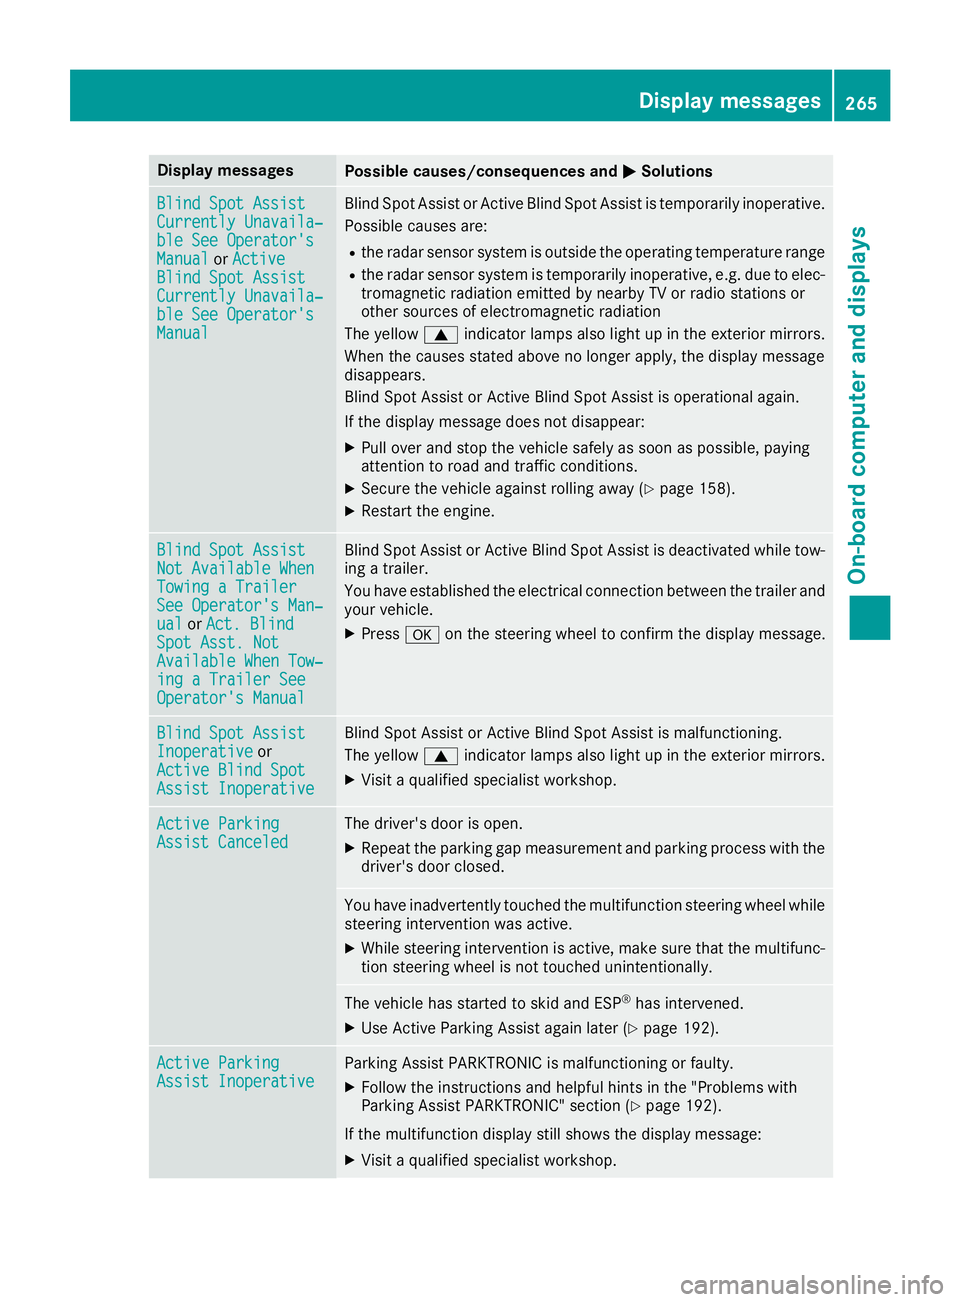
Display messages
Possible causes/consequences and
0050
0050Solutions Blind Spot Assist
Blind Spot Assist
Currently Unavaila‐ Currently Unavaila‐
ble See Operator's ble See Operator's
Manual Manual
orActive
Active
Blind Spot Assist
Blind Spot Assist
Currently Unavaila‐ Currently Unavaila‐
ble See Operator's ble See Operator's
Manual Manual Blind Spot Assist or Active Blind Spot Assist is temporarily inoperative.
Possible causes are:
R the radar sensor system is outside the operating temperature range
R the radar sensor system is temporarily inoperative, e.g. due to elec-
tromagnetic radiation emitted by nearby TV or radio stations or
other sources of electromagnetic radiation
The yellow 0063indicator lamps also light up in the exterior mirrors.
When the causes stated above no longer apply, the display message
disappears.
Blind Spot Assist or Active Blind Spot Assist is operational again.
If the display message does not disappear:
X Pull over and stop the vehicle safely as soon as possible, paying
attention to road and traffic conditions.
X Secure the vehicle against rolling away (Y page 158).
X Restart the engine. Blind Spot Assist Blind Spot Assist
Not Available When Not Available When
Towing a Trailer Towing a Trailer
See Operator's Man‐ See Operator's Man‐
ual ual
orAct. Blind
Act. Blind
Spot Asst. Not
Spot Asst. Not
Available When Tow‐ Available When Tow‐
ing a Trailer See ing a Trailer See
Operator's Manual Operator's Manual Blind Spot Assist or Active Blind Spot Assist is deactivated while tow-
ing a trailer.
You have established the electrical connection between the trailer and
your vehicle.
X Press 0076on the steering wheel to confirm the display message. Blind Spot Assist Blind Spot Assist
Inoperative Inoperative
or
Active Blind Spot
Active Blind Spot
Assist Inoperative Assist Inoperative Blind Spot Assist or Active Blind Spot Assist is malfunctioning.
The yellow
0063indicator lamps also light up in the exterior mirrors.
X Visit a qualified specialist workshop. Active Parking Active Parking
Assist Canceled Assist Canceled The driver's door is open.
X Repeat the parking gap measurement and parking process with the
driver's door closed. You have inadvertently touched the multifunction steering wheel while
steering intervention was active.
X While steering intervention is active, make sure that the multifunc-
tion steering wheel is not touched unintentionally. The vehicle has started to skid and ESP
®
has intervened.
X Use Active Parking Assist again later (Y page 192).Active Parking
Active Parking
Assist Inoperative Assist Inoperative Parking Assist PARKTRONIC is malfunctioning or faulty.
X Follow the instructions and helpful hints in the "Problems with
Parking Assist PARKTRONIC" section (Y page 192).
If the multifunction display still shows the display message:
X Visit a qualified specialist workshop. Display
messages
265On-board computer and displays Z
Page 307 of 398
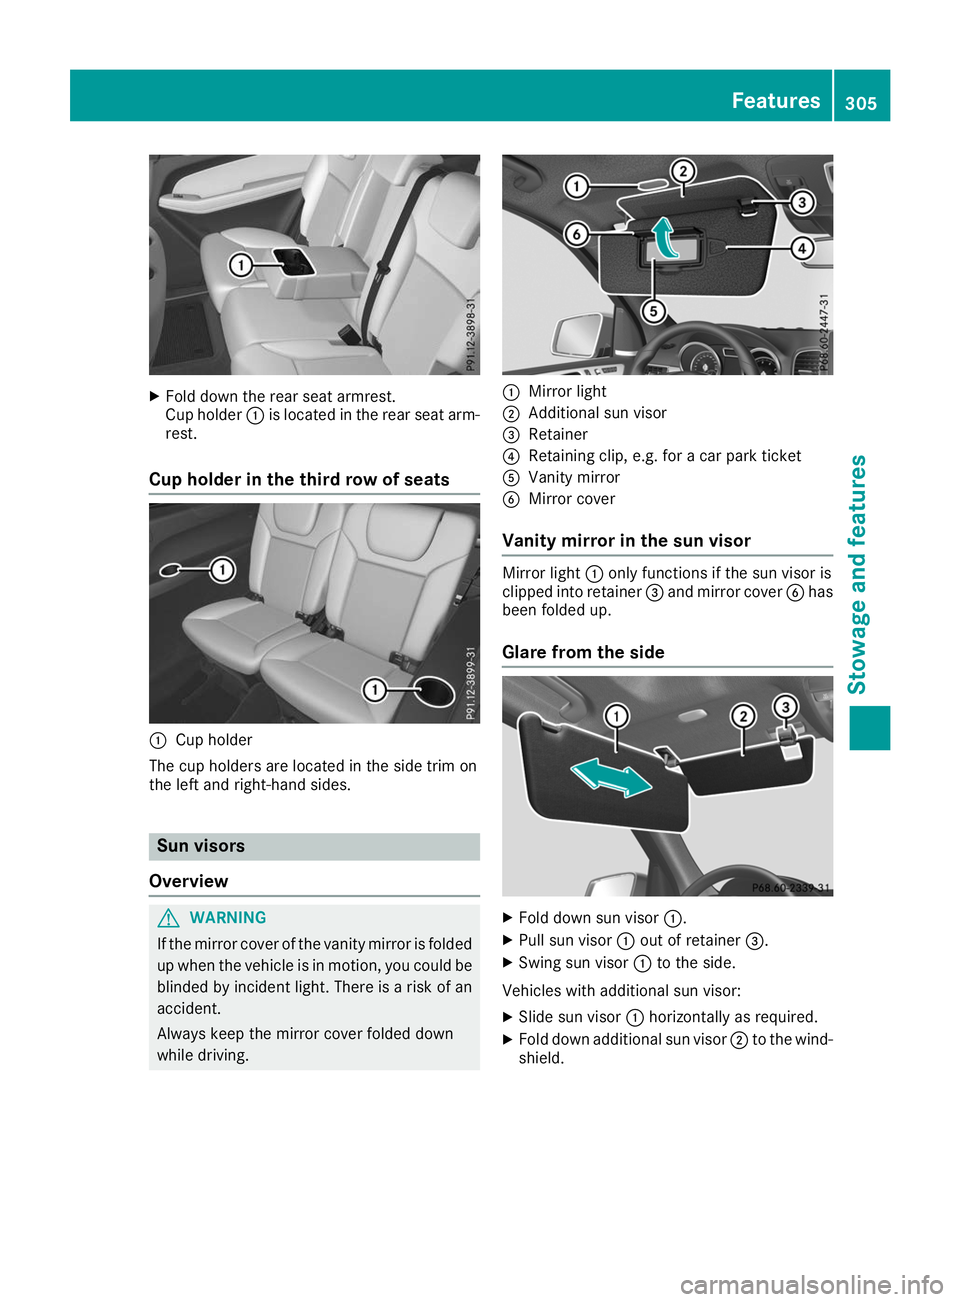
X
Fold down the rear seat armrest.
Cup holder 0043is located in the rear seat arm-
rest.
Cup holder in the third row of seats 0043
Cup holder
The cup holders are located in the side trim on
the left and right-hand sides. Sun visors
Overview G
WARNING
If the mirror cover of the vanity mirror is folded up when the vehicle is in motion, you could be
blinded by incident light. There is a risk of an
accident.
Always keep the mirror cover folded down
while driving. 0043
Mirror light
0044 Additional sun visor
0087 Retainer
0085 Retaining clip, e.g. for a car park ticket
0083 Vanity mirror
0084 Mirror cover
Vanity mirror in the sun visor Mirror light
0043only functions if the sun visor is
clipped into retainer 0087and mirror cover 0084has
been folded up.
Glare from the side X
Fold down sun visor 0043.
X Pull sun visor 0043out of retainer 0087.
X Swing sun visor 0043to the side.
Vehicles with additional sun visor:
X Slide sun visor 0043horizontally as required.
X Fold down additional sun visor 0044to the wind-
shield. Features
305Stowage and features Z
Page 318 of 398
The data you receive contains the following
information:
R the location where the speed limit was excee-
ded
R the time at which the speed limit was excee-
ded
R the selected speed limit which was exceeded
Geo fencing Geo fencing allows you to select areas which the
vehicle should not enter or leave. You will be
informed if the vehicle crosses the boundaries
of the selected areas. You can select the way in which you receive this information beforehand.
Possible options include text message, e-mail or an automated call.
The area can be determined as either a circle or
a polygon with a maximum of ten corners. You
can specify up to ten areas simultaneously. Dif- ferent settings are possible for each area.
These settings can be called up under "Owners
Online" at http://www.mbusa.com.
Alternatively, you can also trigger an Info call
and notify the customer service representative
that you wish to activate geo-fencing.
Currently inactive areas can be activated by text
message.
Triggering the vehicle alarm With this function, you can trigger the vehicle's
panic alarm via text message. An alarm sounds
and the exterior lighting flashes. Depending on
the setting, the panic alarm lasts five or ten sec-
onds. Afterwards, the alarm switches off. Garage door opener
General notes The HomeLink
®
garage door opener integrated
in the rear-view mirror allows you to operate up to three different door and gate systems.
Use the integrated garage door opener only on
garage doors that:
R they are equipped with a safety stop and
reverse feature
R they conform to the current U.S. safety stand-
ards When it has been programmed, the integrated
garage door opener in the rear-view mirror will
assume the function of the garage door sys-
tem's remote control. Please also read the oper-
ating instructions for the garage door system.
When programming a garage door opener, park the vehicle outside the garage. Do not leave the
engine running while programming.
Certain garage door drives are incompatible
with the integrated garage door opener. If you
have difficulty programing the integrated garage
door opener, contact a Mercedes-Benz Service
Center.
Alternatively, you can call the following tele-
phone assistance services:
R USA: Mercedes-Benz Customer Assistance
Center at 1-800-FOR-MERCedes
R Canada: Customer Service at
1-800-387-0100
R HomeLink ®
hotline 1-800-355-3515 (free of
charge)
More information on HomeLink ®
and/or com-
patible products is also available on the Internet
at http://www.homelink.com.
Notes on the declaration of conformity
(Y page 30).
USA: FCC ID: CB2HMIHL4
Canada: IC: 279B-HMIHL4
Important safety notes G
WARNING
When you operate or program the door with
the integrated garage door opener, persons in the range of movement of the door may
become trapped or be struck by the door.
There is a risk of injury.
When using the integrated garage door
opener, always make sure that nobody is
within the range of movement of the door. G
DANGER
Combustion engines emit poisonous exhaust
gases such as carbon monoxide. Inhaling
these exhaust gases is hazardous to health
and can result in poisoning. There is a risk of
fatal injury. Therefore, never leave the engine running an enclosed space without adequate
ventilation. 316
FeaturesStowage and features
Page 319 of 398
Programming
Programming the buttons
Pay attention to the "Important safety notes"
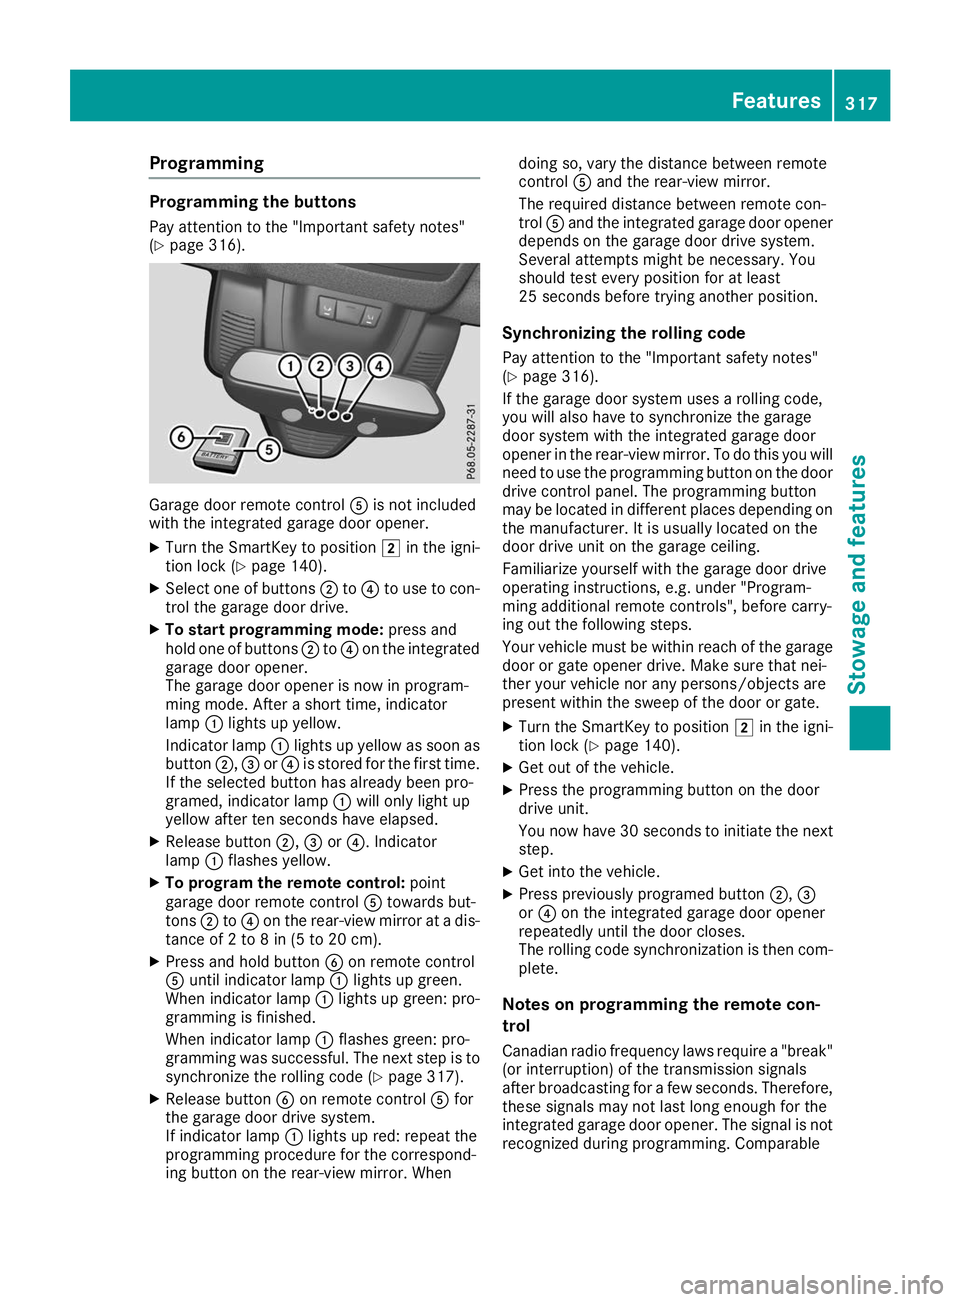
(Y page 316). Garage door remote control
0083is not included
with the integrated garage door opener.
X Turn the SmartKey to position 0048in the igni-
tion lock (Y page 140).
X Select one of buttons 0044to0085 to use to con-
trol the garage door drive.
X To start programming mode: press and
hold one of buttons 0044to0085 on the integrated
garage door opener.
The garage door opener is now in program-
ming mode. After a short time, indicator
lamp 0043lights up yellow.
Indicator lamp 0043lights up yellow as soon as
button 0044,0087or0085 is stored for the first time.
If the selected button has already been pro-
gramed, indicator lamp 0043will only light up
yellow after ten seconds have elapsed.
X Release button 0044,0087or0085. Indicator
lamp 0043flashes yellow.
X To program the remote control: point
garage door remote control 0083towards but-
tons 0044to0085 on the rear-view mirror at a dis-
tance of 2 to 8 in (5 to 20 cm).
X Press and hold button 0084on remote control
0083 until indicator lamp 0043lights up green.
When indicator lamp 0043lights up green: pro-
gramming is finished.
When indicator lamp 0043flashes green: pro-
gramming was successful. The next step is to synchronize the rolling code (Y page 317).
X Release button 0084on remote control 0083for
the garage door drive system.
If indicator lamp 0043lights up red: repeat the
programming procedure for the correspond-
ing button on the rear-view mirror. When doing so, vary the distance between remote
control
0083and the rear-view mirror.
The required distance between remote con-
trol 0083and the integrated garage door opener
depends on the garage door drive system.
Several attempts might be necessary. You
should test every position for at least
25 seconds before trying another position.
Synchronizing the rolling code
Pay attention to the "Important safety notes"
(Y page 316).
If the garage door system uses a rolling code,
you will also have to synchronize the garage
door system with the integrated garage door
opener in the rear-view mirror. To do this you will
need to use the programming button on the door
drive control panel. The programming button
may be located in different places depending on the manufacturer. It is usually located on the
door drive unit on the garage ceiling.
Familiarize yourself with the garage door drive
operating instructions, e.g. under "Program-
ming additional remote controls", before carry-
ing out the following steps.
Your vehicle must be within reach of the garage
door or gate opener drive. Make sure that nei-
ther your vehicle nor any persons/objects are
present within the sweep of the door or gate.
X Turn the SmartKey to position 0048in the igni-
tion lock (Y page 140).
X Get out of the vehicle.
X Press the programming button on the door
drive unit.
You now have 30 seconds to initiate the next
step.
X Get into the vehicle.
X Press previously programed button 0044,0087
or 0085 on the integrated garage door opener
repeatedly until the door closes.
The rolling code synchronization is then com- plete.
Notes on programming the remote con-
trol
Canadian radio frequency laws require a "break" (or interruption) of the transmission signals
after broadcasting for a few seconds. Therefore,
these signals may not last long enough for the
integrated garage door opener. The signal is not recognized during programming. Comparable Features
317Stowage and features Z