2019 MERCEDES-BENZ GLS SUV instrument cluster
[x] Cancel search: instrument clusterPage 167 of 398
You can obtain further information about this
from your authorized Mercedes-Benz Center.
New and replaced brake pads and discs only
reach their optimum braking effect after several
hundred kilometers of driving. Compensate for
this by applying greater force to the brake pedal. Keep this in mind, and adapt your driving and
braking accordingly during this break-in period.
Excessive heavy braking results in correspond-
ingly high brake wear. Observe the 0026brake
wear warning lamp in the instrument cluster and
note any brake status messages in the multi-
function display. Especially for high perform-
ance driving, it is important to maintain and have the brake system checked regularly. Driving on wet roads
Hydroplaning If water has accumulated to a certain depth on
the road surface, there is a danger of hydro-
planing occurring, even if:
R you drive at low speeds
R the tires have adequate tread depth
For this reason, in the event of heavy rain or in
conditions in which hydroplaning may occur,
you must drive in the following manner:
R lower your speed
R avoid ruts
R avoid sudden steering movements
R brake carefully
Driving on flooded roads !
Do not drive through flooded areas. Check
the depth of any water before driving through
it. Drive slowly through standing water. Oth-
erwise, water could enter the vehicle interior
or engine compartment. It can then damage
the engine's or automatic transmission's
electronic components. It can also be sucked
in by the engine's air intake connection and
cause engine damage.
i Vehicles with the AIRMATIC Package:
select the raised vehicle level before driving
through a body of water. Off-road fording !
Under no circumstances should you accel-
erate before entering the water. The bow
wave could cause water to enter and damage
the engine and other assemblies.
! Do not open any of the vehicle's doors while
fording. Otherwise, water could get into the
vehicle interior and damage the vehicle's
electronics and interior equipment.
R Establish how deep the water is and the char-
acteristics of the body of water before ford-
ing.
R Select the highest possible vehicle level.
R Shift to a lower gear using the left-hand steer-
ing wheel paddle shifter.
R Avoid high engine speeds.
R Enter and exit the water at a flat place and at
a steady walking pace.
R Drive slowly and at an even speed through the
water.
R Ensure that a bow wave does not form as you
drive.
R Do not stop and do not switch off the engine.
Water offers a high degree of resistance, and the ground is slippery and in some cases
unstable. Therefore, it is difficult and danger-
ous to pull away in the water.
R Clean any mud from the tire tread after ford-
ing.
R Apply the brakes to dry them after fording.
Always observe the maximum fording depth val- ues (Y page 390). Winter driving
G
WARNING
If you shift down on a slippery road surface in an attempt to increase the engine's braking
effect, the drive wheels could lose their grip.
There is an increased danger of skidding and
accidents.
Do not shift down for additional engine brak-
ing on a slippery road surface. G
DANGER
If the exhaust pipe is blocked or adequate
ventilation is not possible, poisonous gases Driving tips
165Driving and parking
Z
Page 174 of 398
stored speed on downhill gradients by auto-
matically applying the brakes.
Storing or calling up a speed G
WARNING
If you call up the stored speed and it differs
from the current speed, the vehicle acceler-
ates or decelerates. If you do not know the
stored speed, the vehicle could accelerate or brake unexpectedly. There is a risk of an acci-
dent.
Pay attention to the road and traffic condi-
tions before calling up the stored speed. If you do not know the stored speed, store the
desired speed again.
X Briefly pull the cruise control lever towards
you 0087.
X Remove your foot from the accelerator pedal.
Cruise control is operational and when first
activated stores the current speed or regu-
lates the speed of the vehicle to the stored
speed.
Setting a speed Keep in mind that it may take a brief moment
until the vehicle has accelerated or braked to
the speed set.
X Press the cruise control lever up 0043for a
higher speed or down 0044for a lower speed.
X To adjust the set speed in 1 mph incre-
ments (1 km/h increments):
briefly press
the cruise control lever up 0043or down 0044to
the pressure point.
Every time the cruise control lever is pressed
up 0043 or down 0044the last speed stored is
increased or reduced.
X To adjust the set speed in 5 mph incre-
ments (10 km/h increments):
briefly press
the cruise control lever up 0043or down 0044
beyond the pressure point.
Every time the cruise control lever is pressed
up 0043 or down 0044the last speed stored is
increased or reduced.
i Cruise control is not deactivated if you
depress the accelerator pedal. For example, if
you accelerate briefly to overtake, cruise con-
trol adjusts the vehicle's speed to the last
speed stored after you have finished overtak-
ing. Deactivating cruise control There are several ways to deactivate cruise con-
trol:
X Briefly press the cruise control lever for-
wards 0043.
or X Brake.
Cruise control is automatically deactivated if: R you engage the electric parking brake
R you are driving at less than 20 mph (30 km/h)
R ESP ®
intervenes or you deactivate ESP ®
R you activate DSR
R you activate the Offroad Plus program (vehi-
cles with the Off-road Engineering Package)
R you shift the transmission to position 005C
while driving
If cruise control is deactivated, you will hear a
warning tone. You will see the Cruise Con‐ Cruise Con‐
trol Off
trol Off message in the multifunction display
for approximately five seconds.
i When you switch off the engine, the last
speed stored is cleared. Active Distance Assist DISTRONIC
General notes Active Distance Assist DISTRONIC regulates the
speed and automatically helps you maintain the
distance from the vehicle detected in front.
Vehicles are detected with the aid of the radar
sensor system. Active Distance Assist
DISTRONIC brakes automatically so that the set
speed is not exceeded.
You must select a lower gear in good time on
long and steep downhill gradients, especially if
the vehicle is laden or towing a trailer. By doing so, you will make use of the braking effect of theengine. This relieves the load on the brake sys-
tem and prevents the brakes from overheating
and wearing too quickly.
If Active Distance Assist DISTRONIC detects
that there is a risk of a collision with the vehicle
in front, you will be warned visually and audibly.
Active Distance Assist DISTRONIC cannot pre-
vent a collision without your intervention. An
intermittent warning tone will then sound and
the distance warning lamp will light up in the
instrument cluster. Brake immediately in order 172
Driving systemsDriving and parking
Page 180 of 398
Displays in the instrument cluster
Displays in the speedometer
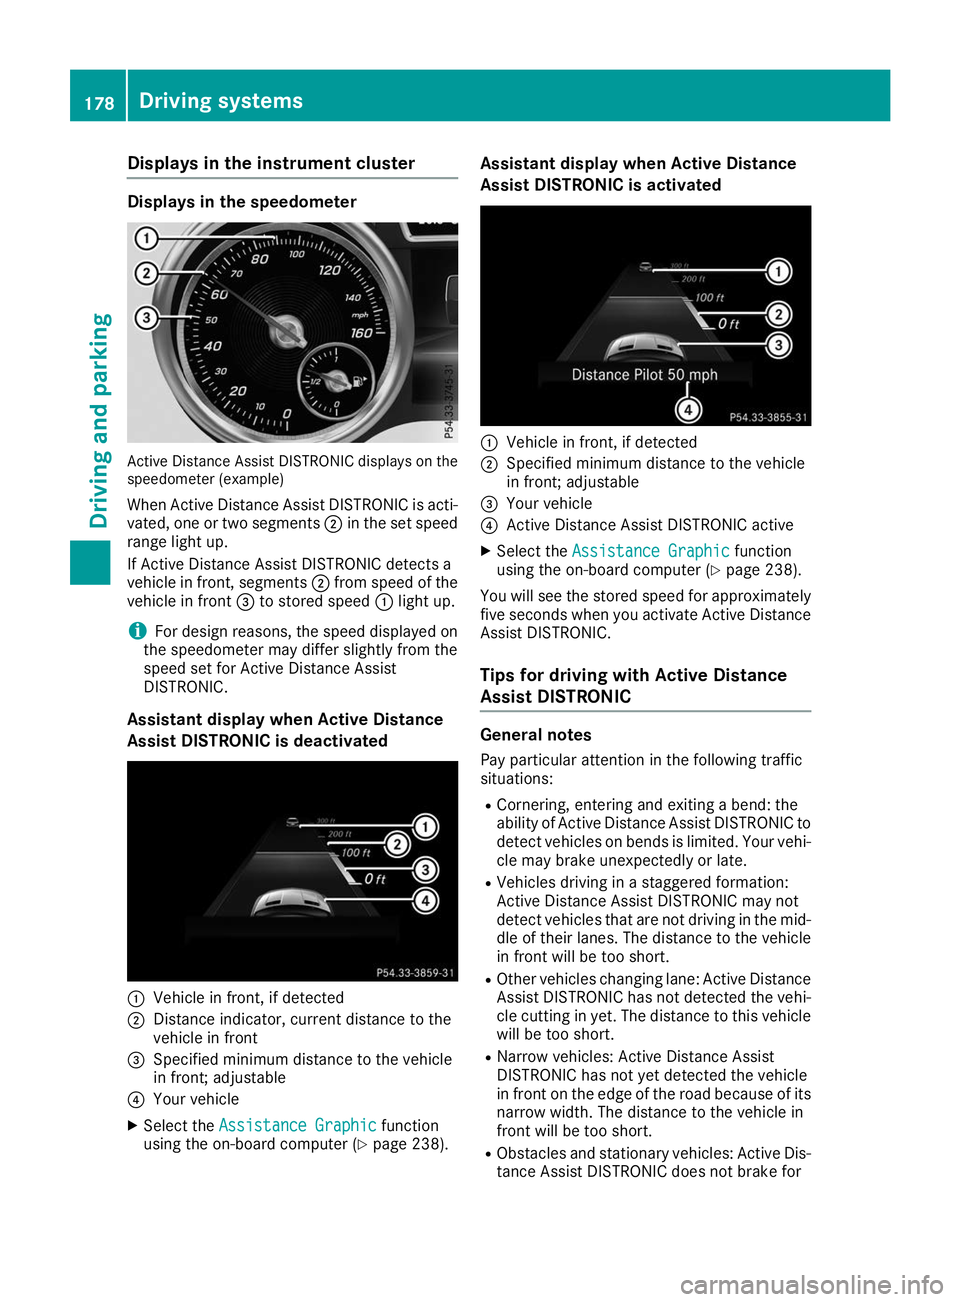
Active Distance Assist DISTRONIC displays on the
speedometer (example)
When Active Distance Assist DISTRONIC is acti-
vated, one or two segments 0044in the set speed
range light up.
If Active Distance Assist DISTRONIC detects a
vehicle in front, segments 0044from speed of the
vehicle in front 0087to stored speed 0043light up.
i For design reasons, the speed displayed on
the speedometer may differ slightly from the
speed set for Active Distance Assist
DISTRONIC.
Assistant display when Active Distance
Assist DISTRONIC is deactivated 0043
Vehicle in front, if detected
0044 Distance indicator, current distance to the
vehicle in front
0087 Specified minimum distance to the vehicle
in front; adjustable
0085 Your vehicle
X Select the Assistance Graphic Assistance Graphic function
using the on-board computer (Y page 238).Assistant display when Active Distance
Assist DISTRONIC is activated
0043
Vehicle in front, if detected
0044 Specified minimum distance to the vehicle
in front; adjustable
0087 Your vehicle
0085 Active Distance Assist DISTRONIC active
X Select the Assistance Graphic Assistance Graphic function
using the on-board computer (Y page 238).
You will see the stored speed for approximately five seconds when you activate Active Distance
Assist DISTRONIC.
Tips for driving with Active Distance
Assist DISTRONIC General notes
Pay particular attention in the following traffic
situations:
R Cornering, entering and exiting a bend: the
ability of Active Distance Assist DISTRONIC to detect vehicles on bends is limited. Your vehi-cle may brake unexpectedly or late.
R Vehicles driving in a staggered formation:
Active Distance Assist DISTRONIC may not
detect vehicles that are not driving in the mid-
dle of their lanes. The distance to the vehiclein front will be too short.
R Other vehicles changing lane: Active Distance
Assist DISTRONIC has not detected the vehi-
cle cutting in yet. The distance to this vehicle
will be too short.
R Narrow vehicles: Active Distance Assist
DISTRONIC has not yet detected the vehicle
in front on the edge of the road because of its
narrow width. The distance to the vehicle in
front will be too short.
R Obstacles and stationary vehicles: Active Dis-
tance Assist DISTRONIC does not brake for 178
Driving syste
msDriving and parking
Page 196 of 398
R
that are parallel to the direction of travel and
at least 39.5 in (1.0 m)longer than your vehi-
cle
R that are at right angles to the direction of
travel and at least 39.5 in (1.0 m) wider than
your vehicle
i Note that Active Parking Assist cannot
measure the size of a parking space if it is at
right angles to the direction of travel. You will
need to judge whether your vehicle will fit into the parking space.
When driving at speeds below 19 mph
(30 km/h), you will see parking symbol 0044as a
status indicator in the instrument cluster. When
a parking space has been detected, an arrow
towards the right or the left also appears. By
default, Active Parking Assist only displays park- ing spaces on the front-passenger side. Parking spaces on the driver's side are displayed as
soon as the turn signal on the driver's side is
activated. When parking on the driver's side,
this must remain activated until you confirm the
use of Active Parking Assist by pressing the
0076 button on the multifunction steering
wheel. The system automatically determines
whether the parking space is parallel or at right
angles to the direction of travel.
A parking space is displayed while you are driv- ing past it, and until you are approximately 50 ft
(15 m) away from it.
Parking G
WARNING
If you leave the driver's seat when the vehicle is being braked only by the Active Parking
Assist, it could roll away in the following sit-
uations:
R if there is a malfunction in the system or in
the voltage supply
R if the electrical system in the engine com-
partment, the battery or the fuses have
been tampered with
R if the battery is disconnected
R if the vehicle is accelerated, e.g. by a vehi-
cle occupant
There is a risk of an accident.
Before leaving the vehicle, always secure it
against rolling away. i
If Parking Assist PARKTRONIC detects
obstacles, Active Parking Assist will brake
automatically whilst the vehicle is parking.
You are responsible for braking in good time.
X Stop the vehicle when the parking space sym-
bol shows the desired parking space in the
instrument cluster.
X Shift the transmission to position 005E.
The Start
Start Parking Parking Assist?
Assist?Yes:
Yes:OK
OKNo:
No:
0038 message will appear on the multifunc-
tion display.
X To cancel the procedure: press the0038
button on the multifunction steering wheel or pull away.
or
X To park using Active Parking Assist: press
the 0076 button on the multifunction steering
wheel.
The Parking
Parking Assist AssistActive
ActiveAccelerate
Accelerate
and Brake Observe Surroundings
and Brake Observe Surroundings mes-
sage will appear on the multifunction display.
X Let go of the multifunction steering wheel.
X Back up the vehicle, being ready to brake at all
times. When backing up, drive at a speed
below approximately 6 mph (10 km/h). Oth-
erwise, Active Parking Assist will be canceled.
Active Parking Assist brakes the vehicle to a
standstill when the vehicle approaches the
rear border of the parking space.
Maneuvering may be required in tight parking
spaces.
The Parking Assist Active Select D Parking Assist Active Select D
Observe Surroundings
Observe Surroundings message will appear
on the multifunction display.
X Shift the transmission to position 005Bwhile
the vehicle is stationary.
Active Parking Assist immediately steers in
the other direction.
The Parking Parking Assist
AssistActive
ActiveAccelerate
Accelerate
and Brake Observe Surroundings
and Brake Observe Surroundings mes-
sage will appear on the multifunction display.
i You will achieve the best results by waiting
for the steering procedure to complete before
pulling away.
X Drive forwards and be ready to brake at all
times.
Active Parking Assist brakes the vehicle to a
standstill.
The Parking Assist Active Select R Parking Assist Active Select R
Observe Surroundings
Observe Surroundings message will appear
on the multifunction display. 194
Driving systemsDriving and parking
Page 198 of 398
the vehicle has exited the parking space com-
pletely. This is useful, for example when you
recognize that it is already possible to pull out of
the parking space.
Canceling Active Parking Assist X
Stop the movement of the multifunction
steering wheel or steer yourself.
Active Parking Assist will be canceled at once.
The Active Parking Assist Canceled
Active Parking Assist Canceled
message appears on the multifunction dis-
play.
or X Press the Parking Assist PARKTRONIC button
(Y page 191).
Parking Assist PARKTRONIC is switched off
and Active Parking Assist is immediately can-
celed. The Active Parking Assist Can‐
Active Parking Assist Can‐
celed celed message appears on the multifunction
display.
Active Parking Assist is canceled automatically
if: R the electric parking brake is engaged
R transmission position 005Dis selected
R parking using Active Parking Assist is no lon-
ger possible
R you are driving faster than 6 mph (10 km/h)
R a wheel spins, ESP ®
intervenes or fails. The
00E5 warning lamp lights up in the instrument
cluster
A warning tone sounds. The parking symbol dis-
appears and the multifunction display shows the
Active
Active Parking Parking Assist
AssistCanceled
Canceled message.
When Active Parking Assist is canceled, you
must steer and brake again yourself.
If a system malfunction occurs, the vehicle is
braked to a standstill. To drive on, depress the
accelerator again. Rear view camera
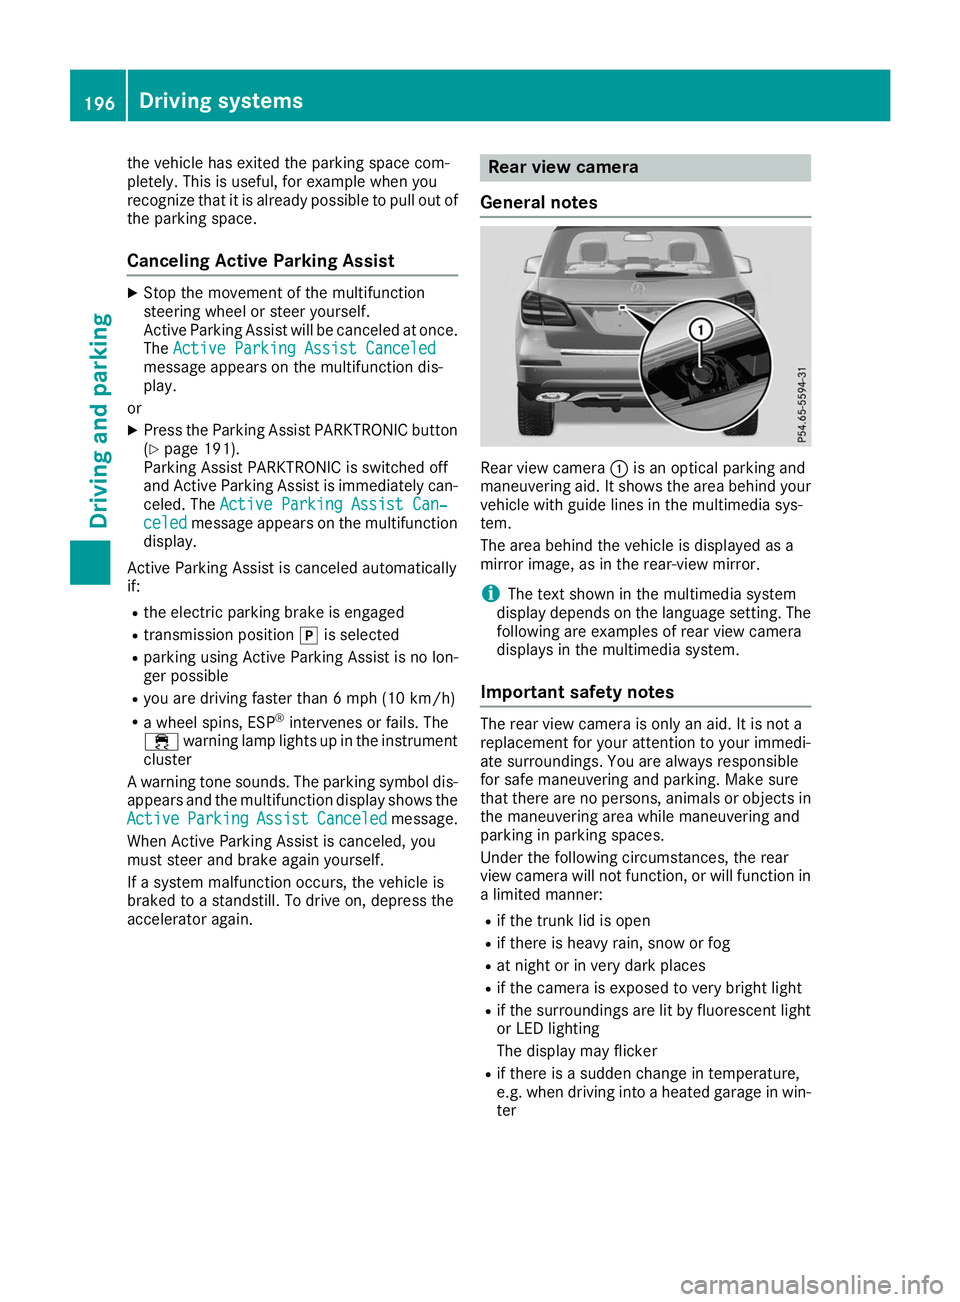
General notes Rear view camera
0043is an optical parking and
maneuvering aid. It shows the area behind your
vehicle with guide lines in the multimedia sys-
tem.
The area behind the vehicle is displayed as a
mirror image, as in the rear-view mirror.
i The text shown in the multimedia system
display depends on the language setting. The
following are examples of rear view camera
displays in the multimedia system.
Important safety notes The rear view camera is only an aid. It is not a
replacement for your attention to your immedi-
ate surroundings. You are always responsible
for safe maneuvering and parking. Make sure
that there are no persons, animals or objects in
the maneuvering area while maneuvering and
parking in parking spaces.
Under the following circumstances, the rear
view camera will not function, or will function in
a limited manner:
R if the trunk lid is open
R if there is heavy rain, snow or fog
R at night or in very dark places
R if the camera is exposed to very bright light
R if the surroundings are lit by fluorescent light
or LED lighting
The display may flicker
R if there is a sudden change in temperature,
e.g. when driving into a heated garage in win-
ter 196
Driving systemsDriving an
d parking
Page 208 of 398
On long journeys, take regular breaks in good
time to allow yourself to rest. If you do not take a break, you will be warned again after
15 minutes at the earliest. This will only happen
if ATTENTION ASSIST still detects typical indi-
cators of fatigue or increasing lapses in concen- tration.
Vehicles with COMAND: if a warning is issued
in the multifunction display, a service station
search is performed in COMAND. You can select a service station and navigation to this service
station will then begin. This function can be acti-
vated and deactivated in COMAND. Traffic Sign Assist
General notes Traffic Sign Assist displays the maximum speed
permitted to the driver in the instrument cluster.
The data stored in the navigation system and
general traffic regulations are used to determine
the current speed limit.
As Traffic Sign Assist is a map-based system,
traffic signs put up temporarily (e.g. near road-
works) are not detected.
If a traffic sign that is relevant to your vehicle is passed, the display of the speed limits is upda-
ted.
Traffic signs with a restriction indicated by an
additional sign (e.g. in wet conditions) are also
shown.
The traffic signs are only displayed with the
restrictions if:
R The regulation must be observed with the
restriction, or
R Traffic Sign Assist is unable to determine
whether the restriction applies
If Traffic Sign Assist is unable to determine a
maximum permitted speed from any of the avail- able sources, no speed limit is displayed in the
instrument cluster either. Traffic Sign Assist is not available in all coun-
tries. In this case, symbol
0043is shown in the
assistance graphic display (Y page 238).
Important safety notes Traffic Sign Assist is only an aid and is not always
able to correctly display speed limits. Traffic
signs always have priority over the Traffic Sign
Assist display.
The system may be either functionally impaired
or temporarily unavailable if the information in
the digital street map of the navigation system is incorrect or out of date.
Instrument cluster display Displaying the assistance graphic
X Call up the assistance graphics display func-
tion using the on-board computer
(Y page 238).
X Select the Traffic Sign Assist display.
Detected traffic signs are displayed in the
instrument cluster.
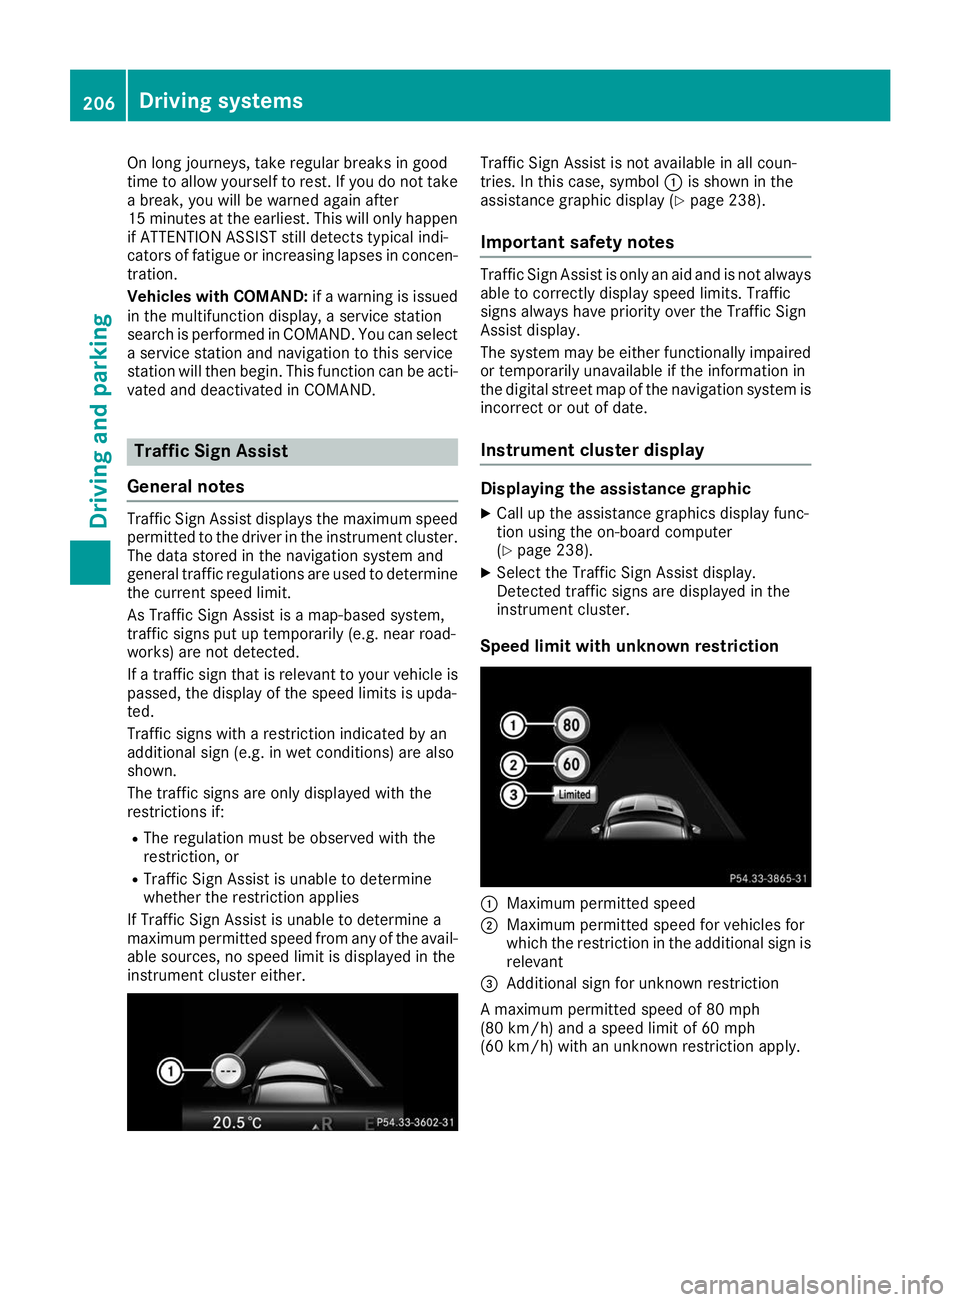
Speed limit with unknown restriction 0043
Maximum permitted speed
0044 Maximum permitted speed for vehicles for
which the restriction in the additional sign is
relevant
0087 Additional sign for unknown restriction
A maximum permitted speed of 80 mph
(80 km/h) and a speed limit of 60 mph
(60 km/h) with an unknown restriction apply. 206
Driving systemsDriving and parking
Page 232 of 398
Important safety notes
G
WARNING
If you operate information systems and com-
munication equipment integrated in the vehi- cle when driving, you may be distracted from
the traffic situation. You could also lose con-
trol of the vehicle. There is a risk of an acci-
dent.
Only operate this equipment when the traffic
situation permits. If you are not sure that this
is possible, park the vehicle paying attention
to traffic conditions and operate the equip-
ment when the vehicle is stationary.
You must observe the legal requirements for the country in which you are currently driving whenoperating the on-board computer. G
WARNING
If the instrument cluster has failed or mal-
functioned, you may not recognize function
restrictions in systems relevant to safety. The operating safety of your vehicle may be
impaired. There is a risk of an accident.
Drive on carefully. Have the vehicle checked
at a qualified specialist workshop immedi-
ately.
If the operating safety of your vehicle is
impaired, pull over as soon as it is safe to do so.
Contact a qualified specialist workshop.
The on-board computer only shows messages or warnings from certain systems in the multifunc-tion display. You should therefore make sure
your vehicle is operating safely at all times.
For an overview, see the instrument panel illus-
tration (Y page 37). Displays and operation
Instrument cluster lighting
The lighting in the instrument cluster, in the dis-
plays and the controls in the vehicle interior can be adjusted using the brightness control knob.
The brightness control knob is located on the
bottom left of the instrument cluster
(Y page 37). X
Turn the brightness control knob clockwise or
counter-clockwise.
If you turn the light switch to 0058,0060or
0058, the brightness is dependent upon the
brightness of the ambient light.
i The light sensor in the instrument cluster
automatically controls the brightness of the
multifunction display.
In daylight, the displays in the instrument
cluster are not illuminated. Speedometer with segments
The segments in the speedometer indicate
which speed range is available.
R Cruise control activated (Y page 171):
The segments light up from the stored speed to the maximum speed.
R Active Distance Assist DISTRONIC activated
(Y page 172):
One or two segments in the set speed range
light up.
R Active Distance Assist DISTRONIC detects a
vehicle in front moving more slowly than the
stored speed:
The segments between the speed of the vehi- cle in front and the stored speed light up. Tachometer
! Do not drive in the overrevving range, as this
could damage the engine.
The red band in the tachometer indicates the
engine's overrevving range.
The fuel supply is interrupted to protect the
engine when the red band is reached. Outside temperature display
You should pay special attention to road condi-
tions when temperatures are around freezing
point.
Bear in mind that the outside temperature dis-
play indicates the temperature measured and
does not record the road temperature.
The outside temperature display is in the multi-
function display (Y page 232).230
Displays and operationOn-board computer and displays
Page 242 of 398
Settings menu
Introduction Depending on the equipment installed in the
vehicle, In the
Sett. Sett.menu you have the follow-
ing options:
R Changing the instrument cluster settings
(Y page 240)
R Changing the light settings (Y page 240)
R Changing the vehicle settings (Y page 241)
R Changing the convenience settings
(Y page 241)
R Restoring the factory settings (Y page 242)
Instrument cluster submenu Selecting the distance unit
The Display Unit Speedometer / Odome‐ Display Unit Speedometer / Odome‐
ter:
ter: function allows you to choose whether
certain displays appear in kilometers or miles in
the multifunction display.
X Press the 0059or0065 button on the steering
wheel to select the Sett.
Sett. menu.
X Press the 0064or0063 button to select the
Instrument Cluster
Instrument Cluster submenu.
X Press 0076to confirm.
X Press the 0064or0063 button to select the
Display Unit Speedometer / Odometer
Display Unit Speedometer / Odometer
function.
You will see the selected setting: km kmormiles
miles.
X Press the 0076button to save the setting.
The selected unit of measurement for distance
applies to:
R Digital speedometer in the Trip
Trip menu
R Odometer and the trip odometer
R Trip computer
R Current consumption and the range
R Navigation instructions in the Navi
Navimenu
R Cruise control
R Active Distance Assist DISTRONIC
R ASSYST PLUS service interval display
Selecting permanent display
The Permanent Display:
Permanent Display: function allows you
to choose whether the multifunction display
always shows the outside temperature or the
speed. The speed display is inverse to the speedome-
ter.
X Press the 0059or0065 button on the steering
wheel to select the Sett. Sett.menu.
X Press the 0064or0063 button to select the
Instrument Cluster
Instrument Cluster submenu.
X Confirm by pressing 0076on the steering
wheel.
X Press the 0064or0063 button to select the
Permanent Display:
Permanent Display: function.
The current setting, Outside Temperature
Outside Temperature,
Speedometer [km/h]
Speedometer [km/h] orSpeedometer
Speedometer
[mph]
[mph] appears.
X To change the setting: press0076again.
Light submenu Setting the daytime running lamps
This function is not available in Canada.
X Press the 0059or0065 button on the steering
wheel to select the Sett.
Sett.menu.
X Press the 0064or0063 button to select the
Light
Light submenu.
X Press 0076to confirm.
X Press 0064or0063 to select the Daytime
Daytime
Running Lights
Running Lights function.
If the Daytime
Daytime Running
RunningLights
Lightsfunction has
been switched on, the cone of light and the
0086 symbol in the multifunction display are
shown in orange.
X Press the 0076button to save the setting.
Further information on daytime running lamps
(Y page 115).
Switching the Intelligent Light System
on/off
X Press the 0059or0065 button on the steering
wheel to select the Sett.
Sett. menu.
X Press the 0064or0063 button to select the
Light Light submenu.
X Press 0076to confirm.
X Press the 0064or0063 button to select the
Intell. Light System
Intell. Light System function.
If the Intell. Light System
Intell. Light System function has
been switched on, the cone of light and the
0058 symbol in the multifunction display are
shown in orange.
X Press the 0076button to save the setting.
When you activate Intell. Light System Intell. Light System,
you activate the following functions: 240
Menus and submenusOn-board computer and displays