2019 MERCEDES-BENZ GLS SUV window
[x] Cancel search: windowPage 94 of 398
set correctly. If this is not the case, repeat the
steps above. Problems with the side windows
G
WARNING
If you close a side window again immediately after it has been blocked or reset, the side window
closes with increased or maximum force. The reversing feature is then not active. Parts of the
body could be trapped in the closing area in the process. This poses an increased risk of injury or even fatal injury.
Make sure that no parts of the body are in the closing area. To stop the closing process, releasethe switch or push the switch again to reopen the side window. Problem
Possible causes/consequences and
0050 0050Solutions A side window cannot be
closed because it is
blocked by objects, e.g.
leaves in the window
guide. X
Remove the objects.
X Close the side window. A side window cannot be
closed and you cannot
see the cause. If a side window is obstructed during closing and reopens again
slightly:
X Immediately after the window blocks, pull the corresponding switch
again until the side window has closed.
The side window is closed with increased force.
If a side window is obstructed again during closing and reopens again slightly:
X Immediately after the window blocks, pull the corresponding switch
again until the side window has closed.
The side window is closed without the automatic reversing feature. The side windows cannot
be opened or closed with
convenience opening. The SmartKey battery is discharged or nearly discharged.
X Check the SmartKey battery (Y page 80) and replace it if necessary
(Y page 80). If a side window will still not open or close due to a malfunction, consult a qualified specialist
workshop. Sliding sunroof
Important safety notes
Your vehicle may be equipped with a sliding
sunroof or a panorama roof with power tilt/slid- ing panel. In the following section, the term
"sliding sunroof" refers to both sliding sunroof
variants. G
WARNING
While opening and closing the sliding sunroof, body parts in close proximity could become
trapped. There is a risk of injury.
Make sure that no body parts are in close
proximity during the opening and closing pro-cedures. 92
Sliding sunroofOpening and closing
Page 109 of 398
The system automatically switches down from
level 2to level 1after approximately ten
minutes.
The system automatically switches off approx-
imately 35 minutes after it is set to level 1.
X Turn the SmartKey to position 0047or0048 in the
ignition lock (Y page 140).
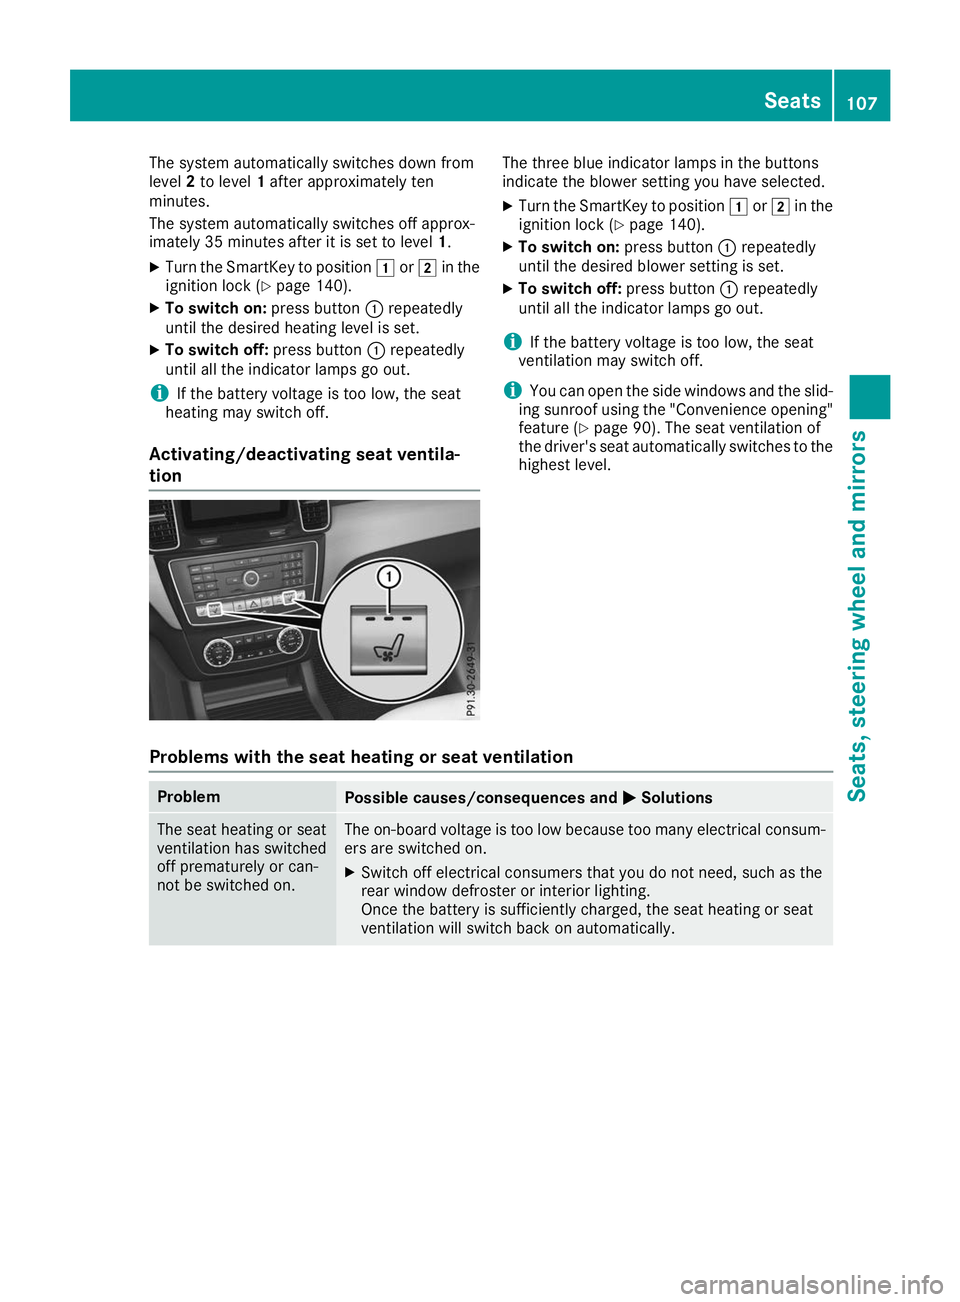
X To switch on: press button0043repeatedly
until the desired heating level is set.
X To switch off: press button0043repeatedly
until all the indicator lamps go out.
i If the battery voltage is too low, the seat
heating may switch off.
Activating/deactivating seat ventila-
tion The three blue indicator lamps in the buttons
indicate the blower setting you have selected.
X Turn the SmartKey to position 0047or0048 in the
ignition lock (Y page 140).
X To switch on: press button0043repeatedly
until the desired blower setting is set.
X To switch off: press button0043repeatedly
until all the indicator lamps go out.
i If the battery voltage is too low, the seat
ventilation may switch off.
i You can open the side windows and the slid-
ing sunroof using the "Convenience opening" feature (Y page 90). The seat ventilation of
the driver's seat automatically switches to the
highest level.
Problems with the seat heating or seat ventilation Problem
Possible causes/consequences and
0050 0050Solutions The seat heating or seat
ventilation has switched
off prematurely or can-
not be switched on. The on-board voltage is too low because too many electrical consum-
ers are switched on.
X Switch off electrical consumers that you do not need, such as the
rear window defroster or interior lighting.
Once the battery is sufficiently charged, the seat heating or seat
ventilation will switch back on automatically. Seats
107Seats, steering wheel and mirrors Z
Page 111 of 398
Steering wheel heating
Switching on/off X
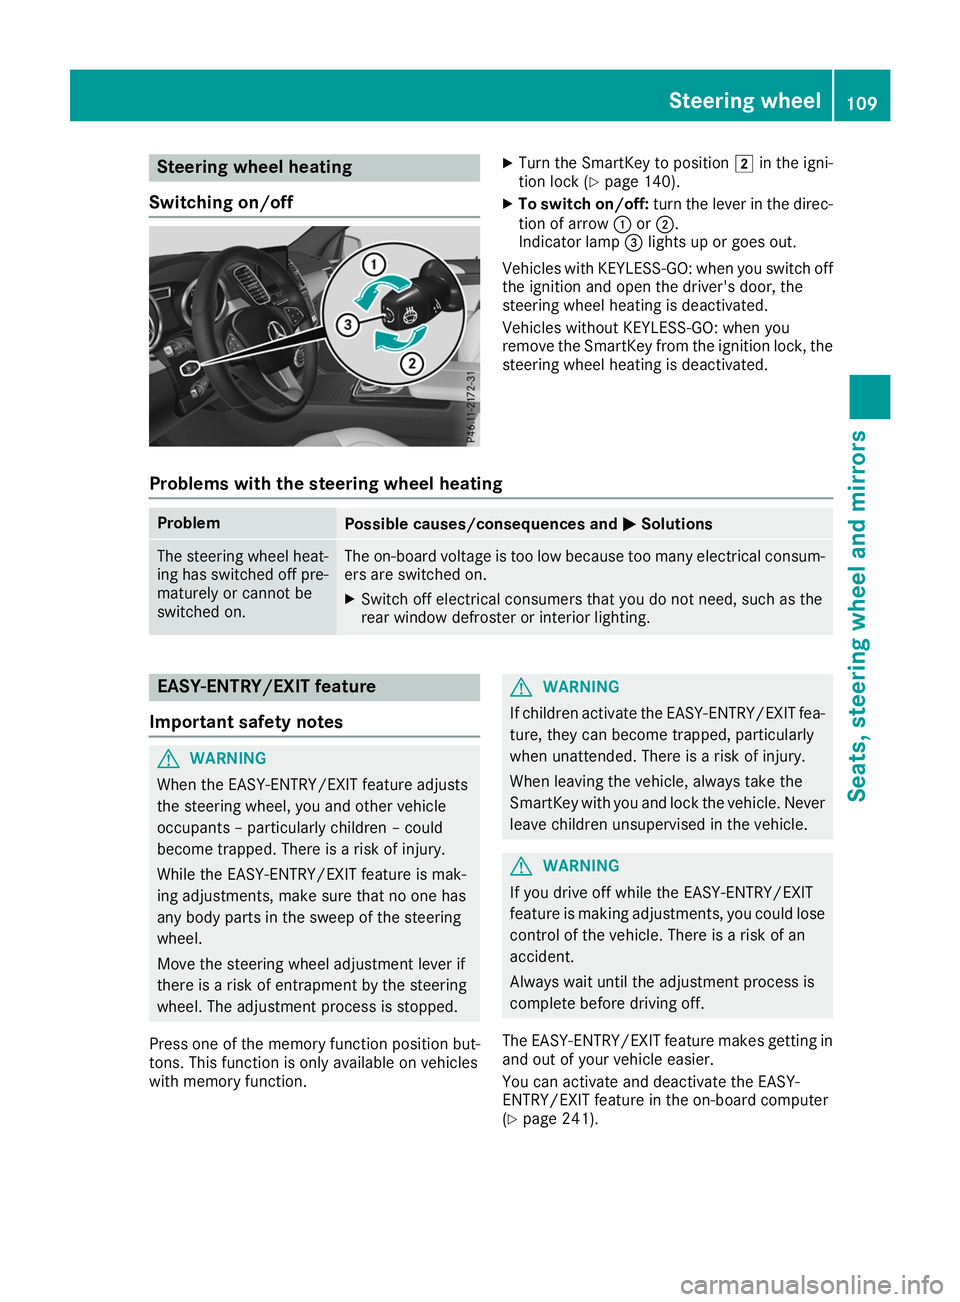
Turn the SmartKey to position 0048in the igni-
tion lock (Y page 140).
X To switch on/off: turn the lever in the direc-
tion of arrow 0043or0044.
Indicator lamp 0087lights up or goes out.
Vehicles with KEYLESS-GO: when you switch off the ignition and open the driver's door, the
steering wheel heating is deactivated.
Vehicles without KEYLESS-GO: when you
remove the SmartKey from the ignition lock, the
steering wheel heating is deactivated.
Problems with the steering wheel heating Problem
Possible causes/consequences and
0050 0050Solutions The steering wheel heat-
ing has switched off pre-
maturely or cannot be
switched on. The on-board voltage is too low because too many electrical consum-
ers are switched on.
X Switch off electrical consumers that you do not need, such as the
rear window defroster or interior lighting. EASY-ENTRY/EXIT feature
Important safety notes G
WARNING
When the EASY-ENTRY/EXIT feature adjusts
the steering wheel, you and other vehicle
occupants – particularly children – could
become trapped. There is a risk of injury.
While the EASY-ENTRY/EXIT feature is mak-
ing adjustments, make sure that no one has
any body parts in the sweep of the steering
wheel.
Move the steering wheel adjustment lever if
there is a risk of entrapment by the steering
wheel. The adjustment process is stopped.
Press one of the memory function position but-
tons. This function is only available on vehicles
with memory function. G
WARNING
If children activate the EASY-ENTRY/EXIT fea- ture, they can become trapped, particularly
when unattended. There is a risk of injury.
When leaving the vehicle, always take the
SmartKey with you and lock the vehicle. Never leave children unsupervised in the vehicle. G
WARNING
If you drive off while the EASY-ENTRY/EXIT
feature is making adjustments, you could lose
control of the vehicle. There is a risk of an
accident.
Always wait until the adjustment process is
complete before driving off.
The EASY-ENTRY/EXIT feature makes getting in
and out of your vehicle easier.
You can activate and deactivate the EASY-
ENTRY/EXIT feature in the on-board computer
(Y page 241). Steering wheel
109Seats, steering wheel and mirrors Z
Page 113 of 398
X
Turn the SmartKey to position 0047or0048 in the
ignition lock (Y page 140).
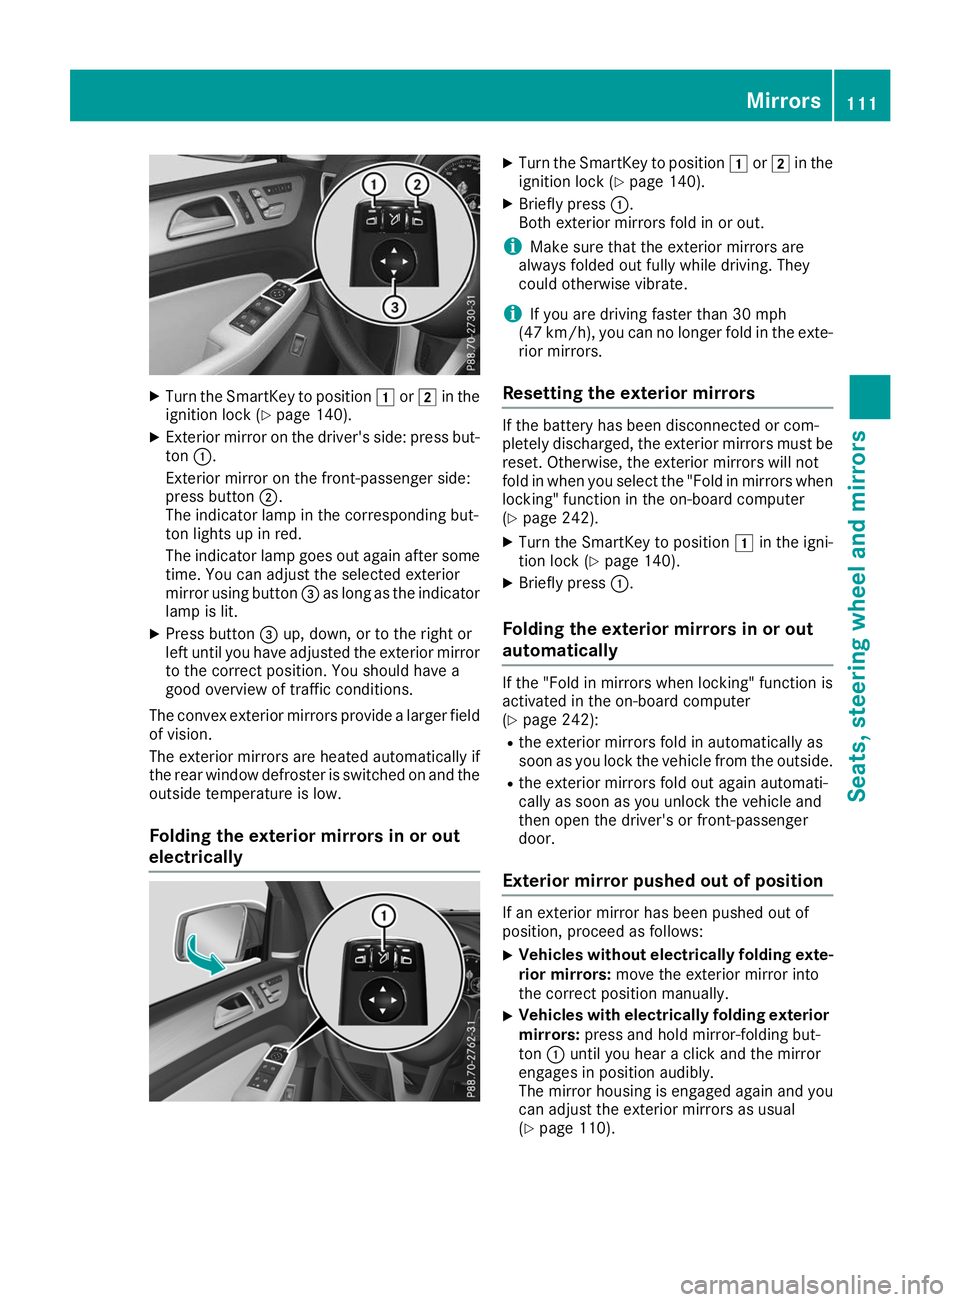
X Exterior mirror on the driver's side: press but-
ton 0043.
Exterior mirror on the front-passenger side:
press button 0044.
The indicator lamp in the corresponding but-
ton lights up in red.
The indicator lamp goes out again after some
time. You can adjust the selected exterior
mirror using button 0087as long as the indicator
lamp is lit.
X Press button 0087up, down, or to the right or
left until you have adjusted the exterior mirror
to the correct position. You should have a
good overview of traffic conditions.
The convex exterior mirrors provide a larger field of vision.
The exterior mirrors are heated automatically if
the rear window defroster is switched on and the
outside temperature is low.
Folding the exterior mirrors in or out
electrically X
Turn the SmartKey to position 0047or0048 in the
ignition lock (Y page 140).
X Briefly press 0043.
Both exterior mirrors fold in or out.
i Make sure that the exterior mirrors are
always folded out fully while driving. They
could otherwise vibrate.
i If you are driving faster than 30 mph
(47 km/h), you can no longer fold in the exte-
rior mirrors.
Resetting the exterior mirrors If the battery has been disconnected or com-
pletely discharged, the exterior mirrors must be
reset. Otherwise, the exterior mirrors will not
fold in when you select the "Fold in mirrors whenlocking" function in the on-board computer
(Y page 242).
X Turn the SmartKey to position 0047in the igni-
tion lock (Y page 140).
X Briefly press 0043.
Folding the exterior mirrors in or out
automatically If the "Fold in mirrors when locking" function is
activated in the on-board computer
(Y
page 242):
R the exterior mirrors fold in automatically as
soon as you lock the vehicle from the outside.
R the exterior mirrors fold out again automati-
cally as soon as you unlock the vehicle and
then open the driver's or front-passenger
door.
Exterior mirror pushed out of position If an exterior mirror has been pushed out of
position, proceed as follows:
X
Vehicles without electrically folding exte-
rior mirrors: move the exterior mirror into
the correct position manually.
X Vehicles with electrically folding exterior
mirrors: press and hold mirror-folding but-
ton 0043until you hear a click and the mirror
engages in position audibly.
The mirror housing is engaged again and you
can adjust the exterior mirrors as usual
(Y page 110). Mirrors
111Seats, steering wheel and mirrors Z
Page 125 of 398
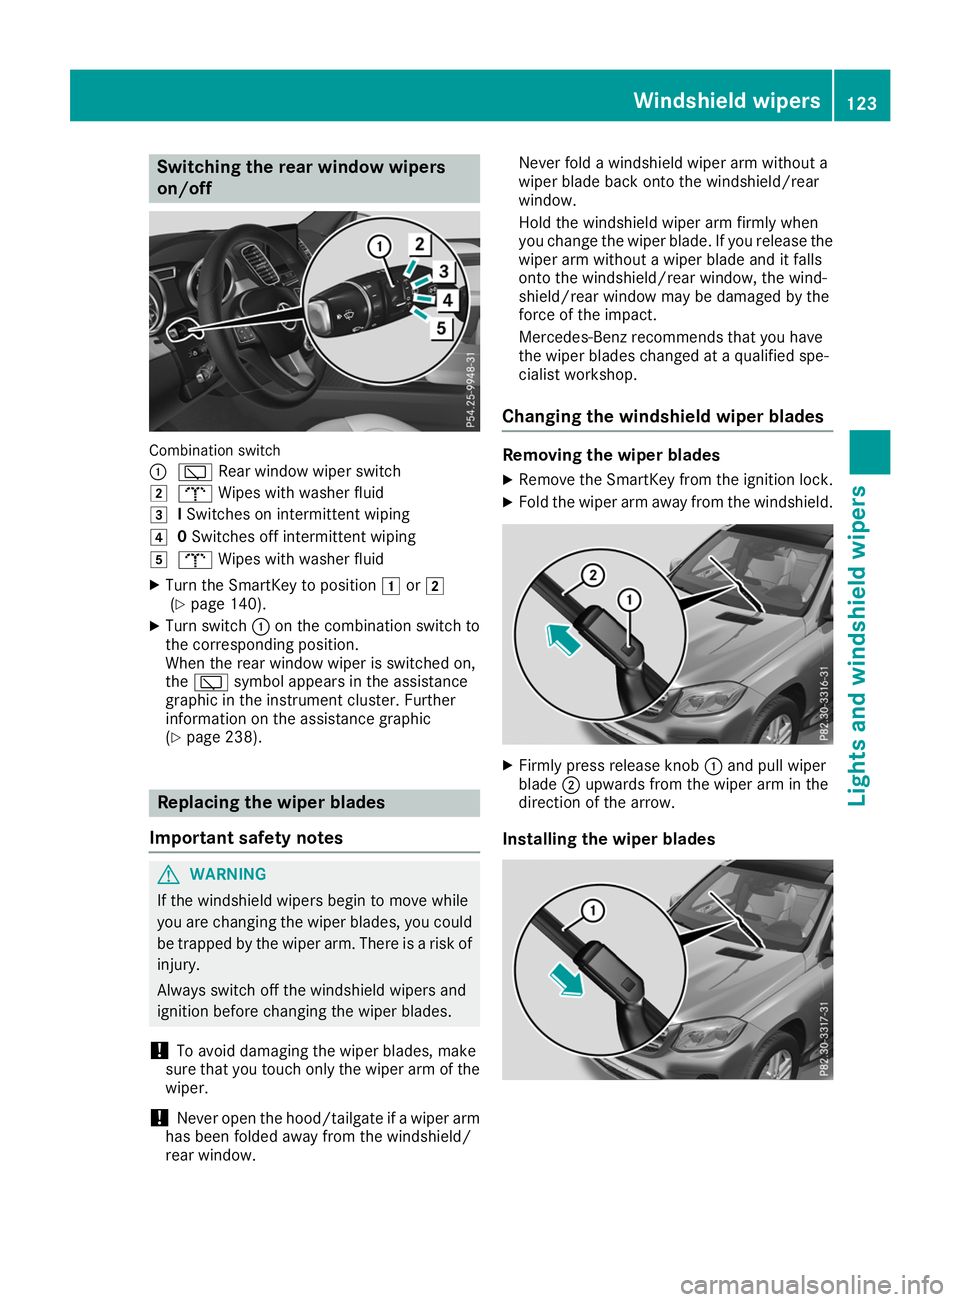
Switching the rear window wipers
on/off
Combination switch
0043
00C5 Rear window wiper switch
0048 008E Wipes with washer fluid
0049 ISwitches on intermittent wiping
004A 0Switches off intermittent wiping
004B 008E Wipes with washer fluid
X Turn the SmartKey to position 0047or0048
(Y page 140).
X Turn switch 0043on the combination switch to
the corresponding position.
When the rear window wiper is switched on,
the 00C5 symbol appears in the assistance
graphic in the instrument cluster. Further
information on the assistance graphic
(Y page 238). Replacing the wiper blades
Important safety notes G
WARNING
If the windshield wipers begin to move while
you are changing the wiper blades, you could be trapped by the wiper arm. There is a risk of
injury.
Always switch off the windshield wipers and
ignition before changing the wiper blades.
! To avoid damaging the wiper blades, make
sure that you touch only the wiper arm of the
wiper.
! Never open the hood/tailgate if a wiper arm
has been folded away from the windshield/
rear window. Never fold a windshield wiper arm without a
wiper blade back onto the windshield/rear
window.
Hold the windshield wiper arm firmly when
you change the wiper blade. If you release the
wiper arm without a wiper blade and it falls
onto the windshield/rear window, the wind-
shield/rear window may be damaged by the
force of the impact.
Mercedes-Benz recommends that you have
the wiper blades changed at a qualified spe-
cialist workshop.
Changing the windshield wiper blades Removing the wiper blades
X Remove the SmartKey from the ignition lock.
X Fold the wiper arm away from the windshield. X
Firmly press release knob 0043and pull wiper
blade 0044upwards from the wiper arm in the
direction of the arrow.
Installing the wiper blades Windshield wipers
123Lights and windshield wipers Z
Page 126 of 398
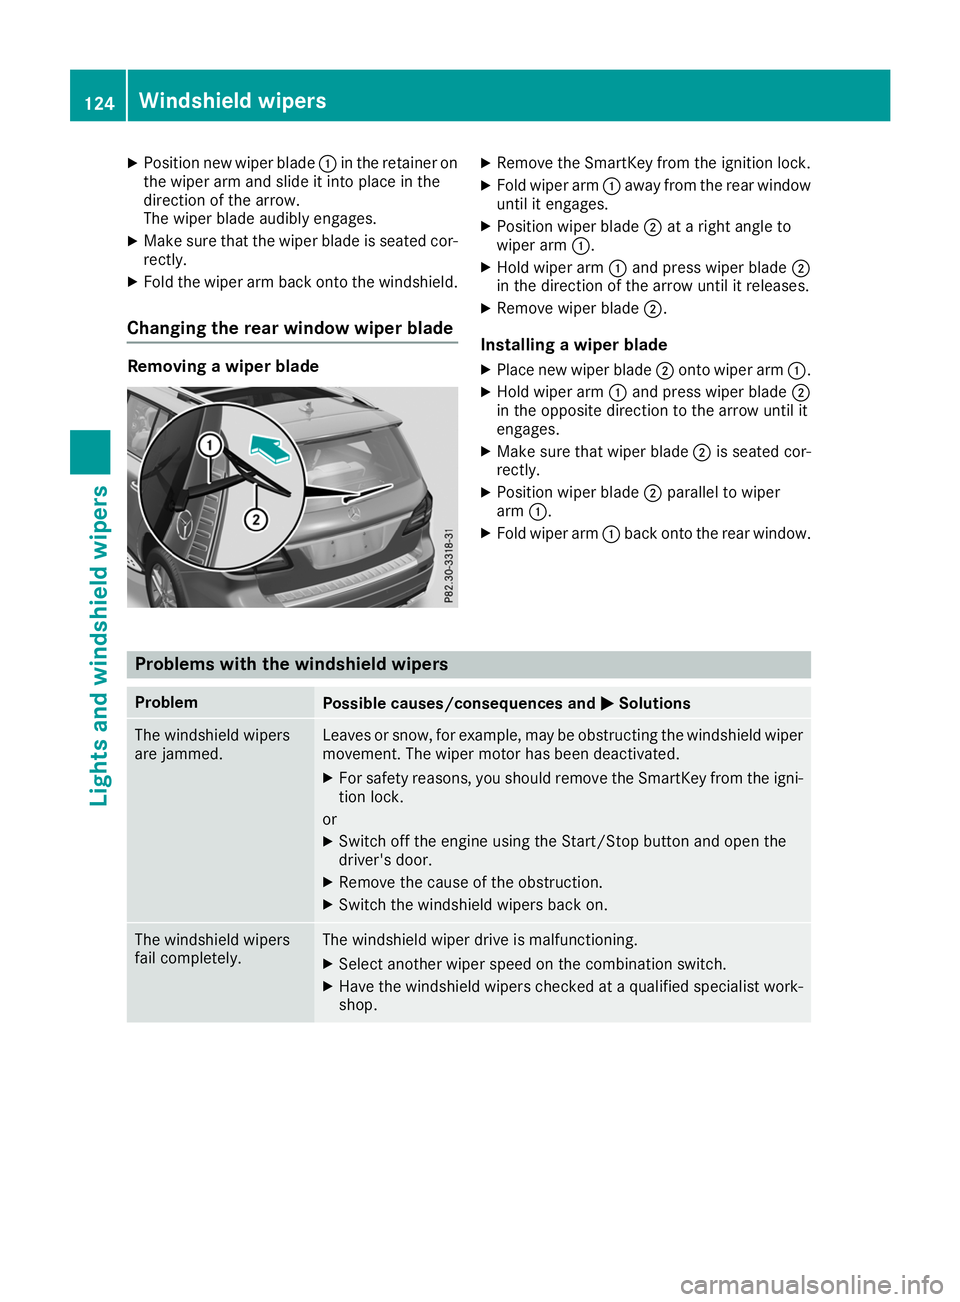
X
Position new wiper blade 0043in the retainer on
the wiper arm and slide it into place in the
direction of the arrow.
The wiper blade audibly engages.
X Make sure that the wiper blade is seated cor-
rectly.
X Fold the wiper arm back onto the windshield.
Changing the rear window wiper blade Removing a wiper blade X
Remove the SmartKey from the ignition lock.
X Fold wiper arm 0043away from the rear window
until it engages.
X Position wiper blade 0044at a right angle to
wiper arm 0043.
X Hold wiper arm 0043and press wiper blade 0044
in the direction of the arrow until it releases.
X Remove wiper blade 0044.
Installing a wiper blade
X Place new wiper blade 0044onto wiper arm 0043.
X Hold wiper arm 0043and press wiper blade 0044
in the opposite direction to the arrow until it
engages.
X Make sure that wiper blade 0044is seated cor-
rectly.
X Position wiper blade 0044parallel to wiper
arm 0043.
X Fold wiper arm 0043back onto the rear window. Problems with the windshield wipers
Problem
Possible causes/consequences and
0050 0050Solutions The windshield wipers
are jammed. Leaves or snow, for example, may be obstructing the windshield wiper
movement. The wiper motor has been deactivated.
X For safety reasons, you should remove the SmartKey from the igni-
tion lock.
or X Switch off the engine using the Start/Stop button and open the
driver's door.
X Remove the cause of the obstruction.
X Switch the windshield wipers back on. The windshield wipers
fail completely. The windshield wiper drive is malfunctioning.
X Select another wiper speed on the combination switch.
X Have the windshield wipers checked at a qualified specialist work-
shop. 124
Windshield wipersLights and windshield wipers
Page 127 of 398
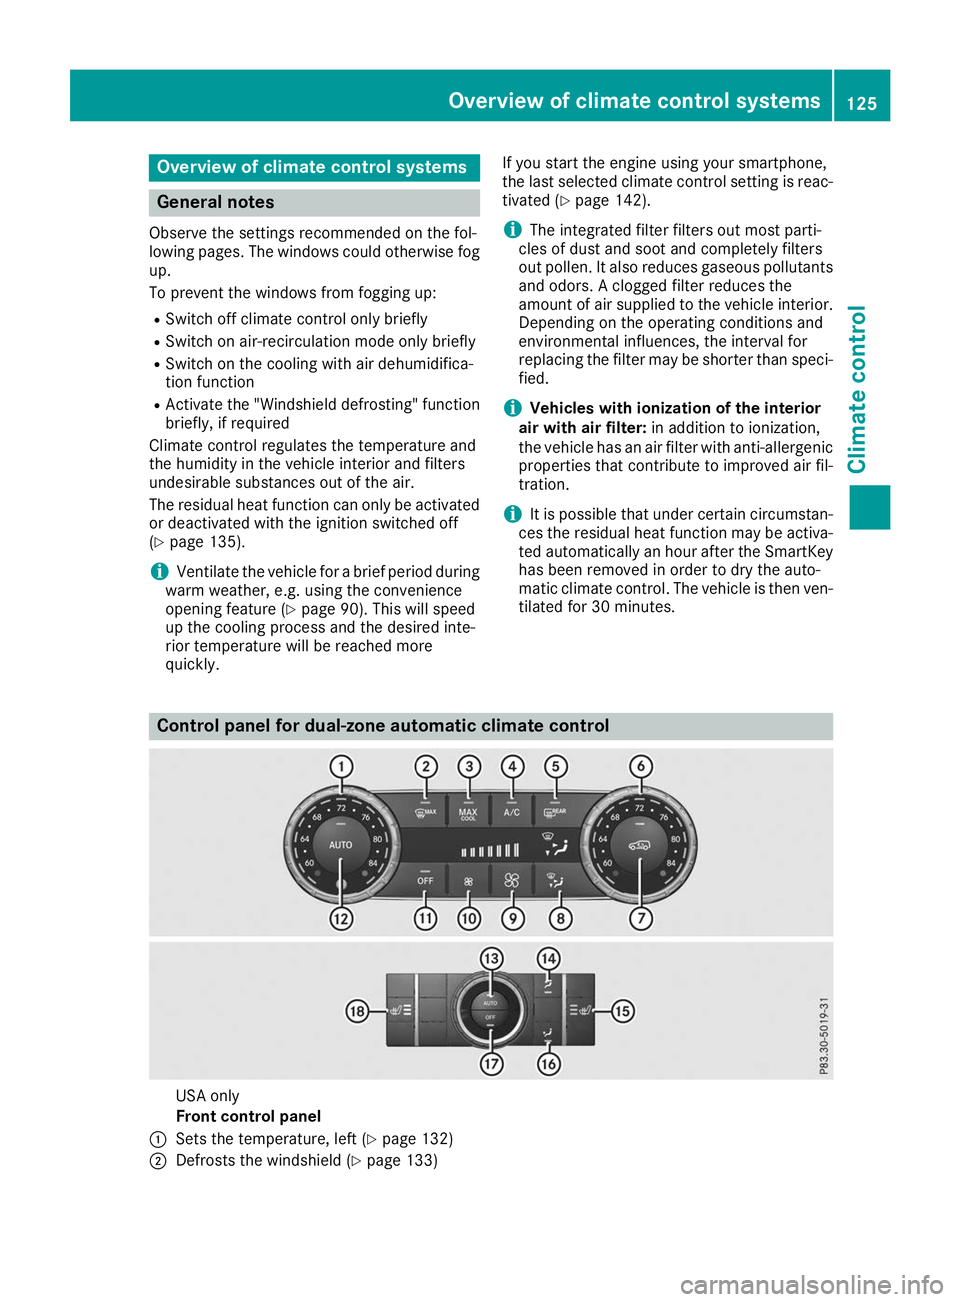
Overview of climate control systems
General notes
Observe the settings recommended on the fol-
lowing pages. The windows could otherwise fog up.
To prevent the windows from fogging up:
R Switch off climate control only briefly
R Switch on air-recirculation mode only briefly
R Switch on the cooling with air dehumidifica-
tion function
R Activate the "Windshield defrosting" function
briefly, if required
Climate control regulates the temperature and
the humidity in the vehicle interior and filters
undesirable substances out of the air.
The residual heat function can only be activated or deactivated with the ignition switched off
(Y page 135).
i Ventilate the vehicle for a brief period during
warm weather, e.g. using the convenience
opening feature (Y page 90). This will speed
up the cooling process and the desired inte-
rior temperature will be reached more
quickly. If you start the engine using your smartphone,
the last selected climate control setting is reac-
tivated (Y page 142).
i The integrated filter filters out most parti-
cles of dust and soot and completely filters
out pollen. It also reduces gaseous pollutants and odors. A clogged filter reduces the
amount of air supplied to the vehicle interior.
Depending on the operating conditions and
environmental influences, the interval for
replacing the filter may be shorter than speci-
fied.
i Vehicles with ionization of the interior
air with air filter: in addition to ionization,
the vehicle has an air filter with anti-allergenic properties that contribute to improved air fil-
tration.
i It is possible that under certain circumstan-
ces the residual heat function may be activa-
ted automatically an hour after the SmartKey has been removed in order to dry the auto-
matic climate control. The vehicle is then ven-tilated for 30 minutes. Control panel for dual-zone automatic climate control
USA only
Front control panel
0043 Sets the temperature, left (Y page 132)
0044 Defrosts the windshield (Y page 133) Overview of climate control systems
125Climate control
Page 128 of 398
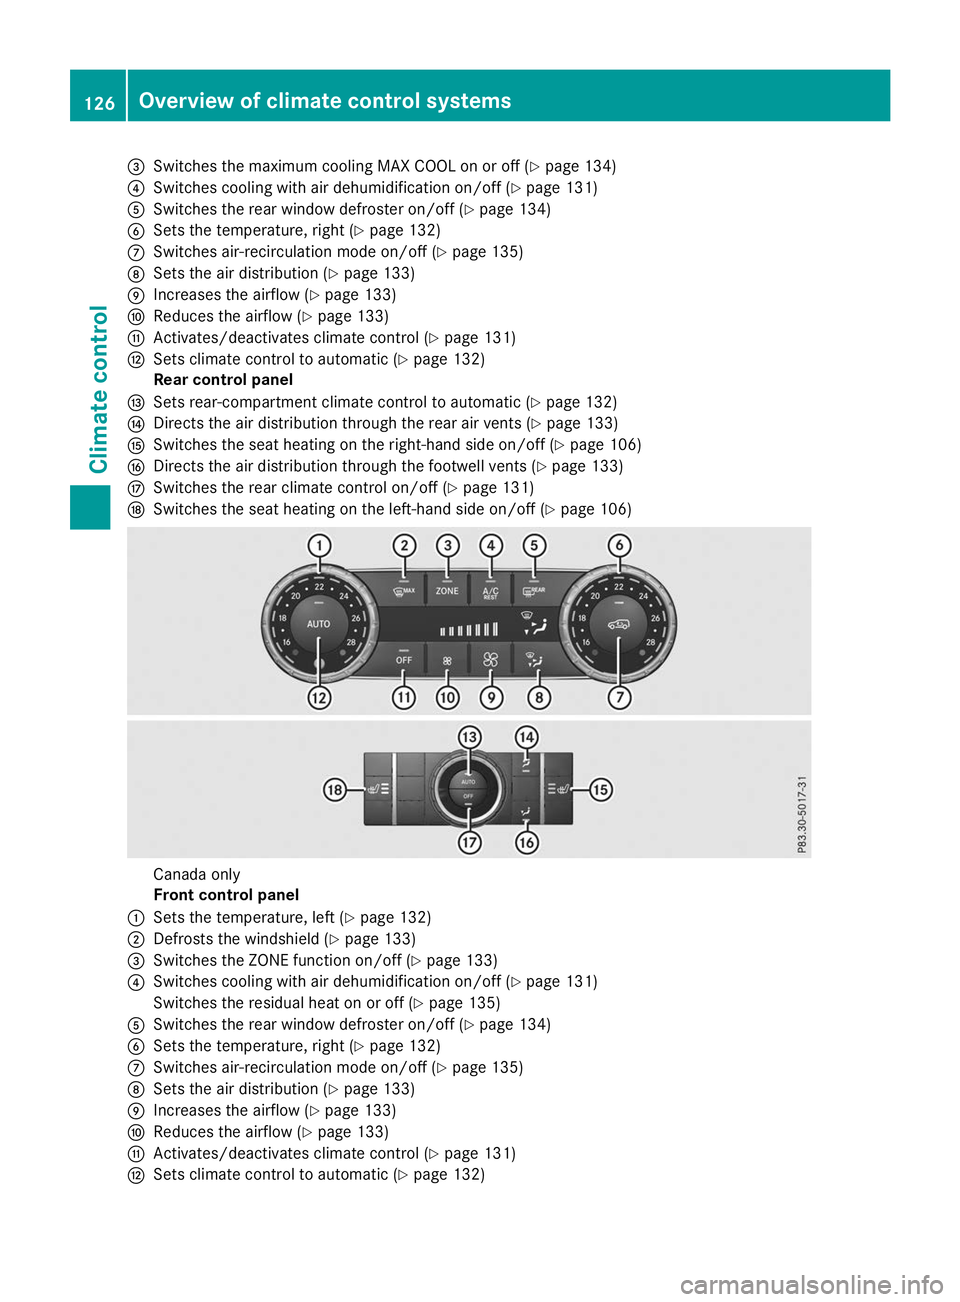
0087
Switches the maximum cooling MAX COOL on or off (Y page 134)
0085 Switches cooling with air dehumidification on/off (Y page 131)
0083 Switches the rear window defroster on/off (Y page 134)
0084 Sets the temperature, right (Y page 132)
006B Switches air-recirculation mode on/off (Y page 135)
006C Sets the air distribution (Y page 133)
006D Increases the airflow (Y page 133)
006E Reduces the airflow (Y page 133)
006F Activates/deactivates climate control (Y page 131)
0070 Sets climate control to automatic (Y page 132)
Rear control panel
0071 Sets rear-compartment climate control to automatic (Y page 132)
0072 Directs the air distribution through the rear air vents (Y page 133)
0073 Switches the seat heating on the right-hand side on/off (Y page 106)
0074 Directs the air distribution through the footwell vents (Y page 133)
0075 Switches the rear climate control on/off (Y page 131)
0076 Switches the seat heating on the left-hand side on/off (Y page 106)Canada only
Front control panel
0043 Sets the temperature, left (Y page 132)
0044 Defrosts the windshield (Y page 133)
0087 Switches the ZONE function on/off (Y page 133)
0085 Switches cooling with air dehumidification on/off (Y page 131)
Switches the residual heat on or off (Y page 135)
0083 Switches the rear window defroster on/off (Y page 134)
0084 Sets the temperature, right (Y page 132)
006B Switches air-recirculation mode on/off (Y page 135)
006C Sets the air distribution (Y page 133)
006D Increases the airflow (Y page 133)
006E Reduces the airflow (Y page 133)
006F Activates/deactivates climate control (Y page 131)
0070 Sets climate control to automatic (Y page 132)126
Overview of climate control systemsClimate control