2019 MERCEDES-BENZ GLS SUV manual transmission
[x] Cancel search: manual transmissionPage 252 of 398
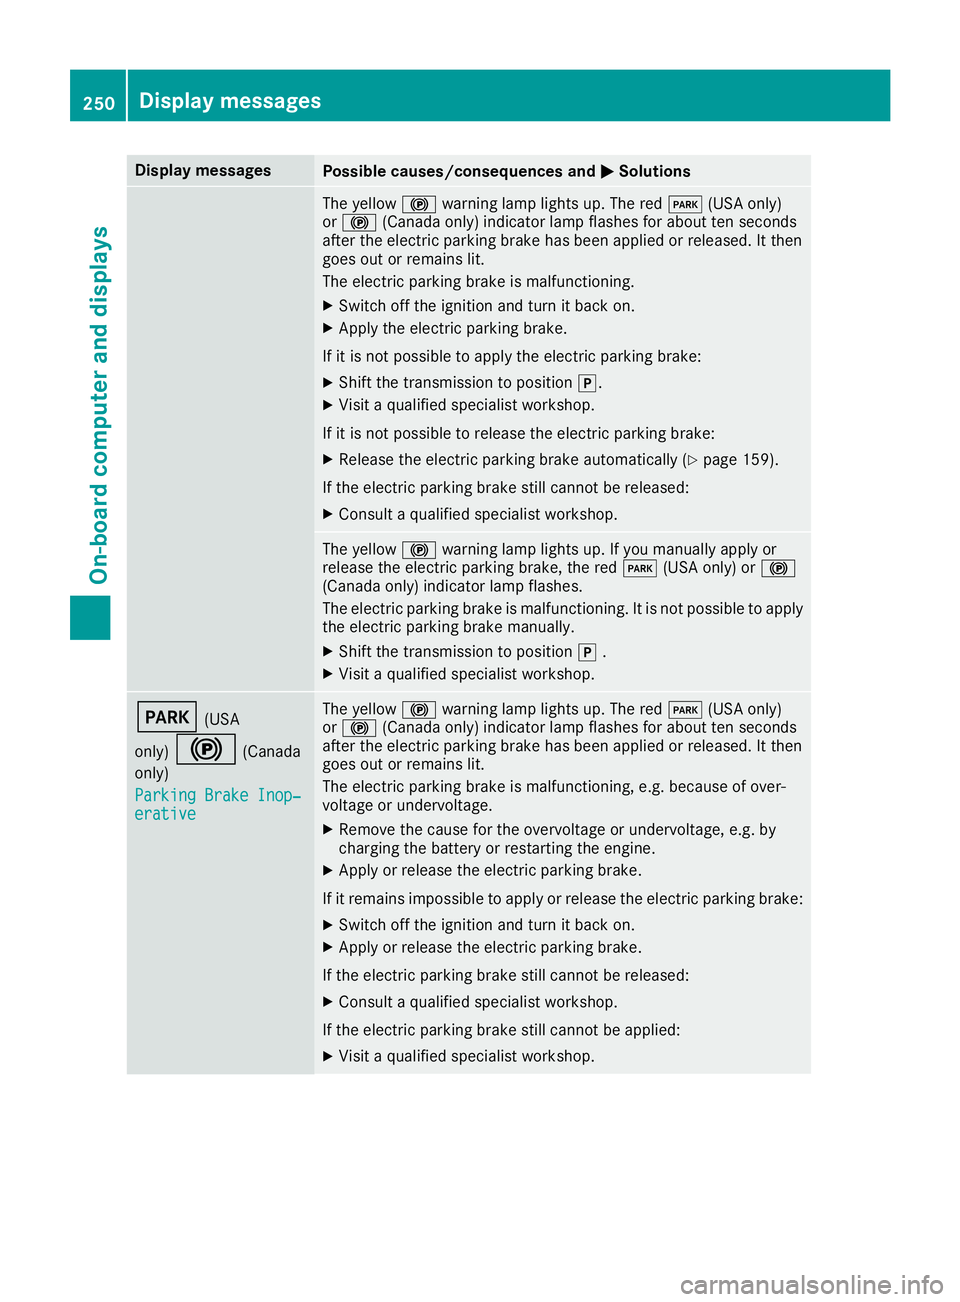
Display messages
Possible causes/consequences and
0050
0050Solutions The yellow
0024warning lamp lights up. The red 0049(USA only)
or 0024 (Canada only) indicator lamp flashes for about ten seconds
after the electric parking brake has been applied or released. It then
goes out or remains lit.
The electric parking brake is malfunctioning.
X Switch off the ignition and turn it back on.
X Apply the electric parking brake.
If it is not possible to apply the electric parking brake:
X Shift the transmission to position 005D.
X Visit a qualified specialist workshop.
If it is not possible to release the electric parking brake:
X Release the electric parking brake automatically (Y page 159).
If the electric parking brake still cannot be released:
X Consult a qualified specialist workshop. The yellow
0024warning lamp lights up. If you manually apply or
release the electric parking brake, the red 0049(USA only) or 0024
(Canada only) indicator lamp flashes.
The electric parking brake is malfunctioning. It is not possible to apply
the electric parking brake manually.
X Shift the transmission to position 005D.
X Visit a qualified specialist workshop. 0049
(USA
only) 0024 (Canada
only)
Parking Brake Inop‐
Parking Brake Inop‐
erative erative The yellow
0024warning lamp lights up. The red 0049(USA only)
or 0024 (Canada only) indicator lamp flashes for about ten seconds
after the electric parking brake has been applied or released. It then
goes out or remains lit.
The electric parking brake is malfunctioning, e.g. because of over-
voltage or undervoltage.
X Remove the cause for the overvoltage or undervoltage, e.g. by
charging the battery or restarting the engine.
X Apply or release the electric parking brake.
If it remains impossible to apply or release the electric parking brake:
X Switch off the ignition and turn it back on.
X Apply or release the electric parking brake.
If the electric parking brake still cannot be released: X Consult a qualified specialist workshop.
If the electric parking brake still cannot be applied:
X Visit a qualified specialist workshop. 250
Display
messagesOn-board computer and displays
Page 253 of 398
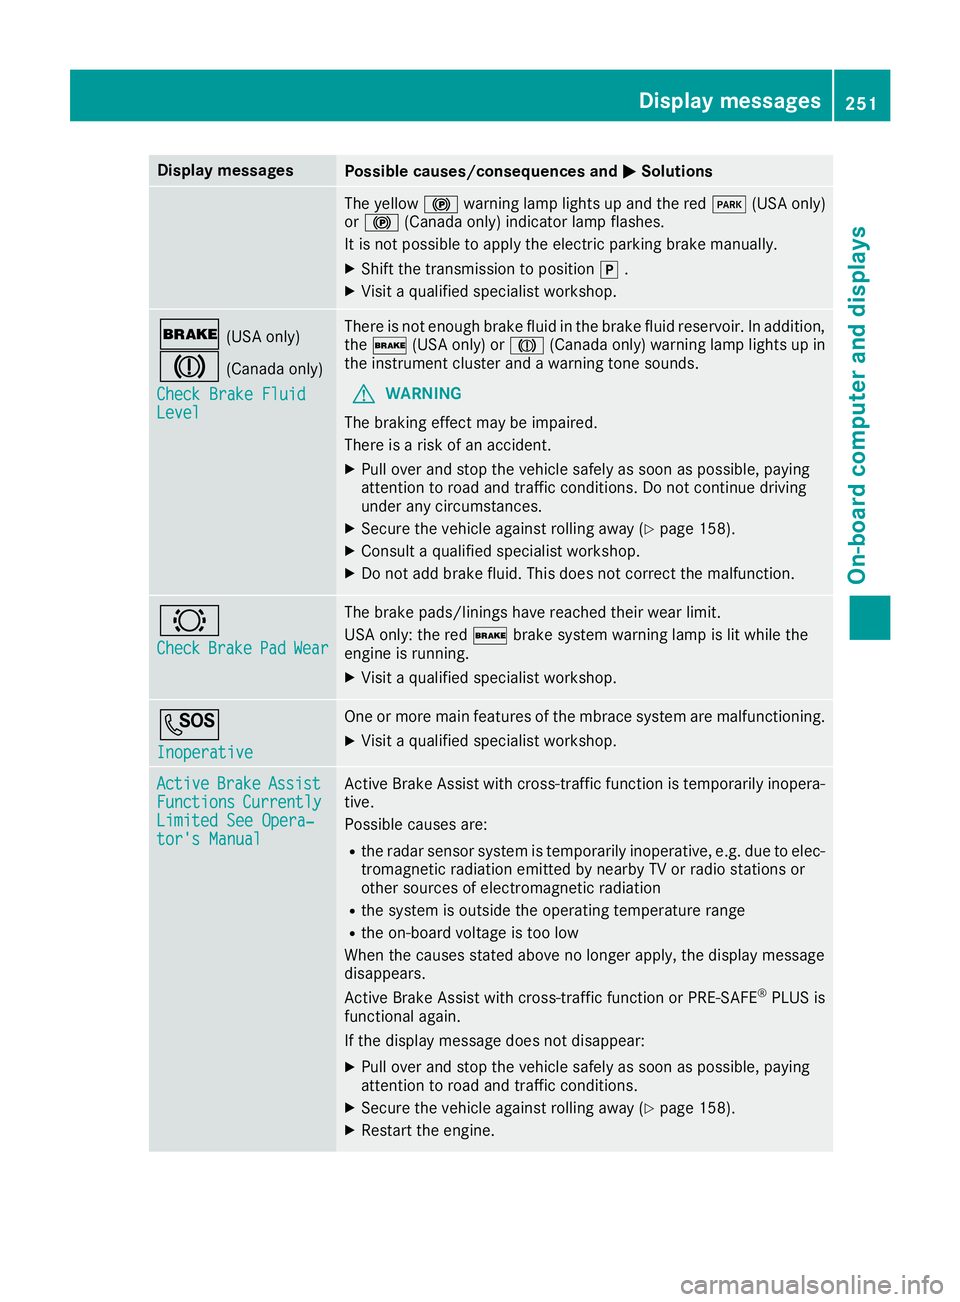
Display messages
Possible causes/consequences and
0050
0050Solutions The yellow
0024warning lamp lights up and the red 0049(USA only)
or 0024 (Canada only) indicator lamp flashes.
It is not possible to apply the electric parking brake manually.
X Shift the transmission to position 005D.
X Visit a qualified specialist workshop. 0027
(USA only)
004D (Canada only)
Check Brake Fluid Check Brake Fluid
Level Level There is not enough brake fluid in the brake fluid reservoir. In addition,
the 0027 (USA only) or 004D(Canada only) warning lamp lights up in
the instrument cluster and a warning tone sounds.
G WARNING
The braking effect may be impaired.
There is a risk of an accident.
X Pull over and stop the vehicle safely as soon as possible, paying
attention to road and traffic conditions. Do not continue driving
under any circumstances.
X Secure the vehicle against rolling away (Y page 158).
X Consult a qualified specialist workshop.
X Do not add brake fluid. This does not correct the malfunction. 0026
Check Check
Brake
BrakePad
PadWear
Wear The brake pads/linings have reached their wear limit.
USA only: the red
0027brake system warning lamp is lit while the
engine is running.
X Visit a qualified specialist workshop. 0053
Inoperative Inoperative One or more main features of the mbrace system are malfunctioning.
X Visit a qualified specialist workshop. Active
Active
Brake
BrakeAssist
Assist
Functions
Functions Currently
Currently
Limited See Opera‐
Limited See Opera‐
tor's Manual tor's Manual Active Brake Assist with cross-traffic function is temporarily inopera-
tive.
Possible causes are:
R the radar sensor system is temporarily inoperative, e.g. due to elec-
tromagnetic radiation emitted by nearby TV or radio stations or
other sources of electromagnetic radiation
R the system is outside the operating temperature range
R the on-board voltage is too low
When the causes stated above no longer apply, the display message
disappears.
Active Brake Assist with cross-traffic function or PRE ‑SAFE®
PLUS is
functional again.
If the display message does not disappear:
X Pull over and stop the vehicle safely as soon as possible, paying
attention to road and traffic conditions.
X Secure the vehicle against rolling away (Y page 158).
X Restart the engine. Display
messages
251On-board computer and displays Z
Page 265 of 398
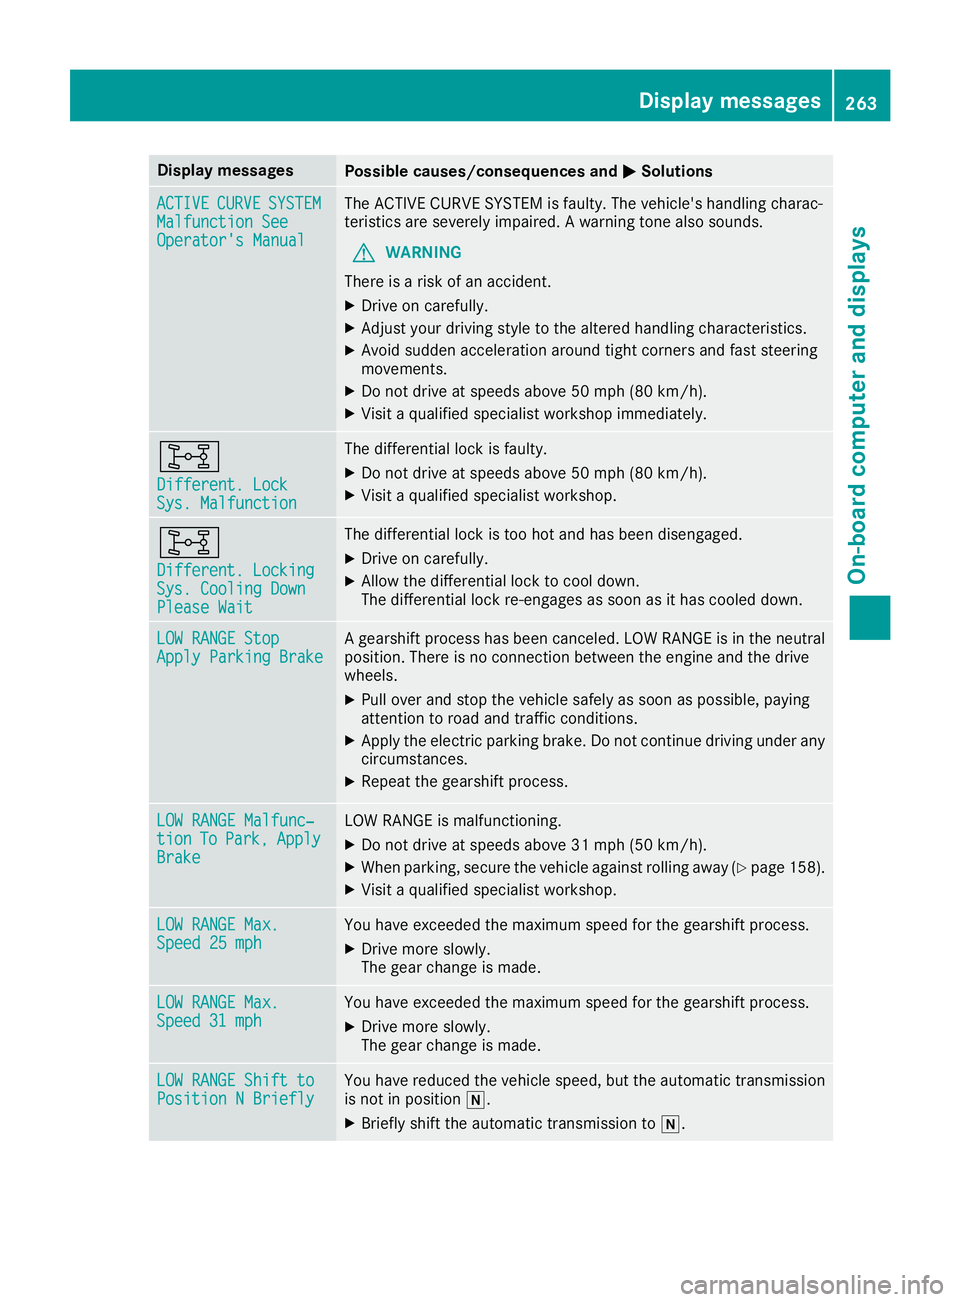
Display messages
Possible causes/consequences and
0050
0050Solutions ACTIVE
ACTIVE
CURVE
CURVESYSTEM
SYSTEM
Malfunction See
Malfunction See
Operator's Manual Operator's Manual The ACTIVE CURVE SYSTEM is faulty. The vehicle's handling charac-
teristics are severely impaired. A warning tone also sounds.
G WARNING
There is a risk of an accident.
X Drive on carefully.
X Adjust your driving style to the altered handling characteristics.
X Avoid sudden acceleration around tight corners and fast steering
movements.
X Do not drive at speeds above 50 mph (80 km/h).
X Visit a qualified specialist workshop immediately. 003B
Different. Lock Different. Lock
Sys. Malfunction Sys. Malfunction The differential lock is faulty.
X Do not drive at speeds above 50 mph (80 km/h).
X Visit a qualified specialist workshop. 003B
Different. Locking Different. Locking
Sys. Cooling Down Sys. Cooling Down
Please Wait Please Wait The differential lock is too hot and has been disengaged.
X Drive on carefully.
X Allow the differential lock to cool down.
The differential lock re-engages as soon as it has cooled down. LOW RANGE Stop LOW RANGE Stop
Apply Parking Brake Apply Parking Brake A gearshift process has been canceled. LOW RANGE is in the neutral
position. There is no connection between the engine and the drive
wheels.
X Pull over and stop the vehicle safely as soon as possible, paying
attention to road and traffic conditions.
X Apply the electric parking brake. Do not continue driving under any
circumstances.
X Repeat the gearshift process. LOW RANGE Malfunc‐
LOW RANGE Malfunc‐
tion tion
To
ToPark,
Park, Apply
Apply
Brake
Brake LOW RANGE is malfunctioning.
X Do not drive at speeds above 31 mph (50 km/h).
X When parking, secure the vehicle against rolling away (Y page 158).
X Visit a qualified specialist workshop. LOW RANGE Max.
LOW RANGE Max.
Speed 25 mph Speed 25 mph You have exceeded the maximum speed for the gearshift process.
X Drive more slowly.
The gear change is made. LOW RANGE Max. LOW RANGE Max.
Speed 31 mph Speed 31 mph You have exceeded the maximum speed for the gearshift process.
X Drive more slowly.
The gear change is made. LOW RANGE Shift to LOW RANGE Shift to
Position N Briefly Position N Briefly You have reduced the vehicle speed, but the automatic transmission
is not in position 005C.
X Briefly shift the automatic transmission to 005C. Display
messages
263On-board computer and displays Z
Page 343 of 398
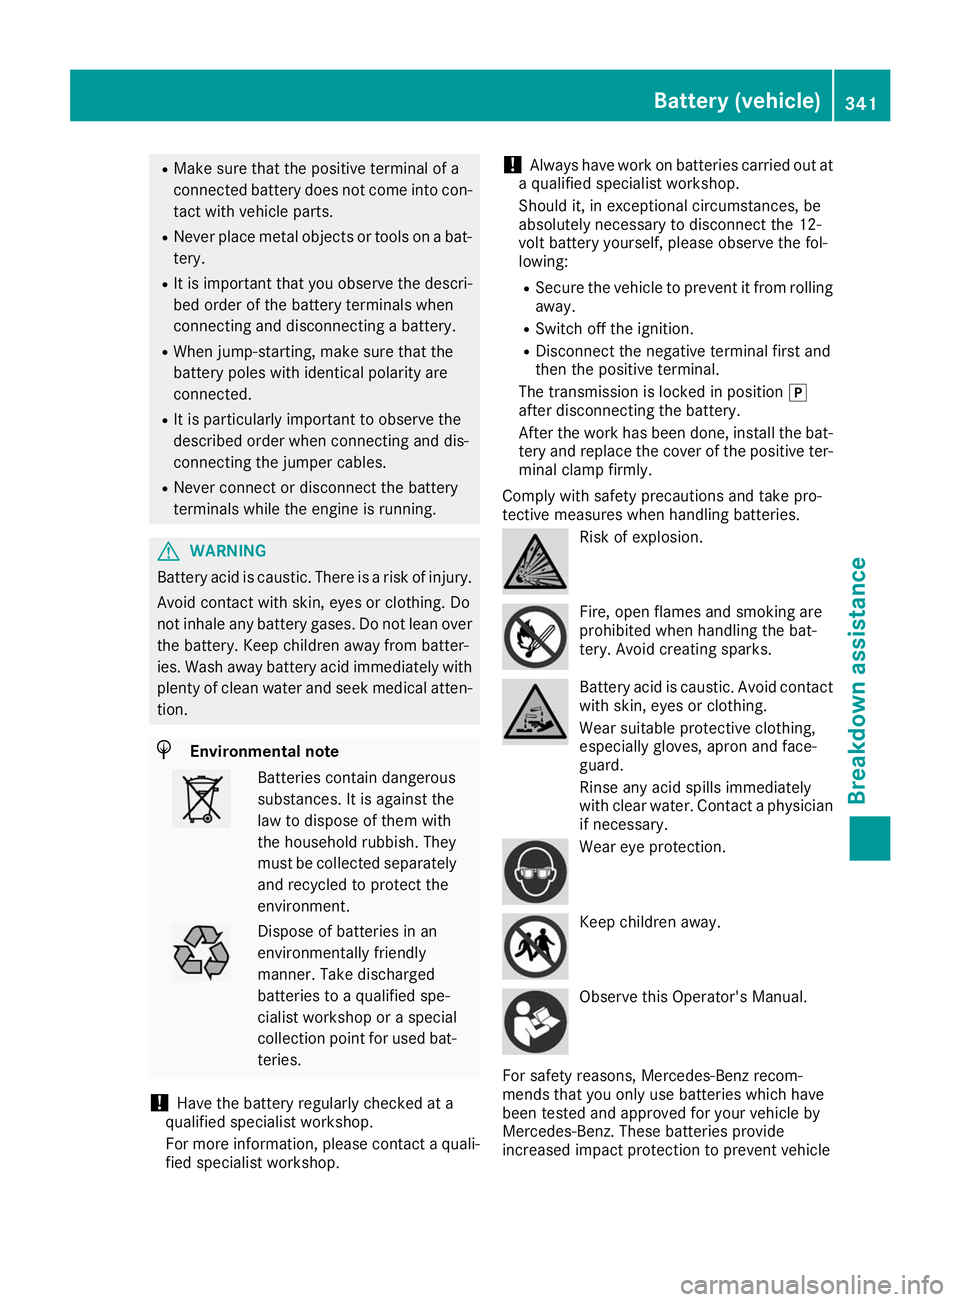
R
Make sure that the positive terminal of a
connected battery does not come into con-
tact with vehicle parts.
R Never place metal objects or tools on a bat-
tery.
R It is important that you observe the descri-
bed order of the battery terminals when
connecting and disconnecting a battery.
R When jump-starting, make sure that the
battery poles with identical polarity are
connected.
R It is particularly important to observe the
described order when connecting and dis-
connecting the jumper cables.
R Never connect or disconnect the battery
terminals while the engine is running. G
WARNING
Battery acid is caustic. There is a risk of injury. Avoid contact with skin, eyes or clothing. Do
not inhale any battery gases. Do not lean over
the battery. Keep children away from batter-
ies. Wash away battery acid immediately with
plenty of clean water and seek medical atten- tion. H
Environmental note Batteries contain dangerous
substances. It is against the
law to dispose of them with
the household rubbish. They
must be collected separately
and recycled to protect the
environment. Dispose of batteries in an
environmentally friendly
manner. Take discharged
batteries to a qualified spe-
cialist workshop or a special
collection point for used bat-
teries.
! Have the battery regularly checked at a
qualified specialist workshop.
For more information, please contact a quali- fied specialist workshop. !
Always have work on batteries carried out at
a qualified specialist workshop.
Should it, in exceptional circumstances, be
absolutely necessary to disconnect the 12-
volt battery yourself, please observe the fol-
lowing:
R Secure the vehicle to prevent it from rolling
away.
R Switch off the ignition.
R Disconnect the negative terminal first and
then the positive terminal.
The transmission is locked in position 005D
after disconnecting the battery.
After the work has been done, install the bat-
tery and replace the cover of the positive ter- minal clamp firmly.
Comply with safety precautions and take pro-
tective measures when handling batteries. Risk of explosion.
Fire, open flames and smoking are
prohibited when handling the bat-
tery. Avoid creating sparks.
Battery acid is caustic. Avoid contact
with skin, eyes or clothing.
Wear suitable protective clothing,
especially gloves, apron and face-
guard.
Rinse any acid spills immediately
with clear water. Contact a physician if necessary. Wear eye protection.
Keep children away.
Observe this Operator's Manual.
For safety reasons, Mercedes-Benz recom-
mends that you only use batteries which have
been tested and approved for your vehicle by
Mercedes-Benz. These batteries provide
increased impact protection to prevent vehicle Battery (vehicle)
341Breakdown assistance Z
Page 375 of 398
ponents may also be damaged. There is a risk
of an accident.
Rotate front and rear wheels only if the wheels
and tires are of the same dimensions.
! On vehicles equipped with a tire pressure
monitor, electronic components are located
in the wheel.
Tire-mounting tools should not be used near
the valve. This could damage the electronic
components.
Only have tires changed at a qualified spe-
cialist workshop.
Always observe the instructions and safety
notes in the "Mounting a wheel" section
(Y page 373).
The wear patterns on the front and rear tires
differ, depending on the operating conditions.
Rotate the wheels before a clear wear pattern
has formed on the tires. Front tires typically
wear more on the shoulders and the rear tires in
the center.
On vehicles that have the same size front and
rear wheels, you can rotate the wheels accord-
ing to the intervals in the tire manufacturer's
warranty book in your vehicle documents. If no
warranty book is available, the tires should be
rotated every 3,000 to 6,000 miles (5,000 to
10,000 km). Depending on tire wear, this may
be required earlier. Do not change the direction
of wheel rotation.
Clean the contact surfaces of the wheel and the brake disc thoroughly every time a wheel is rota-
ted. Check the tire pressure and, if necessary,
restart the tire pressure loss warning system or
the tire pressure monitor (Y page 359).Direction of rotation
Tires with a specified direction of rotation have
additional benefits, e.g. if there is a risk of hydro-
planing. These advantages can only be gained if the tires are installed corresponding to the
direction of rotation.
An arrow on the sidewall of the tire indicates its
correct direction of rotation. Storing wheels
Store wheels that are not being used in a cool,
dry and preferably dark place. Protect the tires
from oil, grease, gasoline and diesel. Mounting a wheel
Preparing the vehicle X
Vehicle with emergency spare wheel:
when mounting the emergency spare wheel in
the event of a flat tire, follow the additional
notes on vehicle preparation under "Flat tire" (Y page 335).
X Stop the vehicle on solid, non-slippery and
level ground.
X Apply the electric parking brake manually.
X Bring the front wheels into the straight-ahead
position.
X Vehicles with automatic transmission:
shift the transmission to position
005D.
X Vehicles with the AIRMATIC package:
make sure that the normal vehicle level is
selected (Y page 187).
X Vehicles with the Off-Road Engineering
package:
make sure that the normal level is
selected (Y page 180).
X Switch off the engine.
X Vehicles without KEYLESS-GO: remove the
SmartKey from the ignition lock.
X Vehicles with KEYLESS-GO: open the driv-
er's door.
The vehicle electronics are now in position
0092. This means no SmartKey is in the ignition lock.
X Vehicles with KEYLESS-GO: remove the
Start/Stop button from the ignition lock
(Y page 140).
X If included in the vehicle equipment, remove
the tire-change tool kit from the vehicle.
X Safeguard the vehicle against rolling away.
i Apart from certain country-specific varia-
tions, vehicles are not equipped with a tire-
change tool kit. For more information on
which tools are required to perform a wheel
change on your vehicle, consult a qualified
specialist workshop. Changing a wheel
373Wheels and tires Z