2019 MERCEDES-BENZ GLS SUV center console
[x] Cancel search: center consolePage 42 of 398
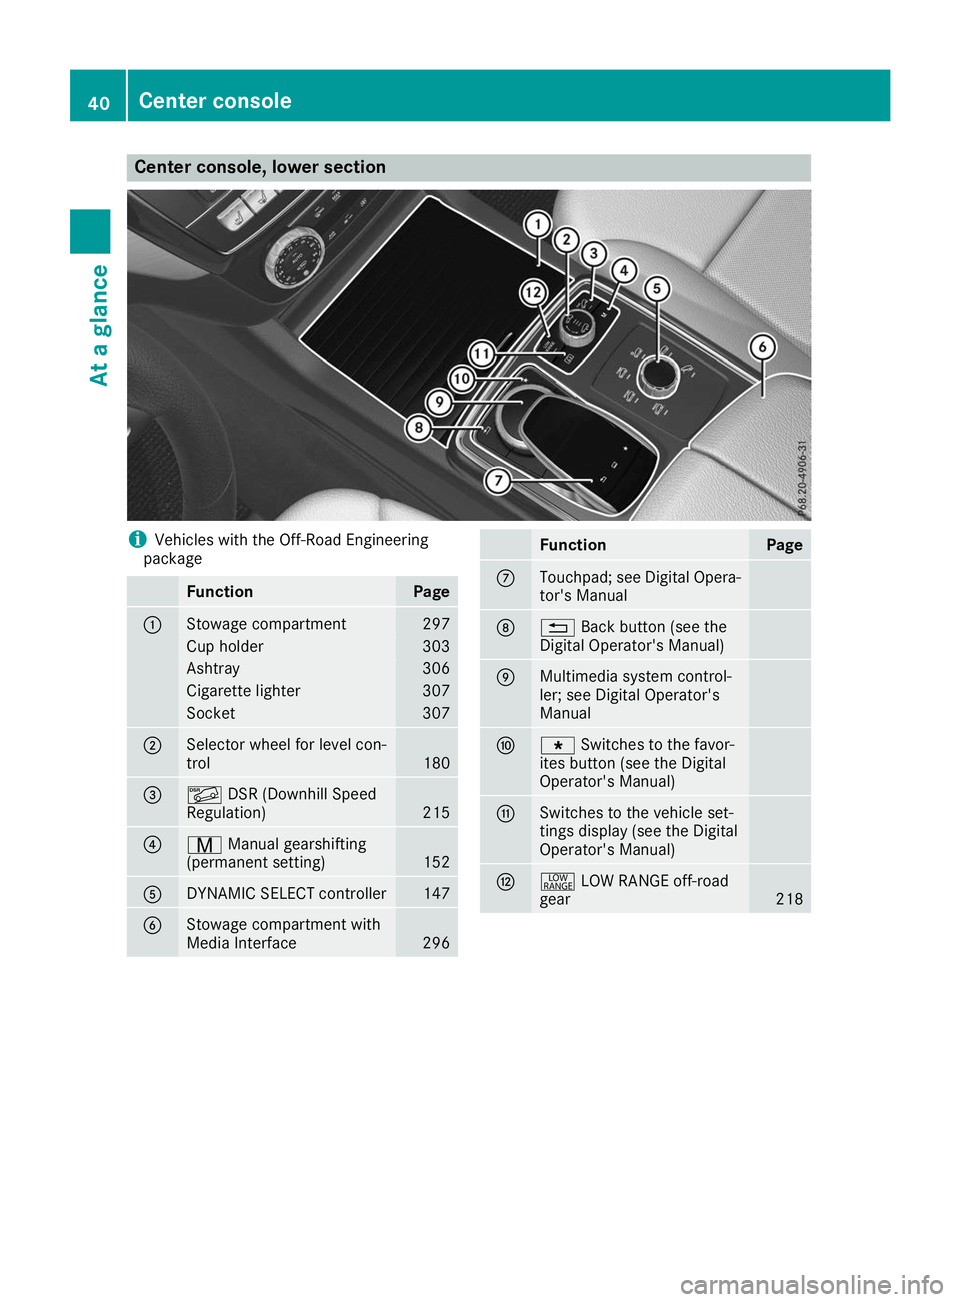
Center console, lower section
i
Vehicles with the Off-Road Engineering
package Function Page
0043
Stowage compartment 297
Cup holder 303
Ashtray 306
Cigarette lighter 307
Socket 307
0044
Selector wheel for level con-
trol
180
0087
00C6
DSR (Downhill Speed
Regulation) 215
0085
008D
Manual gearshifting
(permanent setting) 152
0083
DYNAMIC SELECT controller 147
0084
Stowage compartment with
Media Interface
296 Function Page
006B
Touchpad; see Digital Opera-
tor's Manual 006C
0038
Back button (see the
Digital Operator's Manual) 006D
Multimedia system control-
ler; see Digital Operator's
Manual 006E
007D
Switches to the favor-
ites button (see the Digital
Operator's Manual) 006F
Switches to the vehicle set-
tings display (see the Digital
Operator's Manual)
0070
002E
LOW RANGE off-road
gear 21840
Center consoleAt a glance
Page 43 of 398
i
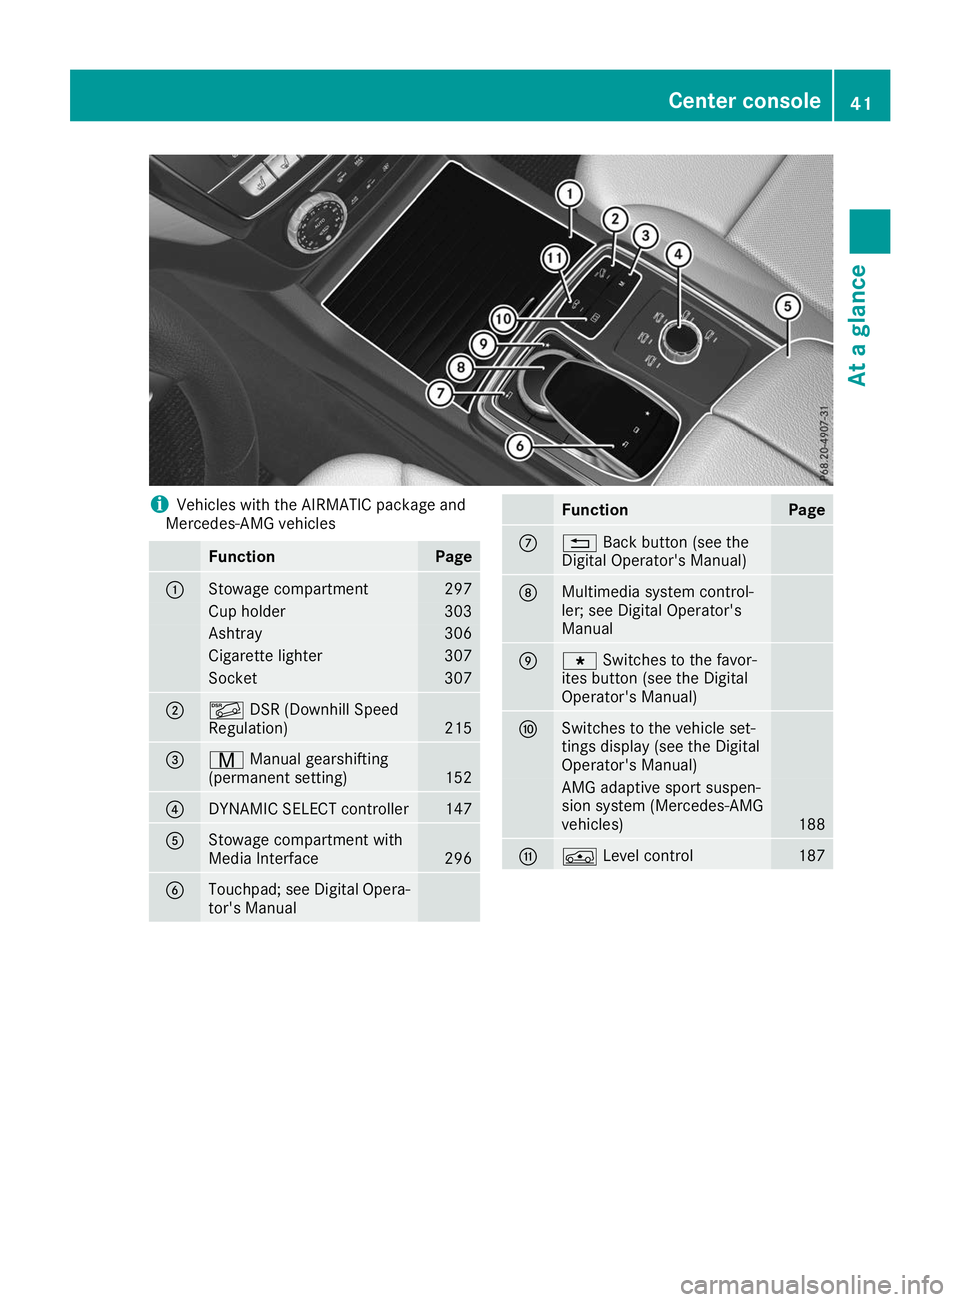
Vehicles with the AIRMATIC package and
Mercedes-AMG vehicles Function Page
0043
Stowage compartment 297
Cup holder 303
Ashtray 306
Cigarette lighter 307
Socket 307
0044
00C6
DSR (Downhill Speed
Regulation) 215
0087
008D
Manual gearshifting
(permanent setting) 152
0085
DYNAMIC SELECT controller 147
0083
Stowage compartment with
Media Interface
296
0084
Touchpad; see Digital Opera-
tor's Manual Function Page
006B
0038
Back button (see the
Digital Operator's Manual) 006C
Multimedia system control-
ler; see Digital Operator's
Manual
006D
007D
Switches to the favor-
ites button (see the Digital
Operator's Manual) 006E
Switches to the vehicle set-
tings display (see the Digital
Operator's Manual)
AMG adaptive sport suspen-
sion system (Mercedes-AMG
vehicles)
188
006F
00C4
Level control 187Center console
41At a glance
Page 190 of 398
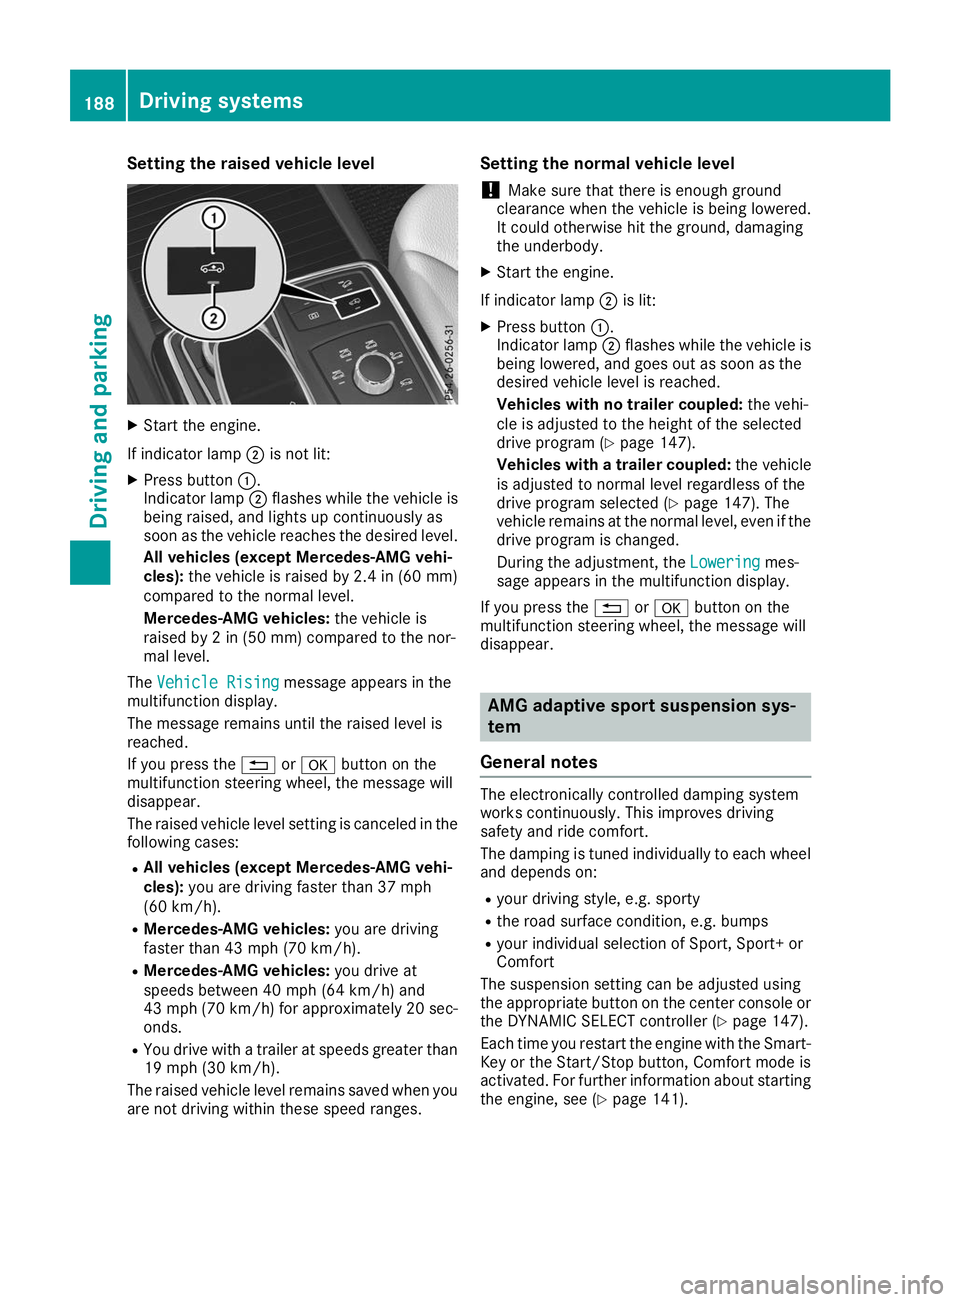
Setting the raised vehicle level
X
Start the engine.
If indicator lamp 0044is not lit:
X Press button 0043.
Indicator lamp 0044flashes while the vehicle is
being raised, and lights up continuously as
soon as the vehicle reaches the desired level.
All vehicles (except Mercedes-AMG vehi-
cles): the vehicle is raised by 2.4 in (60 mm)
compared to the normal level.
Mercedes-AMG vehicles: the vehicle is
raised by 2 in (50 mm) compared to the nor-
mal level.
The Vehicle Rising Vehicle Rising message appears in the
multifunction display.
The message remains until the raised level is
reached.
If you press the 0038or0076 button on the
multifunction steering wheel, the message will
disappear.
The raised vehicle level setting is canceled in the following cases:
R All vehicles (except Mercedes-AMG vehi-
cles): you are driving faster than 37 mph
(60 km/h).
R Mercedes-AMG vehicles: you are driving
faster than 43 mph (70 km/h).
R Mercedes-AMG vehicles: you drive at
speeds between 40 mph (64 km/h) and
43 mph (70 km/h) for approximately 20 sec- onds.
R You drive with a trailer at speeds greater than
19 mph (30 km/h).
The raised vehicle level remains saved when you are not driving within these speed ranges. Setting the normal vehicle level
! Make sure that there is enough ground
clearance when the vehicle is being lowered.
It could otherwise hit the ground, damaging
the underbody.
X Start the engine.
If indicator lamp 0044is lit:
X Press button 0043.
Indicator lamp 0044flashes while the vehicle is
being lowered, and goes out as soon as the
desired vehicle level is reached.
Vehicles with no trailer coupled: the vehi-
cle is adjusted to the height of the selected
drive program (Y page 147).
Vehicles with a trailer coupled: the vehicle
is adjusted to normal level regardless of the
drive program selected (Y page 147). The
vehicle remains at the normal level, even if the
drive program is changed.
During the adjustment, the Lowering
Lowering mes-
sage appears in the multifunction display.
If you press the 0038or0076 button on the
multifunction steering wheel, the message will
disappear. AMG adaptive sport suspension sys-
tem
General notes The electronically controlled damping system
works continuously. This improves driving
safety and ride comfort.
The damping is tuned individually to each wheel and depends on:
R your driving style, e.g. sporty
R the road surface condition, e.g. bumps
R your individual selection of Sport, Sport+ or
Comfort
The suspension setting can be adjusted using
the appropriate button on the center console or the DYNAMIC SELECT controller (Y page 147).
Each time you restart the engine with the Smart-
Key or the Start/Stop button, Comfort mode is
activated. For further information about starting
the engine, see (Y page 141).188
Driving systemsDriving and parking
Page 204 of 398
Guide lines are always shown at road level. In
trailer mode, the guide lines are shown at the
level of the trailer coupling.
The field of vision and other functions of the
camera system may be restricted due to addi-
tional accessories on the rear of the vehicle (e.g.
license plate holder, bicycle rack).
On vehicles with height-adjustable chassis,
depending on technical conditions, leaving the
standard height can result in:
R inaccuracies in the guide lines
R inaccuracies in the display of generated
images (top view)
Activation conditions The 360° camera image can be displayed in the
following situations:
R your vehicle is equipped with a 360° camera
R the SmartKey is in key position 0048in the igni-
tion lock
R the multimedia system is switched on
Switching on the 360° camera X
Press the 00D4button in the center console
for longer than two seconds.
Depending on whether transmission position
005B or005E is selected, the following appears:
R a split screen with top view and the image
from the front camera or
R a split screen with top view and the image
from the rear view camera
or
X Press the 00D4button in the center console.
The vehicle menu is displayed.
X Select 360°
360° Camera Camera and press 7to confirm.
Depending on whether transmission position
005B or005E is selected, the following appears:
R a split screen with top view and the image
from the front camera or
R a split screen with top view and the image
from the rear view camera
Activating the 360° camera using
reverse gear The 360° camera images can be automatically
displayed by engaging reverse gear. X
Make sure that the SmartKey is in position 0048
in the ignition lock.
X Make sure that the Activation by R gear Activation by R gear
function is selected on the multimedia system (see the Digital Operator's Manual).
X To show the 360° camera image: engage
reverse gear.
The multimedia system shows the area
behind the vehicle in split-screen mode. You
see the top view of the vehicle and the image from the rear view camera.
Selecting the split-screens or 180° view Selecting split-screen view
X To switch to the line with the vehicle icons:
slide 5the controller.
X To select one of the vehicle icons: turn 3
the controller.
X To switch to 180° View
180° View :turn 3 the con-
troller to select 180° View
180° View and press7to
confirm.
i The
180° 180° View
Viewoption is only available in the
following views:
R Top view with picture from the rear view
camera
R Top view with picture from the front camera
Displays in the multimedia system Important safety notes
The camera system may show a distorted view
of obstacles, show them incorrectly or not at all. Obstacles are not shown by the system in the
following locations:
R under the front and rear bumpers
R very close to the front and rear bumpers
R in the area immediately above the tailgate
handle
R very close to the exterior mirrors
R in the transitional areas between the various
cameras in the virtual top view
! Objects not at ground level may appear to
be further away than they actually are, e.g.:
R the bumper of a parked vehicle
R the drawbar of a trailer
R the ball coupling of a trailer tow hitch 202
Driving systemsDriving and parking
Page 222 of 398
Messages in the multifunction display
If a gear change process has not been successful, the following messages may be displayed in the
multifunction display: Display messages
Possible causes/consequences and
0050
0050Solutions LOW RANGE Max.
LOW RANGE Max.
Speed 24 mph Speed 24 mph You have been driving faster than 24 mph (40 km/h). Additionally, the
indicator lamp on the button in the center console is flashing.
X Slow down to change gear. LOW RANGE Shift to
LOW RANGE Shift to
Position N Briefly Position N Briefly The transmission is in position
005Band you are driving at below
40 km/h.
X To shift gear, shift the transmission to position 005C.LOW RANGE Shifting
LOW RANGE Shifting
Canceled Please Canceled Please
Reactivate Reactivate The gear change process was not carried out.
X Ensure that all gear change conditions are fulfilled and carry out the
gear change process again. LOW RANGE Stop
LOW RANGE Stop
Apply Parking Brake Apply Parking Brake A warning tone also sounds. The gear change process has not been
completed. LOW RANGE is in the neutral position. There is no con-
nection between the engine and the drive wheels.
! Do not drive any further. You could otherwise damage the vehi-
cle's drive train.
X Stop the vehicle. Take into account the road and traffic conditions
when doing this.
X Apply the electric parking brake (Y page 159).
X Carry out the gear change process again.
If the gear change process has been carried out, the LOW RANGE LOW RANGE
stop apply parking brake
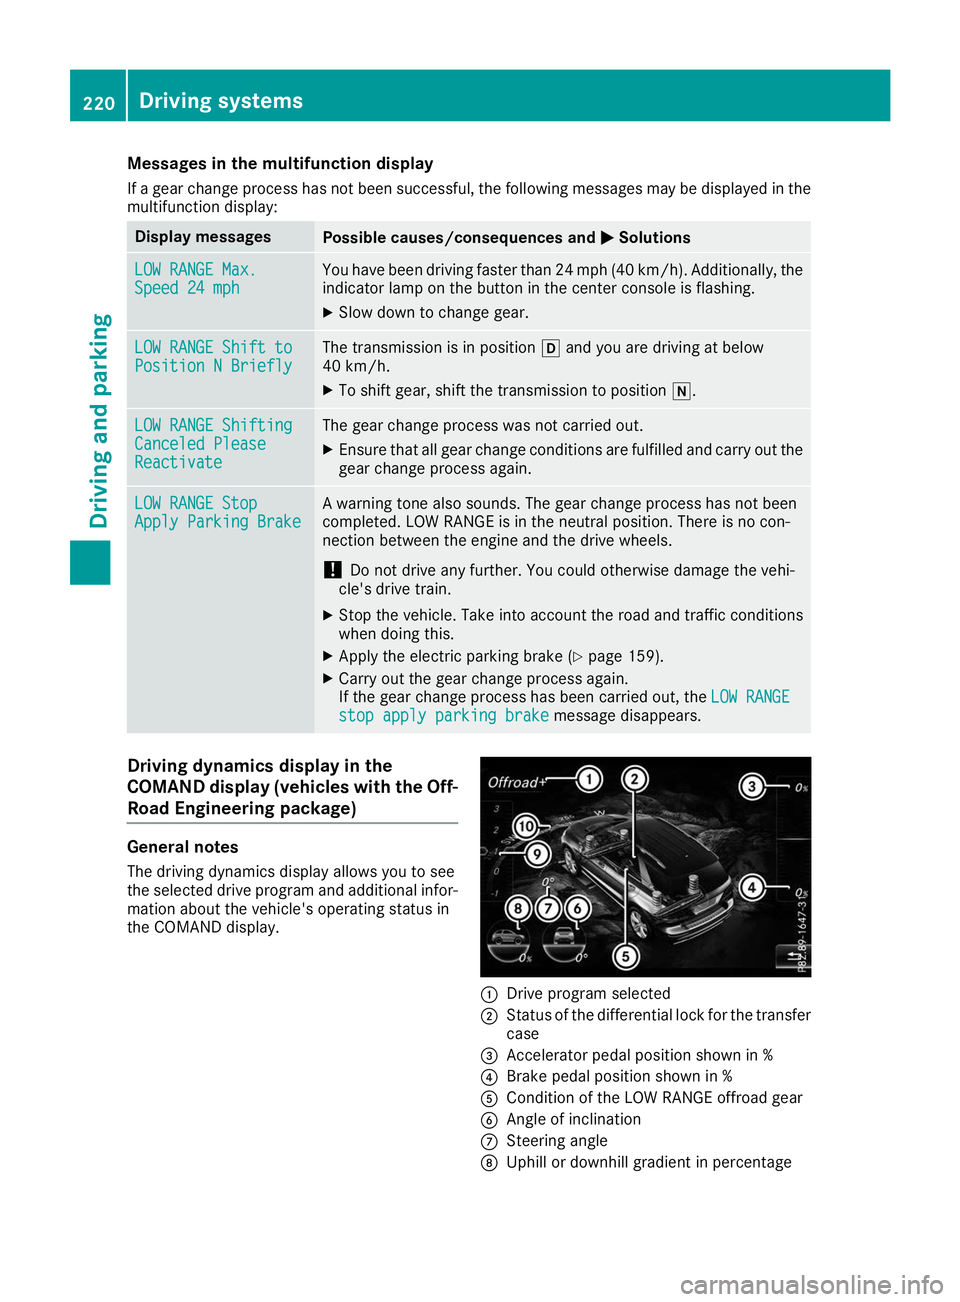
stop apply parking brake message disappears.Driving dynamics display in the
COMAND display (vehicles with the Off-
Road Engineering package) General notes
The driving dynamics display allows you to see
the selected drive program and additional infor-
mation about the vehicle's operating status in
the COMAND display. 0043
Drive program selected
0044 Status of the differential lock for the transfer
case
0087 Accelerator pedal position shown in %
0085 Brake pedal position shown in %
0083 Condition of the LOW RANGE offroad gear
0084 Angle of inclination
006B Steering angle
006C Uphill or downhill gradient in percentage 220
Driving systemsDriving and parking
Page 257 of 398
Display messages
Possible causes/consequences and
0050
0050Solutions Front
Front
Passenger
Passenger Air‐
Air‐
bag Disabled See
bag Disabled See
Operator's Manual Operator's Manual The front-passenger front air bag is deactivated during the journey,
although:
R an adult
or
R a person of the corresponding stature is on the front-passenger seat
If additional forces are applied to the seat, the system may interpret
the occupant's weight as lower than it actually is.
G WARNING
The front-passenger front air bag does not deploy during an accident.
There is an increased risk of injury.
X Pull over and stop the vehicle safely as soon as possible, paying
attention to road and traffic conditions.
X Secure the vehicle against rolling away (Y page 158).
X Switch the ignition off.
X Have the occupant on the front-passenger seat get out of the vehi-
cle.
X Keep the seat unoccupied, close the front-passenger door and
switch on the ignition.
X Observe the PASSENGER AIR BAG indicator lamps in the center
console and the multifunction display and check the following:
Seat unoccupied and ignition switched on:
R a self-diagnosis is carried out. The PASSENGER AIR BAG OFF and
PASSENGER AIR BAG ON indicator lamps must light up simulta-
neously for approximately six seconds
R the PASSENGER AIR BAG OFF indicator lamp must then light up
and remain lit after the self-diagnosis. If the indicator lamp is on, OCS (vehicle Occupant Classification System) has deactivated
the front-passenger front air bag (Y page 52)
R the Front Passenger Airbag Enabled See Operator's
Front Passenger Airbag Enabled See Operator's
Manual Manual orFront Passenger Airbag Disabled See Opera‐
Front Passenger Airbag Disabled See Opera‐
tor's
tor's Manual
Manual display messages must not be shown on the mul-
tifunction display
X Wait for a period of at least 60 seconds until the necessary system
checks have been completed.
X Make sure that the display messages do not appear in the multi-
function display.
If these conditions are fulfilled, the front-passenger seat can be occu-
pied again. Whether the PASSENGER AIR BAG OFF or ON indicator
lamp remains lit or goes out depends on how OCS classifies the occu-
pant.
If the conditions are not fulfilled, the system is not operating correctly.
X Visit a qualified specialist workshop immediately.
For further information about the Occupant Classification System, see (Y page 52). Display
messages
255On-board computer and displays Z
Page 258 of 398
Display messages
Possible causes/consequences and
0050
0050Solutions Front
Front
Passenger
Passenger Air‐
Air‐
bag Enabled See
bag Enabled See
Operator's Manual Operator's Manual The front-passenger front air bag is enabled during the journey,
although:
R a child, a small adult or an object weighing less than the system's
weight threshold is located on the front-passenger seat
or
R the front-passenger seat is unoccupied
The system may detect objects or forces applying additional weight on
the seat.
G WARNING
The front-passenger front air bag may deploy unintentionally.
There is an increased risk of injury.
X Pull over and stop the vehicle safely as soon as possible, paying
attention to road and traffic conditions.
X Secure the vehicle against rolling away (Y page 158).
X Switch the ignition off.
X Open the front-passenger door.
X Remove the child and the child restraint system from the front-
passenger seat.
X Make sure that there are no objects on the seat adding to the
weight.
The system might otherwise detect the additional weight and inter-
pret the seat occupant's weight as greater than it actually is.
X Keep the seat unoccupied, close the front-passenger door and
switch on the ignition.
X Observe the PASSENGER AIR BAG indicator lamps in the center
console and the multifunction display and check the following:
Seat unoccupied and ignition switched on:
R a self-diagnosis is carried out. The PASSENGER AIR BAG OFF and
PASSENGER AIR BAG ON indicator lamps must light up simulta-
neously for approximately six seconds
R the PASSENGER AIR BAG OFF indicator lamp must then light up
and remain lit after the self-diagnosis. If the indicator lamp is on, OCS has deactivated the front-passenger front air bag
(Y page 52)
R the Front Passenger Airbag Enabled See Operator's
Front Passenger Airbag Enabled See Operator's
Manual Manual orFront Passenger Airbag Disabled See Opera‐
Front Passenger Airbag Disabled See Opera‐
tor's
tor's Manual
Manual display messages must not be shown on the mul-
tifunction display
X Wait for a period of at least 60 seconds until the necessary system
checks have been completed.
X Make sure that the display messages do not appear in the multi-
function display.
If these conditions are fulfilled, the front-passenger seat can be occu-
pied again. Whether the PASSENGER AIR BAG OFF or ON indicator
lamp remains lit or goes out depends on how OCS classifies the occu- pant.
If the conditions are not fulfilled, the system is not operating correctly. 256
Display
messagesOn-board computer and displays
Page 290 of 398
Operating system
Overview
General notes !
Do not use the space in front of the display
for storage. Objects placed here could dam-
age the display or impair its function. Avoid
any direct contact with the display surface.
Pressure on the display surface may result in
impairments to the display, which could be
irreversible.
Wearing polarized sunglasses may impair your
ability to read the display.
The display has an automatic temperature-con- trolled switch-off feature. The brightness is
automatically reduced if the temperature is too
high. The display may temporarily switch off
completely.
Cleaning instructions !
Do not touch the display. The display has a
very sensitive high-gloss surface; there is a
risk of scratching. If you have to clean the
screen, however, use a mild cleaning agent
and a soft, lint-free cloth.
The display must be switched off and have
cooled down before you start cleaning. Do not
apply pressure to the display surface when
cleaning it, as this could cause irreversible dam-
age to the display.
Switching the multimedia system
on/off X
Press the 0043control knob.
Adjusting the volume X
Turn the 0043control knob.
The volume is adjusted:
R for the currently selected media source
R during traffic or navigation announcements
R in hands-free mode during an active call
Switching the sound on or off X
Press the 0063button on the control panel.
If the audio output is switched off, the status
line will show the 0063symbol. If you switch the media source or set the volume, the sound
is automatically switched on.
i Navigation announcements will be heard
even if the sound is muted.
Functions The multimedia system has the following func-
tions:
R Radio mode
R Media mode with media search
R Sound systems
R Navigation system
COMAND: navigation via the hard drive
Audio 20: navigation via SD card
R Communication functions
R SIRIUS Weather (COMAND)
R Vehicle functions with system settings
R Favorites functions
Controller The controller in the center console lets you:
R select menu items on the display
R enter characters
R select a destination on the map
R save entries
The controller can be:
R turned 3
R slid left or right 1
R slid forwards or back 4
R slid diagonally 2
R pressed briefly or pressed and held 7
Back button You can use the
0038button to exit a menu or to
call up the main menu of the current operating
mode.
X To exit the menu: briefly press the0038
button.
The multimedia system changes to the next
higher menu level in the current operating
mode.
X To call up the main menu: press the0038
button for longer than two seconds.
The multimedia system changes to the main
menu of the current operating mode. 288
Operating systemMultimedia system