2019 MERCEDES-BENZ GLS clock setting
[x] Cancel search: clock settingPage 86 of 398

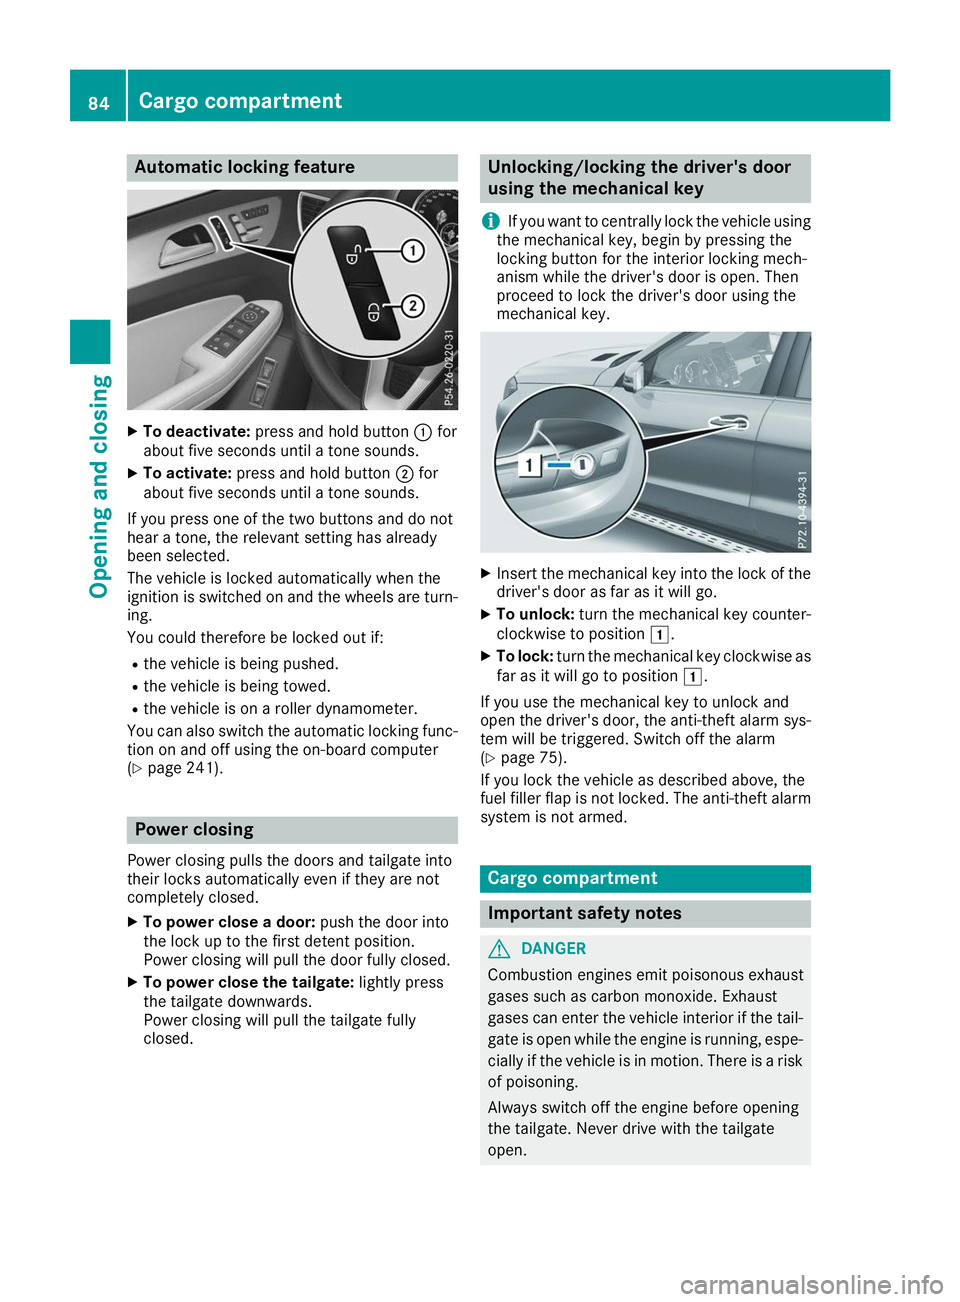
Automatic locking feature
X
To deactivate: press and hold button 0043for
about five seconds until a tone sounds.
X To activate: press and hold button 0044for
about five seconds until a tone sounds.
If you press one of the two buttons and do not
hear a tone, the relevant setting has already
been selected.
The vehicle is locked automatically when the
ignition is switched on and the wheels are turn-
ing.
You could therefore be locked out if:
R the vehicle is being pushed.
R the vehicle is being towed.
R the vehicle is on a roller dynamometer.
You can also switch the automatic locking func-
tion on and off using the on-board computer
(Y page 241). Power closing
Power closing pulls the doors and tailgate into
their locks automatically even if they are not
completely closed.
X To power close a door: push the door into
the lock up to the first detent position.
Power closing will pull the door fully closed.
X To power close the tailgate: lightly press
the tailgate downwards.
Power closing will pull the tailgate fully
closed. Unlocking/locking the driver's door
using the mechanical key
i If you want to centrally lock the vehicle using
the mechanical key, begin by pressing the
locking button for the interior locking mech-
anism while the driver's door is open. Then
proceed to lock the driver's door using the
mechanical key. X
Insert the mechanical key into the lock of the
driver's door as far as it will go.
X To unlock: turn the mechanical key counter-
clockwise to position 0047.
X To lock: turn the mechanical key clockwise as
far as it will go to position 0047.
If you use the mechanical key to unlock and
open the driver's door, the anti-theft alarm sys- tem will be triggered. Switch off the alarm
(Y page 75).
If you lock the vehicle as described above, the
fuel filler flap is not locked. The anti-theft alarm
system is not armed. Cargo compartment
Important safety notes
G
DANGER
Combustion engines emit poisonous exhaust
gases such as carbon monoxide. Exhaust
gases can enter the vehicle interior if the tail- gate is open while the engine is running, espe-cially if the vehicle is in motion. There is a risk of poisoning.
Always switch off the engine before opening
the tailgate. Never drive with the tailgate
open. 84
Cargo compartmentOpening and closing
Page 134 of 398

Problems with the "Cooling with air dehumidification" function
Problem
Possible causes/consequences and
0050
0050Solutions The indicator lamp in the
005A or0056 button
flashes three times or
remains off. The "Cool-
ing with air dehumidifi-
cation" function cannot
be switched on. Cooling with air dehumidification has been deactivated due to a mal-
function.
X Visit a qualified specialist workshop. Setting climate control to automatic
General notes In automatic mode, the set temperature is main-
tained automatically at a constant level. The
system automatically regulates the temperature of the dispensed air, the airflow and the air dis- tribution.
The "Cooling with air dehumidification" function
is activated automatically in automatic mode.
In the rear compartment, you can also switch
climate control for the rear seats to automatic
mode using the 0058button.
Automatic control X
Turn the SmartKey to position 0048in the igni-
tion lock (Y page 140).
X Set the desired temperature.
X To activate: press the0058button.
The indicator lamp in the 0058button lights
up. Automatic air distribution and airflow are
activated.
X To switch to manual mode: press the008F
button.
3-zone automatic climate control: when auto-
matic mode is activated, you can select a cli-
mate mode (Y page 132). Adjusting the climate mode settings
You can select the following climate mode set-
tings in automatic mode:
FOCUS high airflow, slightly cooler setting
MEDIUM medium airflow, standard setting
DIFFUSE low airflow, slightly warmer and draft- free setting X
Turn the SmartKey to position 0048in the igni-
tion lock (Y page 140).
X Press the 0058button.
X Press the 00F0button repeatedly until the
desired climate mode appears in the display. Setting the temperature
Dual-zone automatic climate control Different temperatures can be set for the driv-
er's and front-passenger sides.
X Turn the SmartKey to position 0048in the igni-
tion lock (Y page 140).
X To increase or decrease: turn control0043or
0084 counter-clockwise or clockwise
(Y page 125).
Only change the temperature setting in small
increments. Start at 72 ‡ (22 †).
3-zone automatic climate control You can select different temperature settings
for the driver's and front-passenger sides as well
as for the rear compartment.
X Turn the SmartKey to position 0048in the igni-
tion lock (Y page 140).
X To increase or decrease temperature in
the front compartment:
turn control0043or
0084 counter-clockwise or clockwise
(Y page 127).
Only change the temperature setting in small
increments. Start at 72 ‡ (22 †).
X To increase or reduce the temperature in
the rear compartment using the front con-
trol panel: press the00D6button.
The indicator lamp in the 00D6button goes
out. 132
Operating the climate control systemsClimate control
Page 135 of 398

The temperature setting for the driver's side
is adopted for the rear compartment and the
front-passenger side.
X Turn thumbwheel 0043to the left or right
(Y page 127).
Only change the temperature setting in small
increments. Start at 72 ‡ (22 †).
X To increase or decrease the rear compart-
ment temperature using the rear control
panel: turn control 0075counter-clockwise or
clockwise on the rear control panel
(Y page 127).
Only change the temperature setting in small
increments. Start at 72 ‡ (22 †). Setting the air distribution
Air distribution settings Front control panel
009C
Directs the airflow through the center
vents
009B Directs air through the footwell air vents
009F Directs the airflow through the center
and footwell vents
0061 Directs air through the defroster vents
0087 Directs the airflow through the defroster
and center vents (Canada only)
0086 Directs air through the defroster and
footwell vents
008F Directs the airflow through the defroster,
center and footwell air vents (Canada
only)
Rear control panel
0099 Directs the airflow through the rear cen-
ter and B-pillar air vents
009B Directs air through the footwell air vents
i Using the rear control panel, you can also
activate both air distribution positions simul-
taneously. In order to do this, press both air
distribution buttons. The air is then routed
through all rear air vents.
i Regardless of the air distribution setting,
airflow is always directed through the side air vents. The side air vents can only be closed
when the controls on the side air vents are
turned downwards. Setting X
Turn the SmartKey to position 0048in the igni-
tion lock (Y page 140).
X Press the 008Fbutton repeatedly until the
desired symbol appears in the display. Setting the airflow
X Turn the SmartKey to position 0048in the igni-
tion lock (Y page 140).
X To increase: press the0097button.
X To reduce: press the0095button.
i You can use 3-zone automatic climate con-
trol to set the airflow in the rear compartment
separately. Switching the ZONE function on/off
X To activate: press the00D6button.
The indicator lamp above the 00D6button
lights up.
Dual-zone automatic climate control: the tem-
perature setting for the driver's side is not
adopted for the front-passenger side.
3-zone automatic climate control: the tem-
perature setting for the driver's side is not
adopted for the front-passenger side and the rear compartment.
X To deactivate: press the00D6button.
The indicator lamp above the 00D6button
goes out.
Dual-zone automatic climate control: the tem-
perature setting for the driver's side is adop-
ted for the front-passenger side.
3-zone automatic climate control: the tem-
perature setting for the driver's side is adop-
ted for the front-passenger side and the rear
compartment. Defrosting the windshield
General notes You can use this function to defrost the wind-
shield or to clear a fogged up windshield or front
side windows on the inside.
Switch off the "Windshield defrosting" function
as soon as the windshield is clear again. Operating the climate control systems
133Climate control
Page 184 of 398

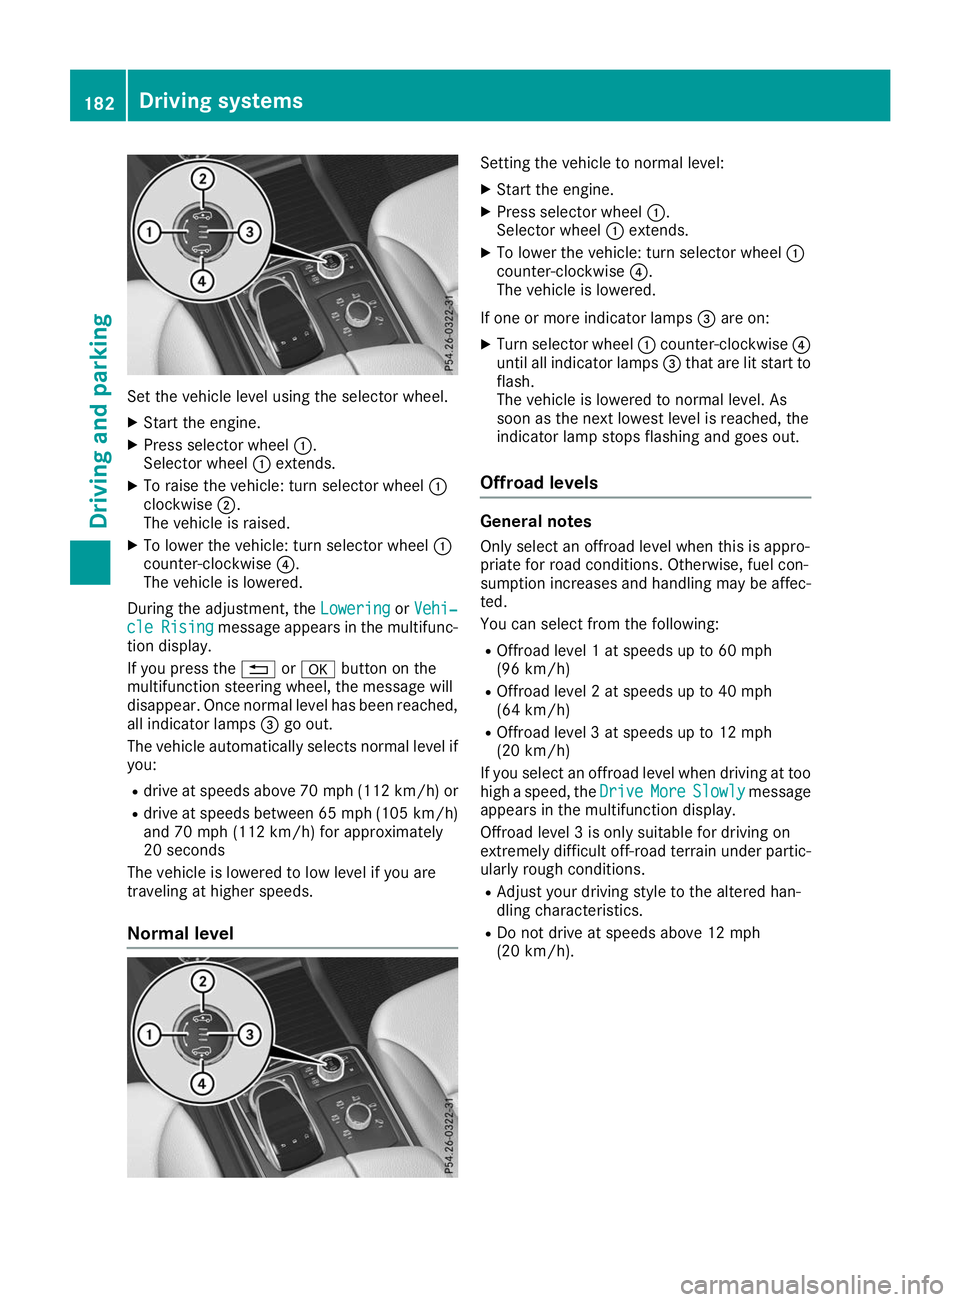
Set the vehicle level using the selector wheel.
X Start the engine.
X Press selector wheel 0043.
Selector wheel 0043extends.
X To raise the vehicle: turn selector wheel 0043
clockwise 0044.
The vehicle is raised.
X To lower the vehicle: turn selector wheel 0043
counter-clockwise 0085.
The vehicle is lowered.
During the adjustment, the Lowering
Lowering orVehi‐
Vehi‐
cle
cle Rising
Rising message appears in the multifunc-
tion display.
If you press the 0038or0076 button on the
multifunction steering wheel, the message will
disappear. Once normal level has been reached, all indicator lamps 0087go out.
The vehicle automatically selects normal level if
you:
R drive at speeds above 70 mph (112 km/h) or
R drive at speeds between 65 mph (105 km/h)
and 70 mph (112 km/h) for approximately
20 seconds
The vehicle is lowered to low level if you are
traveling at higher speeds.
Normal level Setting the vehicle to normal level:
X Start the engine.
X Press selector wheel 0043.
Selector wheel 0043extends.
X To lower the vehicle: turn selector wheel 0043
counter-clockwise 0085.
The vehicle is lowered.
If one or more indicator lamps 0087are on:
X Turn selector wheel 0043counter-clockwise 0085
until all indicator lamps 0087that are lit start to
flash.
The vehicle is lowered to normal level. As
soon as the next lowest level is reached, the
indicator lamp stops flashing and goes out.
Offroad levels General notes
Only select an offroad level when this is appro-
priate for road conditions. Otherwise, fuel con-
sumption increases and handling may be affec- ted.
You can select from the following:
R Offroad level 1 at speeds up to 60 mph
(96 km/h)
R Offroad level 2 at speeds up to 40 mph
(64 km/h)
R Offroad level 3 at speeds up to 12 mph
(20 km/h)
If you select an offroad level when driving at too high a speed, the Drive DriveMore
MoreSlowly
Slowly message
appears in the multifunction display.
Offroad level 3 is only suitable for driving on
extremely difficult off-road terrain under partic- ularly rough conditions.
R Adjust your driving style to the altered han-
dling characteristics.
R Do not drive at speeds above 12 mph
(20 km/h). 182
Driving systemsDriving and parking