2019 MERCEDES-BENZ GLS tire pressure
[x] Cancel search: tire pressurePage 288 of 398
Tires
Warning/
indicator
lamp
0051 0051
Signal type
Possible causes/consequences and 0050
0050Solutions 0077
0051
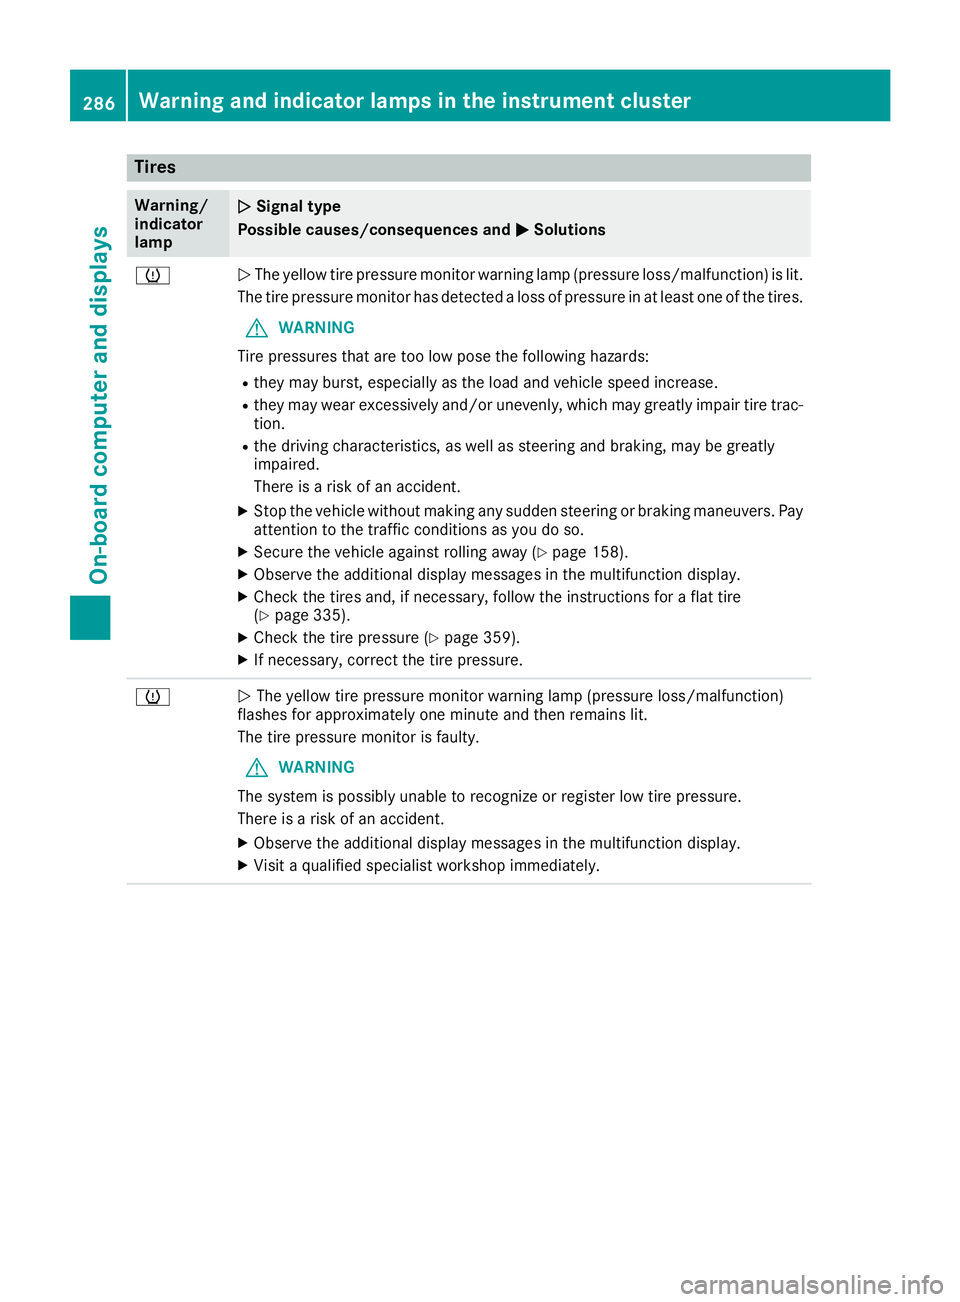
The yellow tire pressure monitor warning lamp (pressure loss/malfunction) is lit.
The tire pressure monitor has detected a loss of pressure in at least one of the tires.
G WARNING
Tire pressures that are too low pose the following hazards: R they may burst, especially as the load and vehicle speed increase.
R they may wear excessively and/or unevenly, which may greatly impair tire trac-
tion.
R the driving characteristics, as well as steering and braking, may be greatly
impaired.
There is a risk of an accident.
X Stop the vehicle without making any sudden steering or braking maneuvers. Pay
attention to the traffic conditions as you do so.
X Secure the vehicle against rolling away (Y page 158).
X Observe the additional display messages in the multifunction display.
X Check the tires and, if necessary, follow the instructions for a flat tire
(Y page 335).
X Check the tire pressure (Y page 359).
X If necessary, correct the tire pressure. 0077
0051
The yellow tire pressure monitor warning lamp (pressure loss/malfunction)
flashes for approximately one minute and then remains lit.
The tire pressure monitor is faulty.
G WARNING
The system is possibly unable to recognize or register low tire pressure.
There is a risk of an accident.
X Observe the additional display messages in the multifunction display.
X Visit a qualified specialist workshop immediately. 286
Warning and indicator lamps in the instrument clusterOn-board computer and displays
Page 338 of 398

X
Stop the vehicle on solid, non-slippery and
level ground, as far away as possible from
traffic.
X Switch on the hazard warning lamps.
X Secure the vehicle against rolling away
(Y page 158).
X If possible, bring the front wheels into the
straight-ahead position.
X Vehicles with the AIRMATIC package:
make sure that the normal vehicle level is
selected (Y page 187).
X Vehicles with the Off-Road Engineering
package:
make sure that the normal level is
selected (Y page 180).
X Switch off the engine.
X Vehicles without KEYLESS-GO: remove the
SmartKey from the ignition lock.
X Vehicles with KEYLESS-GO: open the driv-
er's door.
The vehicle electronics are now in position
0092. This means no SmartKey is in the ignition
lock.
X Vehicles with KEYLESS-GO: remove the
Start/Stop button from the ignition lock
(Y page 140).
X Make sure that the passengers are not endan-
gered as they do so. Make sure that no one is
near the danger area while a wheel is being
changed. Anyone who is not directly assisting in the wheel change should, for example,
stand behind the barrier.
X Get out of the vehicle. Pay attention to traffic
conditions when doing so.
X Close the driver's door.
X Unload heavy luggage.
i Only operate the tire inflation compressor
using a 12 V socket, even if the ignition is
turned off (Y page 307).
An emergency cut-out ensures that the on-
board voltage does not drop too low. If the on-
board voltage is too low, the power to the
sockets is automatically cut. This ensures
that there is sufficient power to start the
engine. MOExtended tires (tires with run-flat
properties)
General notes With MOExtended tires (tires with run flat char-
acteristics), you can continue to drive your vehi- cle even if there is a total loss of pressure in one
or more tires. The affected tire must not show
any clearly visible damage.
You can recognize an MOExtended tire by the
MOExtended marking which appears on the
sidewall of the tire. You will find this marking
next to the tire size designation, the load-bear-
ing capacity and the speed index (Y page 367).
MOExtended tires may only be used in conjunc-
tion with an active tire pressure loss warning
system or with an active tire pressure monitor.
If a pressure loss warning message appears in the multifunction display:
R observe the instructions in the display mes-
sages (Y page 268).
R check the tire for damage
R if driving on, observe the following notes
The driving distance possible in run-flat mode is approximately 50 miles (80 km) when the vehi-
cle is partially laden and approximately 18 miles
(30 km) when the vehicle is fully laden.
In addition to the vehicle load, the driving dis-
tance possible depends upon:
R Vehicle speed
R Road condition
R Outside temperature
The driving distance possible in run-flat mode
may be reduced by extreme driving conditions
or maneuvers, or it can be increased through a
moderate style of driving.
The driving distance possible in run-flat mode is counted from the moment the tire pressure loss warning appears in the multifunction display.
You must not exceed a maximum permissible
speed of 50 mph (80 km/h).
i When replacing one or all tires, please
observe the following specifications for your
vehicle's tires:
R Size
R Type and
R The "MOExtended" mark
If a tire has gone flat and cannot be replaced with an MOExtended tire, a standard tire may 336
Flat tireBreakdown assistance
Page 339 of 398
be used as a temporary measure. Make sure
that you use the proper size and type (sum-
mer or winter tire).
i Vehicles equipped with MOExtended tires
are not equipped with a TIREFIT kit at the fac- tory. It is therefore recommended that you
additionally equip your vehicle with a TIREFIT
kit if you mount tires that do not feature run- flat characteristics, e.g. winter tires. A TIREFIT kit may be obtained from a qualified specialist
workshop.
Important safety notes G
WARNING
When you drive in emergency mode, the han- dling characteristics will be impaired. e.g.
when cornering, when accelerating heavily
and when braking. There is a risk of an acci-
dent.
Do not exceed the maximum permissible
speed for MOExtended tires. Avoid any abrupt
steering and driving maneuver as well as driv-
ing over obstacles (curbs, pot holes, off-road).
This applies, in particular, to laden vehicles.
Stop driving in emergency mode if you notice:
R banging noises
R vehicle vibration
R smoke and the smell of rubber
R continual ESP ®
intervention
R cracks in the tire sidewall
After driving in emergency mode, have the
rims checked by a qualified specialist work-
shop to determine whether they can continue
to be used. The defective tire must be
replaced in every case. TIREFIT kit
Important safety notes TIREFIT is a tire sealant.
You can use TIREFIT to seal punctures of up to
0.16 in (4 mm), particularly those in the tire
tread. You can use TIREFIT at outside tempera-
tures down to 00F84 ‡ (00F820 †). G
WARNING
In the following situations, the tire sealant is
unable to provide sufficient breakdown assis- tance, as it is unable to seal the tire properly:
R there are cuts or punctures in the tire larger
than those mentioned above.
R the wheel rim is damaged.
R you have driven at very low tire pressures or
on a flat tire.
There is a risk of an accident.
Do not drive the vehicle. Contact a qualified
specialist workshop. G
WARNING
The tire sealant is harmful and causes irrita-
tion. It must not come into contact with your
skin, eyes or clothing or be swallowed. Do not inhale TIREFIT fumes. Keep tire sealant away
from children. There is a risk of injury.
If you come into contact with the tire sealant,
observe the following:
R Rinse off the tire sealant from your skin
immediately with water.
R If the tire sealant comes into contact with
your eyes, immediately rinse them thor-
oughly with clean water.
R If tire sealant is swallowed, immediately
rinse your mouth out thoroughly and drink
plenty of water. Do not induce vomiting,
and seek medical attention immediately.
R Immediately change out of clothing which
has come into contact with tire sealant.
R If an allergic reaction occurs, seek medical
attention immediately.
! Do not operate the tire inflation compressor
for longer than eight minutes at a time without a break. It may otherwise overheat.
The tire inflation compressor can be operatedagain once it has cooled down.
Comply with the manufacturer’s safety instruc-
tions on the sticker on the tire inflation com-
pressor. Flat tire
337Breakdown assistance Z
Page 340 of 398
Using the TIREFIT kit
X
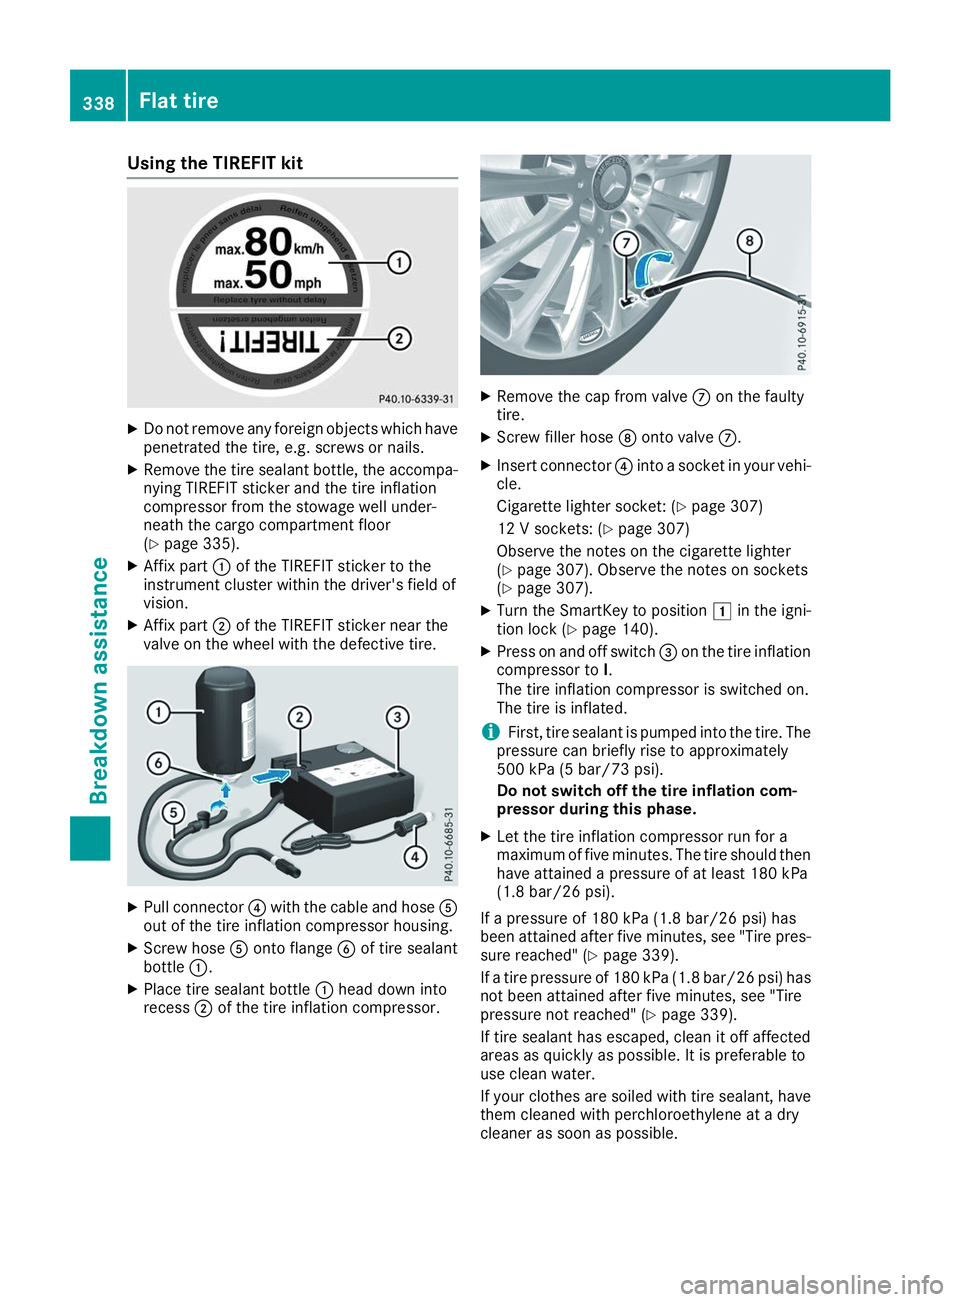
Do not remove any foreign objects which have
penetrated the tire, e.g. screws or nails.
X Remove the tire sealant bottle, the accompa-
nying TIREFIT sticker and the tire inflation
compressor from the stowage well under-
neath the cargo compartment floor
(Y page 335).
X Affix part 0043of the TIREFIT sticker to the
instrument cluster within the driver's field of
vision.
X Affix part 0044of the TIREFIT sticker near the
valve on the wheel with the defective tire. X
Pull connector 0085with the cable and hose 0083
out of the tire inflation compressor housing.
X Screw hose 0083onto flange 0084of tire sealant
bottle 0043.
X Place tire sealant bottle 0043head down into
recess 0044of the tire inflation compressor. X
Remove the cap from valve 006Bon the faulty
tire.
X Screw filler hose 006Conto valve 006B.
X Insert connector 0085into a socket in your vehi-
cle.
Cigarette lighter socket: (Y page 307)
12 V sockets: (Y page 307)
Observe the notes on the cigarette lighter
(Y page 307). Observe the notes on sockets
(Y page 307).
X Turn the SmartKey to position 0047in the igni-
tion lock (Y page 140).
X Press on and off switch 0087on the tire inflation
compressor to I.
The tire inflation compressor is switched on.
The tire is inflated.
i First, tire sealant is pumped into the tire. The
pressure can briefly rise to approximately
500 kPa (5 bar/73 psi).
Do not switch off the tire inflation com-
pressor during this phase.
X Let the tire inflation compressor run for a
maximum of five minutes. The tire should then
have attained a pressure of at least 180 kPa
(1.8 bar/26 psi).
If a pressure of 180 kPa (1.8 bar/26 psi) has
been attained after five minutes, see "Tire pres-
sure reached" (Y page 339).
If a tire pressure of 180 kPa (1.8 bar/26 psi) has not been attained after five minutes, see "Tire
pressure not reached" (Y page 339).
If tire sealant has escaped, clean it off affected
areas as quickly as possible. It is preferable to
use clean water.
If your clothes are soiled with tire sealant, have
them cleaned with perchloroethylene at a dry
cleaner as soon as possible. 338
Flat tireBreakdown assistance
Page 341 of 398
Tire pressure not reached
If a pressure of 180 kPa (1.8 bar/26 psi) has not
been attained after five minutes:
X Switch off the tire inflation compressor.
X Unscrew the filler hose from the valve of the
faulty tire.
Note that tire sealant may escape when you
unscrew the filler hose.
X Very slowly drive forwards or reverse approx-
imately 30 ft (10 m).
X Pump up the tire again.
After a maximum of five minutes the tire pres-
sure must be at least 180 kPa (1.8 bar/
26 psi). G
WARNING
If the required tire pressure is not reached
after the specified time, the tire is too badly
damaged. The tire sealant cannot repair the
tire in this instance. Damaged tires and a tire pressure that is too low can significantly
impair the vehicle's braking and driving char-
acteristics. There is a risk of accident.
Do not continue driving. Contact a qualified
specialist workshop.
Tire pressure reached G
WARNING
A tire temporarily sealed with tire sealant
impairs the vehicle's driving characteristics
and is not suitable for driving at higher
speeds. There is a risk of an accident.
Adapt your driving style accordingly and drive carefully. Do not exceed the maximum per-
missible speed for a tire sealed with tire seal- ant.
The maximum permissible speed for a tire
sealed with tire sealant is 50 mph (80 km/h).
The upper part of the TIREFIT sticker must be
affixed to the instrument cluster in the driver's
field of vision.
! Residue from the tire sealant may come out
of the filler hose after use. This could cause
stains.
Therefore, place the filler hose in the plastic
bag which contained the TIREFIT kit. H
Environmental note
Have the used tire sealant bottle disposed of
professionally, e.g. at a qualified specialist
workshop.
If a tire pressure of 180 kPa (1.8 ba r/26 psi) has
been attained after five minutes:
X Switch off the tire inflation compressor.
X Unscrew the filler hose from the valve of the
faulty tire.
X Stow the tire sealant bottle and the tire infla-
tion compressor.
X Pull away immediately.
X Stop after driving for approximately ten
minutes and check the tire pressure with the tire inflation compressor.
The tire pressure must now be at least
130 kPa (1.3 bar/19 psi). G
WARNING
If the required tire pressure is not reached
after driving for a short period, the tire is too
badly damaged. The tire sealant cannot repair the tire in this instance. Damaged tires and a
tire pressure that is too low can significantly
impair the vehicle's braking and driving char-
acteristics. There is a risk of accident.
Do not continue driving. Contact a qualified
specialist workshop.
i In cases such as the one mentioned above,
contact an authorized Mercedes-Benz Cen-
ter. Or call 1-800-FOR-MERCedes (in the
USA) or 1-800-387-0100 (in Canada).
X Correct the tire pressure if it is still at least
130 kPa (1.3 bar/19 psi). See the Tire and
Loading Information placard on the driver's
side B-pillar or the tire pressure table in the
fuel filler flap for values.
X To increase the tire pressure: switch on the
tire inflation compressor. Flat tire
339Breakdown assistance Z
Page 342 of 398
X
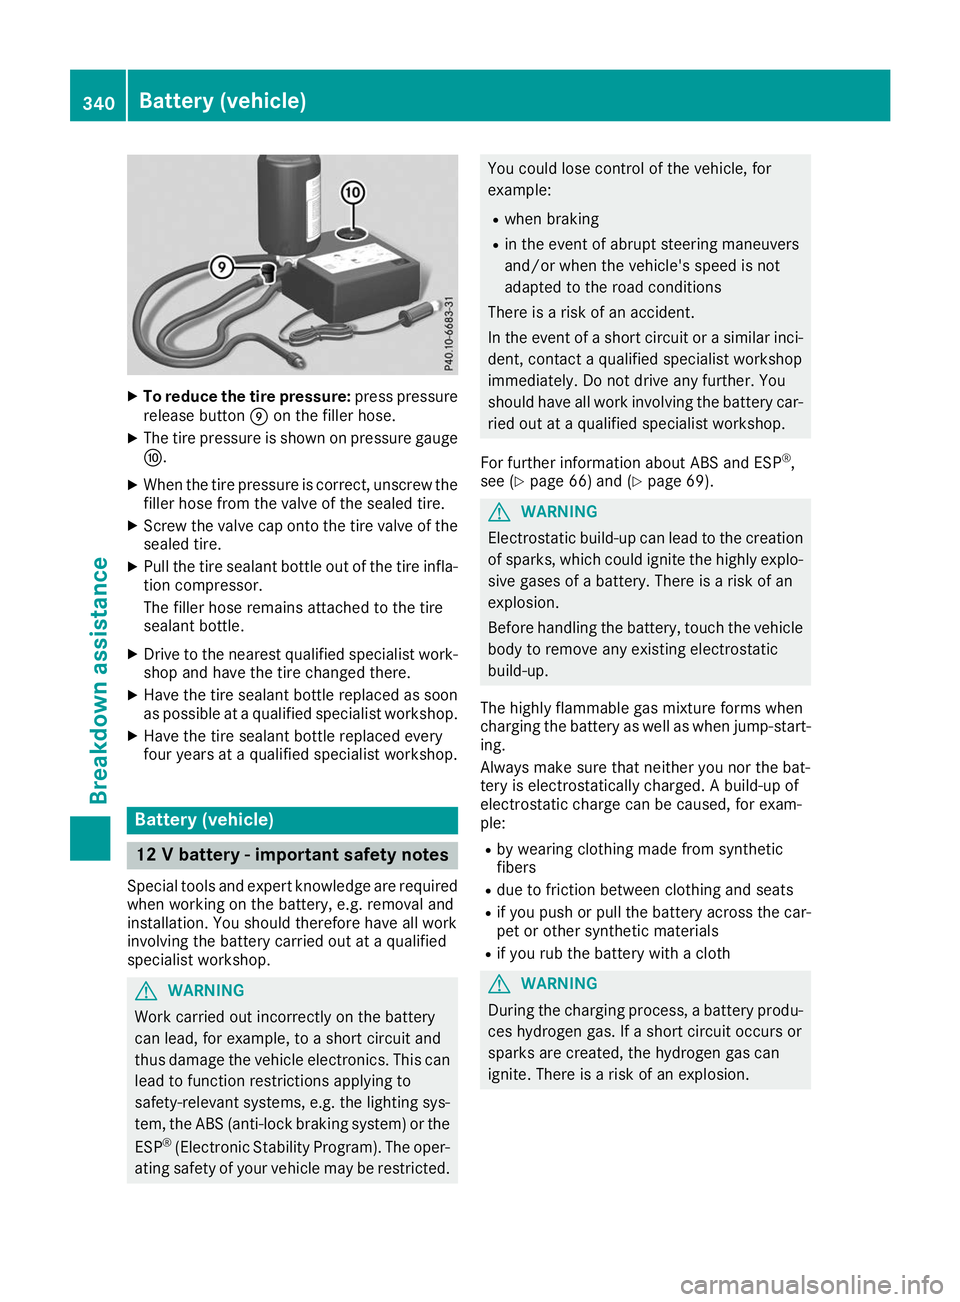
To reduce the tire pressure: press pressure
release button 006Don the filler hose.
X The tire pressure is shown on pressure gauge
006E.
X When the tire pressure is correct, unscrew the
filler hose from the valve of the sealed tire.
X Screw the valve cap onto the tire valve of the
sealed tire.
X Pull the tire sealant bottle out of the tire infla-
tion compressor.
The filler hose remains attached to the tire
sealant bottle.
X Drive to the nearest qualified specialist work-
shop and have the tire changed there.
X Have the tire sealant bottle replaced as soon
as possible at a qualified specialist workshop.
X Have the tire sealant bottle replaced every
four years at a qualified specialist workshop. Battery (vehicle)
12 V battery - important safety notes
Special tools and expert knowledge are required
when working on the battery, e.g. removal and
installation. You should therefore have all work
involving the battery carried out at a qualified
specialist workshop. G
WARNING
Work carried out incorrectly on the battery
can lead, for example, to a short circuit and
thus damage the vehicle electronics. This can lead to function restrictions applying to
safety-relevant systems, e.g. the lighting sys- tem, the ABS (anti-lock braking system) or the
ESP ®
(Electronic Stability Program). The oper-
ating safety of your vehicle may be restricted. You could lose control of the vehicle, for
example:
R when braking
R in the event of abrupt steering maneuvers
and/or when the vehicle's speed is not
adapted to the road conditions
There is a risk of an accident.
In the event of a short circuit or a similar inci-
dent, contact a qualified specialist workshop
immediately. Do not drive any further. You
should have all work involving the battery car- ried out at a qualified specialist workshop.
For further information about ABS and ESP ®
,
see (Y page 66) and (Y page 69). G
WARNING
Electrostatic build-up can lead to the creation of sparks, which could ignite the highly explo-
sive gases of a battery. There is a risk of an
explosion.
Before handling the battery, touch the vehicle body to remove any existing electrostatic
build-up.
The highly flammable gas mixture forms when
charging the battery as well as when jump-start- ing.
Always make sure that neither you nor the bat-
tery is electrostatically charged. A build-up of
electrostatic charge can be caused, for exam-
ple:
R by wearing clothing made from synthetic
fibers
R due to friction between clothing and seats
R if you push or pull the battery across the car-
pet or other synthetic materials
R if you rub the battery with a cloth G
WARNING
During the charging process, a battery produ- ces hydrogen gas. If a short circuit occurs or
sparks are created, the hydrogen gas can
ignite. There is a risk of an explosion. 340
Battery (vehicle)Breakdo
wn assis tance
Page 354 of 398
Important safety notes
G
WARNING
If you install wheels and tires with incorrect
dimensions, the service brake or wheel sus-
pension components may be damaged. There is a risk of an accident.
Always replace wheels and tires with ones
that comply with the specifications of the
original part.
When replacing wheels, pay attention to the:
R Designation
R Model
When replacing tires, pay attention to the:
R Designation
R Manufacturer
R Model G
WARNING
A flat tire will severely affect the driving char- acteristics as well as the steering and braking
of the vehicle. There is a risk of an accident.
Tires without run-flat characteristics:
R Do not drive on with a flat tire.
R Change the flat tire immediately with an
emergency spare wheel or spare wheel.
Alternatively, consult a qualified specialist
workshop.
Tires with run-flat characteristics:
R Observe the information and warning notes
on MOExtended tires (run-flat tires).
Accessories that are not approved for your vehi-
cle by Mercedes-Benz or are not being used cor- rectly can impair the operating safety.
Before purchasing and using non-approved
accessories, visit a qualified specialist work-
shop and inquire about:
R suitability
R legal stipulations
R factory recommendations
Further information regarding wheels and tires
can be found under "Wheel/tire combinations"
(Y page 377). You can ask for information regarding permitted
wheel/tire combinations at an authorized
Mercedes-Benz Center.
Tire pressure information can be found:
R on the Tire and Loading Information placard
on the B-pillar on the driver's side
R in the tire pressure table in the fuel filler flap
R in the "Tire pressure" section Operation
Information on driving
Check the tire pressure when the vehicle is
heavily laden and adjust prior to a trip.
While driving, pay attention to vibrations, noises and unusual handling characteristics, e.g. pull-
ing to one side. This may indicate that the
wheels or tires are damaged. If you suspect that
a tire is defective, reduce your speed immedi-
ately. Stop the vehicle as soon as possible to
check the wheels and tires for damage. Hidden tire damage could also be causing the unusual
handling characteristics. If you find no signs of
damage, have the tires and wheels checked at a
qualified specialist workshop.
When parking your vehicle, make sure that the
tires do not get deformed by the curb or other
obstacles. If it is necessary to drive over curbs,
speed humps or similar elevations, try to do so
slowly and at an obtuse angle. Otherwise, the
tires, particularly the sidewalls, may be dam-
aged. Regular checking of wheels and tires
G
WARNING
Damaged tires can cause tire inflation pres-
sure loss. As a result, you could lose control of your vehicle. There is a risk of accident.
Check the tires regularly for signs of damage
and replace any damaged tires immediately.
Check wheels and tires for damage at least once a month. Check wheels and tires after driving
off-road or on rough roads. Damaged wheels
can cause a loss of tire pressure.
Pay particular attention to damage such as:
R cuts in the tires
R punctures in the tires 352
OperationWheels and ti
res
Page 355 of 398
R
tears in the tires
R bulges on tires
R deformation or severe corrosion on wheels
Regularly check the tire tread depth and the
condition of the tread across the whole width of
all tires (Y page 353). If necessary, turn the
front wheels to full lock in order to inspect the
inner side of the tire surface.
All wheels must have a valve cap to protect the
valve against dirt and moisture. Do not mount
anything onto the valve other than the standard valve cap or other valve caps approved by
Mercedes-Benz for your vehicle. Do not use any other valve caps or systems, e.g. tire pressure
monitoring systems.
Regularly check the pressure of all the tires par- ticularly prior to long trips. Adjust the tire pres-
sure as necessary (Y page 355).
Observe the notes on the emergency spare
wheel (Y page 378).
The service life of tires depends, among other
things, on the following factors:
R Driving style
R Tire pressure
R Distance covered Notes on tire tread
G
WARNING
If there is insufficient tire tread, the tire trac-
tion decreases. The tire tread is no longer able to dissipate water. This increases the risk of
hydroplaning when the road surface is wet,
particularly when the vehicle's speed is not
adapted to the road conditions. There is a risk
of an accident.
When the tire pressure is too high or too low,
tires may wear differently at different points
on the tire tread. Therefore, regularly check
the tire tread depth and the condition of the
tread across the whole width of all tires.
Minimum tire tread depth on:
R Summer tires: 00CEin (3 mm)
R M+S tires: 00CFin (4 mm)
For safety reasons, have the tires replaced
before they reach the legally prescribed min-
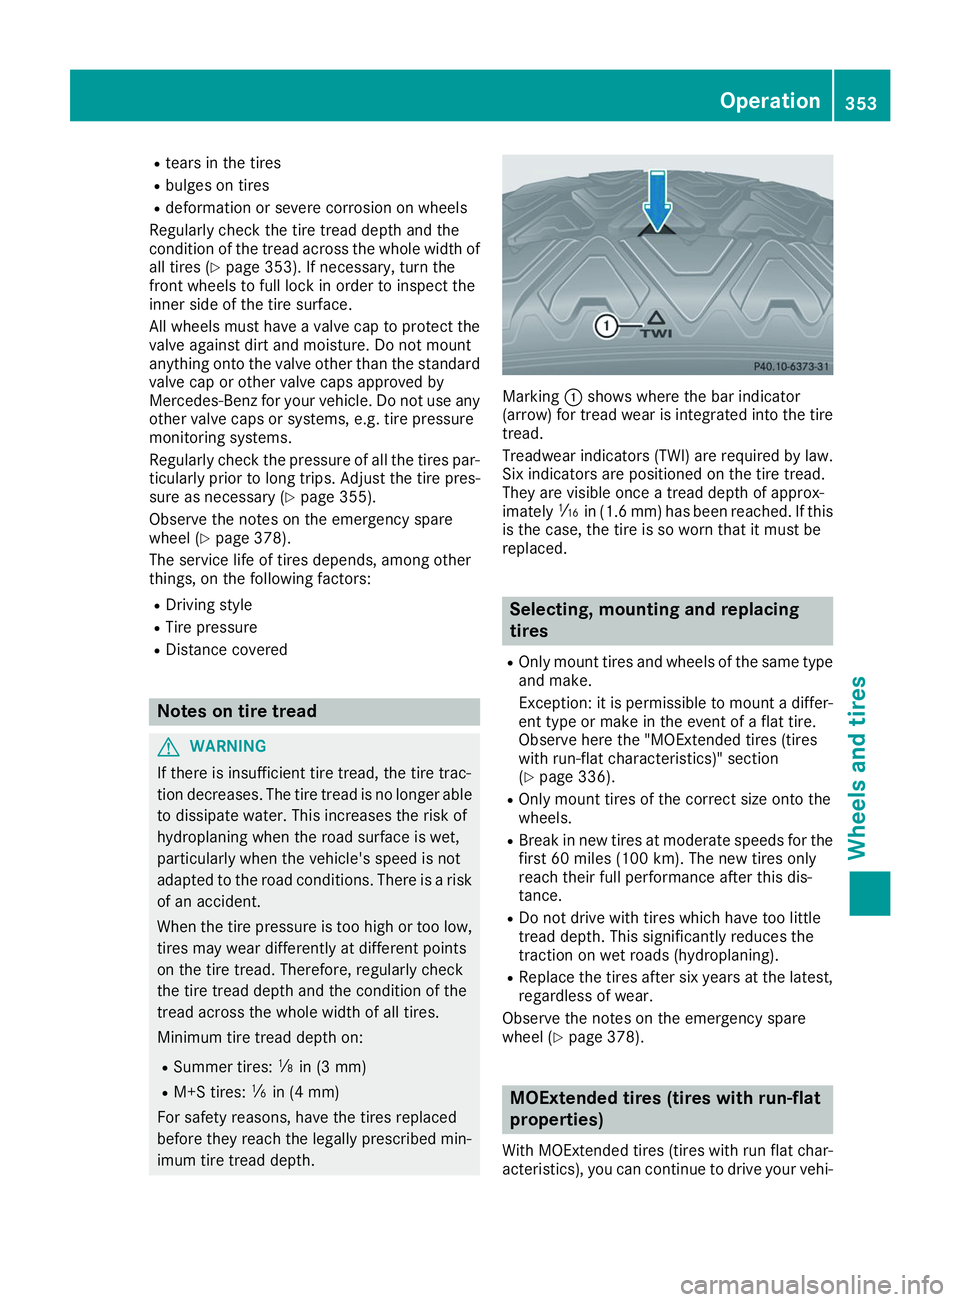
imum tire tread depth. Marking
0043shows where the bar indicator
(arrow) for tread wear is integrated into the tire
tread.
Treadwear indicators (TWI) are required by law. Six indicators are positioned on the tire tread.
They are visible once a tread depth of approx-
imately 00CDin (1.6 mm) has been reached. If this
is the case, the tire is so worn that it must be
replaced. Selecting, mounting and replacing
tires
R Only mount tires and wheels of the same type
and make.
Exception: it is permissible to mount a differ-
ent type or make in the event of a flat tire.
Observe here the "MOExtended tires (tires
with run-flat characteristics)" section
(Y page 336).
R Only mount tires of the correct size onto the
wheels.
R Break in new tires at moderate speeds for the
first 60 miles (100 km). The new tires only
reach their full performance after this dis-
tance.
R Do not drive with tires which have too little
tread depth. This significantly reduces the
traction on wet roads (hydroplaning).
R Replace the tires after six years at the latest,
regardless of wear.
Observe the notes on the emergency spare
wheel (Y page 378). MOExtended tires (tires with run-flat
properties)
With MOExtended tires (tires with run flat char- acteristics), you can continue to drive your vehi- Operation
353Wheels and tires Z