2019 MERCEDES-BENZ GLE SUV light
[x] Cancel search: lightPage 166 of 681
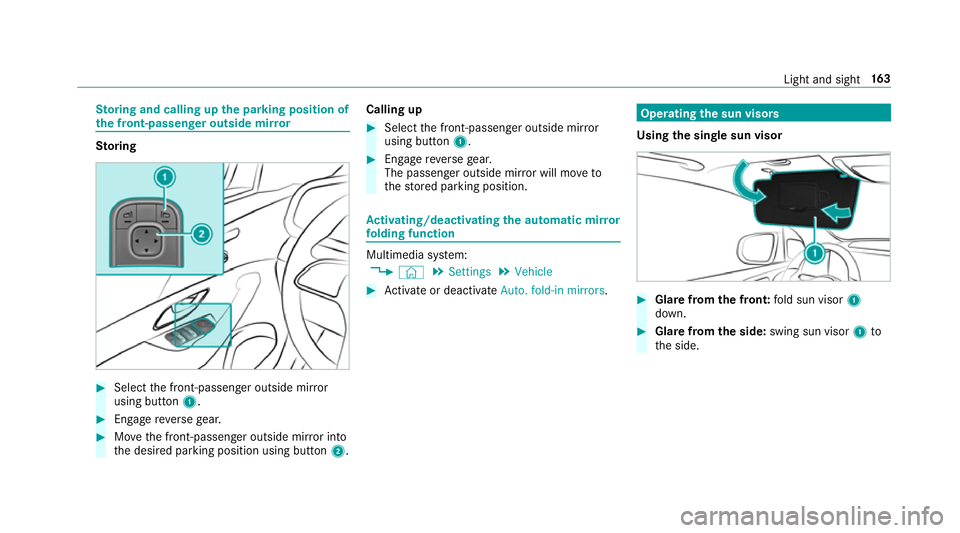
St
oring and calling up the pa rking position of
th e front-passenger outside mir rorSto
ring #
Select the front-passen ger outside mir ror
using but ton1. #
Engage reve rsege ar. #
Movethe front-passen ger outside mir ror into
th e desired parking position using button 2.Calling up #
Select the front-passen ger outside mir ror
using but ton1. #
Engage reve rsege ar.
The passenger outside mir ror will mo veto
th estored parking position. Ac
tivating/deactivating the automatic mir ror
fo lding function Multimedia sy
stem:
, © .
Settings .
Vehicle #
Activate or deacti vate Auto. fold-in mirrors . Ope
rating the sun viso rs
Using the single sun visor #
Glarefrom the front: fold sun visor 1
down. #
Glare from the side: swing sun visor 1to
th e side. Light and sight
16 3
Page 167 of 681
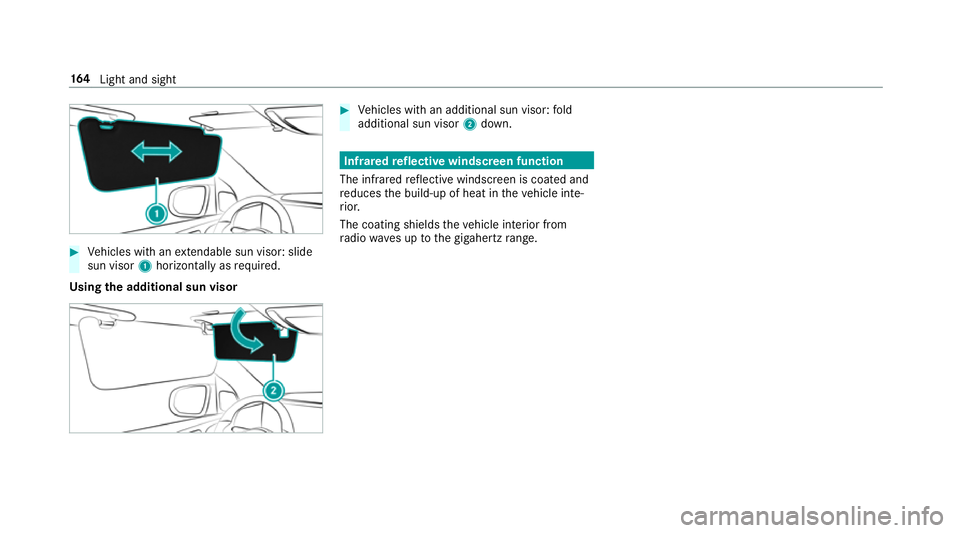
#
Vehicles with an extendable sun visor: slide
sun visor 1horizontal lyas requ ired.
Using the additional sun visor #
Vehicles with an additional sun visor: fold
additional sun visor 2down. Infrared
reflective windscreen function
The inf rare dre flective windscreen is coated and
re duces the build-up of heat in theve hicle inte‐
ri or.
The coating shields theve hicle interior from
ra dio waves up tothe gigahertz range. 16 4
Light and sight
Page 175 of 681
#
After heating or ventilating theve hicle
twice, drive for a longer period of time. Re
quirements:
R The fuel tank is filled toat least reser vefuel
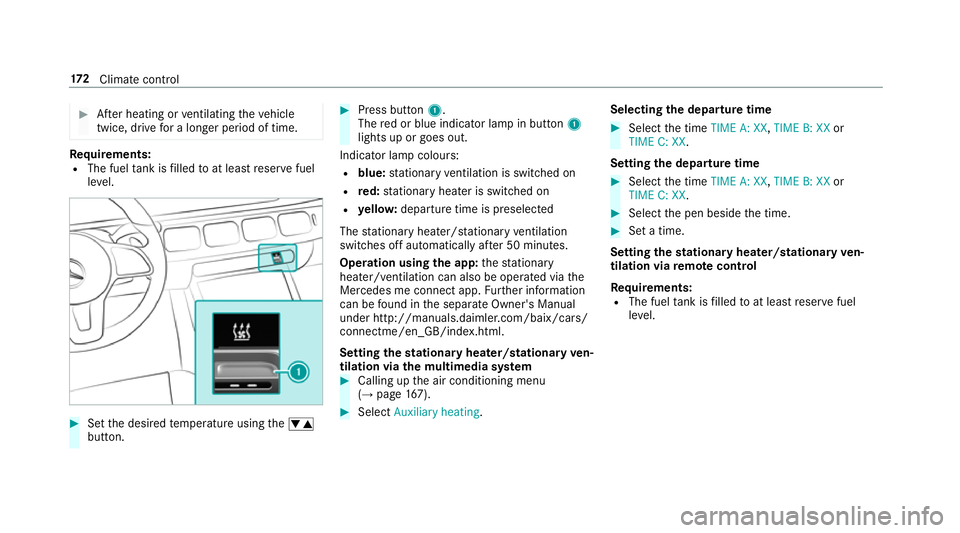
le ve l. #
Set the desired temp erature using thew
button. #
Press button 1.
The red or blue indicator lamp in button 1
lights up or goes out.
Indicator lamp colours: R blue: stationary ventilation is switched on
R red: stationary heater is swit ched on
R yello w: departure time is preselected
The stationary heater/ stationary ventilation
switches off au tomatically af ter 50 minutes.
Operation using the app: thest ationary
heater/ ventilation can also be operated via the
Mercedes me connect app. Further information
can be found in the separate Owner's Manual
under http://manuals.daimler.com/baix/cars/
connectme/en_GB/index.html.
Setting thest ationary heater/stationary ven‐
tilation via the multimedia sy stem #
Calling up the air conditioning menu
(→ page 167). #
Select Auxiliary heating. Selecting
the departu retime #
Select the time TIME A: XX, TIME B: XXor
TIME C: XX.
Setting the departu retime #
Select the time TIME A: XX, TIME B: XXor
TIME C: XX. #
Select the pen beside the time. #
Set a time.
Setting thest ationary heater/stationary ven‐
tilation via remo tecont rol
Re quirements:
R The fuel tank is filled toat least reser vefuel
le ve l. 17 2
Climate cont rol
Page 182 of 681
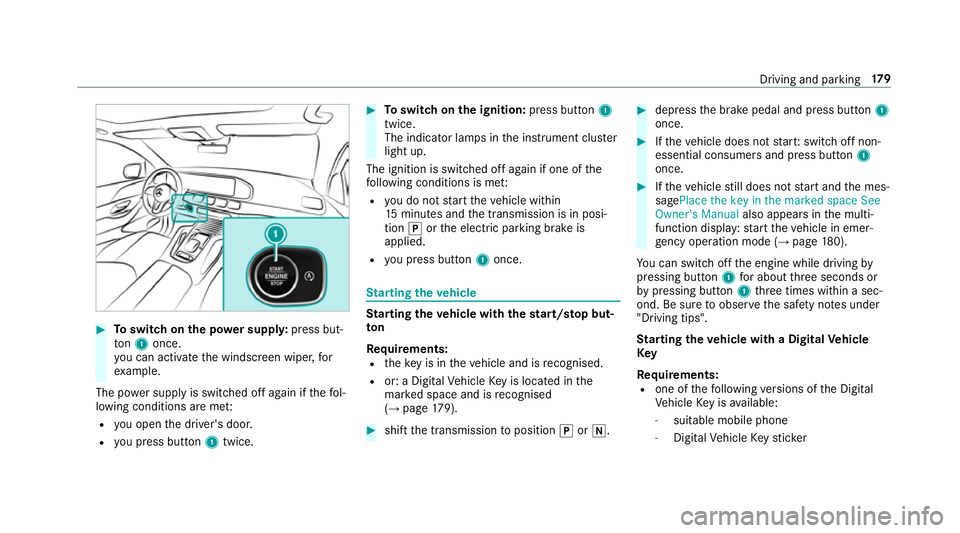
#
Toswitch on the po wer supp ly:press but‐
to n1 once.
yo u can activate the windscreen wiper, for
ex ample.
The po wer supp lyis switched off again if thefo l‐
lowing conditions are me t:
R you open the driver's door.
R you press but ton1 twice. #
Toswitch on the ignition: press button 1
twice.
The indicator lamps in the instrument clus ter
light up.
The ignition is switched off again if one of the
fo llowing conditions is me t:
R you do not start theve hicle within
15 minutes and the transmission is in posi‐
tion jorthe electric parking brake is
applied.
R you press but ton1 once. St
arting theve hicle St
arting theve hicle with thest art/s top but‐
ton
Requ irements:
R theke y is in theve hicle and is recognised.
R or: a Digi talVe hicle Key is located in the
mar ked space and is recognised
(→ page 179). #
shif tth e transmission toposition jori. #
depress the brake pedal and press button 1
once. #
Ifth eve hicle does not star t:switch off non-
essential consumers and press button 1
once. #
Ifth eve hicle still does not start and the mes‐
sagePlace the key in the marked space See
Owner's Manual also appears inthe multi‐
function display: start theve hicle in emer‐
ge ncy operation mode (→ page 180).
Yo u can swit choff the engine while driving by
pressing button 1for about thre e seconds or
by pressing button 1thre e times within a sec‐
ond. Be sure toobser vethe saf ety no tes under
"Driving tips".
St arting theve hicle with a Digital Vehicle
Key
Re quirements:
R one of thefo llowing versions of the Digital
Ve hicle Key is available:
- suitable mobile phone
- Digital Vehicle Keyst icker Driving and pa
rking 17 9
Page 187 of 681
*
NO
TEDama getothe driv etra in and
engine when pulling away #
Do not warm upthe engine while the
ve hicle is stationar y.Pull away immedi‐
atel y. #
Avoid high engine speeds and driving at
full thro ttle until the engine has reached
its operating temp erature. *
NO
TEDama getothe catalytic con verter
due tonon-combu sted fuel The engine is not
running smo othly and is
misfiring.
Non-combus ted fuel may get into the cata‐
lytic con verter. #
Only depress the accelera tor pedal
slightl y. #
Have the cause rectified immediately at
a qu alified specialist workshop. Limited braking ef
fect on salt-trea tedro ads:
R due tosalt build-up on the brake disks and
brakepads, the braking dis tance can increase
conside rably or result in braking only on one
side
R maintain a much greater safe dis tance tothe
ve hicle in front
To preve nt salt build-up:
R brake occasionally while paying attention to
th e tra ffic conditions
R carefully depress the brake pedal at the end
of the journey and when starting the next
journey Note
s on off-road driving &
WARNING Risk of accident if you do not
ke ep toline of fall on inclines
If yo u drive at an angle or turn on an incline,
th eve hicle could slip side ways, tip and roll‐
ove r. #
Alw ays drive on inclines in the line of
fa ll (straight up or down) and do not
turn. &
WARNING Risk offire due toflammable
materials on hot parts of theex haust
sy stem
Flammable material such as lea ves, grass or
twigs may ignite if they come into contact
wi th hot parts of theex haust sy stem. #
When driving on unpa vedro ads or off-
ro ad, regular lych eck theve hicle under‐
side. #
Remo vetrapped plants or other flam‐
mable material, in particular. #
Ifth ere is damage, consult a qualified
specialist workshop immediately. When driving off-road, subs
tances su chas sand,
mud and water orwate r mixed with oil may get
into the brakes. This may lead toare duction in
braking ef fect or total brake failure as a result of
increased wear. The braking characteristics will
va ry depending on the material that has entered 184
Driving and pa rking
Page 191 of 681
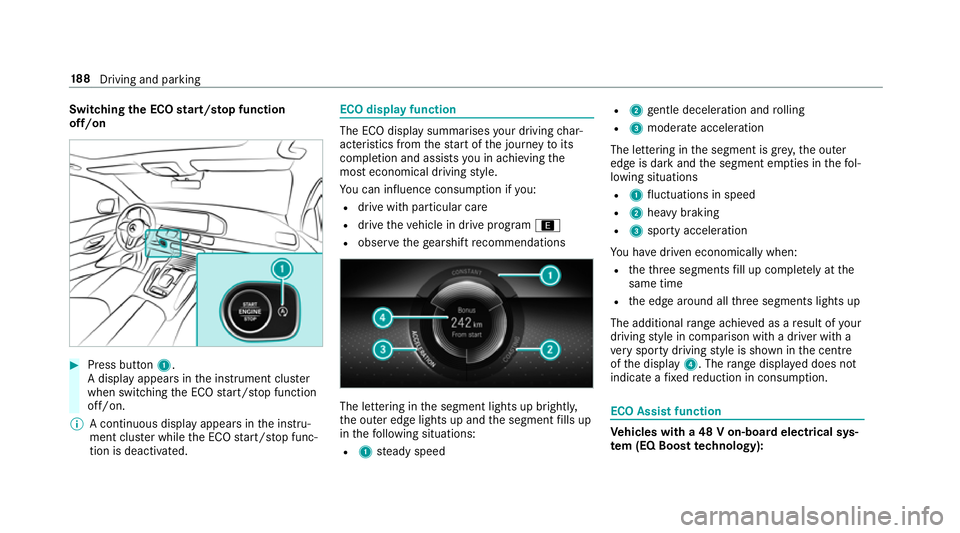
Switching
the ECO start/s top function
off/on #
Press button 1.
A displ ayappears in the instrument clus ter
when swit ching the ECO start/ stop function
off/on.
% A continuous display appears in the instru‐
ment clus ter while the ECO start/ stop func‐
tion is deactivated. ECO display function
The ECO display summarises
your driving char‐
acteristics from thest art of the journey toits
completion and assists you in achieving the
most economical driving style.
Yo u can influence consum ption if you:
R drive with particular care
R drive theve hicle in drive program ;
R obser vethege arshift recommendations The lettering in
the segment lights up brightl y,
th e outer edge lights up and the segment fills up
in thefo llowing situations:
R 1 steady speed R
2 gentle deceleration and rolling
R 3 moderate acceleration
The lettering in the segment is gr ey,th e outer
edge is dark and the segment em pties in thefo l‐
lowing situations
R 1 fluctuations in speed
R 2 heavy braking
R 3 sporty acceleration
Yo u ha vedriven economically when:
R theth re e segments fill up comple tely at the
same time
R the edge around all thre e segments lights up
The additional range achi eved as a result of your
driving style in comparison with a driver with a
ve ry sporty driving style is shown in the cent re
of the display 4. Therange displ ayed does not
indicate a fixe dre duction in consum ption. ECO Assist function
Ve
hicles with a 48 V on-board electrical sys‐
te m (EQ Boo sttech nology): 18 8
Driving and pa rking
Page 193 of 681
If
th e sy stem does not inter vene du ring the
eve nt ahead, no thing will be displa yed. The sys‐
te m is passive.
ECO Assist is active only in drive programs ;
and A.
Sy stem limitations
ECO Assist can function more precisely if the
ro ute is main tained when route guidance is
active. The basic function is also available with‐
out active route guidance. Notall information
and traf fic situations can be fore seen. The qual‐
ity depends on the map data.
ECO Assist is only an aid. The driver is responsi‐
ble forke eping a safe dis tance totheve hicle in
front, forve hicle speed and for braking in good
time. The driver must be ready tobrake at all
times ir respective of whe ther the sy stem inter‐
ve nes.
The sy stem may be impaired or may not function
in thefo llowing situations:
R Ifth ere is poor visibility, e.g. due toinsuf fi‐
cient illumination of thero ad, high lyvariable
shade conditions, or due torain, sno w,fog or
heavy spr ay. R
Ifth ere is glare, e.g. from oncoming traf fic,
di re ct sunlight or reflections.
R Ifth ere is dirt on the windscreen in the vicin‐
ity of the multifunction camera or the camera
is mis ted up, damaged or obscured.
R Ifth e traf fic signs are ha rdtodetect, e.g. due
to dirt or snow or insuf ficient lighting, or
because they are co vered.
R Ifth e information on the navigation sy stem's
digital map is incor rect or out of da te.
R Ifth e signs are ambiguous, e.g. traf fic signs
on construction sites or in adjacent lanes. DY
NA MIC SELECT switch Fu
nction of theDY NA MIC SELECT switch Depending on
the engine and equipment, the
ve hicle has dif fere nt drive programs.
Use theDY NA MIC SELECT switch tochange
between thefo llowing drive programs:
R = (Individual): individual settings
R B (Sport Plus): particularly sporty driving
st yle R
C (Sport): sporty driving style
R A (Comfort): comfortable and economi‐
cal driving style
R ; (Eco): particular lyeconomical driving
st yle
R Vehicles with ACTIVE BODY CONT ROL:
N (CURVE): comfortable driving with
cur veinclination function
R FOff-road: driving on less demanding
cross-country terrain
R GOff- road Plus: driving on dif ficult cross-
country terrain
% The drive prog ram selected appears in the
multifunction display of the on-board com‐
puter.
Depending on the drive prog ram, thefo llowing
sy stems change their characteristics:
R drive
-
engine and transmission management
- Active Dis tance Assi stDISTRONIC
R ESP ® 19 0
Driving and pa rking
Page 201 of 681
Shift
ranges
HIGH RANGE LOW RANGE
Ro ad position for all
normal on-road driv‐
ing situations. Off-road
gear for driv‐
ing off-road, when
fo rd ing and on steep
uphill or downhill
inclines. Properties of
theLO W RANGE off-road gear:
R reduced maximum speed: 50 km/h
R increased tractive po wer
R the transmission ratio changes byappr ox‐
imately a factor of thre e.
R increased drive torque
Do not use LOW RANGE in thefo llowing situa‐
tions:
R when driving on public roads. Shifting
the transfer case Shifting
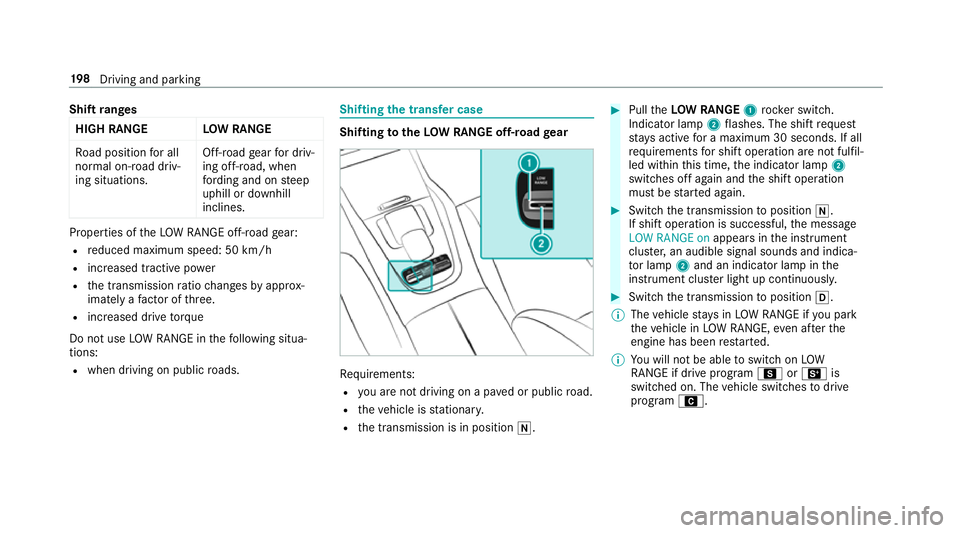
totheLOW RANGE off-road gear Re
quirements:
R you are not driving on a pa ved or public road.
R theve hicle is stationar y.
R the transmission is in position i. #
Pull theLOW RANGE 1rock er switch.
Indicator lamp 2flashes. The shift request
st ay s active for a maximum 30 seconds. If all
re qu irements for shift operation are not fulfil‐
led within this time, the indicator lamp 2
switches off again and the shift operation
must be star ted again. #
Switch the transmission toposition i.
If shift operation is successful, the message
LOW RANGE on appears inthe instrument
clus ter,an audible signal sounds and indica‐
to r lamp 2and an indica tor lamp in the
instrument clus ter light up continuously. #
Switch the transmission toposition h.
% The vehicle stay s in LOW RANGE if you park
th eve hicle in LOW RANGE, even af terthe
engine has been restar ted.
% You will not be able toswitch on LOW
RANGE if drive prog ram C orB is
switched on. The vehicle switches todrive
program A. 19 8
Driving and pa rking