2019 MERCEDES-BENZ GLE SUV steering wheel
[x] Cancel search: steering wheelPage 292 of 681
In
rare cases, the sy stem may make an inappro‐
priate brake application. This brake application
may be inter rupte d at any time if yousteer
slightly in the opposite direction or accelera te.
Sy stem limitations
Either a course-cor recting brake application
appropria teto the driving situation, or none at
all, may occur in thefo llowing situations:
R Vehicles or obs tacles, e.g. crash ba rriers, are
located on bo thsides of your vehicle.
R Ave hicle approaches too closely on the side.
R You ha veadop ted a sporty driving style with
high cornering speeds.
R You brake or accelerate significantl y.
R A driving sa fety sy stem inter venes, e.g. ESP ®
or Active Brake Assi st.
R ESP ®
is deacti vated.
R A loss of tyre pressure or a defective tyre is
de tected.
R You are driving with a trailer and the electri‐
cal connection tothe trailer hitch has been
cor rectly es tablished. Ac
tivating/deactivating Blind Spot Assi stor
Ac tive Blind Spot Assi st
Multimedia sy stem:
, © .
Settings .
Assistance #
Activate or deacti vate Blind Spot Assist . Ac
tive Lane Keeping Assist Fu
nction of Active Lane Keeping Assist Ac
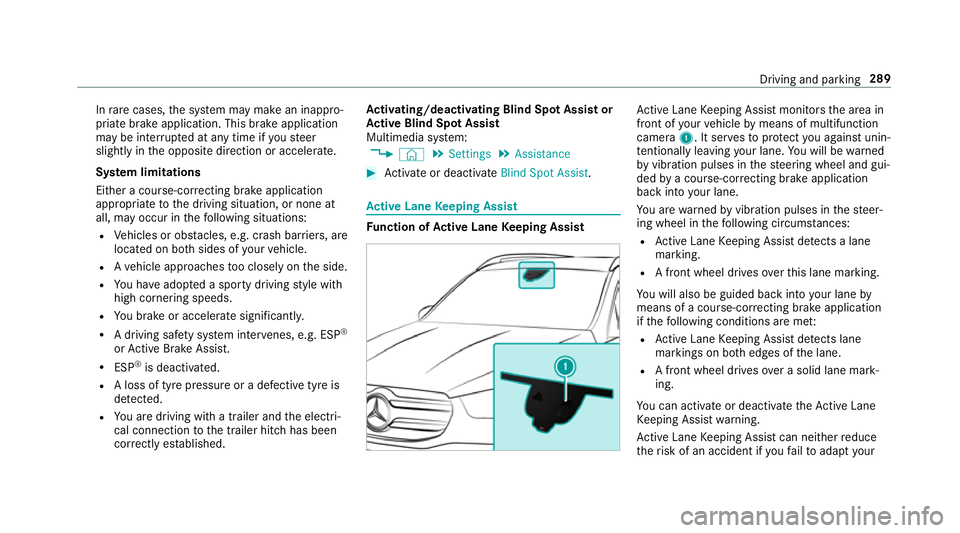
tive Lane Keeping Assist monitors the area in
front of your vehicle bymeans of multifunction
camera 1. It ser vesto protect you against unin‐
te ntional lyleaving your lane. You will be warned
by vibration pulses in thesteering wheel and gui‐
ded bya course-cor recting brake application
ba ck into your lane.
Yo u are warned byvibration pulses in thesteer‐
ing wheel in thefo llowing circums tances:
R Active Lane Keeping Assist de tects a lane
marking.
R A front wheel drives overth is lane marking.
Yo u will also be guided back into your lane by
means of a course-cor recting brake application
if th efo llowing conditions are me t:
R Active Lane Keeping Assist de tects lane
markings on bo thedges of the lane.
R A front wheel drives over a solid lane mark‐
ing.
Yo u can activate or deactivate theAc tive Lane
Ke eping Assist warning.
Ac tive Lane Keeping Assist can neither reduce
th erisk of an accident if youfa ilto adapt your Driving and parking
289
Page 314 of 681
#
Press the left-hand Touch Control.
Yo u may accept/ reject the call using button
6 or~ onthesteering wheel. Setting
the head-up display using the on-
board compu ter On-board computer:
, HEAD-UP DISPLAY
The following head-up display settings can be
selec ted:
R Position
R Brightness
R Displa ys #
Toselect a setting: swipe upwards or down‐
wa rds on the left-hand Touch Control. #
Press the left-hand Touch Control. #
Toadjust the position: swipe upwards or
down wards on the left-hand Touch Control. #
Toadjust the brightness: swipetothe left
or right on the left-hand Touch Control. #
Press the left-hand Touch Control. Selecting what
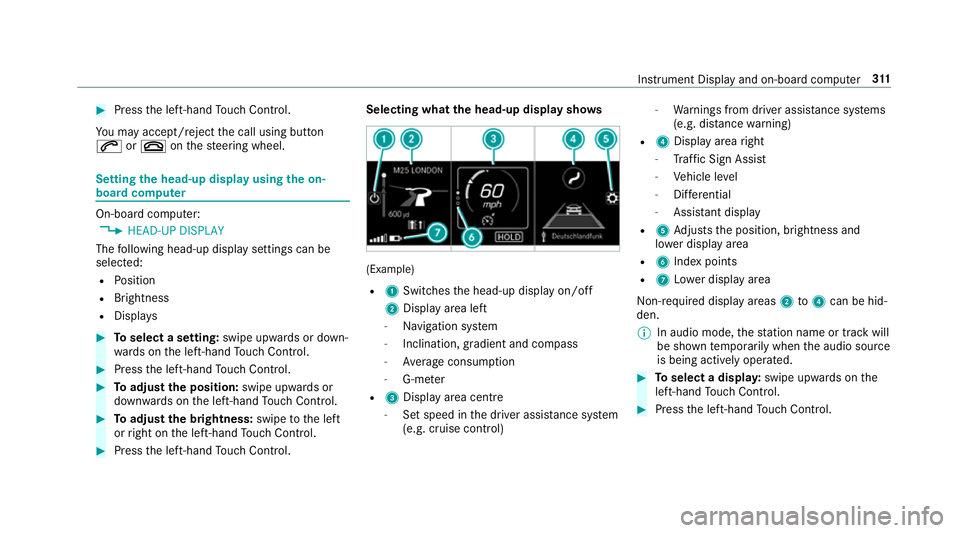
the head-up display sho ws (Example)
R 1 Switches the head-up display on/off
2 Display area left
- Navigation sy stem
- Inclination, gradient and compass
- Average consum ption
- G-me ter
R 3 Displ ayarea centre
- Set speed in the driver assis tance sy stem
(e.g. cruise control) -
Warnings from driver assis tance sy stems
(e.g. dis tancewarning)
R 4 Display area right
- Traf fic Sign Assi st
- Vehicle le vel
- Differe ntial
- Assi stant display
R 5 Adjusts the position, brightness and
lo we r display area
R 6 Index points
R 7 Lowe r display area
Non-re quired display areas 2to4 can be hid‐
den.
% In audio mode, thest ation name or track will
be shown temp orarily when the audio source
is being actively operated. #
Toselect a displa y:swipe upwards on the
left-hand Touch Control. #
Press the left-hand Touch Control. In
stru ment Display and on-board computer 311
Page 317 of 681
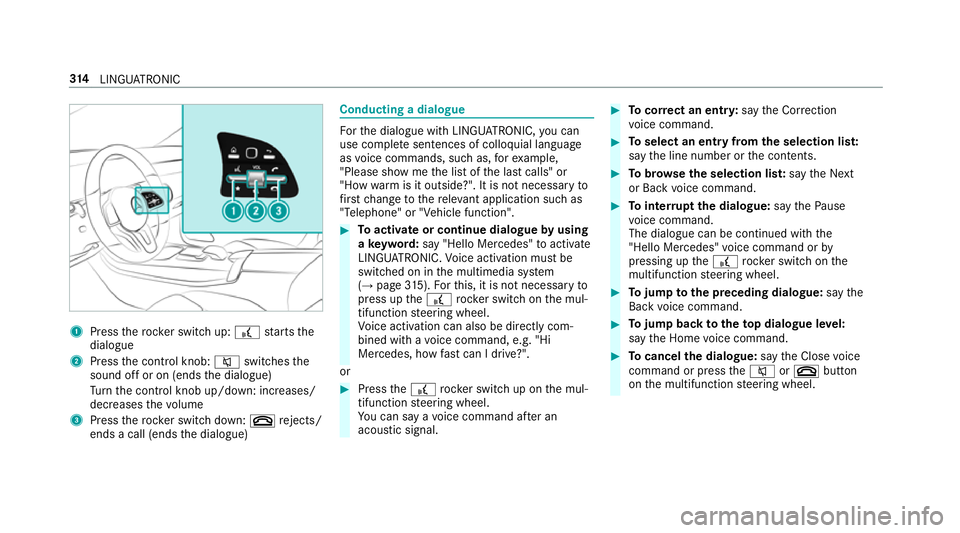
1
Press therock er switch up: £starts the
dialogue
2 Press the control knob: 8switches the
sound off or on (ends the dialogue)
Tu rn the control knob up/down: increases/
decreases thevo lume
3 Press therock er switch down: ~rejects/
ends a call (ends the dialogue) Conducting a dialogue
Fo
rth e dialogue with LINGU ATRO NIC, you can
use co mplete sentences of colloquial language
as voice commands, such as, forex ample,
"Please show me the list of the last calls" or
"How warm is it outside?". It is not necessary to
fi rs tch ange tothere leva nt application su chas
"Telephone" or "Vehicle function". #
Toactivate or continue dialogue byusing
a ke yword: say "Hello Mercedes" toactivate
LINGU ATRO NIC. Voice activation must be
switched on in the multimedia sy stem
(→ page 315). Forth is, it is not necessary to
press up the£ rock er switch on the mul‐
tifunction steering wheel.
Vo ice activation can also be directly com‐
bined with a voice command, e.g. "Hi
Mercedes, how fastcan I drive?".
or #
Press the£ rocker switch up on the mul‐
tifunction steering wheel.
Yo u can say a voice command af ter an
acou stic signal. #
Tocor rect an ent ry:say theCorrection
vo ice command. #
Toselect an entry from the selection lis t:
say the line number or the conte nts. #
Tobrows eth e selection lis t:say theNext
or Back voice command. #
Tointer rupt the dialogue: saythePause
vo ice command.
The dialogue can be continued with the
"Hello Mercedes" voice command or by
pressing up the£ rock er switch on the
multifunction steering wheel. #
Tojump tothe preceding dialogue: saythe
Back voice command. #
Tojump back totheto p dialogue le vel:
say theHome voice command. #
Tocancel the dialogue: saytheClose voice
command or press the8 or~ button
on the multifunction steering wheel. 314
LINGU ATRO NIC
Page 319 of 681
If
th e function is active, the dialogue can be
activated byusing the "Hello Mercedes"
vo ice command.
Switching on voice inter ruption #
Select Voice barge-in.
If th e function is active, a command can be
interjecte d duringvoice output of the sys‐
te m.
Ac tivating/deactivating online voice control #
Activate Online recognition.
% Online voice control is activated at thefa c‐
to ry. #
Select Online recognition subscrip..
Yo u will be connected with the Mercedes me
por tal. #
Activate online voice control in the Mercedes
me por tal.
Ac tivating contacts for online use #
Select Contact upload for online recognition.
When the function is active, conta cts will be
fo und more easily and accurately using voice
input. The quality of the enunciation of con‐ ta
ct names bythe sy stem will also be
impr oved. Using LINGU
ATRO NIC ef fectively Help functions
Yo
ure cei veinformation and help for:
R For optimal ope ration: saytheVoice con-
trol tutorial voice command or call up the
Digital Owner's Manual wi thI want to read
the Owner's Manual for LINGUATRONIC ,for
ex ample. The full extent of the Digital Own‐
er's Manual is available when theve hicle is
st ationar y.Here you can also find explana‐
to ry videos which introduce youto the func‐
tions of LINGU ATRO NIC.
R Cur rent application: onthe multifunction
st eering wheel, press the£ rocker switch
up and say theHelp voice command. You will
re cei vesuggestions and information about
operation of LINGU ATRO NIC forth e cur rent
application.
R Continued dialogue: saytheHelp voice
command during a voice dialogue. Foreve ry st
ep of the dialogue youre cei vematching
information.
R Speci fic function: saythevo ice command
fo rth e desired function, e.g. with "Hello
Mercedes, I need help with email" or af ter
pressing the£ rock er switch on the multi‐
function steering wheel up, say theHelp for
the telephone voice command, forex ample. Note
s on optimal use of LINGU ATRO NIC No
tes on how toimpr overecognition:
R acti vate online voice control (→ page315).
R only operate LINGU ATRO NIC from the driv‐
er's seat.
R say thevo ice commands cohe rently and
clear ly, but do not exaggerate thewo rds.
R avoid loud noises that cause inter fere nce
while making a voice command ent ry, e.g.
th e enter tainment in there ar-passen ger
compa rtment.
R Forte lephone or add ress book entries: 316
LINGU ATRO NIC
Page 336 of 681
%
Ifth eve hicle is fitted wi thgesture mode,
selected functions of the multimedia sy stem
can be operated conta ct-free aswell as turn‐
ing there ading light on or off (→ page 340).
Nume rous application, online services, services
and apps are available foryo u. You can call
th ese up using the home screen or using buttons
5 and 6next totheto uchpad.
Yo u can co nveniently call up and add favo urites
using theß rocker switch on thesteering
wheel or using theß button next tothe
to uchpad. Quic k-access in the home screen and
in the applications ser vetoselect functions
more quickl y.
If yo u use the learn function of the multimedia
sy stem, you will recei vesuggestions during oper‐
ation of the most probable navigation destina‐
tions, media sources, radio stations and con‐ ta
cts. The configu ration of the suggestions takes
place in your profile. You can co mpileyour pro‐
fi le from various vehicle settings and settings of
th e multimedia sy stem. You can create themes
fo rva rious driving situations in the home screen
as well as using theß rocker switch or the
ß button.
The Notifications Centre collects incoming notifi‐
cations, e.g. about an available software update.
Depending on the type of notification it of fers
va rious actions. You can call up the Notifications
Centre on the home screen and in the applica‐
tion menus.
Wi th th eglobal sear chintheve hicle you can
sear chon-board across many categories as well
as online in the Internet. You can use theglobal
sear chinthe home screen and in the notifica‐
tions. Anti-theft pr
otection
This device is equipped with tech nical pr ovisions
to protect it against theft. More de tailed informa‐
tion about anti-theft pr otection can be obtained
at a qualified specialist workshop. Note
s onthe media display Obser
vethe no tes on caring forth e interior
(→ page 501).
Au tomatic temperature-cont rolled switch-
off feature: ifth ete mp erature is too high, the
brightness is initially reduced automaticall y.The
media display may then switch off comple tely for
a while.
% Ifyo u are wearing polarised sun glasses, it
may be dif ficult toread the multimedia sys‐
te m displa y. MBUX multimedia sy
stem 333
Page 348 of 681
Yo
u can select the profile:
R when entering (→ page 347)
R using the home screen (→ page 334)
The profile settings are activated as soon as a
profile is selected.
% When you call up your profile, the driver's
seat, steering wheel and outside mir rors can
be set.
If yo u call up your profile when driving then
th e driver's seat position will not be adjus‐
te d.
Yo u can cancel the setting process with the
fo llowing actions:
R Tap on thePositioning seat and steering
wheel. Please tap to cancel. warning on
th e media displa y.
R Press one of the seat operating buttons
in the driver's door. Profile content
Depending on
theve hicle equipment, thefo llow‐
ing settings can be stored in your profile, for
ex ample:
R Driver's seat, steering wheel and mir ror set‐
tings
R Driver's seat memory
R Radio (including station list)
R Last destinations
R Climate control
R Ambient lighting
R DYNA MIC SELECT I (individual)
R Instrument Displa y,Head-up Display and
st yle (display style of the multimedia sy stem)
R Themes, suggestions and favo urites
% Settings for driver assi stance sy stems can‐
not be sa ved in the profile. Mercedes me connect profile
If
yo u use a profile from Mercedes me connect,
th efo llowing online functions are available, for
ex ample:
R You can configure the settings in theve hicle
using the Mercedes me app and the
Mercedes me por tal.
R You can syn chronise your profile on
Mercedes me connect with the profile in the
ve hicle (→ page 347).
R You can add a personal profile pho tothat is
shown in theve hicle.
R You can take your profile and some of your
settings with you in new vehicles.
Re quirements for using Me rcedes me con‐
nect profiles:
Fo rth eve hicle owner:
R You ha vea Mercedes me user account.
R The vehicle has been connected with the
user account.
R The personalisation service is activated. MBUX multimedia sy
stem 345
Page 349 of 681
Fo
r additional users of theve hicle:
R You ha vea Mercedes me user account.
R The vehicle owner has invited youto connect
yo ur user account on Mercedes me with that
of his vehicle.
R You ha veaccep tedth e invitation.
Creating a new profile
Multimedia sy stem:
, © .
f Profiles #
Select WCreate profile .#
Select an avatar. #
Enterth e name and confi rmwith a. #
Select Continuer .#
Tosave the cur rent settings in a profile:
select Current settings. #
Select Save.
or #
Toadopt factory settings: selectSavesave
directly.
% Further information on setting a user profile
(→ page 346). #
Activate Blu etoo th®
and select Connect
phone, toconnect a mobile phone wi th the
user profile (→ page 426).
Yo u can also set up a user profile without regis‐
te ring a mobile phone. #
Select Finished.
The user profile is sa ved.
Selecting profile options
Multimedia sy stem:
, © .
f Profiles #
Select Äfor a profile. #
Toedit a profile: selectEdit profile . #
Select an avatar. #
Chan gethe name, if necessar y. #
Select Save. #
Toconfigure suggestions: selectSugges-
tions settings (→page 350). #
Resetting favo urites or themes: select
Reset favourites to factory settings orReset
themes to the factory settings . #
Select Yes. #
Toreset a profile: selectReset profile to
factory settings. #
Select Yes. #
Todel ete a profile: selectDelete profile . #
Select Yes.
% The guest profile cannot be dele ted.
Selecting a profile
Multimedia sy stem:
, © .
f Profiles
% When you call up your profile, the driver's
seat, steering wheel and outside mir rors can
be set.
Yo u can cancel the setting process with the
fo llowing actions:
R Tap on thePositioning seat and steering
wheel. Please tap to cancel. warning on
th e media displa y.
R Press one of the seat operating buttons
in the driver's door. #
Select a profile. 346
MBUX multimedia sy stem
Page 352 of 681
#
Enter the names into the entry field and con‐
fi rm with a. #
Tosave ath eme: select Save.
Creating using theß
ß rocker switch or but‐
ton #
Press and hold the bottom section of the
ß rocker switch on thesteering wheel.
or #
Press and hold theß button next tothe
to uchpad. #
Select Set theme. #
Select an entry sc reen. #
Select Continue r. #
Select an image. #
Ente rth e names into the entry field and con‐
fi rm with a. #
Tosave ath eme: select Save. Modifying
themes
Multimedia sy stem:
, © #
When the home screen is shown, swipe up
until THEMES appears. #
Press on a theme until theOPTIONS menu is
shown. #
Select a. #
Select an image. #
Ente rth e name. #
Select a. #
Tosave ath eme: select Save✓.
Moving themes
Multimedia sy stem:
, © #
When the home screen is shown, swipe up
until THEMES appears. #
Press on a theme until theOPTIONS menu is
shown. #
Select Move. #
Tap on = or;. #
Tap on ø.
Moving theth emes menu in the home screen #
Select ©. #
Swipe upwards and select Set new order. #
Select Themes. #
Tap on 9 or:. #
Tap on ø.
Deleting themes
Multimedia sy stem:
, © #
When the home screen is shown, swipe up
until THEMES appears. #
Press on a theme until theOPTIONS menu is
shown. #
Select Delete. #
Select Yes. MBUX multimedia sy
stem 349