2019 MERCEDES-BENZ GLE SUV display
[x] Cancel search: displayPage 537 of 681
or tyres,
the tyre pressure loss warning sy stem
has tobe restar ted (→ page 534).
The tyre pressure loss warning sy stem does not
re place the need toregular lych eck the tyre
pressures.
Sy stem limitations
The sy stem may be impaired or may not function
in thefo llowing situations:
R ifth e tyre pressure is set incor rectly
R ifth ere is a sudden pressure loss caused, for
ex ample, byafo re ign object penetrating the
tyre
R ifth e pressure loss in se veral tyres decrea‐
ses at the same rate
The sy stem has a limited or dela yed function:
R when thero ad sur face is poo r,e.g. snow or
gra vel
R when driving with sn ow chains
R when driving in a very sporty driving style
with high cornering speeds or sudden accel‐
eration
R when towing a very heavy or large trailer R
when driving with a high load
Be sure toalso obse rveth efo llowing fur ther
re lated subjects:
R Notes on tyre pressure (→ page 526)
R Display messages about the tyres
(→ page 600)
Re starting the ty repressure loss warning
sy stem
Requ irements:
R The recommended tyre pressure is cor rectly
set forth ere spective operating status on
each of thefo ur wheels (→ page 526).
Re start the tyre pressure loss warning sy stem in
th efo llowing situations:
R The tyre pressure has changed.
R The wheels or tyres ha vebeen changed or
newly fitted. On-boa
rdcompu ter:
, Service .
Tyres #
Swipe down wards on Touch Control on the
left-hand side of thesteering wheel.
The Run Flat Indicator activeRestart message
is shown in the multifunction displa y.
Re start the tyre pressure loss warning sy stem in
th efo llowing situations:
R The tyre pressure has changed.
R The wheels or tyres ha vebeen changed or
newly fitted. #
Tobegin restart, press Touch Control on the
left-hand side of thesteering wheel.
The Tyre pressure now OK? message is
shown in the multifunction displa y. #
Select Yes. #
Toconfirm restart, press Touch Control on
th e left-hand side of thesteering wheel.
The Run Flat Indicator restarted message is
shown in the multifunction displa y.534
Wheels and tyres
Page 547 of 681
#
Check the tyre pressure of the newly moun‐
te d wheel and adjust according ly.#
Vehicles with tyre pressure loss warning
sy stem: restart the tyre pressure loss warn‐
ing sy stem (→ page 534).
Exception: the new wheel is an emer gency
spa rewheel. #
Vehicles with a tyre pressure monitoring
sy stem: restart the tyre pressure monitoring
sy stem (→ page 529).
Exception: the new wheel is an emer gency
spa rewheel. Emer
gency spare wheel Note
s onthe emer gency spare wheel &
WARNING Risk of accident caused by
incor rect wheel and tyre dimensions
The wheel or tyre size and the tyre type of
th e emer gency spa rewheel or spare wheel
and the wheel tobe replaced may dif fer.
Mounting an emer gency spa rewheel/spare wheel may se
verely impair the driving char‐
acteristics.
To preve nt hazardous situations: #
Adapt your driving style according lyand
drive carefull y. #
Neverfit more than one emer gency
spa rewheel or spare wheel that dif fers
in size. #
Only use an emer gency spa rewheel or
spare wheel of a dif fere nt size brie fly. #
Do not switch off ESP ®
. #
Have the emer gency spa rewheel or
spare wheel of a dif fere nt size replaced
at the nearest qualified specialist work‐
shop. The new wheel must ha vethe
cor rect dimensions. Check
the tyre pressure of the emer gency spa re
wheel fitted. Co rrect the pressure as necessar y.
The maximum permissible speed with an emer‐
ge ncy spa rewheel fitted is 80 km/h.
Do not fit th e emer gency spa rewheel with sn ow
ch ains. Re
place the emer gency spa rewheel af ter six
ye ars at the latest, rega rdless of wear.
% Ve
hicles with a tyre pressure loss warn‐
ing sy stem: If an emer gency spa rewheel is
fi tted the tyre pressure loss warning sy stem
cann otfunction reliabl y.Only restart the sys‐
te m again when the emer gency spa rewheel
has been replaced with a new wheel.
Ve hicles with a tyre pressure monitoring
sy stem: If an emer gency spa rewheel is fit‐
te dth e tyre pressure monitoring sy stem can‐
not function reliabl y.Only restart the sy stem
again when the emer gency spa rewheel has
been replaced with a new wheel.
Ve hicles with a tyre pressure monitoring
sy stem: For a few minutes af ter an emer‐
ge ncy spa rewheel is fitted, the sy stem may
st ill display the tyre pressure of there mo ved
wheel.
Be sure toalso obse rveth efo llowing fur ther
re lated subjects:
R Notes on tyre pressure (→ page 526)
R Tyre pressure table (→ page 527) 544
Wheels and tyres
Page 549 of 681
Ve
hicles with a tyre pressure monitoring
sy stem: if a collapsible spare wheel is fitted
th e tyre pressure monitoring sy stem cann ot
function reliably. Only restart the sy stem
again when the collapsible spare wheel has
been replaced with a new wheel.
Ve hicles with a tyre pressure monitoring
sy stem: for a few minutes af ter a collapsible
spare wheel is fitted, the sy stem may still
display the tyre pressure of there mo ved
wheel.
Be sure toalso obse rveth efo llowing fur ther
re lated subjects:
R Notes on tyre pressure (→ page 526)
R Tyre pressure table (→ page 527) Re
moving the collapsible spare wheel The collapsible spare wheel is secured in
the col‐
lapsible spare wheel bag in the boot. #
Obser vethe information on mounting tyres
(→ page 535). #
Open the boot. #
Detach thefast ening stra ps. #
Unhook there taining spring hooks of thefa s‐
te ning stra ps from the brac kets. #
Remo vethe emer gency spa rewheel bag
to ge ther with the collapsible spare wheel. #
Open the emer gency spa rewheel bag and
re mo vethe collapsible spare wheel. Inflating
the collapsible spa rewheel Re
quirements:
R Mount the collapsible spare wheel as descri‐
bed. (→ page542)
R Remo vethe tyre inflation compressor from
th estow agewell under the boot floor.
(→ page 507)
* NO
TEDama getothe collapsible spare
wheel when lo wering theve hicle Lo
we ring theve hicle without pr eviously
inflating the collapsible spare wheel can
damage its rim. #
Inflate the collapsible spare wheel using
th e tyre inflation compressor before
lo we ring theve hicle. *
NO
TEOverheating due tothe tyre infla‐
tion compressor running too long #
Do not runth e tyre inflation compres‐
sor for longer than ten minu tes without
inter ruption. #
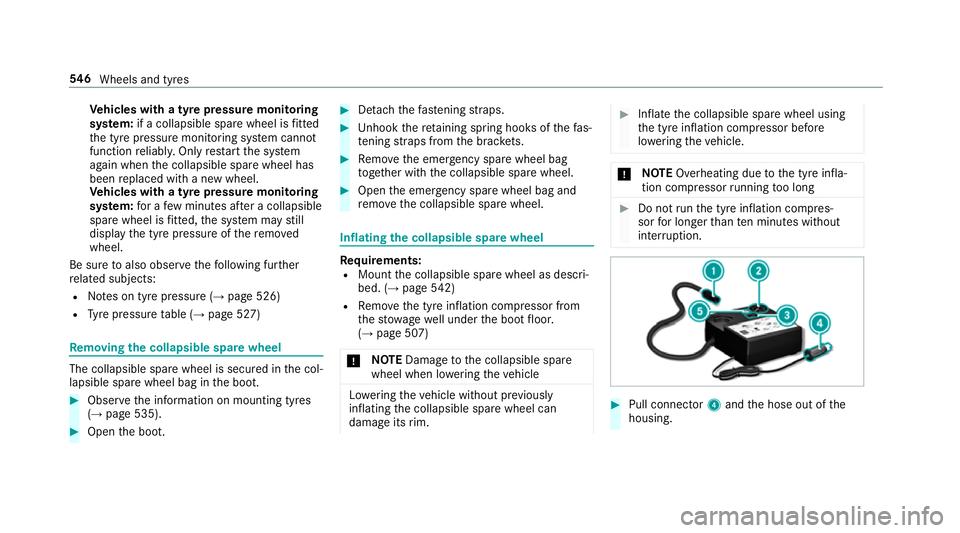
Pull connec tor4 and the hose out of the
housing. 546
Wheels and tyres
Page 559 of 681
*
NO
TEDama geand malfunctions due to
impurities in AdBlue ® Consequences of impu
rities in AdBlue ®
:
R increased emission values
R damage tothe catalytic con verter
R NOx exhaust gas af tertre atment malfunc‐
tions #
Avoid impurities in AdBlue ®
. Ad
Blue ®
re sidues cr ystallise af ter a period of
time, and contamina tethe sur faces wi thwhich
th ey come into contact. Clean the dirty sur faces
wi th wate r as soon as possible.
When you open theAd Blue ®
tan k,small
amounts of ammonia vapour may escape. Do
not inhale any ammonia vapours that may be
re leased. Only fill th eAd Blue ®
tank in well-venti‐
lated areas. Ad
Blue ®
capacity
To tal capacity of AdBlue ®
tank Mode
lT otal capacity
All models 31.6 litres Ad
Blue ®
consu mption
Like fuel consu mption, AdBlue ®
consu mption is
highly dependent upon driving style and operat‐
ing conditions. Forth is reason, your vehicle's
actual consum ption figures under normal operat‐
ing conditions may dif fer from the consum ption
fi gures calculated. AdBlue ®
consu mption is
between 1% and 5% of fuel consumption. Ha ve
th eAd Blue ®
supply checked at a qualified spe‐
cialist workshop before making journe ysoutside
of Europe. Before a longer stay outside of
Europe, consult a qualified specialist workshop.
Display theAd Blue ®
ra nge and le vel
( → page 305). Engine oil
Note
s on engine oil
Obser vethe no tes on operating fluids
(→ page 552). *
NO
TEEngine dama gecaused byan
incor rect oil filter, incor rect oil or addi‐
tives #
Do not use engine oils or oil filters
which do not cor respond tothe specifi‐
cations explicitly prescribed forthe
service inter vals. 556
Tech nical da ta
Page 569 of 681
Display messages
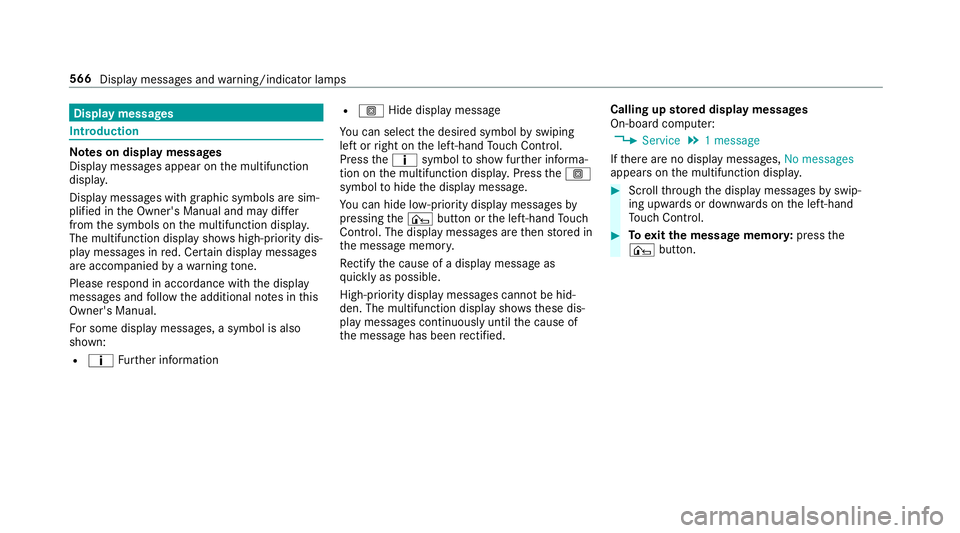
Int
roduction Note
s on display messages
Display messages appear on the multifunction
displa y.
Displ aymessa ges with graphic symbols are sim‐
plified in the Owner's Manual and may dif fer
from the symbols on the multifunction displa y.
The multifunction display sho wshigh-priority dis‐
play messages in red. Cer tain display messages
are accompanied byawa rning tone.
Please respond in accordance with the display
messages and follow the additional no tes in this
Owner's Manual.
Fo r some display messa ges, a symbol is also
shown:
R ¤ Further information R
O Hide display message
Yo u can select the desired symbol byswiping
left or right on the left-hand Touch Control.
Press the¤ symbol toshow fur ther informa‐
tion on the multifunction displa y.Press theO
symbol tohide the display message.
Yo u can hide lo w-priority display messages by
pressing the¤ button or the left-hand Touch
Control. The displ aymessa ges are then stored in
th e message memor y.
Re ctify the cause of a display message as
qu ickly as possible.
High-priority display messages cannot be hid‐
den. The multifunction display sho ws these dis‐
play messages continuously until the cause of
th e message has been rectified. Calling up
stored displ aymessages
On-boa rdcompu ter:
, Service .
1 message
If th ere are no display messages, No messages
appears on the multifunction displa y. #
Scroll thro ugh the display messages byswip‐
ing upwards or down wards on the left-hand
To uch Control. #
Toexitth e message memor y:press the
¤ button. 566
Display messages and warning/indicator lamps
Page 570 of 681
Saf
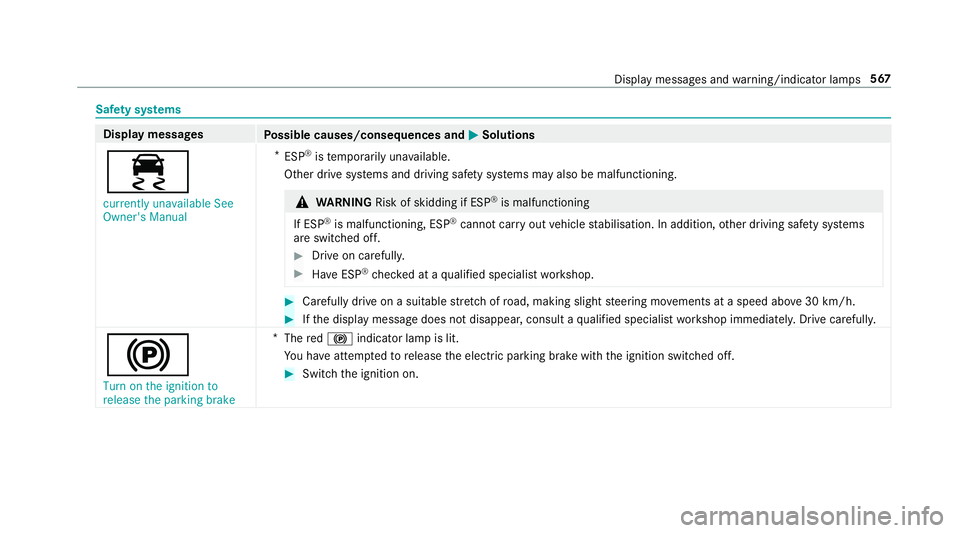
ety sy stems Display messages
Possible causes/consequences and M
MSolutions
÷ currently unavailable See
Owner's Manual *
ESP ®
is temp orarily una vailable.
Other drive sy stems and driving saf ety sy stems may also be malfunctioning. &
WARNING Risk of skidding if ESP ®
is malfunctioning
If ESP ®
is malfunctioning, ESP ®
cannot car ryout vehicle stabilisation. In addition, other driving saf ety sy stems
are switched off. #
Drive on carefull y. #
Have ESP ®
ch ecked at a qualified specialist workshop. #
Carefully drive on a suitable stre tch of road, making slight steering mo vements at a speed abo ve30 km/h. #
Ifth e display message does not disappear, consult a qualified specialist workshop immediately. Drive carefully.
!
Turn on the ignition to
release the parking brake *
The red! indicator lamp is lit.
Yo u ha veattem ptedto release the electric parking brake with the ignition switched off. #
Switch the ignition on. Display messages and
warning/indicator lamps 567
Page 571 of 681
Display messages
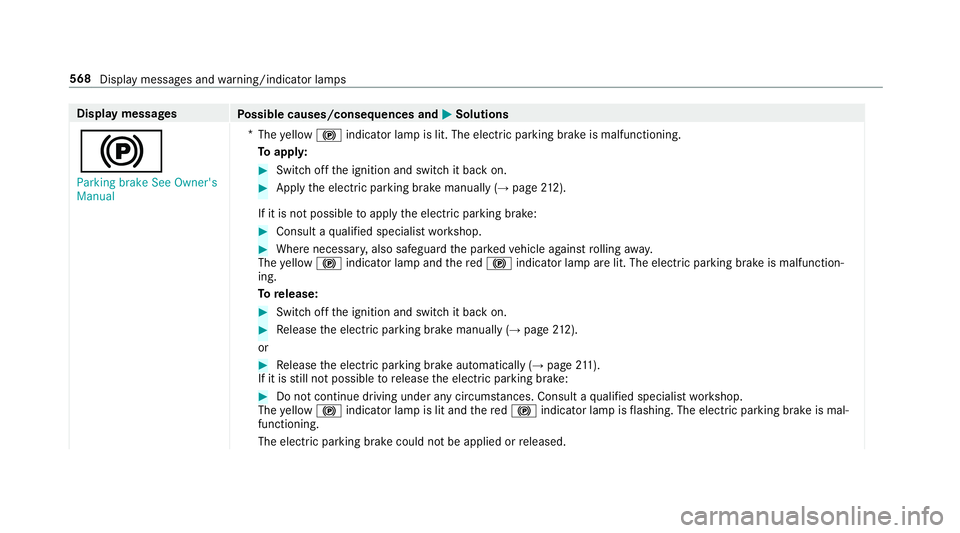
Possible causes/consequences and M
MSolutions
! Parking brake See Owner's
Manual *
The yellow ! indicator lamp is lit. The elect ric pa rking brake is malfunctioning.
To appl y: #
Switch off the ignition and switch it back on. #
Apply the electric parking brake manually (→ page212).
If it is not possible toapply the electric parking brake: #
Consult a qualified specialist workshop. #
Where necessar y,also safeguard the par kedve hicle against rolling away.
The yellow ! indicator lamp and there d! indicator lamp are lit. The elect ric pa rking brake is malfunction‐
ing.
To release: #
Swit choff the ignition and switch it back on. #
Release the electric parking brake manually (→ page212).
or #
Release the electric parking brake automatically (→ page211).
If it is still not possible torelease the electric parking brake: #
Do not continue driving under any circums tances. Consult a qualified specialist workshop.
The yellow ! indicator lamp is lit and there d! indicator lamp is flashing. The electric parking brake is mal‐
functioning.
The electric parking brake could not be applied or released. 568
Display messages and warning/indicator lamps
Page 572 of 681
Display messages
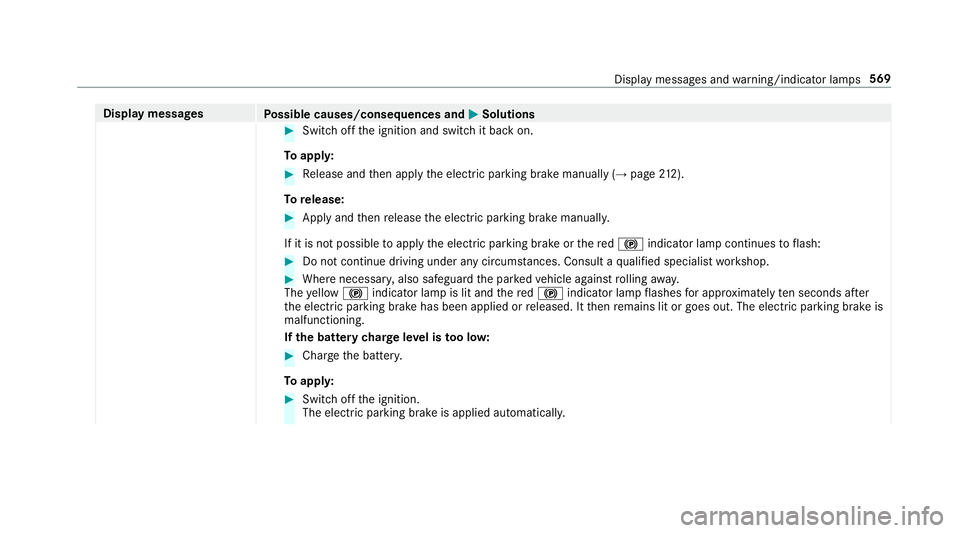
Possible causes/consequences and M
MSolutions #
Switch off the ignition and switch it back on.
To appl y: #
Release and then apply the electric parking brake manually (→ page212).
To release: #
Apply and then release the electric parking brake manuall y.
If it is not possible toapply the electric parking brake or there d! indicator lamp continues toflash: #
Do not continue driving under any circum stances. Consult a qualified specialist workshop. #
Where necessar y,also safeguard the par kedve hicle against rolling away.
The yellow ! indicator lamp is lit and there d! indicator lamp flashes for appro ximately ten seconds af ter
th e electric parking brake has been applied or released. It then remains lit or goes out. The electric parking brake is
malfunctioning.
If th e bat tery charge leve l is too lo w: #
Char gethe batter y.
To appl y: #
Switch off the ignition.
The electric parking brake is applied automaticall y. Displ
aymessa ges and warning/indicator lamps 569