Page 158 of 681
%
There are 64colours available.
Ad justing the brightness #
Select Brightness .
Ad just the brightness.
Ac tivating the brightness for zones #
Select Brightness . #
Select Brightness zones .
The EMPHASIS , andAMBIENT zones can be
set separately.
Ac tivating multi-coloured lighting #
Select Colour. #
Select Multi-colour.
The reare ten preset colour combinations
av ailable. #
Select a colour combination.
Ac tivating multi-coloured animation #
Select Colour. #
Select Multi-colour animat..
The chosen colour combination changes at
predefined inter vals. Ac
tivating welcome lighting #
Select Colour. #
Select Welcome.
When theve hicle is unloc ked, a special ambi‐
ent lighting sequence runs.
Ac tivating dependency on air conditioning
settings #
Select Colour. #
Select Climate.
If ch anges are made tothete mp erature set‐
ting in theve hicle, the colour of the ambient
lighting changes brief ly. Switching
the interior lighting switch-off
delay time on or off Multimedia sy
stem:
, © .
Settings .
Lights .
Int. light.
del. shut-off #
Switch the lighting switch-off delay time on
or off.
When this function is active, the interior light‐
ing lights up again briefly af terth eve hicle
has been loc ked. Light and sight
15 5
Page 168 of 681
Overview of climate control sy
stems Note
s on climate control An interior air
filter must alw ays be used so that
th e air conditioning sy stem, pollution le vel moni‐
to ring and the air filtering function workcor‐
re ctly. Ma kesure that thefilter is ins talled cor‐
re ctly and thefilter housing in the engine com‐
partment is closed cor rectly using the cap and
alw ays tightly sealed when in operation. Use fil‐
te rs recommended and appr ovedby Mercedes-
Benz. Alw ays ha veservice workcar ried out at a
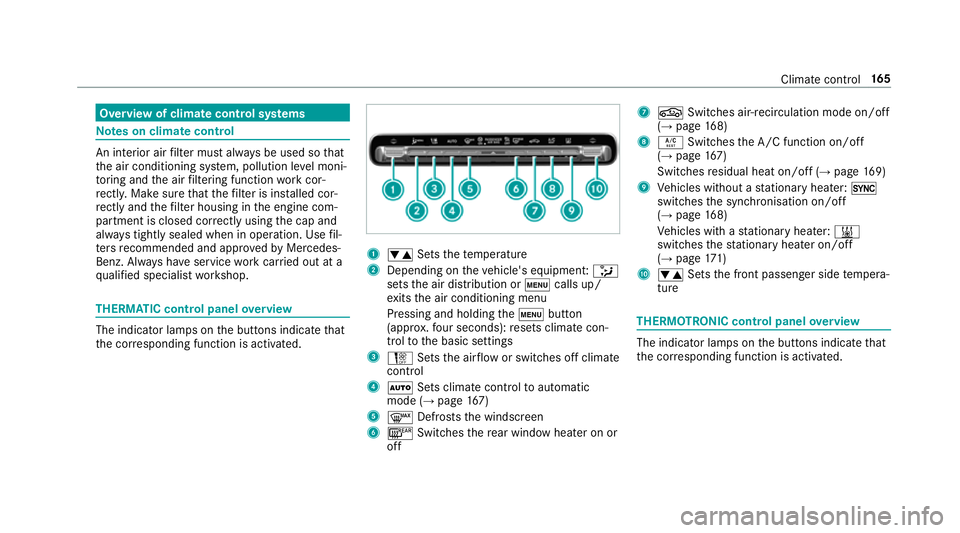
qu alified specialist workshop. THERMATIC control panel
overview The indicator lamps on
the buttons indicate that
th e cor responding function is activated. 1
w Setsthete mp erature
2 Depending on theve hicle's equipment: _
sets the air distribution or tcalls up/
ex its the air conditioning menu
Pressing and holding thet button
(appr ox.fo ur seconds): resets climate con‐
trol tothe basic settings
3 H Setsthe air flow or switches off climate
control
4 Ã Sets climate control toautomatic
mode (→ page167)
5 ¬ Defrosts the windscreen
6 ¤ Switches there ar wind owheater on or
off 7
g Switches air-recirculation mode on/off
(→ page 168)
8 Á Switches the A/C function on/off
(→ page 167)
Switches residual heat on/off (→ page169)
9 Vehicles without a stationary heater: 0
swit ches the synchronisation on/off
(→ page 168)
Ve hicles with a stationary heater: &
swit ches thest ationary heater on/off
(→ page 171)
A w Setsthe front passenger side temp era‐
ture THERMOTRONIC control panel
overview The indicator lamps on
the buttons indicate that
th e cor responding function is activated. Climate
control 16 5
Page 265 of 681
Setting Off-road Assist
Re
quirements:
R theve hicle is stationary
R theve hicle is set tooff-road le vel 1 or 2
R the Off-road or Off-road Plus (only vehicles
with Off-road pac kage ) drive program has
been selected
R all doors and the bonn etare closed
R the parking brake is released
R there is no trailer coupled
R theve hicle is outdoors
R the de tected la tera l inclination of theve hicle
must not exceed appr ox. 8°
R the sy stem is within its operating temp era‐
ture
R the on-board voltage is suf ficiently high Multimedia sy
stem:
, © .
Settings .
Assistance .
Off-
road Assist
Fr ee driving mode
Fr ee driving mode assists the driver when pulling
aw ay on rough terrain, such as sand or sn ow. #
Select Free driving mode. #
Select Start.
Fr ee driving mode is activated. #
Select Stoptostop free driving mode.
Fr ee driving mode is automatically deactivated in
th efo llowing situations:
R theve hicle exceeds a dis tance of 5 m from
th e point at which free driving mode was
activated
R afte r a running time of 30 seconds
R it is de tected that an object has hit the
underbody of theve hicle hard
R not all conditions are met
% Further information on free driving mode
(→ page 258). Individual wheel control
Individual wheel contro
l enablestheve hicle le vel
to be set separately for each wheel. #
Select Individual wheel control. #
Set theve hicle le velfo rth e desired wheel.
% You can also use theto uch displ aytoset the
le ve lfo r two or more wheels at the same
time. #
Select Resettoset all wheels tothe default
setting.
Individual wheel control is automatically deacti‐
va ted in thefo llowing situations:
R you are tra velling fasterthan 5 km/h
R not all conditions are met
% Further information on individual wheel con‐
trol (→ page 259). Pa
rking Assist PARKTRONIC Fu
nction of Parking Assist PARKTRONIC
Pa rking Assist PARKTRONIC is an electronic
parking assi stance sy stem with ultrasound. It 262
Driving and parking
Page 306 of 681
Showing display content on
the instrument
clus ter
Ad ditional display con tent can also be shown on
th e instrument clus ter. #
Toselect display content: swipetothe
ri ght on the left-hand Touch Control. #
Swipe upwards or down wards on the left-
hand Touch Control toselect there qu ired
display con tent.
When the display conte nt is selected1, it is
brie fly highligh ted. 1
Display con tent, le ft(exa mp le: speedom eter)
2 The index points show the selected display
conte nt.
Display content selection, le ft:
R Speedom eter
R Time/date
R Trip computer From startandFrom reset
R Range
R Audio
R Angl e of incline and approach/departure
angle 3
Display conte nt, centre (examp le: media)
Display con tent selection, centre:
R Assi stant display
R Telephone
R Navigation
R Trip
R Radio
R Media
R Styles and display
R Service Instrument Display and on-board computer
303
Page 309 of 681
#
Toswitch between the displa ys:swipe
upwards or down wards on the left-hand
To uch Control. St
atus displa yson the assis tant displ ay:
R é ATTENTION ASSIS T:deactivated
R Light lane markings: Active Lane Keeping
Assist enabled
R Green lane markings: Active Lane Keeping
Assist active
R ¸ Grey radar waves next tovehicle: Blind
Spot Assist or Active Blind Spot Assi stena‐
bled R
¸ Green radar waves next tovehicle:
Blind Spot Assist or Active Blind Spot Assi st
active
R DISTRO NICActive Dis tance Assi stdispla ys
( → page 233) Calling up displa
yson the trip menu On-board computer:
, Trip #
Toselect a displa y:swipe upwards or down‐
wa rds on the left-hand Touch Control.
Trip menu in the widescreen cockpit:
R Standard display
R Range
R Current fuel consum ption
R ECO display (→ page188)
R Trip computer From startandFrom reset
R Full-sur face menu displ ay Example:
standard display
1 Trip dis tance
2 Total dis tance 306
Instrument Display and on-boa rdcompu ter
Page 310 of 681
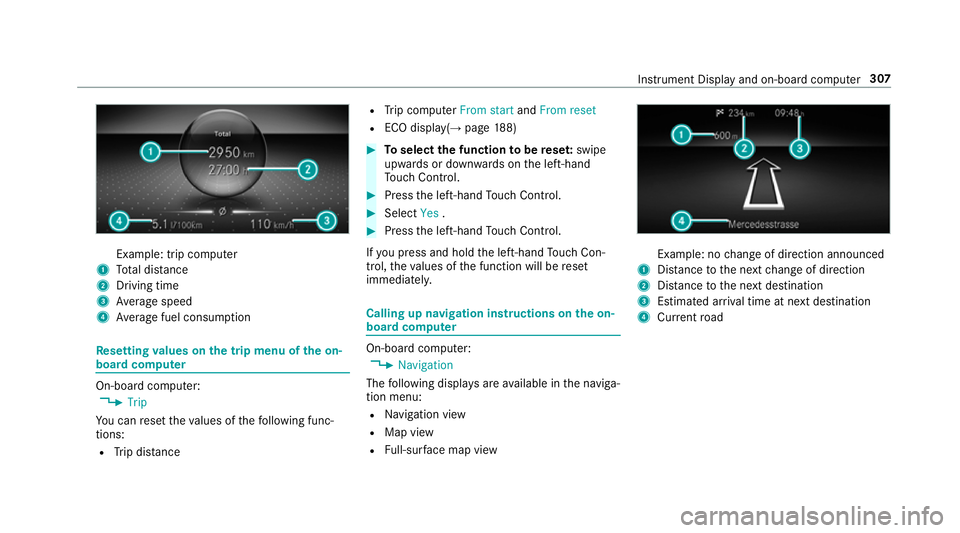
Example: trip computer
1 Total dis tance
2 Driving time
3 Average speed
4 Average fuel consum ption Re
setting values on the trip menu of the on-
board compu ter On-board computer:
, Trip
Yo u can reset theva lues of thefo llowing func‐
tions:
R Trip dis tance R
Trip computer From startandFrom reset
R ECO displa y(→ page 188) #
Toselect the function tobe rese t:swipe
upwards or down wards on the left-hand
To uch Control. #
Press the left-hand Touch Control. #
Select Yes. #
Press the left-hand Touch Control.
If yo u press and hold the left-hand Touch Con‐
trol, theva lues of the function will be reset
immediatel y. Calling up navigation instructions on
the on-
board compu ter On-board computer:
, Navigation
The following displa ysare available in the naviga‐
tion menu:
R Navigation view
R Map view
R Full-sur face map view Example: no
change of direction announced
1 Distance tothe next change of direction
2 Distance tothe next destination
3 Estimated ar riva l time at next destination
4 Current road In
stru ment Display and on-board computer 307
Page 312 of 681
Selecting
radio stations using the on-boa rd
compu ter On-board computer:
, Radio 1
Frequency range
2 Station
3 Name of track
When you select a station from the memory pre‐
sets, the preset will appear next tothest ation
name. When you select a sa vedstation in the
frequency range, an as terisk will appear next to
th est ation name. #
Toselect a radio station: swipe upwards or
down wards on the left-hand Touch Control.
Selecting the frequency range or memory
preset #
Press the left-hand Touch Control. #
Swipe upwards or down wards on the left-
hand Touch Control. #
Press the left-hand Touch Control. Media playba
ckusing the on-boa rdcompu ter On-board computer:
, Media 1
Media source
2 Track number and cur rent track
3 Name of artist (e xamp le) #
Tochange trac kson an active media
source: swipe upwards or down wards on the
left-hand Touch Control.
% This is how tochange thech annel on theTV
media source. Instrument Display and on-board computer
309
Page 349 of 681
Fo
r additional users of theve hicle:
R You ha vea Mercedes me user account.
R The vehicle owner has invited youto connect
yo ur user account on Mercedes me with that
of his vehicle.
R You ha veaccep tedth e invitation.
Creating a new profile
Multimedia sy stem:
, © .
f Profiles #
Select WCreate profile .#
Select an avatar. #
Enterth e name and confi rmwith a. #
Select Continuer .#
Tosave the cur rent settings in a profile:
select Current settings. #
Select Save.
or #
Toadopt factory settings: selectSavesave
directly.
% Further information on setting a user profile
(→ page 346). #
Activate Blu etoo th®
and select Connect
phone, toconnect a mobile phone wi th the
user profile (→ page 426).
Yo u can also set up a user profile without regis‐
te ring a mobile phone. #
Select Finished.
The user profile is sa ved.
Selecting profile options
Multimedia sy stem:
, © .
f Profiles #
Select Äfor a profile. #
Toedit a profile: selectEdit profile . #
Select an avatar. #
Chan gethe name, if necessar y. #
Select Save. #
Toconfigure suggestions: selectSugges-
tions settings (→page 350). #
Resetting favo urites or themes: select
Reset favourites to factory settings orReset
themes to the factory settings . #
Select Yes. #
Toreset a profile: selectReset profile to
factory settings. #
Select Yes. #
Todel ete a profile: selectDelete profile . #
Select Yes.
% The guest profile cannot be dele ted.
Selecting a profile
Multimedia sy stem:
, © .
f Profiles
% When you call up your profile, the driver's
seat, steering wheel and outside mir rors can
be set.
Yo u can cancel the setting process with the
fo llowing actions:
R Tap on thePositioning seat and steering
wheel. Please tap to cancel. warning on
th e media displa y.
R Press one of the seat operating buttons
in the driver's door. #
Select a profile. 346
MBUX multimedia sy stem