2019 MERCEDES-BENZ GLE SUV automatic transmission
[x] Cancel search: automatic transmissionPage 203 of 398

Guide lines are always shown at road level. In
trailer mode, the guide lines are shown at the
level of the trailer coupling.
The field of vision and other functions of the
camera system may be restricted due to addi-
tional accessories on the rear of the vehicle (e.g.
license plate holder, bicycle rack).
On vehicles with height-adjustable chassis,
depending on technical conditions, leaving the
standard height can result in:
R inaccuracies in the guide lines
R inaccuracies in the display of generated
images (top view)
Activation conditions The 360° camera image can be displayed in the
following situations:
R your vehicle is equipped with a 360° camera
R the SmartKey is in key position 0048in the igni-
tion lock
R the multimedia system is switched on
Switching on the 360° camera X
Press the 00D4button in the center console
for longer than two seconds.
Depending on whether transmission position
005B or005E is selected, the following appears:
R a split screen with top view and the image
from the front camera or
R a split screen with top view and the image
from the rear view camera
or
X Press the 00D4button in the center console.
The vehicle menu is displayed.
X Select 360°
360° Camera Camera and press 7to confirm.
Depending on whether transmission position
005B or005E is selected, the following appears:
R a split screen with top view and the image
from the front camera or
R a split screen with top view and the image
from the rear view camera
Activating the 360° camera using
reverse gear The 360° camera images can be automatically
displayed by engaging reverse gear. X
Make sure that the SmartKey is in position 0048
in the ignition lock.
X Make sure that the Activation by R gear Activation by R gear
function is selected on the multimedia system (see the Digital Operator's Manual).
X To show the 360° camera image: engage
reverse gear.
The multimedia system shows the area
behind the vehicle in split-screen mode. You
see the top view of the vehicle and the image from the rear view camera.
Selecting the split-screens or 180° view Selecting split-screen view
X To switch to the line with the vehicle icons:
slide 5the controller.
X To select one of the vehicle icons: turn 3
the controller.
X To switch to 180° View 180° View:turn 3 the con-
troller to select 180° View
180° Viewand press7to
confirm.
i The
180°
180° View
Viewoption is only available in the
following views:
R Top view with picture from the rear view
camera
R Top view with picture from the front camera
Displays in the multimedia system Important safety notes
The camera system may show a distorted view
of obstacles, show them incorrectly or not at all. Obstacles are not shown by the system in the
following locations:
R under the front and rear bumpers
R very close to the front and rear bumpers
R in the area immediately above the tailgate
handle
R very close to the exterior mirrors
R in the transitional areas between the various
cameras in the virtual top view
! Objects not at ground level may appear to
be further away than they actually are, e.g.:
R the bumper of a parked vehicle
R the drawbar of a trailer
R the ball coupling of a trailer tow hitch Driving systems
201Driving and parking Z
Page 215 of 398

cases, the system may make an inappropriate
brake application, e.g. after intentionally driv-
ing over a solid lane marking. There is a risk of an accident.
An inappropriate brake application may be
interrupted at any time if you steer slightly in
the opposite direction. Always make sure that
there is sufficient distance on the side for
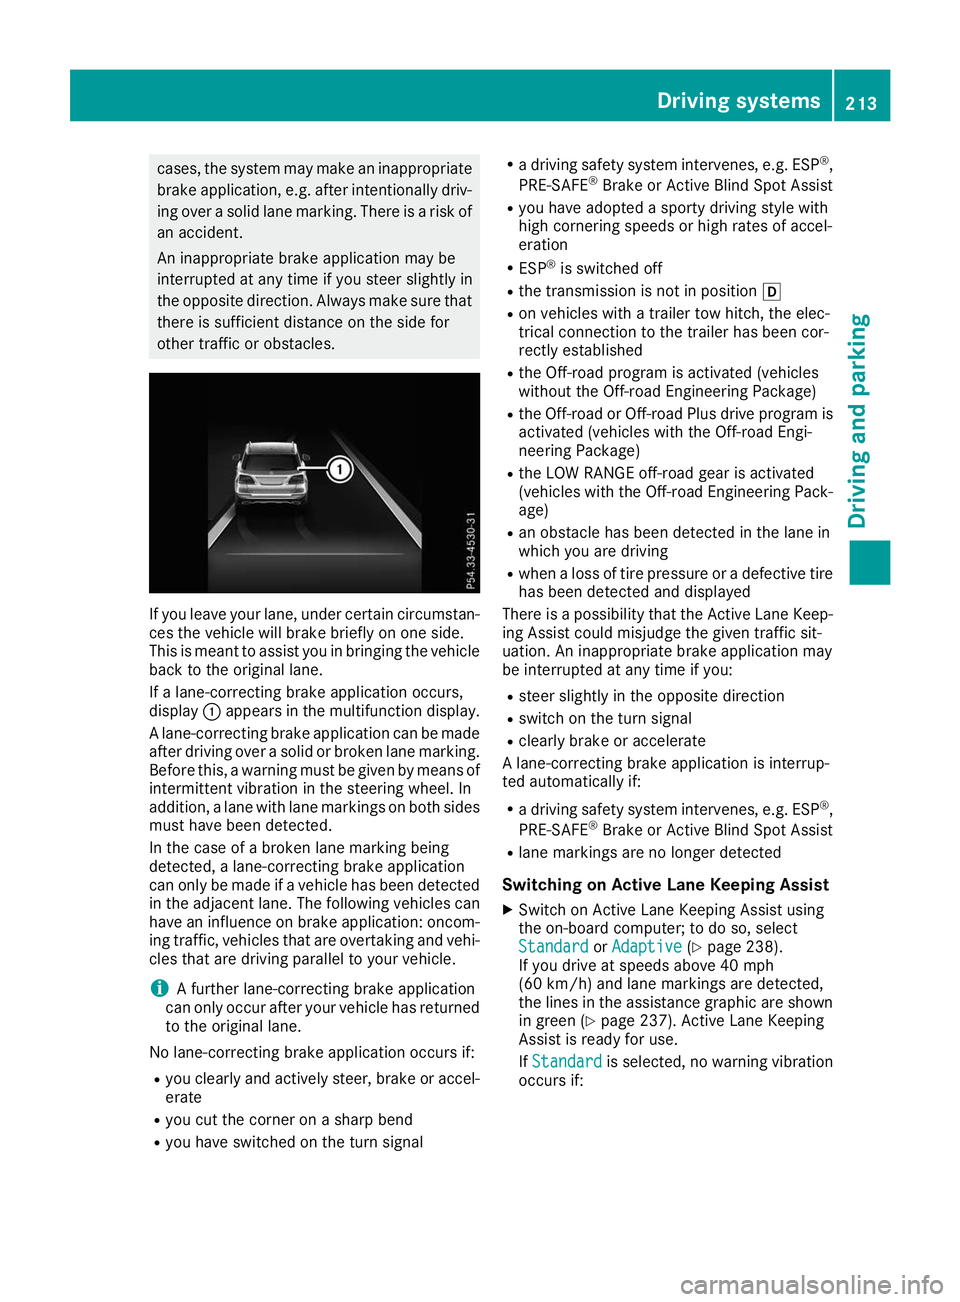
other traffic or obstacles. If you leave your lane, under certain circumstan-
ces the vehicle will brake briefly on one side.
This is meant to assist you in bringing the vehicle
back to the original lane.
If a lane-correcting brake application occurs,
display 0043appears in the multifunction display.
A lane-correcting brake application can be made
after driving over a solid or broken lane marking.
Before this, a warning must be given by means of
intermittent vibration in the steering wheel. In
addition, a lane with lane markings on both sides must have been detected.
In the case of a broken lane marking being
detected, a lane-correcting brake application
can only be made if a vehicle has been detected
in the adjacent lane. The following vehicles can
have an influence on brake application: oncom- ing traffic, vehicles that are overtaking and vehi-cles that are driving parallel to your vehicle.
i A further lane-correcting brake application
can only occur after your vehicle has returned
to the original lane.
No lane-correcting brake application occurs if:
R you clearly and actively steer, brake or accel-
erate
R you cut the corner on a sharp bend
R you have switched on the turn signal R
a driving safety system intervenes, e.g. ESP ®
,
PRE-SAFE ®
Brake or Active Blind Spot Assist
R you have adopted a sporty driving style with
high cornering speeds or high rates of accel-
eration
R ESP ®
is switched off
R the transmission is not in position 005B
R on vehicles with a trailer tow hitch, the elec-
trical connection to the trailer has been cor-
rectly established
R the Off-road program is activated (vehicles
without the Off-road Engineering Package)
R the Off-road or Off-road Plus drive program is
activated (vehicles with the Off-road Engi-
neering Package)
R the LOW RANGE off-road gear is activated
(vehicles with the Off-road Engineering Pack-
age)
R an obstacle has been detected in the lane in
which you are driving
R when a loss of tire pressure or a defective tire
has been detected and displayed
There is a possibility that the Active Lane Keep-
ing Assist could misjudge the given traffic sit-
uation. An inappropriate brake application may
be interrupted at any time if you:
R steer slightly in the opposite direction
R switch on the turn signal
R clearly brake or accelerate
A lane-correcting brake application is interrup-
ted automatically if:
R a driving safety system intervenes, e.g. ESP ®
,
PRE-SAFE ®
Brake or Active Blind Spot Assist
R lane markings are no longer detected
Switching on Active Lane Keeping Assist X Switch on Active Lane Keeping Assist using
the on-board computer; to do so, select
Standard Standard orAdaptive
Adaptive (Ypage 238).
If you drive at speeds above 40 mph
(60 km/h) and lane markings are detected,
the lines in the assistance graphic are shown in green (Y page 237). Active Lane Keeping
Assist is ready for use.
If Standard Standard is selected, no warning vibration
occurs if: Driving systems
213Driving and parking Z
Page 219 of 398

multifunction display. The last active drive pro-
gram is selected again.
Selecting the Offroad program X To select a drive program: turn DYNAMIC
SELECT controller 0043until indicator lamp 0044
lights up.
The Drive program "Offroad" Max.
Drive program "Offroad" Max.
speed 60 mph speed 60 mph message appears in the mul-
tifunction display.
The vehicle is raised by +1.2 in (30 mm).
The vehicle changes from the Offroaddrive pro-
gram to the Comfortdrive program if you drive
faster than 70 mph (112 km/h).
The Drive more slowly
Drive more slowly message appears in
the multifunction display.
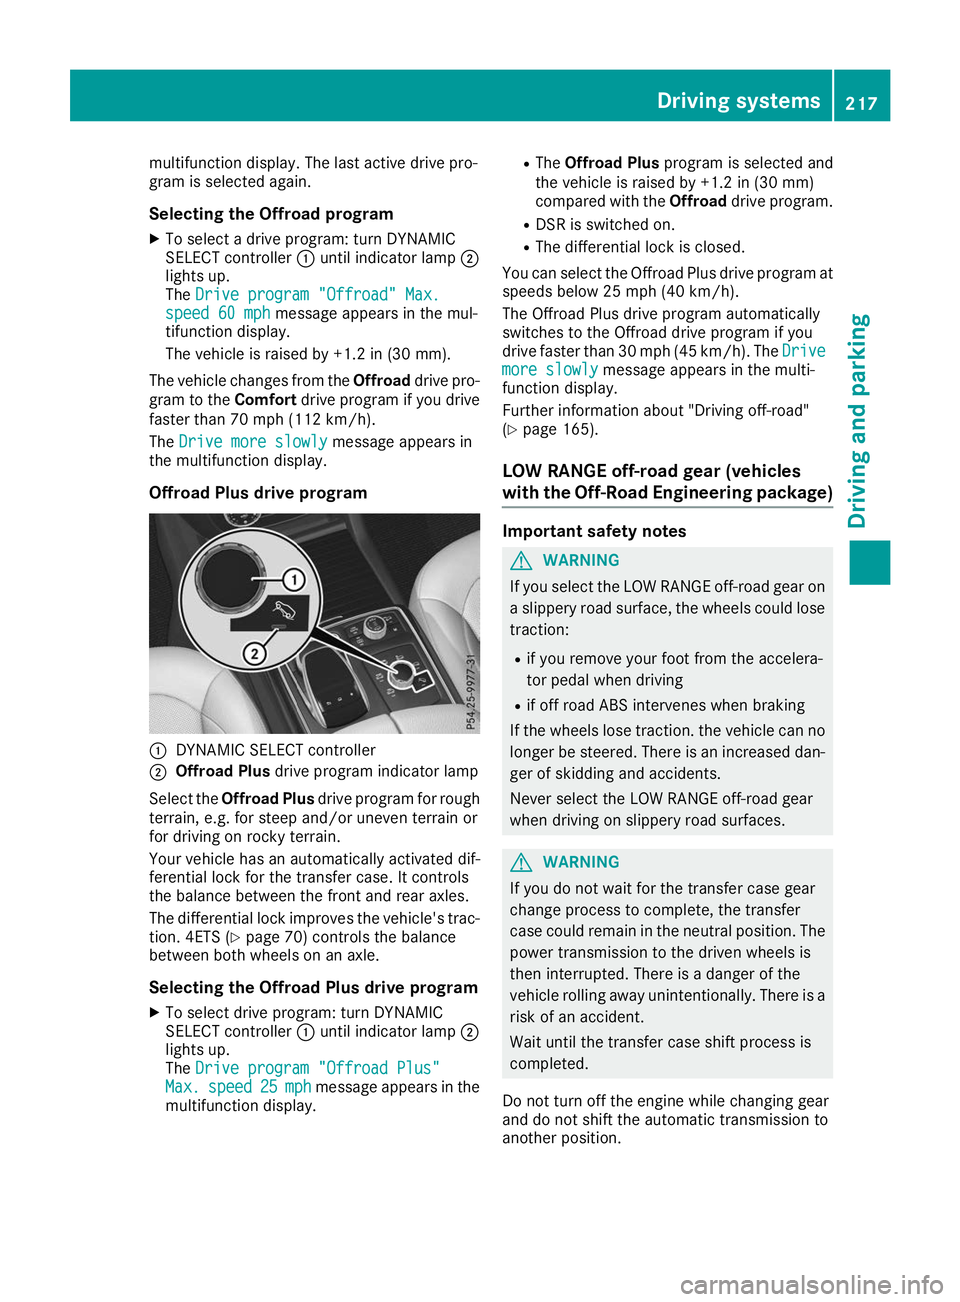
Offroad Plus drive program 0043
DYNAMIC SELECT controller
0044 Offroad Plus drive program indicator lamp
Select the Offroad Plus drive program for rough
terrain, e.g. for steep and/or uneven terrain or
for driving on rocky terrain.
Your vehicle has an automatically activated dif-
ferential lock for the transfer case. It controls
the balance between the front and rear axles.
The differential lock improves the vehicle's trac-
tion. 4ETS (Y page 70) controls the balance
between both wheels on an axle.
Selecting the Offroad Plus drive program X To select drive program: turn DYNAMIC
SELECT controller 0043until indicator lamp 0044
lights up.
The Drive program "Offroad Plus"
Drive program "Offroad Plus"
Max. Max. speed
speed 25
25mph
mph message appears in the
multifunction display. R
The Offroad Plus program is selected and
the vehicle is raised by +1.2 in (30 mm)
compared with the Offroaddrive program.
R DSR is switched on.
R The differential lock is closed.
You can select the Offroad Plus drive program at speeds below 25 mph (40 km/h).
The Offroad Plus drive program automatically
switches to the Offroad drive program if you
drive faster than 30 mph (45 km/h). The Drive Drive
more slowly more slowly message appears in the multi-
function display.
Further information about "Driving off-road"
(Y page 165).
LOW RANGE off-road gear (vehicles
with the Off-Road Engineering package) Important safety notes
G
WARNING
If you select the LOW RANGE off-road gear on a slippery road surface, the wheels could lose traction:
R if you remove your foot from the accelera-
tor pedal when driving
R if off road ABS intervenes when braking
If the wheels lose traction. the vehicle can no
longer be steered. There is an increased dan-
ger of skidding and accidents.
Never select the LOW RANGE off-road gear
when driving on slippery road surfaces. G
WARNING
If you do not wait for the transfer case gear
change process to complete, the transfer
case could remain in the neutral position. The power transmission to the driven wheels is
then interrupted. There is a danger of the
vehicle rolling away unintentionally. There is a
risk of an accident.
Wait until the transfer case shift process is
completed.
Do not turn off the engine while changing gear
and do not shift the automatic transmission to
another position. Driving systems
217Driving and parking Z
Page 220 of 398

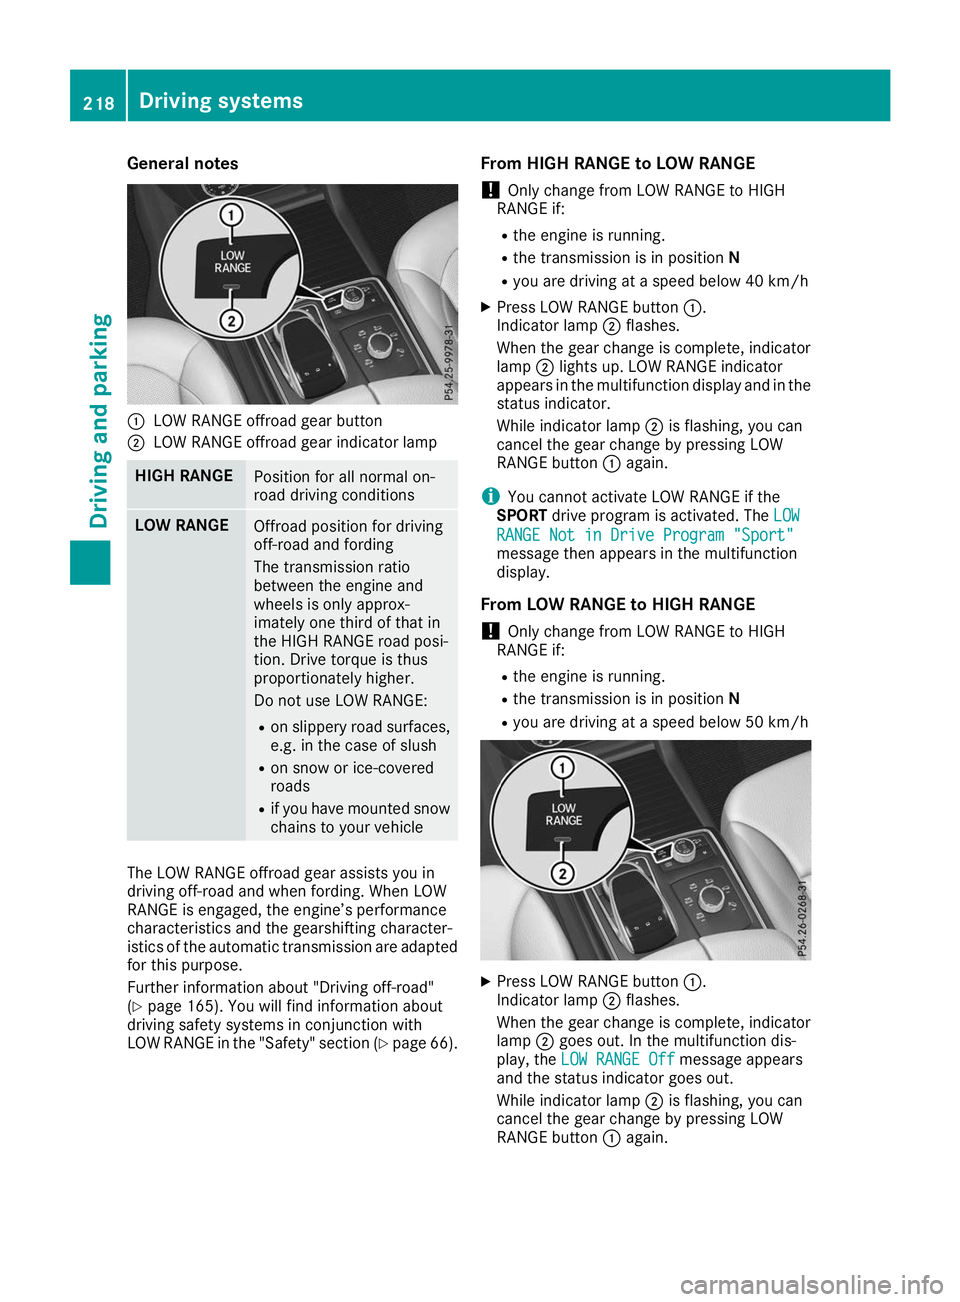
General notes
0043
LOW RANGE offroad gear button
0044 LOW RANGE offroad gear indicator lamp HIGH RANGE
Position for all normal on-
road driving conditions
LOW RANGE
Offroad position for driving
off-road and fording
The transmission ratio
between the engine and
wheels is only approx-
imately one third of that in
the HIGH RANGE road posi-
tion. Drive torque is thus
proportionately higher.
Do not use LOW RANGE:
R on slippery road surfaces,
e.g. in the case of slush
R on snow or ice-covered
roads
R if you have mounted snow
chains to your vehicle The LOW RANGE offroad gear assists you in
driving off-road and when fording. When LOW
RANGE is engaged, the engine’s performance
characteristics and the gearshifting character-
istics of the automatic transmission are adapted for this purpose.
Further information about "Driving off-road"
(Y page 165). You will find information about
driving safety systems in conjunction with
LOW RANGE in the "Safety" section (Y page 66).From HIGH RANGE to LOW RANGE
! Only change from LOW RANGE to HIGH
RANGE if:
R the engine is running.
R the transmission is in position N
R you are driving at a speed below 40 km/h
X Press LOW RANGE button 0043.
Indicator lamp 0044flashes.
When the gear change is complete, indicator
lamp 0044lights up. LOW RANGE indicator
appears in the multifunction display and in the
status indicator.
While indicator lamp 0044is flashing, you can
cancel the gear change by pressing LOW
RANGE button 0043again.
i You cannot activate LOW RANGE if the
SPORT drive program is activated. The LOW LOW
RANGE Not in Drive Program "Sport" RANGE Not in Drive Program "Sport"
message then appears in the multifunction
display.
From LOW RANGE to HIGH RANGE ! Only change from LOW RANGE to HIGH
RANGE if:
R the engine is running.
R the transmission is in position N
R you are driving at a speed below 50 km/h X
Press LOW RANGE button 0043.
Indicator lamp 0044flashes.
When the gear change is complete, indicator
lamp 0044goes out. In the multifunction dis-
play, the LOW RANGE Off LOW RANGE Off message appears
and the status indicator goes out.
While indicator lamp 0044is flashing, you can
cancel the gear change by pressing LOW
RANGE button 0043again. 218
Driving systemsDriving and parking
Page 225 of 398

X
Slide bolt 0083into the hole in the ball coupling
recess and the ball coupling to the stop. X
Secure the bolt using spring cotter 0084.X
Check the ball coupling, bolt and spring cotter
for correct installation.
If the ball coupling cannot be correctly mounted,
remove the ball coupling. Under these circum-
stances, the ball coupling must not be used for
trailer towing.
Have the entire trailer tow hitch checked at a
qualified specialist workshop. Coupling up a trailer
! Do not connect the trailer's brake system (if
featured) to the hydraulic brake system of the towing vehicle, as the latter is equipped with
an anti-lock brake system. Doing so will result
in a loss of function of the brake systems of
both the vehicle and the trailer.
X Shift the transmission to position 005D.
X Apply the vehicle's electric parking brake.
X Start the engine.
X Vehicles with AIRMATIC Package: select
normal level and the Comfortdrive program.
X Switch off the engine.
X Close the doors and tailgate.
X Couple up the trailer.
X Establish the electrical connection between
the vehicle and the trailer.
X Check that the trailer lighting system is work-
ing.
X Push the combination switch upwards/down-
wards and check whether the corresponding
turn signal on the trailer flashes.
A trailer that is connected is recognized only
when the electrical connection is established
correctly and when the lighting system is work-
ing properly. The function of other systems also depends on this, for example:
R ESP ®
R Parking Assist PARKTRONIC
R Active Parking Assist
R Parking Package with rear view camera
R Active Blind Spot Assist
R Active Lane Keeping Assist
i Vehicles with the AIRMATIC Package: if you
couple up a trailer, the vehicle always remains
at normal level. When coupling up a trailer,
please observe the following:
R If the normal level has not been set man-
ually, the vehicle is automatically lowered
to normal level. This is the case if a speed of
5 mph (8 km/h) is reached.
R The Sport drive program is not available.
These restrictions apply to all accessories
powered through a connection to the trailer
power socket of your vehicle, e.g. a bicycle
carrier.
Observe the maximum permissible trailer
dimensions (width and length). Towing a trailer
223Driving and parking Z
Page 226 of 398

Most U.S. states and all Canadian provinces
require by law:
R Safety chains between the towing vehicle and
the trailer. The chains should be cross-woundunder the trailer drawbar. They must be fas-
tened to the vehicle's trailer coupling, not to
the bumper or the axle.
Leave enough play in the chains to make tight
cornering possible.
R A separate brake system for certain types of
trailer.
R Safety switch for braked trailers. Check the
specific legal requirements applicable to your
state.
If the trailer becomes detached from the tow-
ing vehicle, the safety feature triggers the
trailer brakes. Towing a trailer
There are numerous legal requirements con-
cerning the towing of a trailer, e.g. speed restric-
tions. Make sure that your car/trailer combina- tion complies with the local regulations:
R in your place of residence
R in the location to which you are driving
The police and local authorities can provide reli-
able information.
Observe the following when towing a trailer:
R To gain driving experience and to become
accustomed to the new handling characteris-
tics, you should practice the following in a
traffic-free location:
- cornering
- stopping
- backing up
R Before driving, check:
- trailer tow hitch
- safety switch for braked trailers
- safety chains
- electrical connections
- lights
- wheels
R Adjust the exterior mirrors to provide an
unobstructed view of the rear section of the
trailer.
R If the trailer has electronically controlled
brakes, pull away carefully. Brake manually using the brake controller and check whether
the brakes function correctly.
R Secure any objects on the trailer to prevent
the cargo from slipping when the vehicle is in
motion.
R When you couple up a trailer, check at regular
intervals that the load is firmly secured. If the trailer is equipped with trailer lights and
brakes, check the trailer to ensure that these
are working.
R Bear in mind that the handling will be less
stable when towing a trailer than when driving
without one. Avoid sudden steering move-
ments.
R The vehicle/trailer combination is heavier,
accelerates more slowly, has a decreased
gradient climbing capability and a longer
braking distance.
It is more susceptible to side winds and
requires more careful steering.
R If possible, do not brake suddenly, but instead
depress the brake pedal moderately at first sothat the trailer can activate its brakes. Then
increase the pressure on the brake pedal.
R If the automatic transmission repeatedly
shifts between gears on uphill or downhill gra-
dients, shift to a lower gear using the left-hand
steering wheel paddle shifter.
A lower gear and lower speed reduce the risk of engine failure.
R When driving downhill, shift to a lower gear to
utilize the engine's braking effect.
Avoid continuous brake application as this
may overheat the vehicle brakes and, if instal- led, the trailer brakes.
R If the coolant temperature increases dramat-
ically while the air-conditioning system is
switched on, switch off the air-conditioning
system.
Coolant heat can also be dissipated by open-
ing the windows and switching the ventilation blower and the interior temperature to the
highest level.
R When overtaking, pay particular attention to
the extended length of your vehicle/trailer
combination.
Due to the length of the vehicle/trailer com-
bination, you require additional road space in
relation to the vehicle you are overtaking
before you can change back to the original
lane. 224
Towing a trailerDriving and parking
Page 243 of 398

X
Press the 0064or0063 button to select the
Belt Adjustment
Belt Adjustment function.
If the Belt
Belt Adjustment
Adjustment function is activated,
the vehicle seat belt is shown in orange in the
multifunction display.
X Press the 0076button to save the setting.
For further information on belt adjustment, see
(Y page 48).
Switching the fold-in mirrors when lock-
ing feature on/off
This function is only available when the vehicle is
equipped with the electrical fold-in function.
When you activate the Auto.
Auto. Mirror
Mirror Folding
Folding
function, the exterior mirrors are folded in when the vehicle is locked. The exterior mirrors fold
out automatically again as soon as you unlock
the vehicle.
X Press the 0059or0065 button on the steering
wheel to select the Sett.
Sett. menu.
X Press the 0064or0063 button to select the
Convenience Convenience submenu.
X Press 0076to confirm.
X Press the 0064or0063 button to select the
Auto. Mirror Folding
Auto. Mirror Folding function.
If the Auto. Mirror Folding
Auto. Mirror Folding function is
switched on, the multifunction display shows the exterior mirror in orange.
X Press the 0076button to save the setting. If you have switched the
Auto. Mirror Fold‐
Auto. Mirror Fold‐
ing
ing on and you fold the exterior mirrors in using
button 0043, they will not fold out automatically
(Y page 106).
You can then only fold out the exterior mirrors
using button 0043. Restoring the factory settings X
Press the 0059or0065 button on the steering
wheel to select the Sett.
Sett.menu.
X Press the 0064or0063 button to select the
Factory Setting
Factory Setting submenu.
X Press 0076to confirm.
The Reset All Settings?
Reset All Settings? message
appears.
X Press the 0064or0063 button to select No
Noor
Yes
Yes.
X Press 0076to confirm the selection.
If you select Yes
Yes, the multifunction display
shows a confirmation message.
If you want to reset the Daytime Running
Daytime Running
Lights
Lights function in the Light
Lightsubmenu, you
must turn the SmartKey to position 0047in the
ignition lock. ON&OFFROAD menu
X Press the 0059or0065 button on the steering
wheel to select the ON&OFFROAD
ON&OFFROADmenu.
You can view the current off-road program set-
tings in the ON&OFFROAD ON&OFFROAD menu:
R Vehicles with the Off-Road Engineering pack-
age (Y page 216)
R Vehicles without the Offroad Engineering
package (Y page 215) AMG menu (Mercedes-AMG vehicles)
Warm-up 0043
Digital speedometer
0044 Gear indicator
0087 Upshift indicator
0085 Engine oil temperature
0083 Coolant temperature
0084 Transmission oil temperature Menus and submenus
241On-board computer and displays Z
Page 249 of 398

Display messages
Possible causes/consequences and
0050
0050Solutions 007A
0025
00E5 Inoperative See
Inoperative See
Operator's Manual Operator's Manual EBD (electronic brake force distribution), ABS and ESP
®
are malfunc-
tioning.
Other driving systems and driving safety systems may also malfunc-
tion.
In addition, the 00E5,00BBand0025 warning lamps light up in the
instrument cluster and a warning tone sounds.
G WARNING
The brake system continues to function normally, but without the
functions listed above. The wheels could therefore lock if you brake
hard, for example.
The steerability and braking characteristics may be severely affected. The braking distance in an emergency braking situation can increase.
If ESP ®
is not operational, ESP ®
is unable to stabilize the vehicle.
There is an increased risk of skidding and an accident.
X Drive on carefully.
X Visit a qualified specialist workshop immediately. 0049
(USA
only) 0024 (Canada
only)
Turn On the Igni‐ Turn On the Igni‐
tion tion to
toRelease
Release the
the
Parking Brake
Parking Brake The red
0049(USA only) or 0024(Canada only) indicator lamp lights
up.
You attempted to release the electric parking brake while the ignition
was switched off.
X SmartKey : insert the SmartKey into the ignition lock and turn to
position 0047.
X KEYLESS-GO: switch on the ignition. 0049
(USA
only) 0024 (Canada
only)
Please Please Release Release Park‐
Park‐
ing Brake
ing Brake The red
0049(USA only) or 0024(Canada only) indicator lamp flashes
and a warning tone sounds. A condition for automatic release of the
electric parking brake is not fulfilled (Y page 157).
You are driving with the electric parking brake applied.
X Release the electric parking brake manually. The red
0049(USA only) or 0024(Canada only) indicator lamp flashes
and a warning tone sounds.
You are using the electric parking brake for emergency braking
(Y page 157). 0049
(USA
only) 0024 (Canada
only)
Parking Brake See Parking Brake See
Operator's Manual Operator's Manual The yellow
0024warning lamp lights up.
The electric parking brake is malfunctioning.
To apply:
X Switch the ignition off.
X Press the electric parking brake handle for at least ten seconds.
X Shift the transmission to position 005D.
X Consult a qualified specialist workshop. Display
messages
247On-board computer and displays Z