2019 MERCEDES-BENZ GLE change wheel
[x] Cancel search: change wheelPage 220 of 398
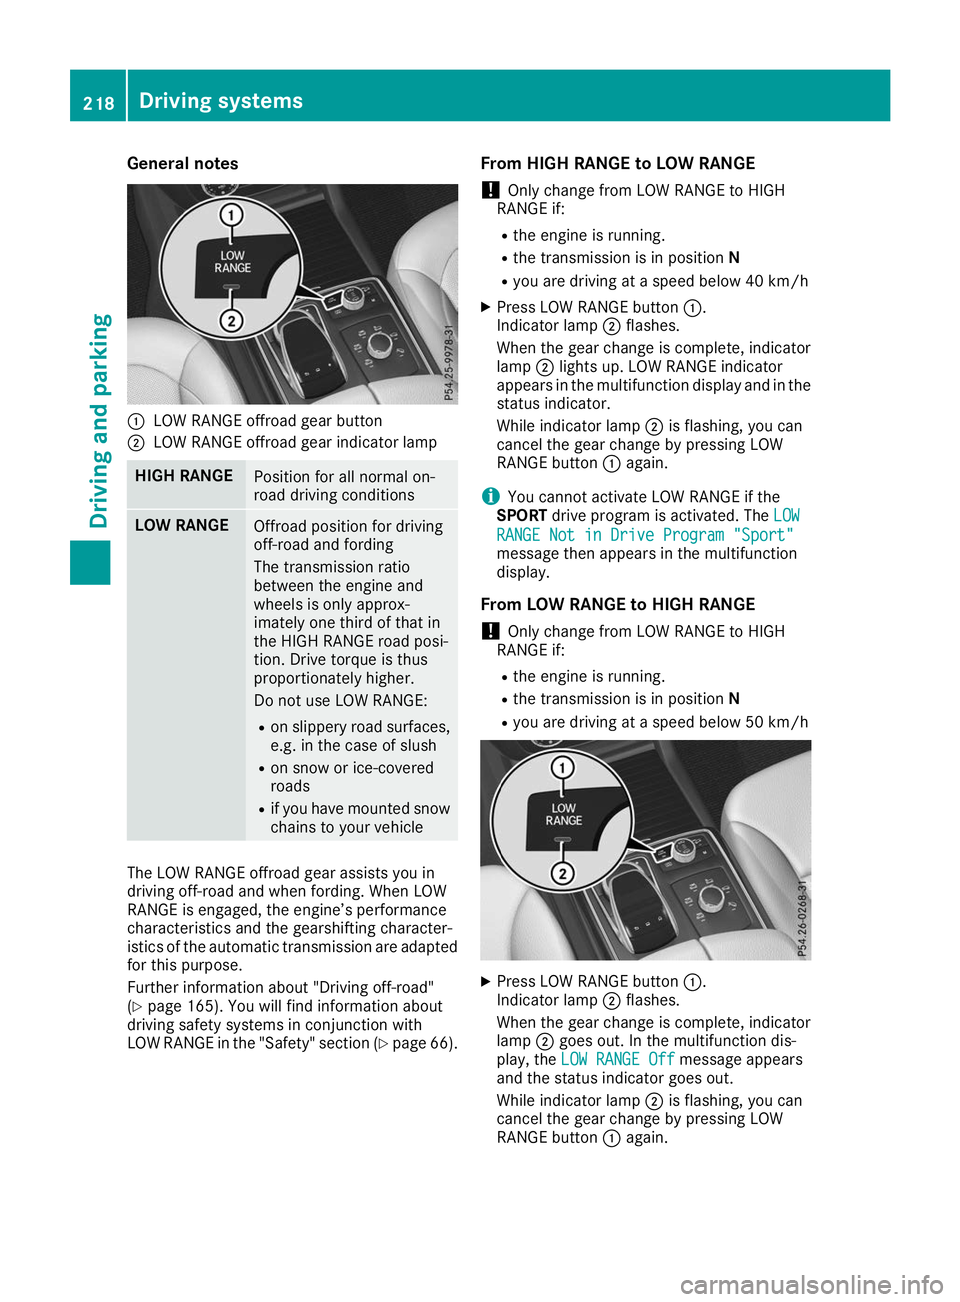
General notes
0043
LOW RANGE offroad gear button
0044 LOW RANGE offroad gear indicator lamp HIGH RANGE
Position for all normal on-
road driving conditions
LOW RANGE
Offroad position for driving
off-road and fording
The transmission ratio
between the engine and
wheels is only approx-
imately one third of that in
the HIGH RANGE road posi-
tion. Drive torque is thus
proportionately higher.
Do not use LOW RANGE:
R on slippery road surfaces,
e.g. in the case of slush
R on snow or ice-covered
roads
R if you have mounted snow
chains to your vehicle The LOW RANGE offroad gear assists you in
driving off-road and when fording. When LOW
RANGE is engaged, the engine’s performance
characteristics and the gearshifting character-
istics of the automatic transmission are adapted for this purpose.
Further information about "Driving off-road"
(Y page 165). You will find information about
driving safety systems in conjunction with
LOW RANGE in the "Safety" section (Y page 66).From HIGH RANGE to LOW RANGE
! Only change from LOW RANGE to HIGH
RANGE if:
R the engine is running.
R the transmission is in position N
R you are driving at a speed below 40 km/h
X Press LOW RANGE button 0043.
Indicator lamp 0044flashes.
When the gear change is complete, indicator
lamp 0044lights up. LOW RANGE indicator
appears in the multifunction display and in the
status indicator.
While indicator lamp 0044is flashing, you can
cancel the gear change by pressing LOW
RANGE button 0043again.
i You cannot activate LOW RANGE if the
SPORT drive program is activated. The LOW LOW
RANGE Not in Drive Program "Sport" RANGE Not in Drive Program "Sport"
message then appears in the multifunction
display.
From LOW RANGE to HIGH RANGE ! Only change from LOW RANGE to HIGH
RANGE if:
R the engine is running.
R the transmission is in position N
R you are driving at a speed below 50 km/h X
Press LOW RANGE button 0043.
Indicator lamp 0044flashes.
When the gear change is complete, indicator
lamp 0044goes out. In the multifunction dis-
play, the LOW RANGE Off LOW RANGE Off message appears
and the status indicator goes out.
While indicator lamp 0044is flashing, you can
cancel the gear change by pressing LOW
RANGE button 0043again. 218
Driving systemsDriving and parking
Page 221 of 398
Messages in the multifunction display
If a gear change process has not been successful, the following messages may be displayed in the
multifunction display: Display messages
Possible causes/consequences and
0050
0050Solutions LOW RANGE Max.
LOW RANGE Max.
Speed 24 mph Speed 24 mph You have been driving faster than 24 mph (40 km/h). Additionally, the
indicator lamp on the button in the center console is flashing.
X Slow down to change gear. LOW RANGE Shift to
LOW RANGE Shift to
Position N Briefly Position N Briefly The transmission is in position
005Band you are driving at below
40 km/h.
X To shift gear, shift the transmission to position 005C.LOW RANGE Shifting
LOW RANGE Shifting
Canceled Please Canceled Please
Reactivate Reactivate The gear change process was not carried out.
X Ensure that all gear change conditions are fulfilled and carry out the
gear change process again. LOW RANGE Stop
LOW RANGE Stop
Apply Parking Brake Apply Parking Brake A warning tone also sounds. The gear change process has not been
completed. LOW RANGE is in the neutral position. There is no con-
nection between the engine and the drive wheels.
! Do not drive any further. You could otherwise damage the vehi-
cle's drive train.
X Stop the vehicle. Take into account the road and traffic conditions
when doing this.
X Depress the electric parking brake (Y page 157).
X Carry out the gear change process again.
If the gear change process has been carried out, the LOW RANGE LOW RANGE
Stop Apply Parking Brake
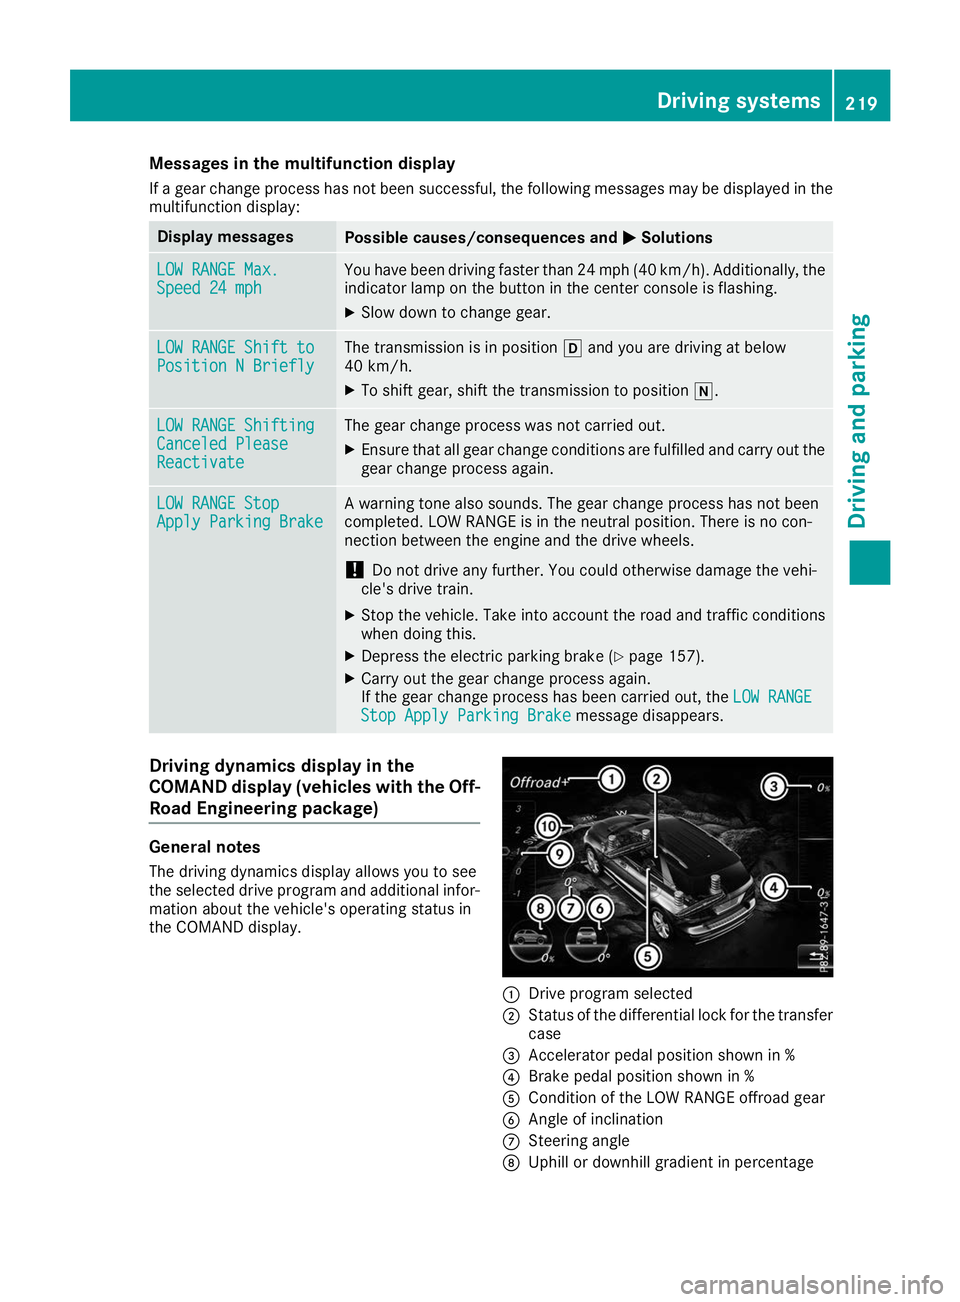
Stop Apply Parking Brake message disappears.Driving dynamics display in the
COMAND display (vehicles with the Off-
Road Engineering package) General notes
The driving dynamics display allows you to see
the selected drive program and additional infor-
mation about the vehicle's operating status in
the COMAND display. 0043
Drive program selected
0044 Status of the differential lock for the transfer
case
0087 Accelerator pedal position shown in %
0085 Brake pedal position shown in %
0083 Condition of the LOW RANGE offroad gear
0084 Angle of inclination
006B Steering angle
006C Uphill or downhill gradient in percentage Driving systems
219Driving and parking Z
Page 223 of 398
R
is affected more by strong crosswinds
R demands more sensitive steering
R has a larger turning circle
This could impair the handling characteristics.
When towing a trailer, always adjust your speed to the current road and weather conditions. Do
not exceed the maximum permissible speed for
your vehicle/trailer combination. Notes on towing a trailer
General notes !
If you have a trailer tow hitch retrofitted,
changes to the cooling system and drive train may be necessary, depending on the vehicle
type.
If you have a trailer tow hitch retrofitted,
observe the anchorage points on the chassis
frame.
R Do not exceed the legally prescribed maxi-
mum speed for vehicle/trailer combinations
in the relevant country.
This lowers the risk of an accident.
R Only install an approved trailer coupling on
your vehicle.
More information on availability and installa-
tion can be obtained at any qualified special-
ist workshop.
R The bumpers of your vehicle are not suitable
for installing detachable trailer couplings.
R Do not install hired trailer couplings or other
detachable trailer couplings on the bumpers
of your vehicle.
R If you no longer need the ball coupling,
remove it from the ball coupling recess. This
will reduce the risk of damage to the ball cou-
pling.
When towing a trailer, set the tire pressure on
the rear axle of the towing vehicle for the max-
imum load. You will find the values in the tire
pressure table in the fuel filler flap of the vehicle (Y page 369).
Please note that when towing a trailer, the fol-
lowing driving systems have limited availability
or are not available at all:
R Parking Assist PARKTRONIC (Y page 188)
R Blind Spot Assist (Y page 206)
R Active Lane Keeping Assist (Y page 211)On vehicles without level control, the height of
the ball coupling will alter according to the load
placed on the vehicle. If necessary, use a trailer
with a height-adjustable drawbar.
You will find installing dimensions and loads
under "Technical data" (Y page 394).
Driving tips Also observe the notes on pulling away with a
trailer (Y
page 138).
The maximum permissible speed for vehicle/
trailer combinations depends on the type of
trailer. Before beginning the journey, check the
trailer's documents to see what the maximum
permissible speed is for your trailer. Observe the
legally permissible maximum speed in the rele-
vant country.
For certain Mercedes-Benz vehicles, the maxi-
mum permissible rear axle load is increased
when towing a trailer. See "Technical data" to
find out whether this applies to your vehicle
(Y page 394). If you utilize any of the added
maximum rear axle load when towing a trailer,
the vehicle/trailer combination may not exceed
a maximum speed of 60 mph (100 km/h) for
reasons concerning the operating permit. This
also applies in countries in which the maximum
permissible speed for car/trailer combinations
is greater than 60 mph (100 km/h).
When towing a trailer, your vehicle's handling
characteristics will be different in comparison
with when driving without a trailer.
Use the left-hand steering wheel paddle shifter
to shift into a lower gear in good time on long
and steep downhill gradients.
This also applies if you have activated cruise
control or Active Distance Assist DISTRONIC.
This will use the braking effect of the engine, so that less braking will be required to maintain the
speed. This relieves the load on the brake sys-
tem and prevents the brakes from overheating
and wearing too quickly. If you need additional
braking, depress the brake pedal repeatedly
rather than continuously.
Driving tips If the trailer swings from side to side:
X Do not accelerate.
X Do not counter-steer.
X Brake if necessary. Towing a trailer
221Driving and parking Z
Page 226 of 398
Most U.S. states and all Canadian provinces
require by law:
R Safety chains between the towing vehicle and
the trailer. The chains should be cross-woundunder the trailer drawbar. They must be fas-
tened to the vehicle's trailer coupling, not to
the bumper or the axle.
Leave enough play in the chains to make tight
cornering possible.
R A separate brake system for certain types of
trailer.
R Safety switch for braked trailers. Check the
specific legal requirements applicable to your
state.
If the trailer becomes detached from the tow-
ing vehicle, the safety feature triggers the
trailer brakes. Towing a trailer
There are numerous legal requirements con-
cerning the towing of a trailer, e.g. speed restric-
tions. Make sure that your car/trailer combina- tion complies with the local regulations:
R in your place of residence
R in the location to which you are driving
The police and local authorities can provide reli-
able information.
Observe the following when towing a trailer:
R To gain driving experience and to become
accustomed to the new handling characteris-
tics, you should practice the following in a
traffic-free location:
- cornering
- stopping
- backing up
R Before driving, check:
- trailer tow hitch
- safety switch for braked trailers
- safety chains
- electrical connections
- lights
- wheels
R Adjust the exterior mirrors to provide an
unobstructed view of the rear section of the
trailer.
R If the trailer has electronically controlled
brakes, pull away carefully. Brake manually using the brake controller and check whether
the brakes function correctly.
R Secure any objects on the trailer to prevent
the cargo from slipping when the vehicle is in
motion.
R When you couple up a trailer, check at regular
intervals that the load is firmly secured. If the trailer is equipped with trailer lights and
brakes, check the trailer to ensure that these
are working.
R Bear in mind that the handling will be less
stable when towing a trailer than when driving
without one. Avoid sudden steering move-
ments.
R The vehicle/trailer combination is heavier,
accelerates more slowly, has a decreased
gradient climbing capability and a longer
braking distance.
It is more susceptible to side winds and
requires more careful steering.
R If possible, do not brake suddenly, but instead
depress the brake pedal moderately at first sothat the trailer can activate its brakes. Then
increase the pressure on the brake pedal.
R If the automatic transmission repeatedly
shifts between gears on uphill or downhill gra-
dients, shift to a lower gear using the left-hand
steering wheel paddle shifter.
A lower gear and lower speed reduce the risk of engine failure.
R When driving downhill, shift to a lower gear to
utilize the engine's braking effect.
Avoid continuous brake application as this
may overheat the vehicle brakes and, if instal- led, the trailer brakes.
R If the coolant temperature increases dramat-
ically while the air-conditioning system is
switched on, switch off the air-conditioning
system.
Coolant heat can also be dissipated by open-
ing the windows and switching the ventilation blower and the interior temperature to the
highest level.
R When overtaking, pay particular attention to
the extended length of your vehicle/trailer
combination.
Due to the length of the vehicle/trailer com-
bination, you require additional road space in
relation to the vehicle you are overtaking
before you can change back to the original
lane. 224
Towing a trailerDriving and parking
Page 232 of 398
There is a short delay before a change in outside
temperature appears in the multifunction dis-
play. Coolant temperature gauge
G
WARNING
Opening the hood when the engine is over-
heated or when there is a fire in the engine
compartment could expose you to hot gases
or other service products. There is a risk of
injury.
Let an overheated engine cool down before
opening the hood. If there is a fire in the
engine compartment, keep the hood closed
and contact the fire department.
! A display message is shown if the coolant
temperature is too high.
If the coolant temperature is over 248 ‡
(120 †), do not continue driving. The engine
will otherwise be damaged.
All vehicles except PLUG-IN HYBRID: the
coolant temperature display is on the instru-
ment cluster on the right-hand side (Y page 37).
Under normal operating conditions and with the specified coolant level, the coolant temperature
may rise to 248 ‡ (120 †). Operating the on-board computer
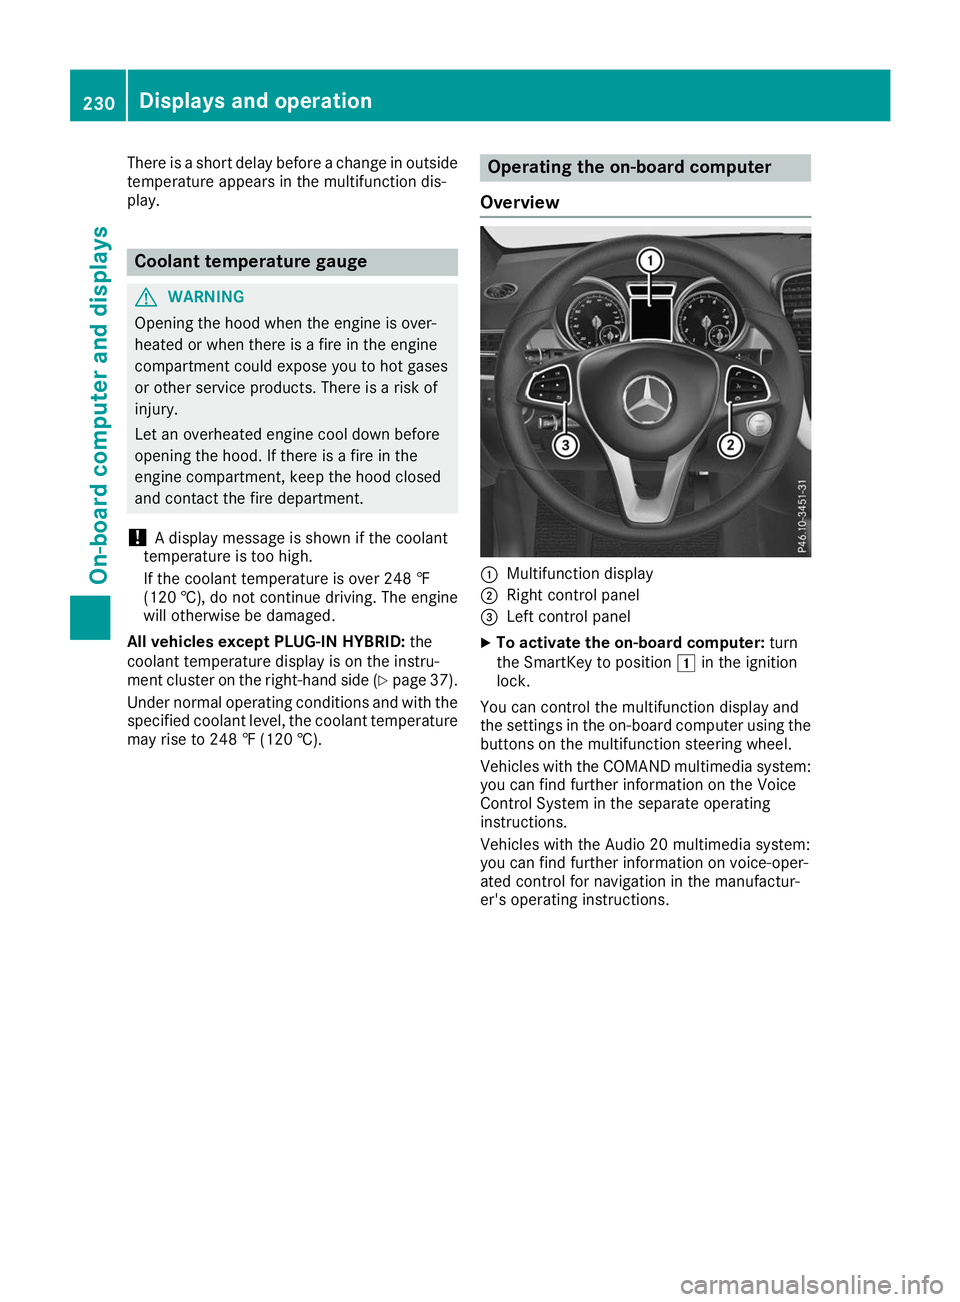
Overview 0043
Multifunction display
0044 Right control panel
0087 Left control panel
X To activate the on-board computer: turn
the SmartKey to position 0047in the ignition
lock.
You can control the multifunction display and
the settings in the on-board computer using the buttons on the multifunction steering wheel.
Vehicles with the COMAND multimedia system: you can find further information on the Voice
Control System in the separate operating
instructions.
Vehicles with the Audio 20 multimedia system:
you can find further information on voice-oper-
ated control for navigation in the manufactur-
er's operating instructions. 230
Displays and operationOn-board computer and displays
Page 241 of 398
R
calling up display messages in message mem-
ory (Y page 244)
R restarting the tire pressure loss warning sys-
tem (Y page 358) or checking the tire pres-
sure electronically (Y page 360)
R calling up the service due date (Y page 325).Settings menu
Introduction Depending on the equipment installed in the
vehicle, In the Sett. Sett.menu you have the follow-
ing options:
R Changing the instrument cluster settings
(Y page 239)
R Changing the light settings (Y page 239)
R Changing the vehicle settings (Y page 240)
R Changing the convenience settings
(Y page 240)
R Restoring the factory settings (Y page 241)
Instrument cluster submenu Selecting the distance unit
The Display Unit Speedometer / Odome‐
Display Unit Speedometer / Odome‐
ter:
ter: function allows you to choose whether
certain displays appear in kilometers or miles in the multifunction display.
X Press the 0059or0065 button on the steering
wheel to select the Sett.
Sett. menu.
X Press the 0064or0063 button to select the
Instrument Cluster
Instrument Cluster submenu.
X Press 0076to confirm.
X Press the 0064or0063 button to select the
Display Unit Speedometer / Odometer
Display Unit Speedometer / Odometer
function.
You will see the selected setting: km
km ormiles miles.
X Press the 0076button to save the setting.
The selected unit of measurement for distance
applies to:
R Digital speedometer in the Trip
Trip menu
R Odometer and the trip odometer
R Trip computer
R Current consumption and the range
R Navigation instructions in the Navi
Navi menu
R Cruise control R
Active Distance Assist DISTRONIC
R ASSYST PLUS service interval display
Selecting permanent display The Permanent Display: Permanent Display: function allows you
to choose whether the multifunction display
always shows the outside temperature or the
speed.
The speed display is inverse to the speedome-
ter.
X Press the 0059or0065 button on the steering
wheel to select the Sett. Sett.menu.
X Press the 0064or0063 button to select the
Instrument Cluster
Instrument Cluster submenu.
X Confirm by pressing 0076on the steering
wheel.
X Press the 0064or0063 button to select the
Permanent Display:
Permanent Display: function.
The current setting, Outside Temperature
Outside Temperature,
Speedometer [km/h]
Speedometer [km/h] orSpeedometer
Speedometer
[mph]
[mph] appears.
X To change the setting: press0076again.
Light submenu Setting the daytime running lamps
This function is not available in Canada.
X Press the 0059or0065 button on the steering
wheel to select the Sett.
Sett.menu.
X Press the 0064or0063 button to select the
Light
Light submenu.
X Press 0076to confirm.
X Press 0064or0063 to select the Daytime
Daytime
Running Lights
Running Lights function.
If the Daytime
Daytime Running
RunningLights
Lightsfunction has
been switched on, the cone of light and the
0086 symbol in the multifunction display are
shown in orange.
X Press the 0076button to save the setting.
Further information on daytime running lamps
(Y page 110).
Switching the Intelligent Light System
on/off
X Press the 0059or0065 button on the steering
wheel to select the Sett. Sett.menu.
X Press the 0064or0063 button to select the
Light
Light submenu.
X Press 0076to confirm. Menus and submenus
239On-board computer and displays Z
Page 265 of 398
Display messages
Possible causes/consequences and
0050
0050Solutions 00F6
Different. Lock Different. Lock
Sys. Malfunction Sys. Malfunction The differential lock is faulty.
X Do not drive at speeds above 50 mph (80 km/h).
X Visit a qualified specialist workshop. 00F6
Different. Locking Different. Locking
Sys. Cooling Down Sys. Cooling Down
Please Wait Please Wait The differential lock is too hot and has been disengaged.
X Drive on carefully.
X Allow the differential lock to cool down.
The differential lock re-engages as soon as it has cooled down. LOW RANGE Stop LOW RANGE Stop
Apply Parking Brake Apply Parking Brake A gearshift process has been canceled. LOW RANGE is in the neutral
position. There is no connection between the engine and the drive
wheels.
X Pull over and stop the vehicle safely as soon as possible, paying
attention to road and traffic conditions.
X Apply the electric parking brake. Do not continue driving under any
circumstances.
X Repeat the gearshift process. LOW RANGE Malfunc‐
LOW RANGE Malfunc‐
tion tion
To
ToPark,
Park, Apply
Apply
Brake
Brake LOW RANGE is malfunctioning.
X Do not drive at speeds above 31 mph (50 km/h).
X When parking, secure the vehicle against rolling away (Y page 156).
X Visit a qualified specialist workshop. LOW RANGE Max.
LOW RANGE Max.
Speed 25 mph Speed 25 mph You have exceeded the maximum speed for the gearshift process.
X Drive more slowly.
The gear change is made. LOW RANGE Max. LOW RANGE Max.
Speed 31 mph Speed 31 mph You have exceeded the maximum speed for the gearshift process.
X Drive more slowly.
The gear change is made. LOW RANGE Shift to LOW RANGE Shift to
Position N Briefly Position N Briefly You have reduced the vehicle speed, but the automatic transmission
is not in position 005C.
X Briefly shift the automatic transmission to 005C.LOW RANGE Shifting LOW RANGE Shifting
Canceled Please Canceled Please
Reactivate Reactivate The gearshift process has been canceled.
X Repeat the gearshift process. 00C6
Inoperative Inoperative DSR (Downhill Speed Regulation) is deactivated due to a malfunction.
X Have DSR checked at a qualified specialist workshop. Display
messages
263On-board computer and displays Z
Page 270 of 398
Tires
Display messages
Possible causes/consequences and
0050
0050Solutions Check
Check
Tire
TirePressure
Pressure
Soon
Soon The tire pressure loss warning system has detected a significant loss
in pressure.
A warning tone also sounds.
Possible causes:
R you have changed the positions of the wheels and tires or installed
new wheels and tires.
R the tire pressure in one or more tires has dropped significantly
G WARNING
Tire pressures that are too low pose the following hazards: R they may burst, especially as the load and vehicle speed increase.
R they may wear excessively and/or unevenly, which may greatly
impair tire traction.
R the driving characteristics, as well as steering and braking, may be
greatly impaired.
There is a risk of an accident.
X Stop the vehicle without making any sudden steering or braking
maneuvers. Pay attention to the traffic conditions as you do so.
X Secure the vehicle against rolling away (Y page 156).
X Check the tires and, if necessary, follow the instructions for a flat
tire (Y page 335).
X Check the tire pressures and, if necessary, correct the tire pressure.
X Restart the tire pressure loss warning system when the tire pres-
sure is correct (Y page 358). Check Check
Tire
TirePressure
Pressure
Then Restart Run
Then Restart Run
Flat Indicator Flat Indicator The tire pressure loss warning system generated a display message
and has not been restarted since.
X Set the correct tire pressure in all four tires.
X Restart the tire pressure loss warning system (Y page 358).Run Flat Indicator Run Flat Indicator
Inoperative Inoperative The tire pressure loss warning system is faulty.
X Visit a qualified specialist workshop. Please
Please
Correct
Correct Tire
Tire
Pressure
Pressure The tire pressure is too low in at least one of the tires, or the tire
pressure difference between the wheels is too great.
X Check the tire pressures at the next opportunity (Y page 358).
X If necessary, correct the tire pressure.
X Restart the tire pressure monitor (Y page 361).268
Display
messagesOn-board computer and displays