2019 MERCEDES-BENZ GLE warning lights
[x] Cancel search: warning lightsPage 108 of 398
G
WARNING
The exterior mirror on the front-passenger
side reduces the size of the image. Visible
objects are actually closer than they appear.
This means that you could misjudge the dis-
tance from road users traveling behind, e.g.
when changing lane. There is a risk of an acci-
dent.
For this reason, always make sure of the
actual distance from the road users traveling
behind by glancing over your shoulder. X
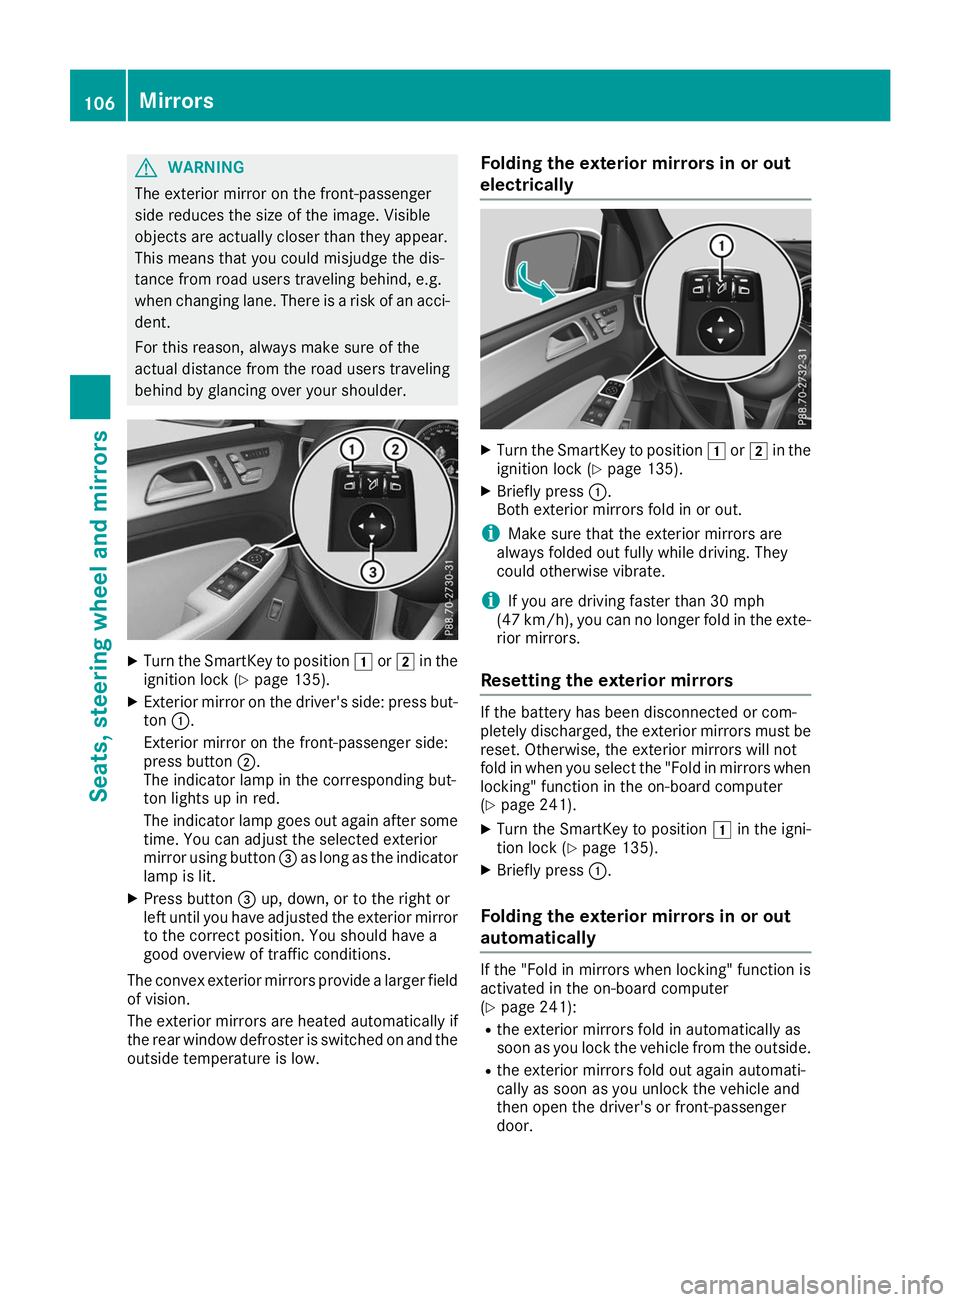
Turn the SmartKey to position 0047or0048 in the
ignition lock (Y page 135).
X Exterior mirror on the driver's side: press but-
ton 0043.
Exterior mirror on the front-passenger side:
press button 0044.
The indicator lamp in the corresponding but-
ton lights up in red.
The indicator lamp goes out again after some
time. You can adjust the selected exterior
mirror using button 0087as long as the indicator
lamp is lit.
X Press button 0087up, down, or to the right or
left until you have adjusted the exterior mirror
to the correct position. You should have a
good overview of traffic conditions.
The convex exterior mirrors provide a larger field of vision.
The exterior mirrors are heated automatically if
the rear window defroster is switched on and the
outside temperature is low. Folding the exterior mirrors in or out
electrically
X
Turn the SmartKey to position 0047or0048 in the
ignition lock (Y page 135).
X Briefly press 0043.
Both exterior mirrors fold in or out.
i Make sure that the exterior mirrors are
always folded out fully while driving. They
could otherwise vibrate.
i If you are driving faster than 30 mph
(47 km/h), you can no longer fold in the exte-
rior mirrors.
Resetting the exterior mirrors If the battery has been disconnected or com-
pletely discharged, the exterior mirrors must be reset. Otherwise, the exterior mirrors will not
fold in when you select the "Fold in mirrors whenlocking" function in the on-board computer
(Y page 241).
X Turn the SmartKey to position 0047in the igni-
tion lock (Y page 135).
X Briefly press 0043.
Folding the exterior mirrors in or out
automatically If the "Fold in mirrors when locking" function is
activated in the on-board computer
(Y
page 241):
R the exterior mirrors fold in automatically as
soon as you lock the vehicle from the outside.
R the exterior mirrors fold out again automati-
cally as soon as you unlock the vehicle and
then open the driver's or front-passenger
door. 106
MirrorsSeats, steering wheel and mirrors
Page 112 of 398
Exterior lighting
General notes
For reasons of safety, Mercedes-Benz recom-
mends that you drive with the lights switched on even during the daytime. In some countries,
operation of the headlamps varies due to legal
requirements and self-imposed obligations. Setting the exterior lighting
Setting options Exterior lighting can be set using:
R the light switch
R the combination switch (Y page 111)
R the on-board computer (Y page 239)
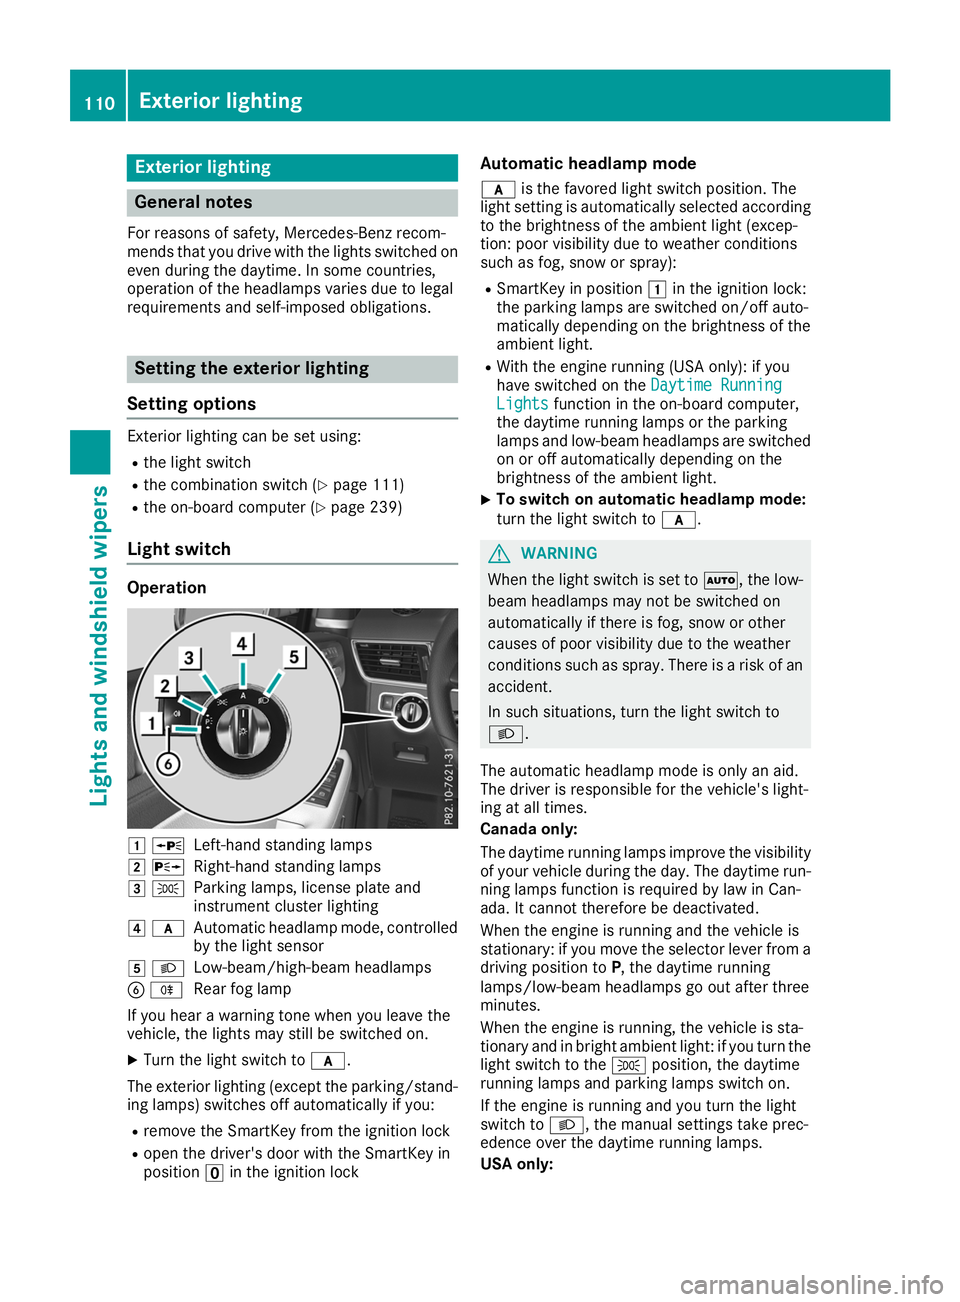
Light switch Operation
0047
0063
Left-hand standing lamps
0048 0064
Right-hand standing lamps
0049 0060
Parking lamps, license plate and
instrument cluster lighting
004A 0071
Automatic headlamp mode, controlled
by the light sensor
004B 0058
Low-beam/high-beam headlamps
0084 005E
Rear fog lamp
If you hear a warning tone when you leave the
vehicle, the lights may still be switched on.
X Turn the light switch to 0071.
The exterior lighting (except the parking/stand-
ing lamps) switches off automatically if you:
R remove the SmartKey from the ignition lock
R open the driver's door with the SmartKey in
position 0092in the ignition lock Automatic headlamp mode
0071 is the favored light switch position. The
light setting is automatically selected according
to the brightness of the ambient light (excep-
tion: poor visibility due to weather conditions
such as fog, snow or spray):
R SmartKey in position 0047in the ignition lock:
the parking lamps are switched on/off auto-
matically depending on the brightness of the
ambient light.
R With the engine running (USA only): if you
have switched on the Daytime Running
Daytime Running
Lights Lights function in the on-board computer,
the daytime running lamps or the parking
lamps and low-beam headlamps are switched on or off automatically depending on the
brightness of the ambient light.
X To switch on automatic headlamp mode:
turn the light switch to 0071. G
WARNING
When the light switch is set to 0058, the low-
beam headlamps may not be switched on
automatically if there is fog, snow or other
causes of poor visibility due to the weather
conditions such as spray. There is a risk of an
accident.
In such situations, turn the light switch to
0058.
The automatic headlamp mode is only an aid.
The driver is responsible for the vehicle's light-
ing at all times.
Canada only:
The daytime running lamps improve the visibility
of your vehicle during the day. The daytime run-
ning lamps function is required by law in Can-
ada. It cannot therefore be deactivated.
When the engine is running and the vehicle is
stationary: if you move the selector lever from a driving position to P, the daytime running
lamps/low-beam headlamps go out after three
minutes.
When the engine is running, the vehicle is sta-
tionary and in bright ambient light: if you turn the light switch to the 0060position, the daytime
running lamps and parking lamps switch on.
If the engine is running and you turn the light
switch to 0058, the manual settings take prec-
edence over the daytime running lamps.
USA only: 110
Exterior lightingLights and windshield wipers
Page 114 of 398
The blue
0057indicator lamp in the instru-
ment cluster lights up when the high-beam
headlamps are switched on.
X To switch off the high-beam headlamps:
move the combination switch back to its nor- mal position.
The blue 0057indicator lamp in the instru-
ment cluster goes out.
Vehicles with Adaptive Highbeam Assist: if
Adaptive Highbeam Assist is activated, it auto-
matically controls activation and deactivation of
the high-beam headlamps (Y page 113).Hazard warning lamps
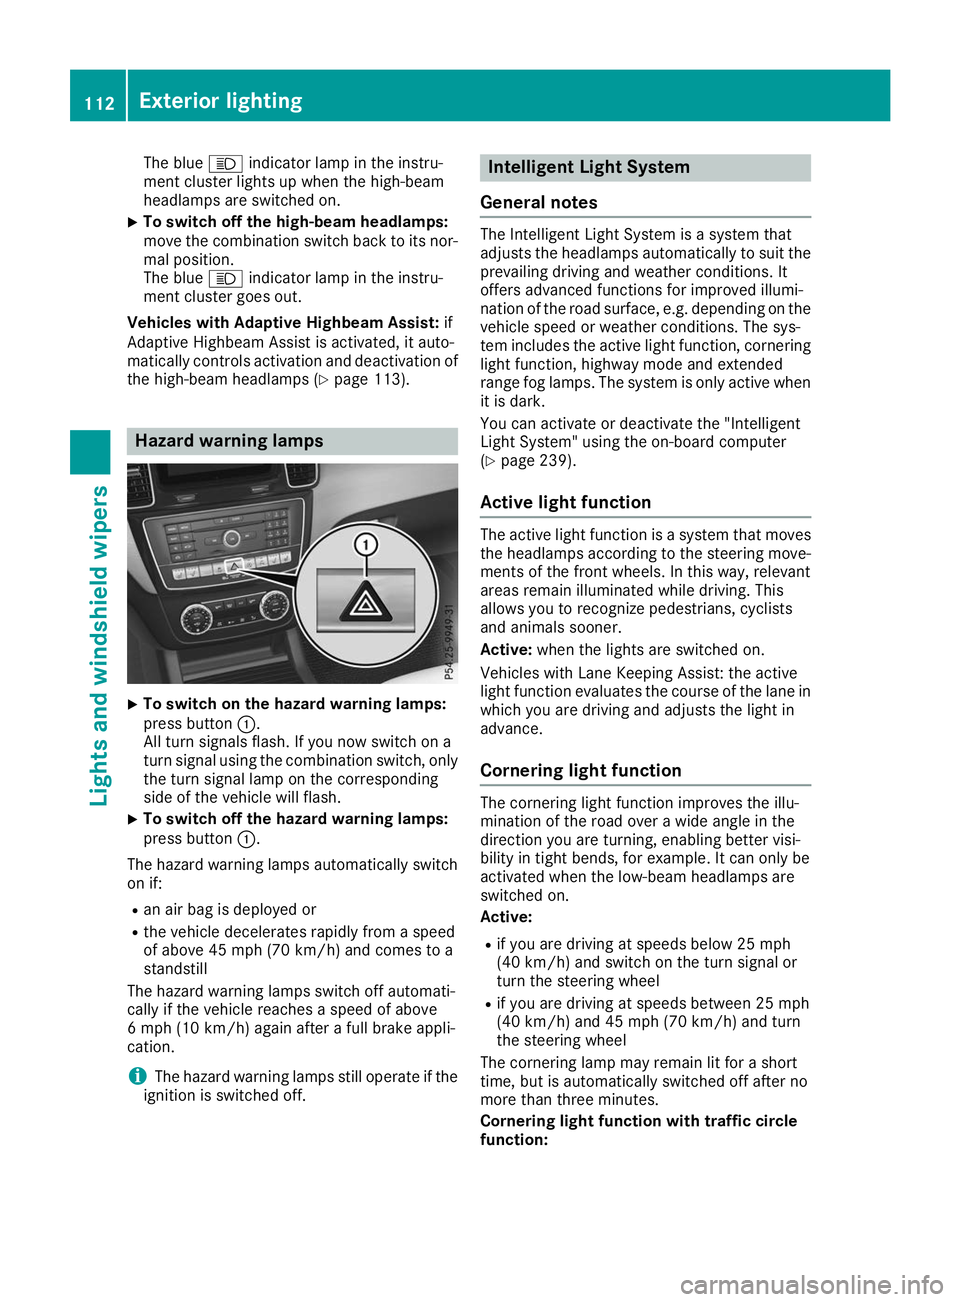
X
To switch on the hazard warning lamps:
press button
0043.
All turn signals flash. If you now switch on a
turn signal using the combination switch, only the turn signal lamp on the corresponding
side of the vehicle will flash.
X To switch off the hazard warning lamps:
press button
0043.
The hazard warning lamps automatically switch
on if:
R an air bag is deployed or
R the vehicle decelerates rapidly from a speed
of above 45 mph (70 km/h) and comes to a
standstill
The hazard warning lamps switch off automati-
cally if the vehicle reaches a speed of above
6 mph (10 km/h) again after a full brake appli-
cation.
i The hazard warning lamps still operate if the
ignition is switched off. Intelligent Light System
General notes The Intelligent Light System is a system that
adjusts the headlamps automatically to suit the
prevailing driving and weather conditions. It
offers advanced functions for improved illumi-
nation of the road surface, e.g. depending on the vehicle speed or weather conditions. The sys-
tem includes the active light function, corneringlight function, highway mode and extended
range fog lamps. The system is only active when it is dark.
You can activate or deactivate the "Intelligent
Light System" using the on-board computer
(Y page 239).
Active light function The active light function is a system that moves
the headlamps according to the steering move- ments of the front wheels. In this way, relevant
areas remain illuminated while driving. This
allows you to recognize pedestrians, cyclists
and animals sooner.
Active: when the lights are switched on.
Vehicles with Lane Keeping Assist: the active
light function evaluates the course of the lane in which you are driving and adjusts the light in
advance.
Cornering light function The cornering light function improves the illu-
mination of the road over a wide angle in the
direction you are turning, enabling better visi-
bility in tight bends, for example. It can only be
activated when the low-beam headlamps are
switched on.
Active:
R if you are driving at speeds below 25 mph
(40 km/h) and switch on the turn signal or
turn the steering wheel
R if you are driving at speeds between 25 mph
(40 km/h) and 45 mph (70 km/h) and turn
the steering wheel
The cornering lamp may remain lit for a short
time, but is automatically switched off after no
more than three minutes.
Cornering light function with traffic circle
function: 112
Exterior lightingLights and windshield wipers
Page 115 of 398
The cornering light function is activated on both
sides before entering a traffic circle through an
evaluation of the current GPS position of the
vehicle. It remains active until after the vehicle
has left the traffic circle. In this way, pedestrians
crossing the road, for example, are illuminated
by your vehicle in good time.
Highway mode Highway mode increases the range of the beam.
Active: if you are driving at a speed above
110 km/h and do not make any large steering
movements for at least 1,000 m or if you are
driving at a speed above 130 km/h.
Not active: if you are driving at speeds below
80 km/h following activation.
Extended range fog lamps The extended range fog lamps reduce the glare
experienced by the driver and improve the illu-
mination of the edge of the road.
Active: if you are driving at speeds below
40 mph (70 km/ h)and you switch on the rear
fog lamp.
Not active: if, following activation, you are driv-
ing at speeds above 60 mph (100 km/h)or if you
switch off the rear fog lamp
Off-road lights The off-road lights facilitate the early recogni-
tion of objects/obstacles when driving off-road thanks to a symmetrical, wider and brighter dis-
tribution of light from the low-beam headlamps.
Active: when driving at speeds no faster than
30 mph (50 km/h) and the off-road program
selector wheel is in position 1 or 2.
Not active: when driving at speeds above
30 mph (50 km/h).
When the off-road lights are switched on, the
cornering light function is permanently activa-
ted, the active light function is deactivated and
the headlamp range control is set to static
mode. Adaptive Highbeam Assist
General notes You can use this function to set the headlamps
to change between low beam and high beam
automatically. The system recognizes vehicles
with their lights on, either approaching from the
opposite direction or traveling in front of your
vehicle, and consequently switches the head-
lamps from high beam to low beam.
The system automatically adapts the low-beam
headlamp range depending on the distance to
the other vehicle. Once the system no longer
detects any other vehicles, it reactivates the
high-beam headlamps.
The system's optical sensor is located behind
the windshield near the overhead control panel.
Important safety notes G
WARNING
Adaptive Highbeam Assist does not recognize road users:
R who have no lights, e.g. pedestrians
R who have poor lighting, e.g. cyclists
R whose lighting is blocked, e.g. by a barrier
On very rare occasions, Adaptive Highbeam
Assist may fail to recognize other road users
that have lights, or may recognize them too
late. In this, or in similar situations, the auto-
matic high-beam headlamps will not be deac-
tivated or will be activated regardless. There is a risk of an accident.
Always carefully observe the traffic conditionsand switch off the high-beam headlamps in
good time.
Adaptive Highbeam Assist cannot take into
account road, weather or traffic conditions.
Adaptive Highbeam Assist is only an aid. You are responsible for adjusting the vehicle's lighting
to the prevailing light, visibility and traffic con-
ditions.
In particular, the detection of obstacles can be
impaired if:
R poor visibility, e.g. due to fog, heavy rain or
snow
R dirt on the sensors or the sensors are
obscured Exterior lighting
113Lights and windshield wipers Z
Page 117 of 398
The interior lighting automatically switches on if
you:
R Unlock the vehicle
R Open a door
R Remove the SmartKey from the ignition lock
The interior lighting is switched on for a set time when the SmartKey is removed from the ignition
lock. This delayed switch-off can be adjusted via
the multimedia system (see Digital Operator's
Manual). Crash-responsive emergency lighting
The interior lighting is activated automatically if
the vehicle is involved in an accident.
X To switch off the crash-responsive emer-
gency lighting:
press the hazard warning
lamp button.
or X Lock and then unlock the vehicle using the
SmartKey. Replacing bulbs (vehicles with LED
headlamps)
The front and rear light clusters of your vehicle
are equipped with light-emitting diodes. Do not
replace the vehicle's bulbs yourself. Contact a
qualified specialist workshop which has the nec-
essary specialist knowledge and tools to carry
out the work required.
Lamps are an important aspect of vehicle safety. You must therefore make sure that these func-
tion correctly at all times. Have the headlamp
setting checked regularly. Replacing bulbs (vehicles with halo-
gen headlamps)
Important safety notes
G
WARNING
Bulbs, lamps and connectors can get very hot when operating. If you change a bulb, you
could burn yourself on these components.
There is a risk of injury. Allow these components to cool down before
changing a bulb.
Do not use a bulb if it has been dropped or if its
glass tube has been scratched.
The bulb may explode if:
R you touch it
R it is hot
R you drop it
R you scratch it
Use bulbs only in closed lamps that have been
designed for this purpose. Only install spare
bulbs of the same type and the specified volt-
age.
Marks on the glass tube reduce the service life
of the bulbs. Do not touch the glass tube with
your bare hands. If necessary, clean the glass
tube when cold with alcohol or spirit and rub it
off with a lint-free cloth.
Protect bulbs from moisture during operation.
Do not allow bulbs to come into contact with
liquids.
Replace only the bulbs listed (Y page 115).
Have the bulbs that you cannot replace yourself
replaced at a qualified specialist workshop.
If you require assistance replacing bulbs, con-
sult a qualified specialist workshop.
If the new bulb still does not light up, consult a
qualified specialist workshop.
Headlamps and lights are an important aspect of
vehicle safety. You must therefore make sure
that these function correctly at all times. Have
the headlamp setting checked regularly. Overview of bulb replacement - bulb
types
You can replace the following bulbs. The bulb
type can be found in the legend. Replacing bulbs (vehicles with halogen headlamps)
115Lights and windshield wipers Z
Page 120 of 398
If the wiper blades are worn, the windshield will
no longer be wiped properly. This could preventyou from observing the traffic conditions. Switching the rear window wipers
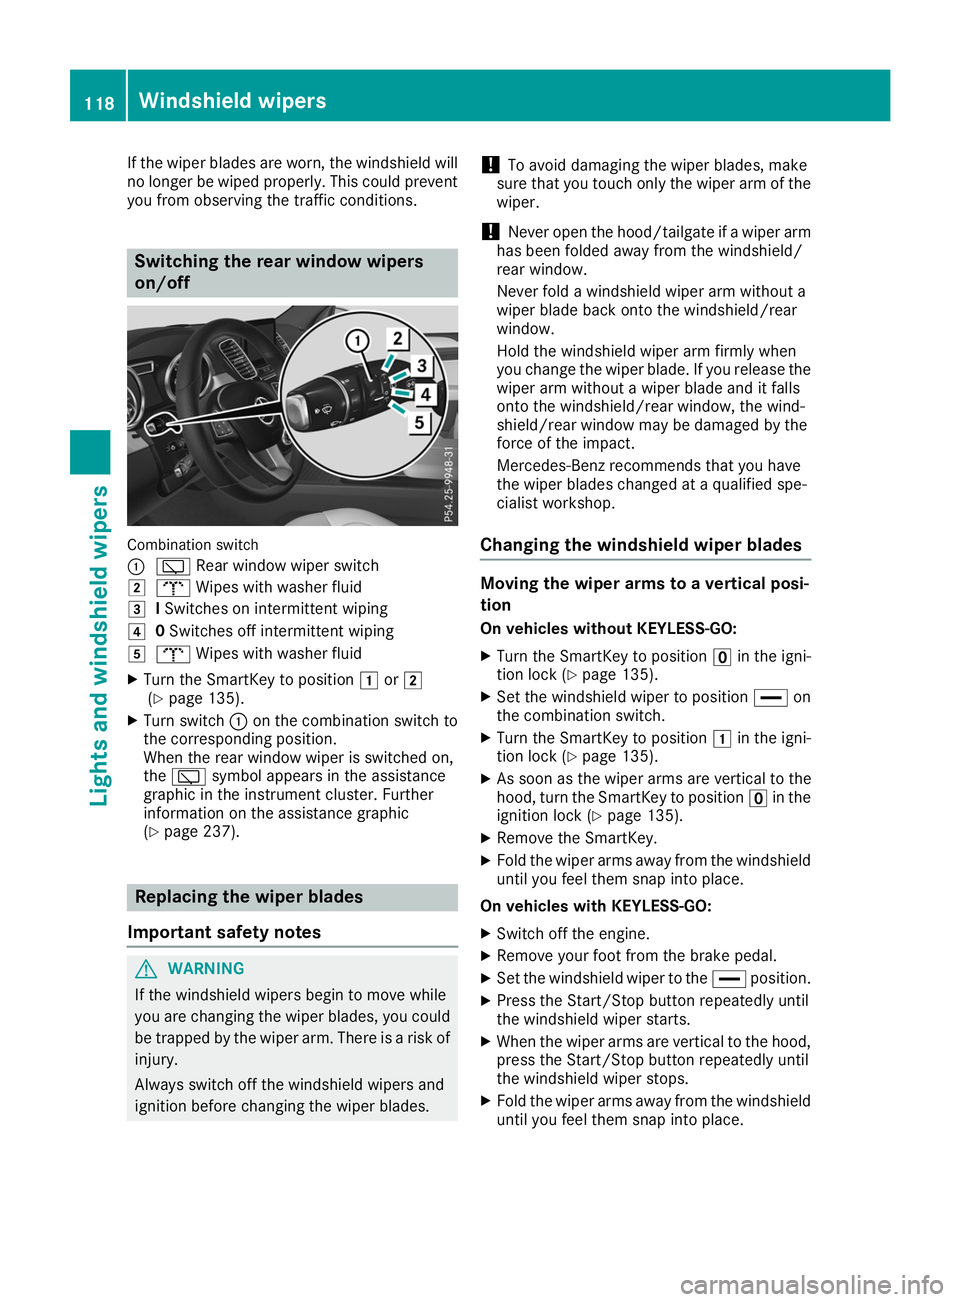
on/off
Combination switch
0043
00C5 Rear window wiper switch
0048 008E Wipes with washer fluid
0049 ISwitches on intermittent wiping
004A 0Switches off intermittent wiping
004B 008E Wipes with washer fluid
X Turn the SmartKey to position 0047or0048
(Y page 135).
X Turn switch 0043on the combination switch to
the corresponding position.
When the rear window wiper is switched on,
the 00C5 symbol appears in the assistance
graphic in the instrument cluster. Further
information on the assistance graphic
(Y page 237). Replacing the wiper blades
Important safety notes G
WARNING
If the windshield wipers begin to move while
you are changing the wiper blades, you could be trapped by the wiper arm. There is a risk of
injury.
Always switch off the windshield wipers and
ignition before changing the wiper blades. !
To avoid damaging the wiper blades, make
sure that you touch only the wiper arm of the
wiper.
! Never open the hood/tailgate if a wiper arm
has been folded away from the windshield/
rear window.
Never fold a windshield wiper arm without a
wiper blade back onto the windshield/rear
window.
Hold the windshield wiper arm firmly when
you change the wiper blade. If you release the
wiper arm without a wiper blade and it falls
onto the windshield/rear window, the wind-
shield/rear window may be damaged by the
force of the impact.
Mercedes-Benz recommends that you have
the wiper blades changed at a qualified spe-
cialist workshop.
Changing the windshield wiper blades Moving the wiper arms to a vertical posi-
tion
On vehicles without KEYLESS-GO:
X Turn the SmartKey to position 0092in the igni-
tion lock (Y page 135).
X Set the windshield wiper to position 00AAon
the combination switch.
X Turn the SmartKey to position 0047in the igni-
tion lock (Y page 135).
X As soon as the wiper arms are vertical to the
hood, turn the SmartKey to position 0092in the
ignition lock (Y page 135).
X Remove the SmartKey.
X Fold the wiper arms away from the windshield
until you feel them snap into place.
On vehicles with KEYLESS-GO:
X Switch off the engine.
X Remove your foot from the brake pedal.
X Set the windshield wiper to the 00AAposition.
X Press the Start/Stop button repeatedly until
the windshield wiper starts.
X When the wiper arms are vertical to the hood,
press the Start/Stop button repeatedly until
the windshield wiper stops.
X Fold the wiper arms away from the windshield
until you feel them snap into place. 118
Windshield wipersLights and windshield wipers
Page 138 of 398
Do not keep the SmartKey:
R with electronic devices, e.g. a mobile phone
or another SmartKey
R with metallic objects, e.g. coins or metal foil
R inside metallic objects, e.g. a metal case
This can impair the functionality of the KEY-
LESS-GO key.
Do not keep the KEYLESS-GO key in the tem-
perature-controlled cup holder (Y page 305).
Otherwise, the KEYLESS-GO key will not be rec-
ognized.
If you lock the vehicle with the SmartKey remote
control or with KEYLESS-GO, after a short time:
R you will not be able to switch on the ignition
with the Start/Stop button
R you will not be able to start the engine with the
Start/Stop button until the vehicle is
unlocked again
If you lock the vehicle centrally using the button
on the front door (Y page 83), you can continue
to start the engine with the Start/Stop button.
The engine can be switched off while the vehicle
is in motion by pressing and holding the Start/
Stop button for three seconds. This function
operates independently of the ECO start/stop
automatic engine switch-off function.
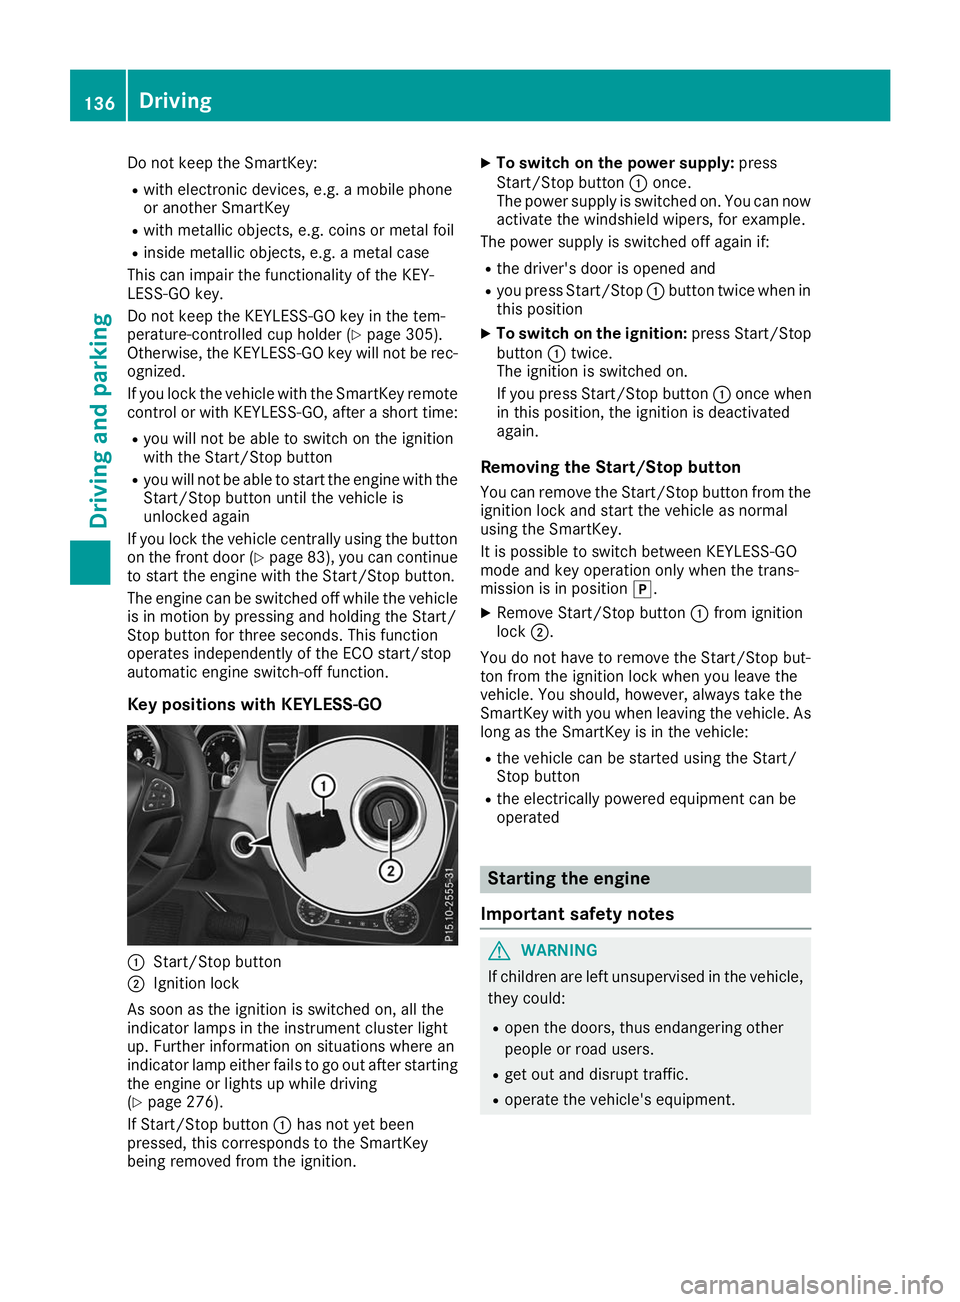
Key positions with KEYLESS-GO 0043
Start/Stop button
0044 Ignition lock
As soon as the ignition is switched on, all the
indicator lamps in the instrument cluster light
up. Further information on situations where an
indicator lamp either fails to go out after starting the engine or lights up while driving
(Y page 276).
If Start/Stop button 0043has not yet been
pressed, this corresponds to the SmartKey
being removed from the ignition. X
To switch on the power supply: press
Start/Stop button 0043once.
The power supply is switched on. You can now activate the windshield wipers, for example.
The power supply is switched off again if:
R the driver's door is opened and
R you press Start/Stop 0043button twice when in
this position
X To switch on the ignition: press Start/Stop
button 0043twice.
The ignition is switched on.
If you press Start/Stop button 0043once when
in this position, the ignition is deactivated
again.
Removing the Start/Stop button
You can remove the Start/Stop button from the
ignition lock and start the vehicle as normal
using the SmartKey.
It is possible to switch between KEYLESS-GO
mode and key operation only when the trans-
mission is in position 005D.
X Remove Start/Stop button 0043from ignition
lock 0044.
You do not have to remove the Start/Stop but-
ton from the ignition lock when you leave the
vehicle. You should, however, always take the
SmartKey with you when leaving the vehicle. As
long as the SmartKey is in the vehicle:
R the vehicle can be started using the Start/
Stop button
R the electrically powered equipment can be
operated Starting the engine
Important safety notes G
WARNING
If children are left unsupervised in the vehicle, they could:
R open the doors, thus endangering other
people or road users.
R get out and disrupt traffic.
R operate the vehicle's equipment. 136
DrivingDriving an
d parking
Page 139 of 398
Additionally, children could set the vehicle in
motion if, for example, they:
R release the parking brake.
R shifting the automatic transmission out of
park position P
R Start the engine.
There is a risk of an accident and injury.
When leaving the vehicle, always take the
SmartKey with you and lock the vehicle. Never
leave children or animals unattended in the
vehicle. Always keep the SmartKey out of
reach of children. G
WARNING
Combustion engines emit poisonous exhaust
gases such as carbon monoxide. Inhaling
these exhaust gases leads to poisoning. There is a risk of fatal injury. Therefore never leave
the engine running in enclosed spaces with-
out sufficient ventilation. G
WARNING
Flammable materials introduced through
environmental influence or by animals can
ignite if in contact with the exhaust system or parts of the engine that heat up. There is a risk
of fire.
Carry out regular checks to make sure that
there are no flammable foreign materials in
the engine compartment or in the exhaust
system.
General notes Vehicles with a gasoline engine:
the catalytic
converter is preheated for up to 30 seconds
after a cold start. The sound of the engine may
change during this time.
Automatic transmission X
Shift the transmission to position 005D
(Y page 144).
The transmission position indicator on the
multifunction display shows 005D
(Y page 145). i
You can start the engine in transmission
position 005Dand 005C.
Starting procedure with the SmartKey X
To start a diesel engine: turn the SmartKey
to position 0048in the ignition lock
(Y page 135).
The 0028 indicator lamp on the instrument
cluster lights up.
X Turn the SmartKey to position 0049in the igni-
tion lock (Y page 135) and release it as soon
as the engine is running.
i Vehicles with a diesel engine:
you can
start the engine without preglow if the engine
is warm.
Using KEYLESS-GO to start the engine The Start/Stop button can be used to start the
vehicle without inserting the SmartKey into the
ignition lock. The Start/Stop button must be
inserted in the ignition lock and the SmartKey
must be in the vehicle. This mode for starting the engine operates independently of the ECO
start/stop automatic engine start function.
X Depress the brake pedal and keep it
depressed.
X Press the Start/Stop button once
(Y page 135).
Vehicles with a gasoline engine: the engine
starts.
Vehicles with a diesel engine: preglow is
activated and the engine starts.
Starting procedure via smartphone Observe the important safety notes on starting
the engine (Y
page 136).
You can also start your engine via your smart-
phone from outside the vehicle. In this case, the previously selected climate control setting is
activated. In this way you can cool or heat the
interior of the vehicle before starting the jour-
ney.
Only start the engine via your smartphone if it is
safe to start and run the engine where your vehi-
cle is parked.
Observe the legal stipulations in the area where your vehicle is parked. Engine start via smart-
phone may be limited to certain countries or
regions. Driving
137Driving an d parking Z