2019 MERCEDES-BENZ GLE tire type
[x] Cancel search: tire typePage 23 of 398
Stowage net
....................................... 297
Summer tires
In winter ........................................3 53
Sun visor ............................................ 305
Suspension setting
AIRMATIC ...................................... 183
AMG adaptive sport suspension
system .......................................... .187
Suspension tuning
SETUP (on-board computer,
Mercedes-AMG vehicles) .............. .242
SUV
(Sport Utility Vehicle) ....................... 30
Switching air-recirculation mode
on/off ................................................. 131
Switching on media mode
Via the device lis t.......................... 293 T
Tachometer ........................................ 229
Tailgate
Display message ............................ 271
Emergency unlocking ....................... 88
Important safety notes .................... 84
Limiting the opening angle ............... 88
Opening dimensions ...................... 390
Opening/closing (automatically
from inside) ...................................... 87
Opening/closing (automatically
from outside) ................................... 86
Opening/closing (from outside) ....... 85
Power closing .................................. 84
Tank
see Fuel tank
Tank content
Fuel gauge ....................................... 37
Technical data
Capacities ...................................... 383
Information .................................... 381
Tires/wheels ................................. 376
Trailer loads ................................... 394
Vehicle data ................................... 390
Telephone
Accepting a call (multifunction
steering wheel) .............................. 236
Authorizing a mobile phone (con-
necting) ......................................... 291 Authorizing a mobile phone via the
device manager (connecting) ......... 292
Connecting a mobile phone
(device manager) ........................... 292
Connecting a mobile phone (gen-
eral information) ............................ 291
Display message ............................ 272
Menu (on-board computer) ............ 236
Number from the phone book ........ 236
Redialing ........................................ 236
Rejecting/ending a call ................. 236
see also Digital Operator's Man-
ual .................................................. 287
Temperature
Coolant (display in the instrumentcluster) .......................................... 230
Coolant (on-board computer,
Mercedes-AMG vehicles) ............... 241
Engine oil (on-board computer,
Mercedes-AMG vehicles) ............... 241
Outside temperature ...................... 229
Setting (climate control )................ 128
Transmission oil (on-board com-
puter, Mercedes-AMG vehicles) ..... 241
Through-loading feature ................... 298
Timing (RACETIMER) ......................... 242
Tire pressure
Calling up (on-board computer) ..... 358
Checking manually ........................ 357
Display message ............................ 268
Maximum ....................................... 357
Not reached (TIREFIT) .................... 339
Notes ............................................. 356
Reached (TIREFIT) .......................... 339
Recommended ............................... 354
Tire pressure loss warning system
General notes ................................ 357
Important safety notes .................. 358
Restarting ...................................... 358
Tire pressure monitor
Checking the tire pressure elec-
tronically ........................................ 360
Function/note s............................. 358
General notes ................................ 358
Important safety notes .................. 359
Radio type approval for the tire
pressure monitor ........................... 361
Restarting ...................................... 361 Index
21
Page 26 of 398
Data acquisition ............................... 32
Display message ............................ 270
Equipment ....................................... 28
Individual settings .......................... 239
Limited Warranty ............................. 32
Loading .......................................... 361
Locking (in an emergency) ............... 84
Locking (SmartKey) .......................... 77
Lowering ........................................ 375
Maintenance .................................... 29
Operating safety .............................. 30
Parking .......................................... 156
Parking for a long period ................ 159
Pulling away ................................... 138
Raising ........................................... 373
Reporting problems ........................ .31
Securing from rolling away ............ 372
Towing away .................................. 345
Transporting .................................. 348
Unlocking (in an emergency) ........... 84
Unlocking (SmartKey) ...................... 77
Vehicle data ................................... 390
Vehicle battery
see Battery (vehicle)
Vehicle data ....................................... 390
Vehicle data (off-road driving)
Approach/departure angle ............ 393
Fording depth ................................ 392
Maximum gradient climbing abil-
ity .................................................. 393
Vehicle dimensions ........................... 390
Vehicle emergency locking ................ 84
Vehicle identification number
see VIN
Vehicle identification plate .............. 382
Vehicle level
AIRMATIC ...................................... 185
Vehicle level (display message) ....... 261
Vehicle tool kit .................................. 335
Video
Operating the DVD ......................... 235
see also Digital Operator's Man-
ual .................................................. 287
VIN ...................................................... 382
Seat ............................................... 383
Type plate ...................................... 382 W
Warning and indicator lamps ABS ................................................ 277
Brake s........................................... 276
Coolant .......................................... 283
Distance warning ........................... 285
Engine diagnostics ......................... 283
ESP ®
.............................................. 279
ESP ®
OFF ....................................... 280
Fuel tank ........................................ 283
Overview .......................................... 37
Parking brake ................................ 282
PASSENGER AIR BAG ...................... 45
Reserve fuel ................................... 283
Restraint system ............................ 282
Seat belt ........................................ 274
Tire pressure monitor .................... 286
Warranty .............................................. 28
Washer fluid
Display message ............................ 272
Weather display (COMAND)
see also Digital Operator's Man-
ual .................................................. 287
Wheel and tire combinations
Tires ............................................... 376
Wheel bolt tightening torque ........... 375
Wheel chock ...................................... 372
Wheels
Changing a whee l.......................... 371
Checking ........................................ 351
Cleaning ......................................... 329
Emergency spare wheel ................. 376
Important safety notes .................. 351
Information on driving .................... 351
Interchanging/changing ................ 371
Mounting a new wheel ................... 374
Mounting a wheel .......................... 372
Overview ........................................ 351
Removing a whee l.......................... 374
Snow chains .................................. 353
Storing ........................................... 372
Tightening torque ........................... 375
Wheel size/tire size ....................... 376
Window curtain air bag
Display message ............................ 253
Operation ......................................... 51 24
Index
Page 32 of 398
Sports Utility Vehicle
G
WARNING
Due to the high center of gravity, the vehicle
may start to skid and roll over in the event of
an abrupt steering maneuver and/or when
the vehicle's speed is not adapted to the road conditions. There is a risk of an accident.
Always adapt your speed and driving style to
the vehicle's driving characteristics and to theprevailing road and weather conditions.
Utility vehicles have a significantly higher roll-
over rate than other types of vehicles.
Failure to operate this vehicle safely may result
in an accident, rollover of the vehicle, and severe or fatal injury.
In a rollover crash, an unbelted person is signif-
icantly more likely to die than a person wearing
a seat belt.
You and all vehicle occupants should always
wear your seat belts. Operating safety
Important safety notes
G
WARNING
If you do not have the prescribed service/
maintenance work or any required repairs
carried out, this can result in malfunctions or system failures. There is a risk of an accident.
Always have the prescribed service/mainte-
nance work as well as any required repairs
carried out at a qualified specialist workshop. G
WARNING
Flammable material such as leaves, grass or
twigs may ignite if they come into contact with hot parts of the exhaust system. There is a risk of fire.
When driving on an unpaved road or off-road,
check the vehicle underside regularly. In par-
ticular, remove trapped plant parts or other
flammable material. Contact a qualified spe-
cialist workshop immediately if damage is
detected. G
WARNING
Modifications to electronic components, their software as well as wiring can impair their
function and/or the function of other net-
worked components. In particular, systems
relevant to safety could also be affected. As a
result, these may no longer function as inten-
ded and/or jeopardize the operating safety of
the vehicle. There is an increased risk of an
accident and injury.
Never tamper with the wiring as well as elec-
tronic components or their software. You
should have all work to electrical and elec-
tronic equipment carried out at a qualified
specialist workshop.
! There is a risk of damage to the vehicle if:
R the vehicle becomes stuck, e.g. on a high
curb or an unpaved road
R you drive too fast over an obstacle, e.g. a
curb, a speed bump or a pothole in the road
R a heavy object strikes the underbody or
parts of the chassis
In situations like this, the body, the under-
body, chassis parts, wheels or tires could be
damaged without the damage being visible.
Components damaged in this way can unex-
pectedly fail or, in the case of an accident, no
longer withstand the loads they are designed
to.
If the underbody paneling is damaged, com-
bustible materials such as leaves, grass or
twigs can gather between the underbody and
the underbody paneling. If these materials
come in contact with hot parts of the exhaust system, they can catch fire.
In such situations, have the vehicle checked
and repaired immediately at a qualified spe-
cialist workshop. If on continuing your jour-
ney you notice that driving safety is impaired,
pull over and stop the vehicle immediately,
paying attention to road and traffic condi-
tions. In such cases, consult a qualified spe-
cialist workshop. Declarations of conformity
USA: "The wireless devices of this vehicle com-
ply with Part 15 of the FCC Rules. Operation is
subject to the two following two conditions: 1) 30
Operating safetyIntroduction
Page 36 of 398
You can usually activate and deactivate the serv-
ices and functions (sometimes subject to a fee).
In many cases, this also applies to the vehicle's entire data connection. However, this does not
apply in particular to legally prescribed func-
tions and services such as the "eCall" emer-
gency call system.
Services from third parties If it is possible to use online services from other
providers, these services are the responsibility
of the provider in question and subject to that
provider's data protection conditions and terms of use. The manufacturer has no influence over
the content exchanged here.
For this reason, please ask the service provider
for information about the type, extent and pur-
pose of the collection and use of personal data
when services are provided by third parties. COMAND/mbrace
If the vehicle is equipped with COMAND or
mbrace, additional data about the vehicle's
operation, the use of the vehicle in certain sit-
uations, and the location of the vehicle may be
compiled through COMAND or the mbrace sys-
tem.
For additional information please refer to the
COMAND User Manual or the Digital Operator's
Manual and/or the mbrace Terms and Condi-
tions. Event data recorders
This vehicle is equipped with an event data
recorder (EDR). This vehicle is equipped with an event data recorder (EDR). The main purpose of
an EDR is to record, in certain crash or near
crash-like situations, such as an air bag deploy- ment or hitting a road obstacle, data that will
assist in understanding how a vehicle's systems
performed. The EDR is designed to record data
relating to vehicle dynamics and safety systems for a short period of time, typically 30 seconds
or less. The EDR in this vehicle is designed to record
such data as:
R How various systems in your vehicle were
operating
R Whether or not the driver and passenger
safety belts were buckled/fastened
R How far (if at all) the driver was depressing the
accelerator and/or brake pedal and
R How fast the vehicle was traveling
These data can help provide a better under-
standing of the circumstances in which crashes
and injuries occur. NOTE:EDR data are recor-
ded by your vehicle only if a non-trivial crash
situation occurs; no data are recorded by the
EDR under normal driving conditions and no
personal data (e.g. name, gender, age and crash
location) are recorded. However, other parties,
such as law enforcement could combine the
EDR data with the type of personally identifying
data routinely acquired during a crash investi-
gation.
Access to the vehicle and/or the EDR is needed to read data that is recorded by an EDR, and
special equipment is required. In addition to the
vehicle manufacturer, other parties that have
the special equipment, such as law enforce-
ment, can read the information by accessing the vehicle or the EDR.
EDR data may be used in civil and criminal mat-
ters as a tool in accident reconstruction, acci-
dent claims and vehicle safety. Since the Crash Data Retrieval CDR tool that is used to extract
data from the EDR is commercially available,
Mercedes-Benz USA, LLC ("MBUSA") expressly
disclaims any and all liability arising from the
extraction of this information by unauthorized
Mercedes-Benz personnel.
MBUSA will not share EDR data with others
without the consent of the vehicle owners or, if
the vehicle is leased, without the consent of the
lessee. Exceptions to this representation
include responses to subpoenas by law enforce-
ment; by federal, state or local government; in
connection with or arising out of litigation involv- ing MBUSA or its subsidiaries and affiliates; or,
as required by law.
Warning: The EDR is a component of the
Restraint System Module. Tampering with, alter-
ing, modifying or removing the EDR component
may result in a malfunction of the Restraint Sys- tem Module and other systems.
State laws or regulations regarding EDRs that
conflict with federal regulation are pre-empted. 34
Data stored in the vehicleIntroduction
Page 154 of 398
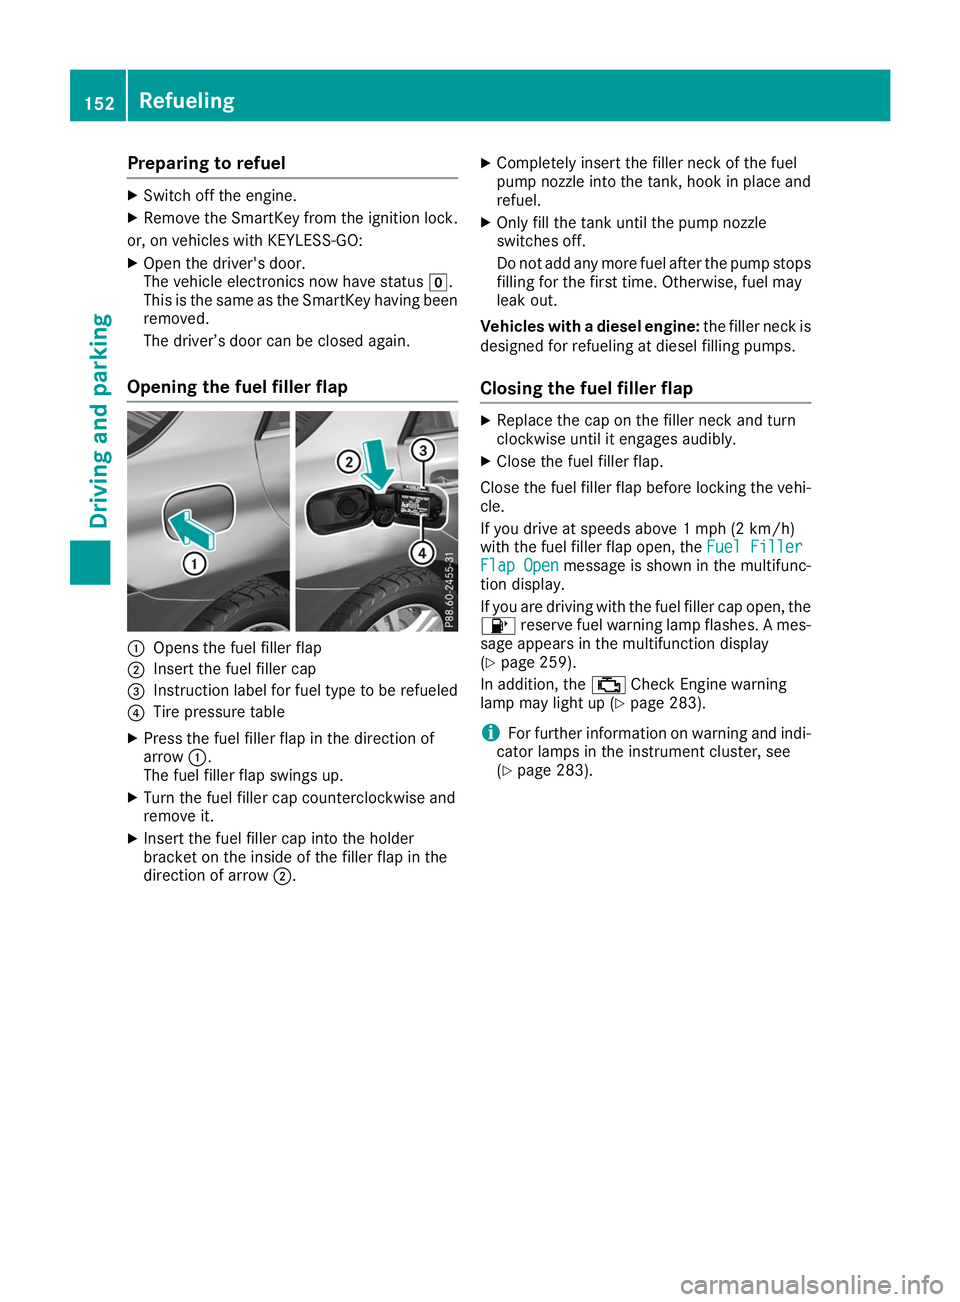
Preparing to refuel
X
Switch off the engine.
X Remove the SmartKey from the ignition lock.
or, on vehicles with KEYLESS‑GO:
X Open the driver's door.
The vehicle electronics now have status 005A.
This is the same as the SmartKey having been removed.
The driver’s door can be closed again.
Opening the fuel filler flap 0043
Opens the fuel filler flap
0044 Insert the fuel filler cap
0087 Instruction label for fuel type to be refueled
0085 Tire pressure table
X Press the fuel filler flap in the direction of
arrow 0043.
The fuel filler flap swings up.
X Turn the fuel filler cap counterclockwise and
remove it.
X Insert the fuel filler cap into the holder
bracket on the inside of the filler flap in the
direction of arrow 0044. X
Completely insert the filler neck of the fuel
pump nozzle into the tank, hook in place and
refuel.
X Only fill the tank until the pump nozzle
switches off.
Do not add any more fuel after the pump stops
filling for the first time. Otherwise, fuel may
leak out.
Vehicles with a diesel engine: the filler neck is
designed for refueling at diesel filling pumps.
Closing the fuel filler flap X
Replace the cap on the filler neck and turn
clockwise until it engages audibly.
X Close the fuel filler flap.
Close the fuel filler flap before locking the vehi-
cle.
If you drive at speeds above 1 mph (2 km/h)
with the fuel filler flap open, the Fuel Filler Fuel Filler
Flap Open
Flap Open message is shown in the multifunc-
tion display.
If you are driving with the fuel filler cap open, the
00B6 reserve fuel warning lamp flashes. A mes-
sage appears in the multifunction display
(Y page 259).
In addition, the 00B9Check Engine warning
lamp may light up (Y page 283).
i For further information on warning and indi-
cator lamps in the instrument cluster, see
(Y page 283). 152
RefuelingDriving and parking
Page 223 of 398
R
is affected more by strong crosswinds
R demands more sensitive steering
R has a larger turning circle
This could impair the handling characteristics.
When towing a trailer, always adjust your speed to the current road and weather conditions. Do
not exceed the maximum permissible speed for
your vehicle/trailer combination. Notes on towing a trailer
General notes !
If you have a trailer tow hitch retrofitted,
changes to the cooling system and drive train may be necessary, depending on the vehicle
type.
If you have a trailer tow hitch retrofitted,
observe the anchorage points on the chassis
frame.
R Do not exceed the legally prescribed maxi-
mum speed for vehicle/trailer combinations
in the relevant country.
This lowers the risk of an accident.
R Only install an approved trailer coupling on
your vehicle.
More information on availability and installa-
tion can be obtained at any qualified special-
ist workshop.
R The bumpers of your vehicle are not suitable
for installing detachable trailer couplings.
R Do not install hired trailer couplings or other
detachable trailer couplings on the bumpers
of your vehicle.
R If you no longer need the ball coupling,
remove it from the ball coupling recess. This
will reduce the risk of damage to the ball cou-
pling.
When towing a trailer, set the tire pressure on
the rear axle of the towing vehicle for the max-
imum load. You will find the values in the tire
pressure table in the fuel filler flap of the vehicle (Y page 369).
Please note that when towing a trailer, the fol-
lowing driving systems have limited availability
or are not available at all:
R Parking Assist PARKTRONIC (Y page 188)
R Blind Spot Assist (Y page 206)
R Active Lane Keeping Assist (Y page 211)On vehicles without level control, the height of
the ball coupling will alter according to the load
placed on the vehicle. If necessary, use a trailer
with a height-adjustable drawbar.
You will find installing dimensions and loads
under "Technical data" (Y page 394).
Driving tips Also observe the notes on pulling away with a
trailer (Y
page 138).
The maximum permissible speed for vehicle/
trailer combinations depends on the type of
trailer. Before beginning the journey, check the
trailer's documents to see what the maximum
permissible speed is for your trailer. Observe the
legally permissible maximum speed in the rele-
vant country.
For certain Mercedes-Benz vehicles, the maxi-
mum permissible rear axle load is increased
when towing a trailer. See "Technical data" to
find out whether this applies to your vehicle
(Y page 394). If you utilize any of the added
maximum rear axle load when towing a trailer,
the vehicle/trailer combination may not exceed
a maximum speed of 60 mph (100 km/h) for
reasons concerning the operating permit. This
also applies in countries in which the maximum
permissible speed for car/trailer combinations
is greater than 60 mph (100 km/h).
When towing a trailer, your vehicle's handling
characteristics will be different in comparison
with when driving without a trailer.
Use the left-hand steering wheel paddle shifter
to shift into a lower gear in good time on long
and steep downhill gradients.
This also applies if you have activated cruise
control or Active Distance Assist DISTRONIC.
This will use the braking effect of the engine, so that less braking will be required to maintain the
speed. This relieves the load on the brake sys-
tem and prevents the brakes from overheating
and wearing too quickly. If you need additional
braking, depress the brake pedal repeatedly
rather than continuously.
Driving tips If the trailer swings from side to side:
X Do not accelerate.
X Do not counter-steer.
X Brake if necessary. Towing a trailer
221Driving and parking Z
Page 227 of 398
Decoupling a trailer
G
WARNING
If you uncouple a trailer with the overrun
brake engaged, you could trap your hand
between the vehicle and the trailer drawbar.
There is a risk of injury.
Do not uncouple a trailer if the overrun brake is engaged. G
WARNING
Vehicles with level control:
The vehicle is lowered as soon as you discon-
nect the trailer cable. This could result in your limbs or those of other people that are
between the vehicle body and tires or under-
neath the vehicle being trapped. There is a
risk of injury.
Make sure that nobody is in the immediate
vicinity of the wheel housings or under the
vehicle when you disconnect the trailer cable.
! Do not disconnect a trailer with an engaged
overrun brake. Otherwise, your vehicle could
be damaged by the rebounding of the overrun
brake.
X Shift the transmission to position 005D.
X Apply the vehicle's electric parking brake.
X Start the engine.
X Close the doors and tailgate.
X Apply the trailer's parking brake.
X Detach the trailer cable and decouple the
trailer.
X Switch off the engine. Permissible trailer loads and drawbar
loads
Weight specifications Maximum allowable gross mass
The gross vehicle weight of the trailer is calcu-
lated by adding the weight of the trailer to the
weight of the load and equipment on the trailer.
You will find installing dimensions and loads
under "Technical data" (Y page 394).Permissible noseweight
You will find installing dimensions and loads
under "Technical data" (Y page 394).
Loading a trailer R
When loading the trailer, make sure that nei-
ther the permissible gross weight of the trailer
nor the gross vehicle weight are exceeded.
The permissible gross vehicle weight is indi-
cated on the identification plate located on
the B-pillar on the driver's side of the vehicle.
You can find the maximum permissible values
on the type plates of your vehicle and the
trailer. When calculating how much weight
the vehicle and trailer may carry, pay atten-
tion to the respective lowest values.
R The trailer drawbar load on the ball coupling
must be added to the rear axle load to avoid
exceeding the permissible gross axle weight.
The permissible gross vehicle weight is indi-
cated on the identification plate located on
the B-pillar on the driver's side of the vehicle.
i Mercedes-Benz recommends a trailer load
where the trailer drawbar noseweight
accounts for 8 % to 15 % of the trailer's per-
missible gross weight.
i The weight of additional accessories, pas-
sengers, and cargo reduces the permissible
trailer load and drawbar load for your vehicle.
Checking the vehicle and trailer weight R
To check that the weights of the towing vehi-
cle and the trailer comply with the maximum
permissible values, have the vehicle/trailer
combination (including the driver, passen-
gers, and cargo with a fully laden trailer)
weighed on a calibrated weighbridge.
R Check the gross axle weight rating of the front
and rear axles, the gross weight of the trailer
and the trailer drawbar noseweight. Removing the ball coupling
X Remove the spring cotter.
X Remove the bolt from the ball coupling
recess.
X Remove the ball coupling from the ball cou-
pling recess. Towing a trailer
225Driving and parking Z
Page 288 of 398
Tires
Warning/
indicator
lamp
0051 0051
Signal type
Possible causes/consequences and 0050
0050Solutions 0077
0051
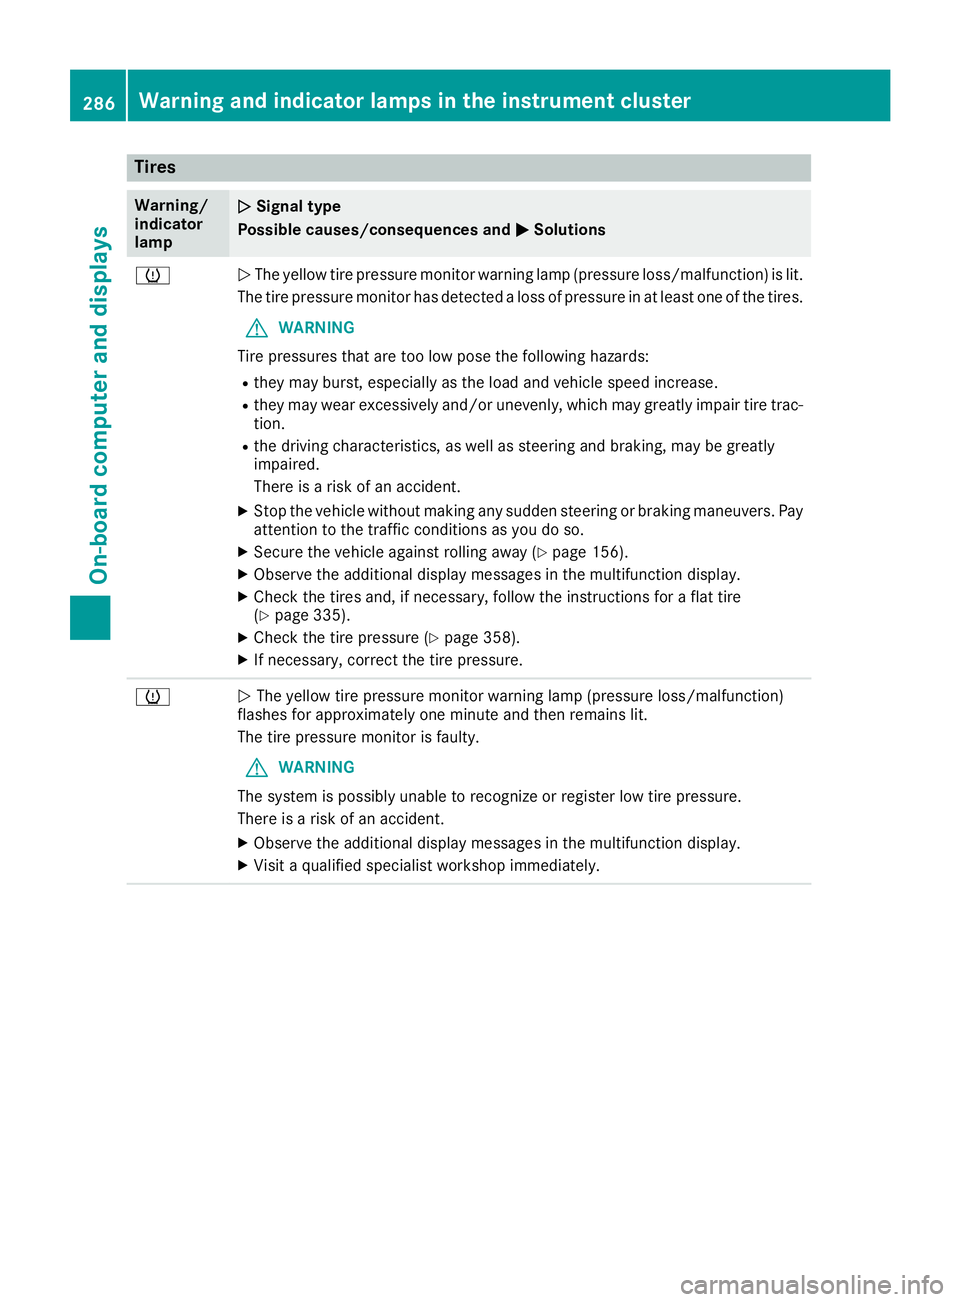
The yellow tire pressure monitor warning lamp (pressure loss/malfunction) is lit.
The tire pressure monitor has detected a loss of pressure in at least one of the tires.
G WARNING
Tire pressures that are too low pose the following hazards: R they may burst, especially as the load and vehicle speed increase.
R they may wear excessively and/or unevenly, which may greatly impair tire trac-
tion.
R the driving characteristics, as well as steering and braking, may be greatly
impaired.
There is a risk of an accident.
X Stop the vehicle without making any sudden steering or braking maneuvers. Pay
attention to the traffic conditions as you do so.
X Secure the vehicle against rolling away (Y page 156).
X Observe the additional display messages in the multifunction display.
X Check the tires and, if necessary, follow the instructions for a flat tire
(Y page 335).
X Check the tire pressure (Y page 358).
X If necessary, correct the tire pressure. 0077
0051
The yellow tire pressure monitor warning lamp (pressure loss/malfunction)
flashes for approximately one minute and then remains lit.
The tire pressure monitor is faulty.
G WARNING
The system is possibly unable to recognize or register low tire pressure.
There is a risk of an accident.
X Observe the additional display messages in the multifunction display.
X Visit a qualified specialist workshop immediately. 286
Warning and indicator lamps in the instrument clusterOn-board computer and displays