2019 MERCEDES-BENZ GLE ECU
[x] Cancel search: ECUPage 64 of 398
All child restraint systems must meet the fol-
lowing standards:
R U.S. Federal Motor Vehicle Safety Standards
213 and 225
R Canadian Motor Vehicle Safety Standards
213 and 210.2
Confirmation that the child restraint system cor- responds to the standards can be found on an
instruction label on the child restraint system.
This confirmation can also be found in the instal-
lation instructions that are included with the
child restraint system.
Observe the warning labels in the vehicle inte-
rior and on the child restraint system. LATCH-type (ISOFIX) child seat secur-
ing system G
WARNING
For LATCH-type (ISOFIX) child restraint sys-
tems in which the child is secured using the
safety belt integrated in the child restraint
system, the maximum permissible weight of
the child and child restraint system together
is 73 lbs (33 kg).
If the child and the child restraint system
together weigh more than 73 lbs (33 kg), the
LATCH-type (ISOFIX) child restraint system
with integrated safety belt no longer offers
sufficient protection. The LATCH-type (ISO-
FIX) child seat securing system may be over-
loaded, and the child may not be restrained in
an accident, for example. This poses an
increased risk of injury or even fatal injury.
If the child and the child restraint system
together weigh more than 73 lb s(33 kg), use
only a LATCH-type (ISOFIX) child restraint sys-
tem in which the child is also secured with the vehicle seat belt. Also secure the child
restraint system with the Top Tether belt, if
available.
Regularly check that the permissible gross
weight of the child together with the child
restraint system is still maintained.
Always comply with the manufacturer's instal-
lation and operating instructions for the child
restraint system used. Before every trip, make sure that the LATCH-
type (ISOFIX) child restraint system is engaged
correctly in both LATCH-type (ISOFIX) securing
rings
! When installing the child restraint system,
make sure that the seat belt for the middle
seat does not get trapped. The seat belt could
otherwise be damaged. X
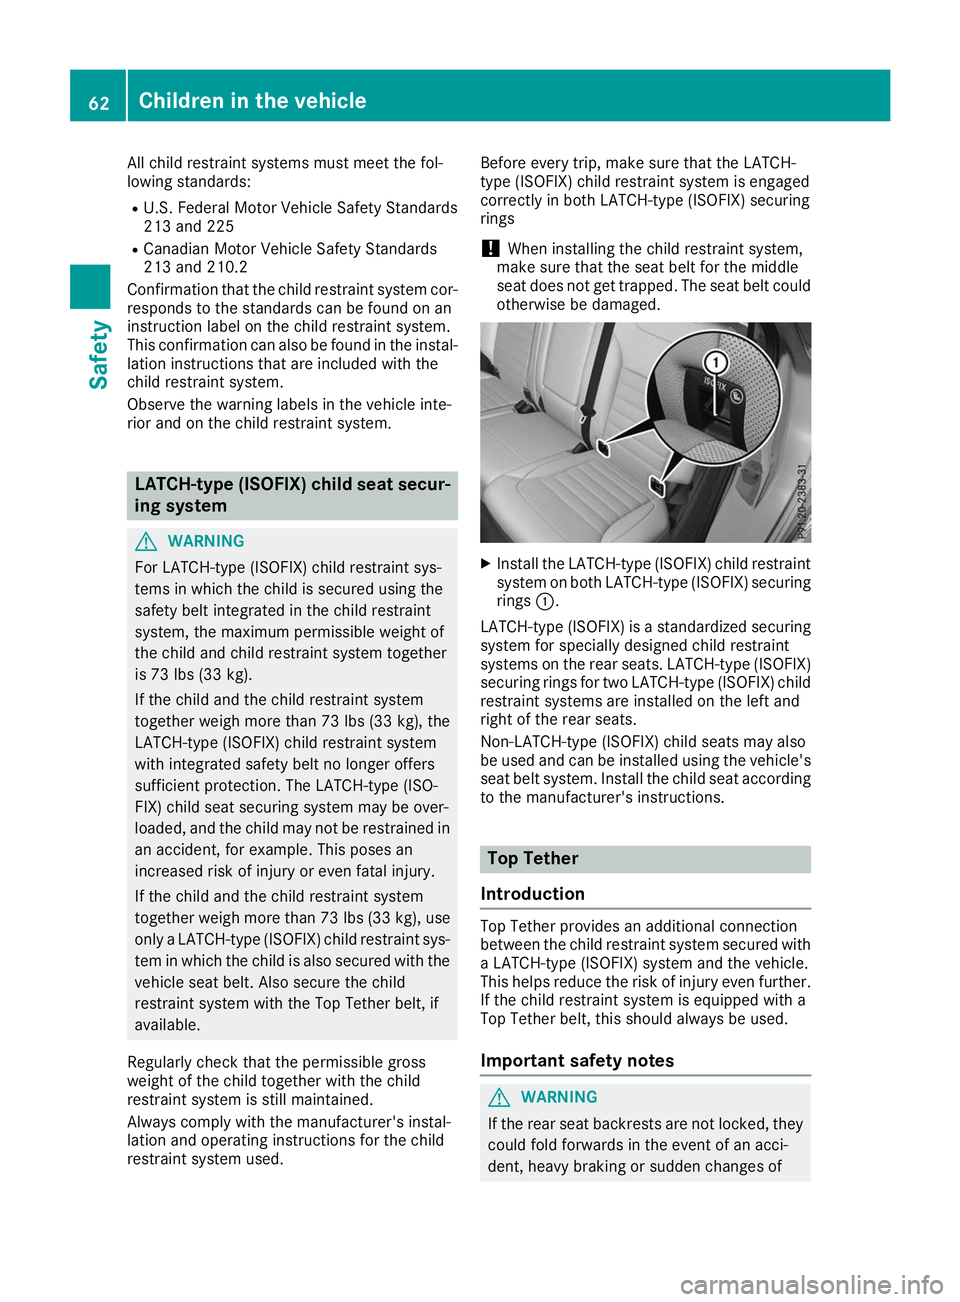
Install the LATCH-type (ISOFIX) child restraint
system on both LATCH-type (ISOFIX) securing
rings 0043.
LATCH-type (ISOFIX) is a standardized securing system for specially designed child restraint
systems on the rear seats. LATCH-type (ISOFIX)
securing rings for two LATCH-type (ISOFIX) child restraint systems are installed on the left and
right of the rear seats.
Non-LATCH-type (ISOFIX) child seats may also
be used and can be installed using the vehicle's seat belt system. Install the child seat according
to the manufacturer's instructions. Top Tether
Introduction Top Tether provides an additional connection
between the child restraint system secured with
a LATCH-type (ISOFIX) system and the vehicle.
This helps reduce the risk of injury even further.
If the child restraint system is equipped with a
Top Tether belt, this should always be used.
Important safety notes G
WARNING
If the rear seat backrests are not locked, they
could fold forwards in the event of an acci-
dent, heavy braking or sudden changes of 62
Children in the vehicleSafety
Page 65 of 398
direction. As a result, child restraint systems
cannot perform their intended protective
function. Rear seat backrests that are not
locked can also cause additional injuries, e.g. in the event of an accident. This poses an
increased risk of injury or even fatal injury.
Always lock rear seat backrests after instal-
ling a Top Tether belt. Adjust the rear seat
backrests so that they are in an upright posi-
tion.
Make sure that the backrest in the rear com-
partment engages fully. To do so, pull firmly on
the seat backrest.
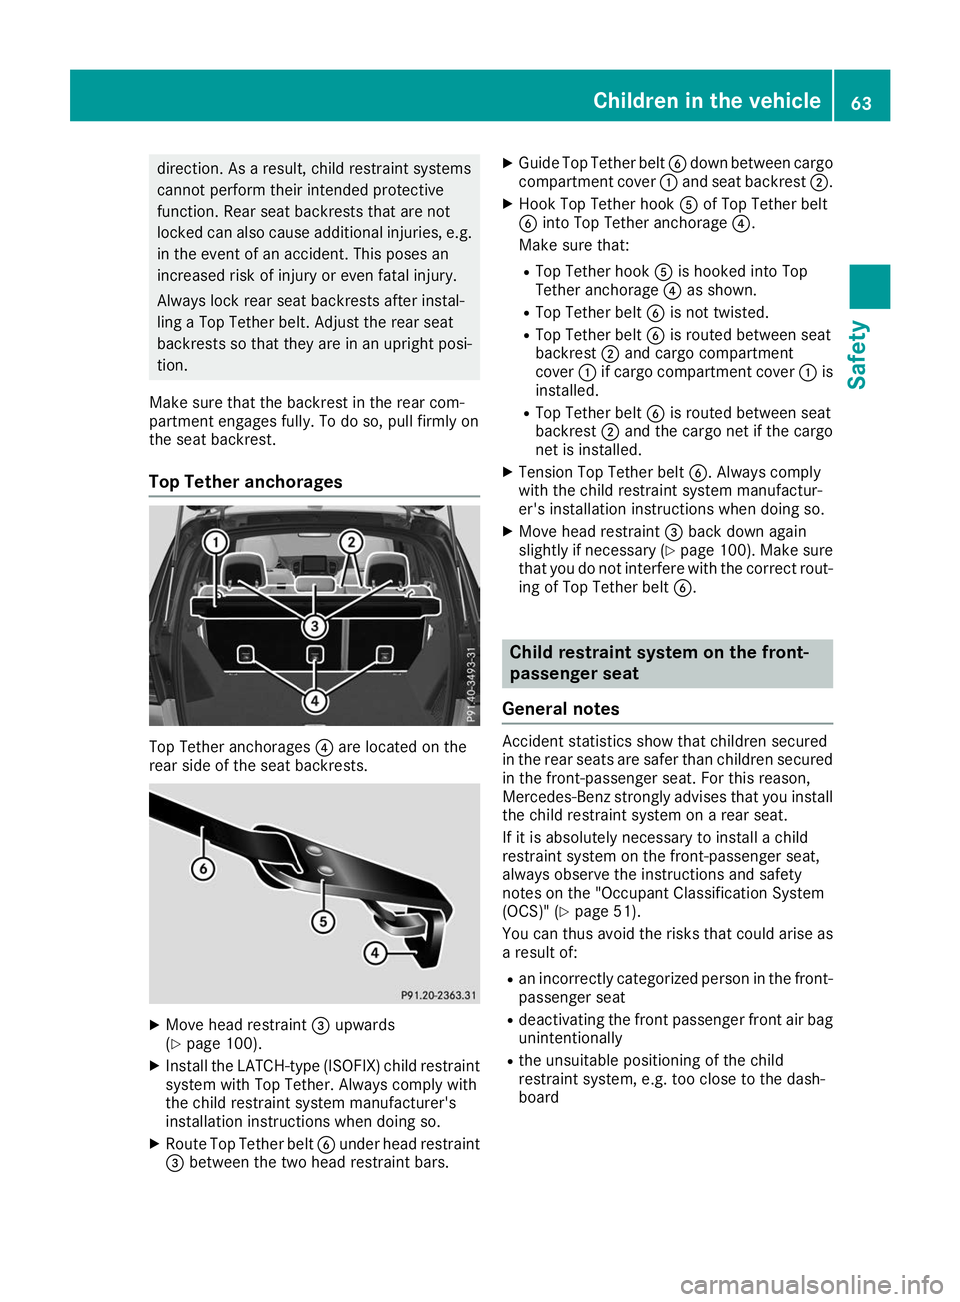
Top Tether anchorages Top Tether anchorages
0085are located on the
rear side of the seat backrests. X
Move head restraint 0087upwards
(Y page 100).
X Install the LATCH-type (ISOFIX) child restraint
system with Top Tether. Always comply with
the child restraint system manufacturer's
installation instructions when doing so.
X Route Top Tether belt 0084under head restraint
0087 between the two head restraint bars. X
Guide Top Tether belt 0084down between cargo
compartment cover 0043and seat backrest 0044.
X Hook Top Tether hook 0083of Top Tether belt
0084 into Top Tether anchorage 0085.
Make sure that:
R Top Tether hook 0083is hooked into Top
Tether anchorage 0085as shown.
R Top Tether belt 0084is not twisted.
R Top Tether belt 0084is routed between seat
backrest 0044and cargo compartment
cover 0043if cargo compartment cover 0043is
installed.
R Top Tether belt 0084is routed between seat
backrest 0044and the cargo net if the cargo
net is installed.
X Tension Top Tether belt 0084. Always comply
with the child restraint system manufactur-
er's installation instructions when doing so.
X Move head restraint 0087back down again
slightly if necessary (Y page 100). Make sure
that you do not interfere with the correct rout-
ing of Top Tether belt 0084. Child restraint system on the front-
passenger seat
General notes Accident statistics show that children secured
in the rear seats are safer than children secured
in the front-passenger seat. For this reason,
Mercedes-Benz strongly advises that you install the child restraint system on a rear seat.
If it is absolutely necessary to install a child
restraint system on the front-passenger seat,
always observe the instructions and safety
notes on the "Occupant Classification System
(OCS)" (Y page 51).
You can thus avoid the risks that could arise as a result of:
R an incorrectly categorized person in the front-
passenger seat
R deactivating the front passenger front air bag
unintentionally
R the unsuitable positioning of the child
restraint system, e.g. too close to the dash-
board Children in the vehicle
63Safety Z
Page 66 of 398
Rearward-facing child restraint system
If circumstances require you to secure a child in
a rearward-facing child restraint system on the
front-passenger seat, always make sure that the front passenger front air bag is deactivated.
Only if the PASSENGER AIR BAG OFF indicator
lamp is lit continuously (Y page 45), is the front
passenger front air bag deactivated.
Always observe the child restraint system man- ufacturer's installation and operating instruc-
tions.
Forward-facing child restraint system If it is absolutely necessary to install a forward-
facing child restraint system on the front-
passenger seat, always move the front-
passenger seat as far back as possible. The
entire base of the child restraint system must
always rest on the seat cushion of the front-
passenger seat. The backrest of the child
restraint system must lie as flat as possible
against the backrest of the front-passenger
seat. The child restraint system must not touch the roof or be subjected to a load by the head
restraint. Adjust the angle of the seat backrest
and the head restraint position accordingly.
Always make sure that the shoulder belt strap is
correctly routed from the vehicle belt outlet to
the shoulder belt guide on the child restraint
system. The shoulder belt strap must be routed
forward and down from the vehicle belt outlet. If
necessary, adjust the vehicle belt outlet and the front-passenger seat accordingly.
Always observe the child restraint system man-ufacturer's installation and operating instruc-
tions. Child-proof locks
Important safety notes G
WARNING
If children are traveling in the vehicle, they
could:
R open doors, thus endangering other people
or road users
R exit the vehicle and be caught by oncoming
traffic
R operate vehicle equipment and become
trapped
There is a risk of an accident and injury.
Always activate the child-proof locks and
override feature if children are traveling in the vehicle. When leaving the vehicle, always take
the key with you and lock the vehicle. Never
leave children unattended in the vehicle.
Override feature for:
R the rear doors (Y page 65)
R the rear side windows (Y page 65) G
WARNING
If you leave children unsupervised in the vehi- cle, they could set it in motion by, for example:
R release the parking brake.
R shift the automatic transmission out of the
parking position P.
R start the engine.
In addition, they may operate vehicle equip-
ment and become trapped. There is a risk of
an accident and injury.
When leaving the vehicle, always take the
SmartKey with you and lock the vehicle. Never
leave children unsupervised in the vehicle. G
WARNING
If persons, particularly children are subjected to prolonged exposure to extreme heat or
cold, there is a risk of injury, possibly even
fatal. Never leave children unattended in the
vehicle. 64
Children in the vehicleSafety
Page 67 of 398
G
WARNING
If the child restraint system is subjected to
direct sunlight, parts may get very hot. Chil-
dren may burn themselves on these parts,
particularly on the metal parts of the child
restraint system. There is a risk of injury.
If you leave the vehicle, taking the child with
you, always ensure that the child restraint
system is not exposed to direct sunlight. Pro- tect it with a blanket, for example. If the child
restraint system has been exposed to direct
sunlight, let it cool down before securing the
child in it. Never leave children unattended in the vehicle.
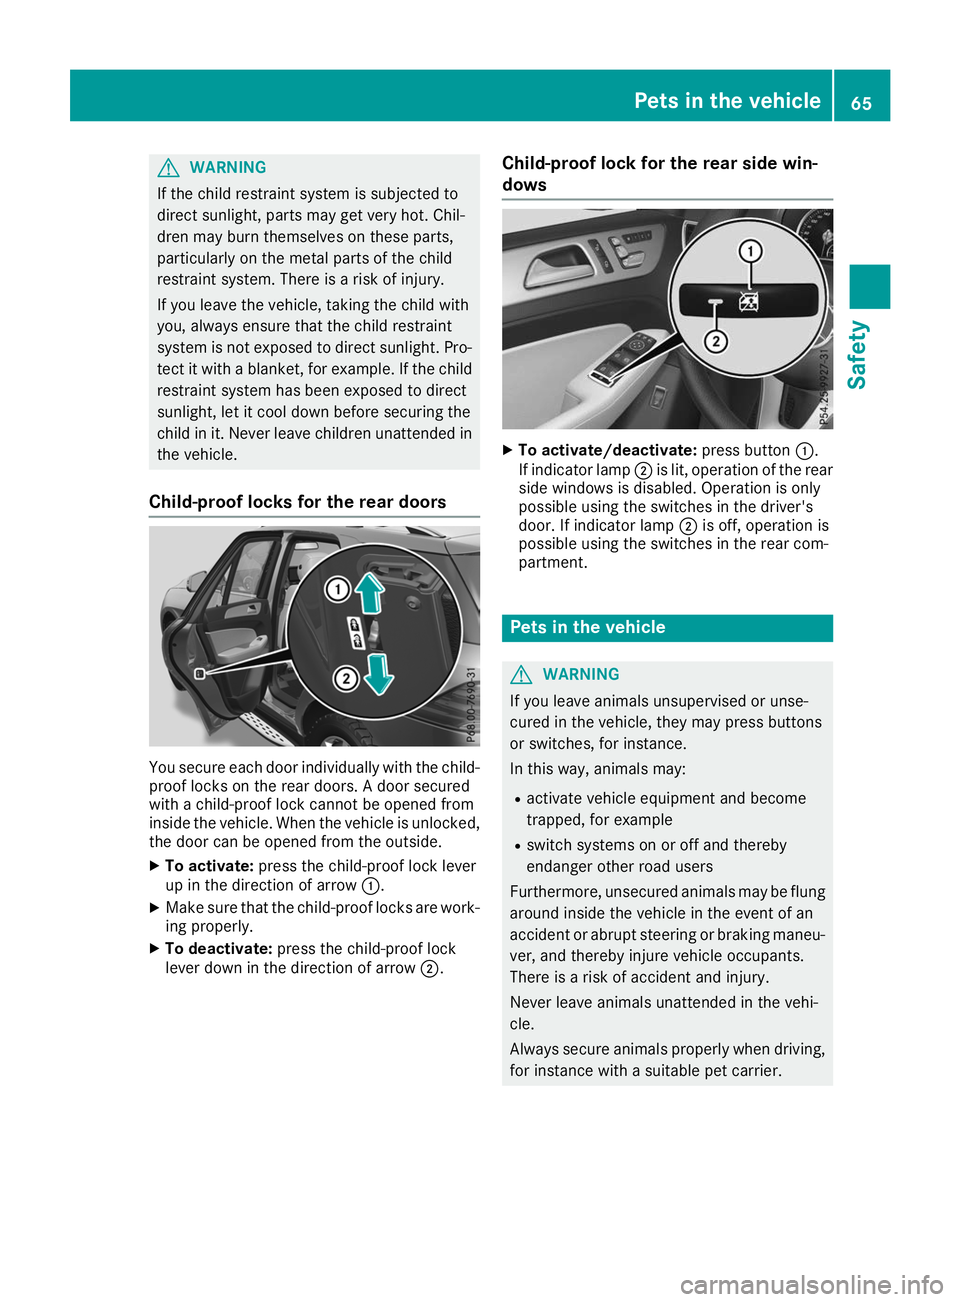
Child-proof locks for the rear doors You secure each door individually with the child-
proof locks on the rear doors. A door secured
with a child-proof lock cannot be opened from
inside the vehicle. When the vehicle is unlocked, the door can be opened from the outside.
X To activate: press the child-proof lock lever
up in the direction of arrow 0043.
X Make sure that the child-proof locks are work-
ing properly.
X To deactivate: press the child-proof lock
lever down in the direction of arrow 0044.Child-proof lock for the rear side win-
dows X
To activate/deactivate: press button0043.
If indicator lamp 0044is lit, operation of the rear
side windows is disabled. Operation is only
possible using the switches in the driver's
door. If indicator lamp 0044is off, operation is
possible using the switches in the rear com-
partment. Pets in the vehicle
G
WARNING
If you leave animals unsupervised or unse-
cured in the vehicle, they may press buttons
or switches, for instance.
In this way, animals may:
R activate vehicle equipment and become
trapped, for example
R switch systems on or off and thereby
endanger other road users
Furthermore, unsecured animals may be flung
around inside the vehicle in the event of an
accident or abrupt steering or braking maneu- ver, and thereby injure vehicle occupants.
There is a risk of accident and injury.
Never leave animals unattended in the vehi-
cle.
Always secure animals properly when driving,
for instance with a suitable pet carrier. Pets in the vehicle
65Safety Z
Page 85 of 398
Doors
Important safety notes
G
WARNING
If children are left unsupervised in the vehicle, they could:
R open the doors, thus endangering other
people or road users.
R get out and disrupt traffic.
R operate the vehicle's equipment.
Additionally, children could set the vehicle in
motion if, for example, they:
R release the parking brake.
R shifting the automatic transmission out of
park position P
R Start the engine.
There is a risk of an accident and injury.
When leaving the vehicle, always take the
SmartKey with you and lock the vehicle. Never
leave children or animals unattended in the
vehicle. Always keep the SmartKey out of
reach of children. Unlocking and opening doors from
the inside
You can open a door from inside the vehicle
even if it has been locked. You can only open the rear doors from inside the vehicle if they are not
secured by the child-proof locks (Y page 65).
If the vehicle has previously been locked from
the outside, opening a door from the inside will
trigger the anti-theft alarm system. Switch off
the alarm (Y page 75). X
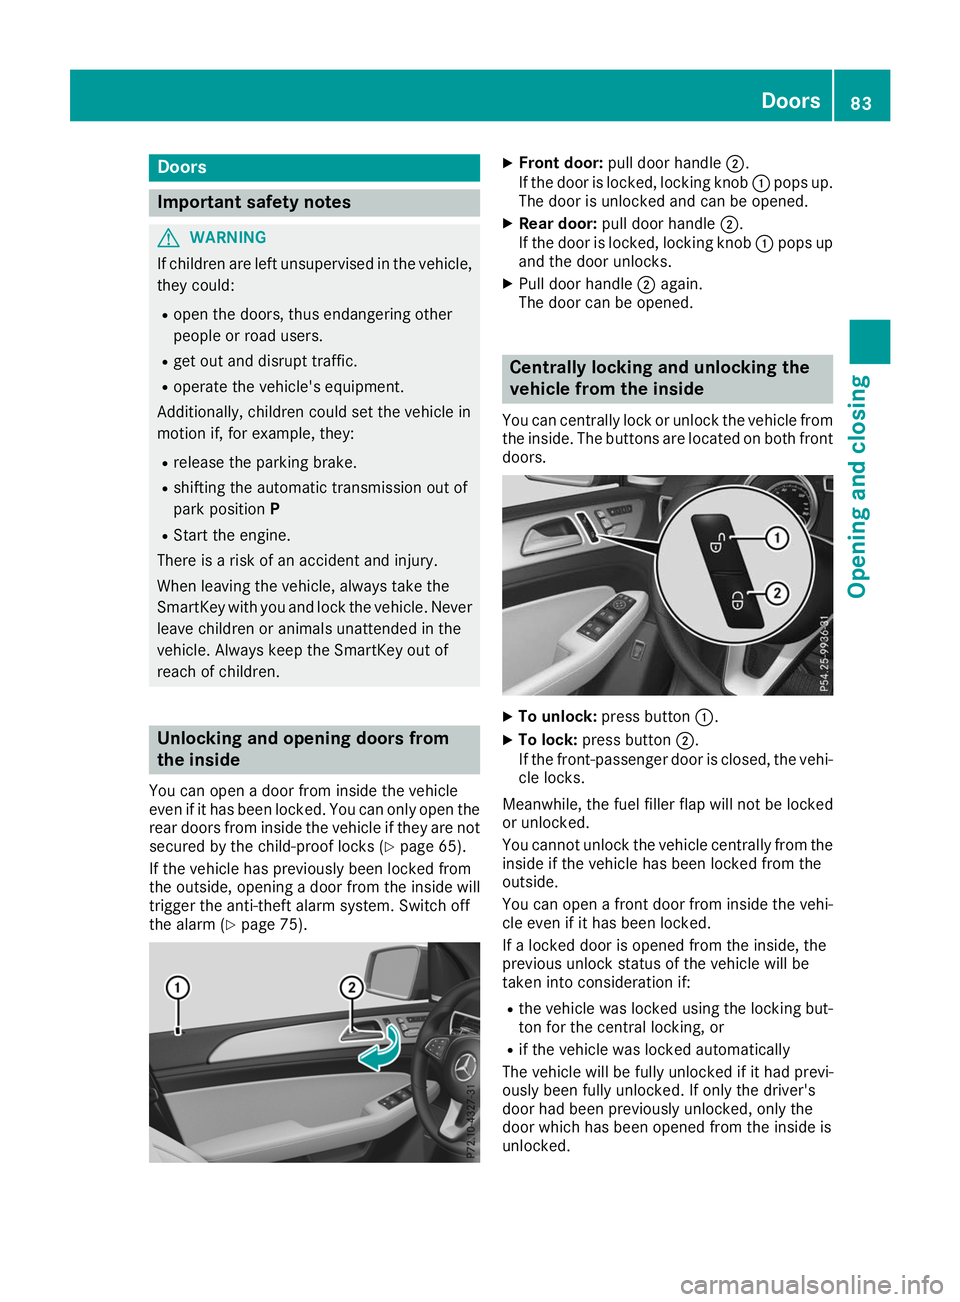
Front door: pull door handle 0044.
If the door is locked, locking knob 0043pops up.
The door is unlocked and can be opened.
X Rear door: pull door handle 0044.
If the door is locked, locking knob 0043pops up
and the door unlocks.
X Pull door handle 0044again.
The door can be opened. Centrally locking and unlocking the
vehicle from the inside
You can centrally lock or unlock the vehicle from the inside. The buttons are located on both frontdoors. X
To unlock: press button 0043.
X To lock: press button 0044.
If the front-passenger door is closed, the vehi-
cle locks.
Meanwhile, the fuel filler flap will not be locked
or unlocked.
You cannot unlock the vehicle centrally from the
inside if the vehicle has been locked from the
outside.
You can open a front door from inside the vehi-
cle even if it has been locked.
If a locked door is opened from the inside, the
previous unlock status of the vehicle will be
taken into consideration if:
R the vehicle was locked using the locking but-
ton for the central locking, or
R if the vehicle was locked automatically
The vehicle will be fully unlocked if it had previ-
ously been fully unlocked. If only the driver's
door had been previously unlocked, only the
door which has been opened from the inside is
unlocked. Doors
83Opening and closing Z
Page 87 of 398
G
WARNING
If objects, luggage or loads are not secured or not secured sufficiently, they could slip, tip
over or be flung around and thereby hit vehicle
occupants. There is a risk of injury, particu-
larly in the event of sudden braking or a sud-
den change in direction.
Always store objects so that they cannot be
flung around. Secure objects, luggage or
loads against slipping or tipping before the
journey.
! The tailgate swings upwards and to the rear
when opened. Therefore, make sure that
there is sufficient clearance above and behind
the tailgate.
The opening dimensions of the tailgate can be
found in the "Vehicle data" section
(Y page 390).
You should preferably place luggage or loads in the cargo compartment. Observe the loading
guidelines (Y page 295).
Do not leave the SmartKey in the cargo com-
partment. You could otherwise lock yourself
out.
Vehicles without the EASY-PACK tailgate:
the tailgate can be:
R opened and closed manually from outside
R unlocked from inside with the emergency
release
For vehicles with the EASY-PACK tailgate:
you can:
R close the tailgate manually from outside
R open the tailgate automatically from outside
R open and close the tailgate automatically
from inside
R unlock the tailgate from inside with the emer-
gency release
R limit the opening angle of the tailgate Tailgate reversing feature
On vehicles with the tailgate remote closing fea- ture, the tailgate is equipped with automatic
obstacle recognition with a reversing feature. If a solid object blocks or restricts the tailgate
when automatically opening or closing, this pro-
cedure is stopped. If the tailgate is stopped dur- ing the closing procedure, it will open again automatically. The automatic obstacle recogni-
tion with reversing feature is only an aid. It is not
a substitute for your attentiveness when open-
ing and closing the tailgate. G
WARNING
The reversing feature does not respond:
R to soft, light and thin objects, e.g. fingers
R over the last 00C2in (8 mm) of the closing
movement
The reversing feature cannot prevent some-
one from becoming trapped in these situa-
tions in particular. There is a risk of injury.
Make sure that no body parts are in close
proximity during the closing procedure.
If somebody becomes trapped:
R press the 0054button on the SmartKey, or
R pull or press the remote operating switch
on the driver's door or
R press the closing or locking button on the
tailgate or
R pull the handle on the tailgate Opening and closing manually from
outside
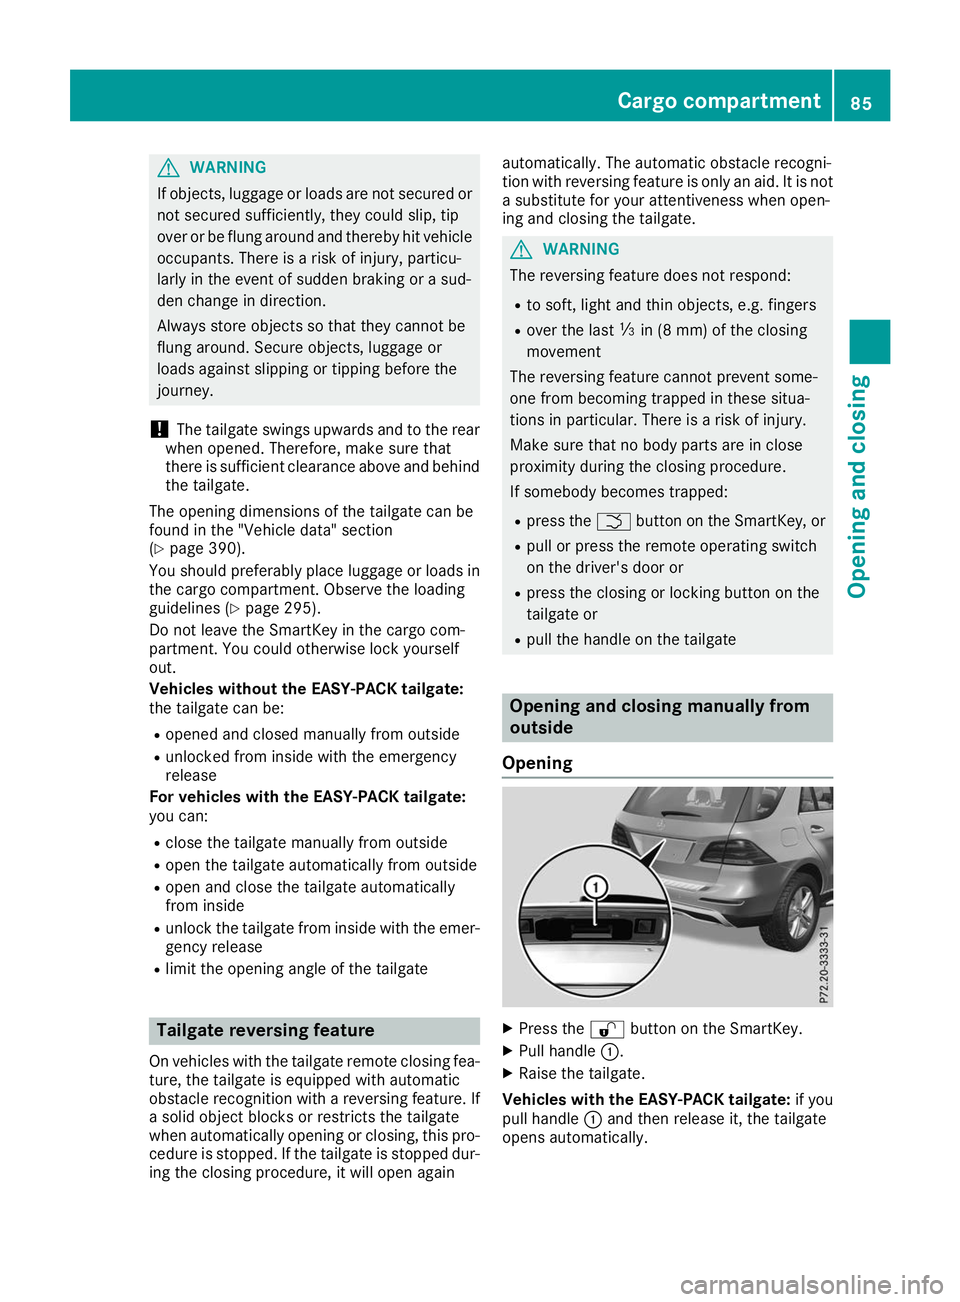
Opening X
Press the 0036button on the SmartKey.
X Pull handle 0043.
X Raise the tailgate.
Vehicles with the EASY-PACK tailgate: if you
pull handle 0043and then release it, the tailgate
opens automatically. Cargo compartment
85Opening and closing Z
Page 118 of 398
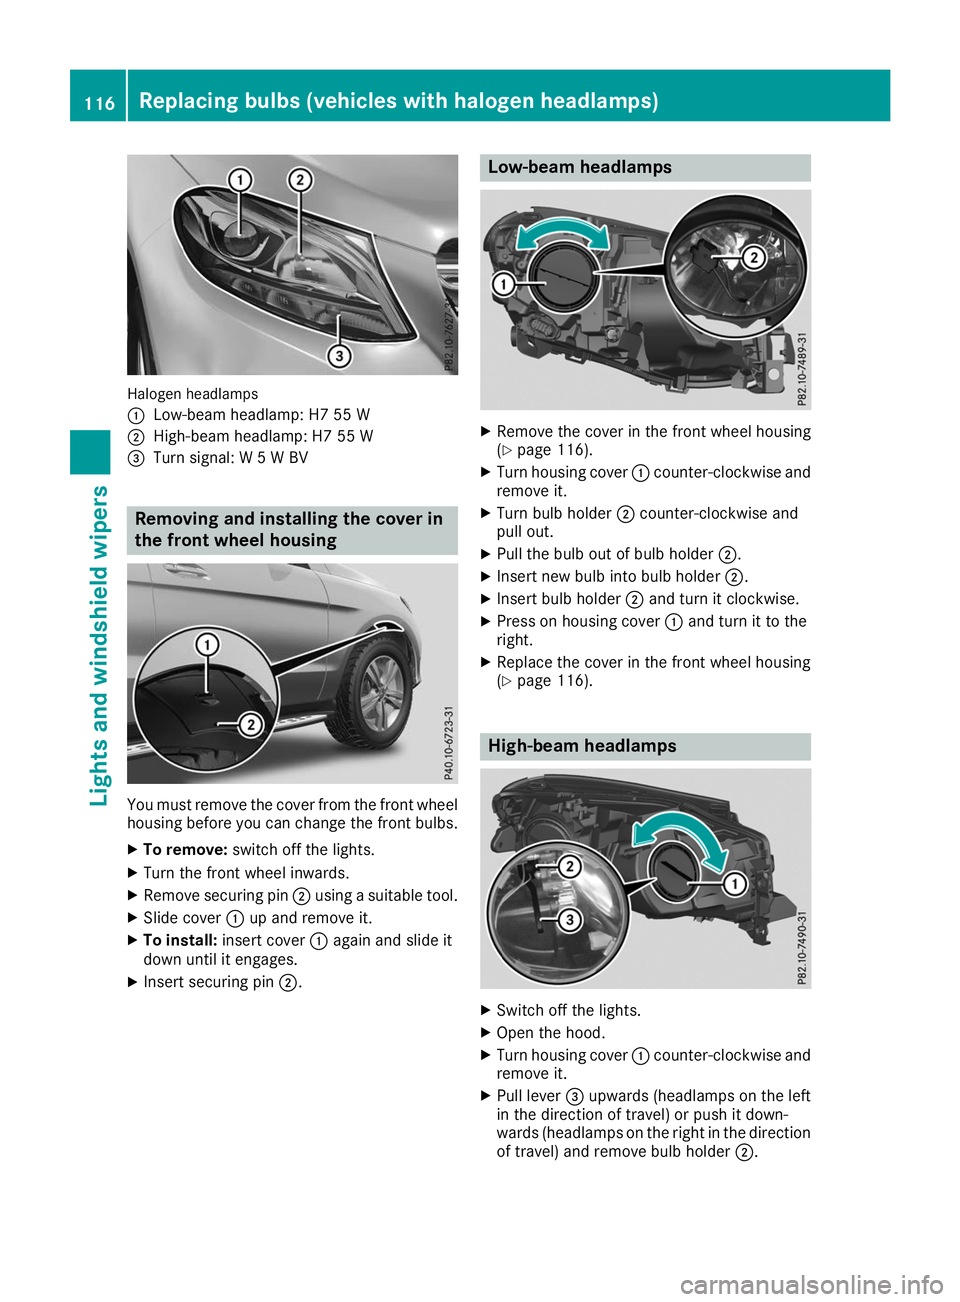
Halogen headlamps
0043
Low-beam headlamp: H7 55 W
0044 High-beam headlamp: H7 55 W
0087 Turn signal: W 5 W BV Removing and installing the cover in
the front wheel housing You must remove the cover from the front wheel
housing before you can change the front bulbs.
X To remove: switch off the lights.
X Turn the front wheel inwards.
X Remove securing pin 0044using a suitable tool.
X Slide cover 0043up and remove it.
X To install: insert cover 0043again and slide it
down until it engages.
X Insert securing pin 0044. Low-beam headlamps
X
Remove the cover in the front wheel housing
(Y page 116).
X Turn housing cover 0043counter-clockwise and
remove it.
X Turn bulb holder 0044counter-clockwise and
pull out.
X Pull the bulb out of bulb holder 0044.
X Insert new bulb into bulb holder 0044.
X Insert bulb holder 0044and turn it clockwise.
X Press on housing cover 0043and turn it to the
right.
X Replace the cover in the front wheel housing
(Y page 116). High-beam headlamps
X
Switch off the lights.
X Open the hood.
X Turn housing cover 0043counter-clockwise and
remove it.
X Pull lever 0087upwards (headlamps on the left
in the direction of travel) or push it down-
wards (headlamps on the right in the direction
of travel) and remove bulb holder 0044.116
Replacing bulbs (vehicles with halogen headlamps)Lights and windshield wipers
Page 136 of 398
Notes on breaking-in a new vehicle
Important safety notes
The sensor system of some driving and driving
safety systems adjusts automatically while a
certain distance is being driven after the vehicle has been delivered or after repairs. Full system
effectiveness is not reached until the end of this
teach-in procedure.
New and replaced brake pads and discs only
reach their optimum braking effect after several hundred kilometers of driving. Compensate for
this by applying greater force to the brake pedal. The first 1000 miles (1500 km)
The more you look after the engine when it is
new, the more satisfied you will be with its per-
formance in the future. R You should therefore drive at varying vehicle
and engine speeds for the first 1000 miles
(1500 km).
R Avoid heavy loads, e.g. driving at full throttle,
during this period.
R Change gear in good time, before the tach-
ometer needle is 00C3of the way to the red area
of the tachometer.
R Do not manually shift to a lower gear to brake
the vehicle.
R Try to avoid depressing the accelerator pedal
beyond the point of resistance (kickdown).
Additional breaking-in notes for Mercedes-AMG
vehicles:
R Do not drive faster than 85 mph (140 km/h)
for the first 1,000 miles (1,500 km).
R Only allow the engine to reach a maximum
engine speed of 4,500 rpm briefly.
R Change gear in good time.
R Ideally, for the first 1,000 miles (1,500 km),
drive in the Comfortdrive program.
After 1000 mile s(1500 km), you can increase
the engine speed gradually and accelerate the
vehicle to full speed.
You should also observe these notes on break-
ing in if the engine or parts of the drive train on your vehicle have been replaced.
Always observe the maximum permissible
speed. Driving
Important safety notes
G
WARNING
Objects in the driver's footwell can restrict the pedal travel or obstruct a depressed pedal.
The operating and road safety of the vehicle is
jeopardized. There is a risk of an accident.
Make sure that all objects in the vehicle are
stowed correctly, and that they cannot enter
the driver's footwell. Install the floormats
securely and as specified in order to ensure
sufficient clearance for the pedals. Do not use loose floormats and do not place floormats on
top of one another. G
WARNING
Unsuitable footwear can hinder correct usage of the pedals, e.g.:
R shoes with thick soles
R shoes with high heels
R slippers
There is a risk of an accident.
Wear suitable footwear to ensure correct
usage of the pedals. G
WARNING
If you switch off the ignition while driving,
safety-relevant functions are only available
with limitations, or not at all. This could affect, for example, the power steering and the brake
boosting effect. You will require considerably
more effort to steer and brake. There is a risk of an accident.
Do not switch off the ignition while driving. G
WARNING
If the parking brake has not been fully
released when driving, the parking brake can:
R overheat and cause a fire
R lose its hold function.
There is a risk of fire and an accident. Release
the parking brake fully before driving off. 134
DrivingDriving and pa
rking