2019 MERCEDES-BENZ GLE COUPE ECO mode
[x] Cancel search: ECO modePage 26 of 697
back conditions, please visit
the national
Mercedes-Benz website foryo ur count ry. Mercedes-Benz Genuine
Parts
+ ENVIRONMENTAL
NOTEEnvironmental
dama gecaused bynot using recycled
re conditioned components Daimler
AGoffers recycled reconditioned
components and pa rts with the same quality
as new parts. The same entitlement from the
implied warranty is valid as for new parts. #
Use recycled reconditioned compo‐
nents and pa rts from Daimler AG. *
NO
TEImpairment of the operating ef fi‐
ciency of there stra int sy stems from
ins talling accessory parts or from repairs
or we lding Airbags and seat belt
tensioners, as well as
control units and sensors forth ere stra int
sy stems, may be ins talled in thefo llowing
areas of your vehicle:
R doors
R door pillars
R door sills
R seats
R cockpit
R instrument clus ter
R centre console
R late ra lro of frame #
Do not ins tall accessory parts such as
audio sy stems in these areas. #
Do not car ryout repairs or welding. #
Have accesso ries retrofitted at a quali‐
fi ed specialist workshop. Yo
u could jeopardise the operating saf ety of your
ve hicle if you use parts, tyres and wheels as well
as accessories releva nt tosaf ety which ha venot
been appr ovedby Mercedes-Benz. Saf ety-re le‐
va nt sy stems, e.g. the brake sy stem, may mal‐
function. Only use Mercedes-Benz Genuine Parts
or parts of equal qualit y.Only use tyres, wheels
and accessories that ha vebeen specifically
appr ovedfo ryo ur vehicle model.
Mercedes-Benz tests original parts and con ver‐
sion parts and accessories that ha vebeen spe‐
cifically appr ovedfo ryo ur vehicle model forth eir
re liability, saf ety and suitabilit y.Despite ongoing
ma rket resear ch, Mercedes-Benz is unable to
assess other parts. Mercedes-Benz therefore
accepts no responsibility forth e use of such
parts in Mercedes-Benz vehicles, even if they
ha ve been of ficially appr oved or independently
appr ovedby ate sting centre.
Cer tain parts are only of ficially appr ovedfor
ins tallation or modification if they comply wi th
legal requirements. All Mercedes-Benz Genuine
Pa rts meet the appr oval requ irements. The use
of non-appr oved parts may in validate theve hi‐
cle's general operating pe rmit. General no
tes23
Page 72 of 697
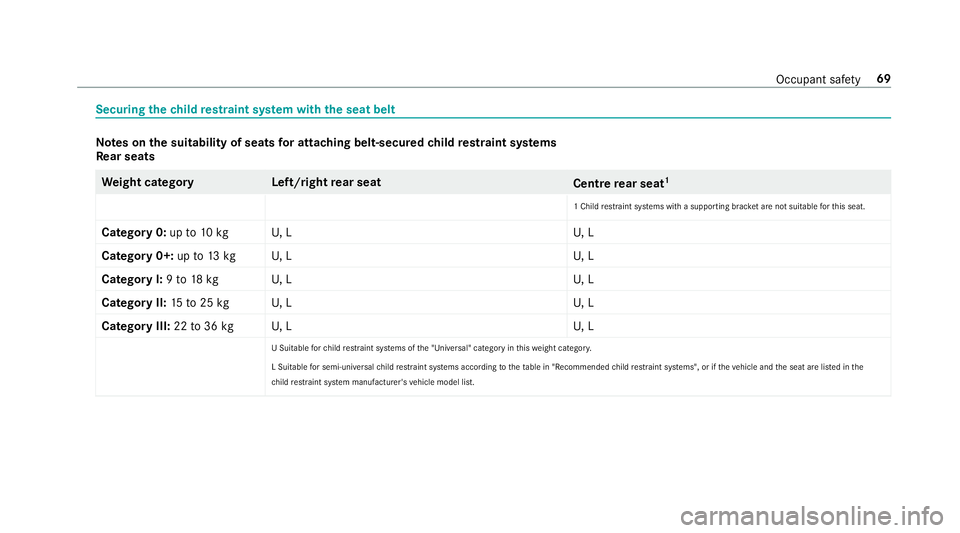
Securing
thech ild restra int sy stem with the seat belt Note
s onthe suitability of seats for attaching belt-secured child restra int sy stems
Re ar seats We
ight categor yL eft/rightrear seat
Centrerear seat 1
1 Child restrai nt sy stems with a supporting brac ket are not sui table forth is seat.
Category 0: upto10 kg U, LU , L
Category 0+: upto13 kg U, LU , L
Category I: 9to 18 kg U, LU , L
Category II: 15to25 kg U, LU , L
Category III: 22to36 kg U, LU , L
U Suitable forch ild restrai nt sy stems of the "Universal" category in this we ight categor y.
L Suitable for semi-universal child restrai nt sy stems according totheta ble in "Recommended child restrai nt sy stems", or if theve hicle and the seat are lis ted in the
ch ild restrai nt sy stem manufacturer's vehicle model list. Occupant saf
ety69
Page 168 of 697
Overview of climate control sy
stems Note
s on climate control An interior air
filter in combination with the pre‐
fi lter in the engine compartment must alw ays be
used so that the air conditioning sy stem, pollu‐
tion lebutton vel monitoring and the air filtration
wo rkcor rectly. Ma kesure that thefilter is ins tal‐
led cor rectly and thefilter housing in the engine
compartment is closed cor rectly using the cap
and alw ays tightly sealed when in operation. Use
fi lters recommended and appr ovedby
Mercedes-Benz. Alw ays ha veservice workcar‐
ri ed out at a qualified specialist workshop. THERMATIC control panel
overview The indicator lamps on
the buttons indicate that
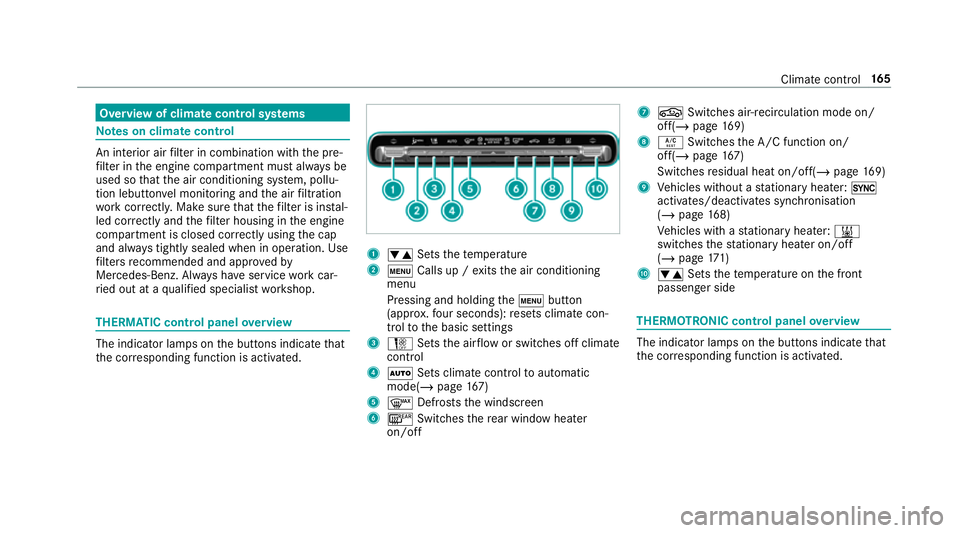
th e cor responding function is activated. 1
w Setsthete mp erature
2 t Calls up / exits the air conditioning
menu
Pressing and holding thet button
(appr ox.fo ur seconds): resets climate con‐
trol tothe basic settings
3 H Setsthe air flow or switches off climate
control
4 Ã Sets climate control toautomatic
mode(/ page167)
5 ¬ Defrosts the windscreen
6 ¤ Switches there ar wind owheater
on/off 7
g Switches air-recirculation mode on/
off(/ page169)
8 Á Switches the A/C function on/
off(/ page167)
Switches residual heat on/off(/ page169)
9 Vehicles without a stationary heater: 0
activates/deactivates syn chronisation
(/ page 168)
Ve hicles with a stationary heater: &
swit ches thest ationary heater on/off
(/ page 171)
A w Setsthete mp erature on the front
passenger side THERMOTRONIC control panel
overview The indicator lamps on
the buttons indicate that
th e cor responding function is activated. Climate
control 16 5
Page 169 of 697
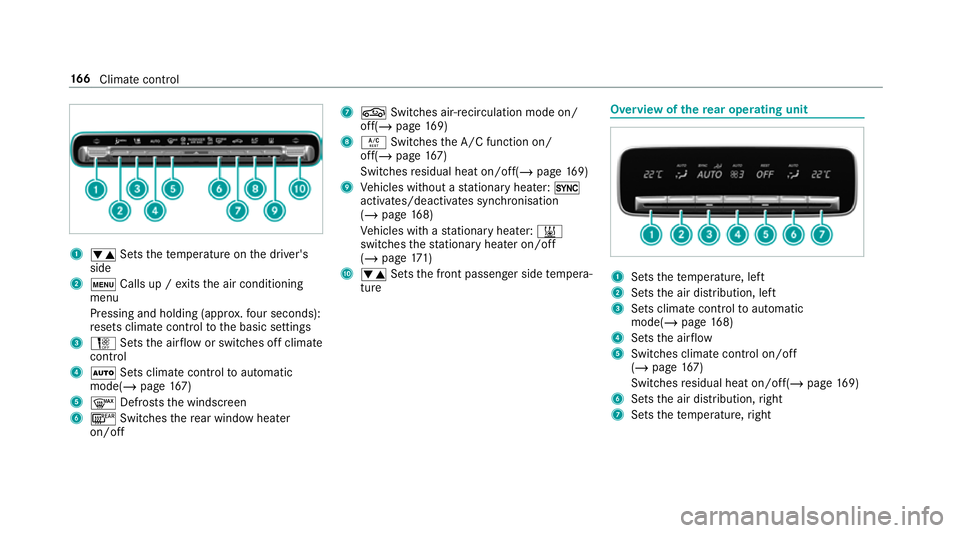
1
w Setsthete mp erature on the driver's
side
2 t Calls up / exits the air conditioning
menu
Pressing and holding (appr ox.fo ur seconds):
re sets climate contro lto the basic settings
3 H Setsthe air flow or switches off climate
control
4 Ã Sets climate control toautomatic
mode(/ page167)
5 ¬ Defrosts the windscreen
6 ¤ Switches there ar wind owheater
on/off 7
g Switches air-recirculation mode on/
off(/ page169)
8 Á Switches the A/C function on/
off(/ page167)
Switches residual heat on/off(/ page169)
9 Vehicles without a stationary heater: 0
activates/deactivates syn chronisation
(/ page 168)
Ve hicles with a stationary heater: &
swit ches thest ationary heater on/off
(/ page 171)
A w Setsthe front passenger side temp era‐
ture Overview of
there ar operating unit 1
Sets thete mp erature, left
2 Sets the air distribution, left
3 Sets climate control toautomatic
mode(/ page168)
4 Sets the air flow
5 Switches climate control on/off
(/ page 167)
Switches residual heat on/off(/ page169)
6 Sets the air distribution, right
7 Sets thete mp erature, right 16 6
Climate cont rol
Page 170 of 697
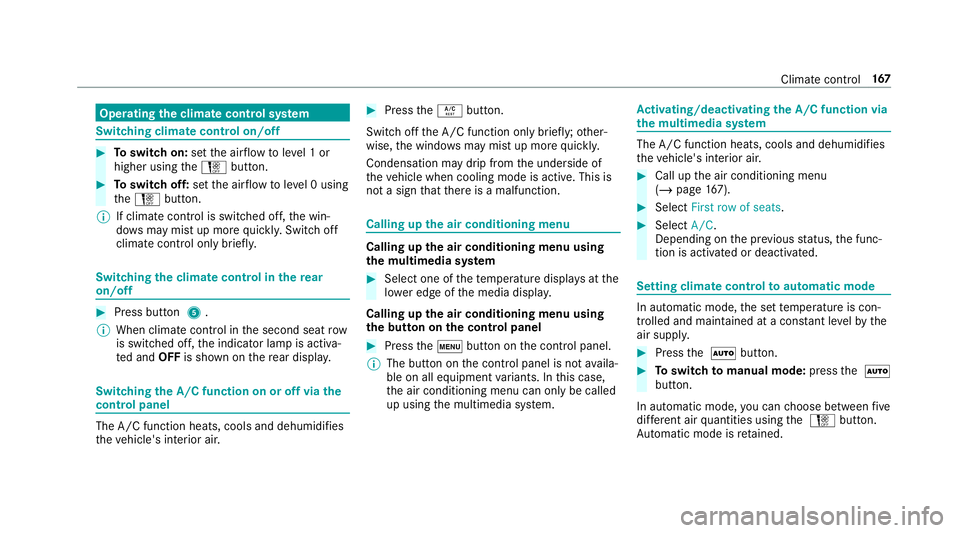
Operating
the clima tecont rol sy stem Switching clima
tecont rol on/off #
Toswitch on: setthe air flow toleve l 1 or
higher using theH button. #
Toswitch off: setthe air flow toleve l 0 using
th eH button.
% If climate control is switched off, the win‐
do ws may mist up more quickl y.Switch off
climate control only brie fly. Switching
the clima tecont rol in there ar
on/off #
Press button 5.
% When clima tecontrol in the second seat row
is switched off, the indicator lamp is activa‐
te d and OFFis shown on there ar displa y. Switching
the A/C function on or off via the
cont rol panel The A/C function heats, cools and dehumidifies
th
eve hicle's interior air. #
Press theÁ button.
Switch off the A/C function only brief ly;ot her‐
wise, the windo wsmay mist up more quickl y.
Condensation may drip from the underside of
th eve hicle when cooling mode is active. This is
not a sign that there is a malfunction. Calling up
the air conditioning menu Calling up
the air conditioning menu using
th e multimedia sy stem #
Select one of thete mp erature displa ysatthe
lo we r edge of the media displa y.
Calling up the air conditioning menu using
th e but ton on the control panel #
Press thet button on the control panel.
% The button on the control panel is not availa‐
ble on all equipment variants. In this case,
th e air conditioning menu can only be called
up using the multimedia sy stem. Ac
tivating/deactivating the A/C function via
the multimedia sy stem The A/C function heats, cools and dehumidifies
th
eve hicle's interior air. #
Call up the air conditioning menu
(/ page 167). #
Select First row of seats. #
Select A/C.
Depending on the pr evious status, the func‐
tion is activated or deactivated. Setting climate control
toautomatic mode In auto
matic mode, the set temp erature is con‐
trolled and maintained at a const ant levelby the
air suppl y. #
Press the à button. #
Toswitch tomanual mode: pressthe Ã
button.
In automatic mode, you can choose between five
dif fere nt air quantities using the H button.
Au tomatic mode is retained. Climate control
167
Page 171 of 697
Au
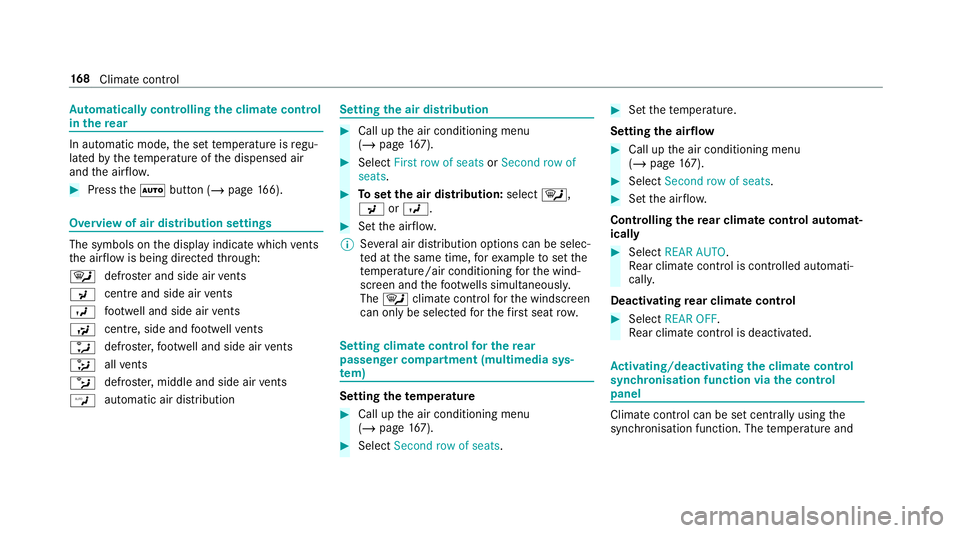
tomatically controlling the climate control
in the rear In auto
matic mode, the set temp erature is regu‐
lated bythete mp erature of the dispensed air
and the air flow. #
Press theà button (/ page166). Overvi
ewof air distribution settings The symbols on
the display indicate which vents
th e air flow is being directed thro ugh:
¯ def
rost er and side air vents
P centre and side air
vents
O fo
ot we ll and side air vents
S centre, side and
foot we llve nts
a defros
ter,fo ot we ll and side air vents
_ all
vents
b defros
ter,middle and side air vents
W au
tomatic air distribution Setting
the air distribution #
Call up the air conditioning menu
(/ page 167). #
Select First row of seats orSecond row of
seats. #
Toset the air distribution: select¯,
P orO. #
Set the air flow.
% Several air distribution options can be selec‐
te d at the same time, forex ample toset the
te mp erature/air conditioning forth e wind‐
screen and thefo ot we lls simultaneousl y.
The ¯ climate contro lfo rth e windscreen
can only be selected forth efirs t seat row. Setting climate control
for the rear
passenger comp artment (multimedia sys‐
te m) Setting the
temperature #
Call up the air conditioning menu
(/ page 167). #
Select Second row of seats. #
Set thete mp erature.
Setting the airflow #
Call up the air conditioning menu
(/ page 167). #
Select Second row of seats. #
Set the air flow.
Controlling there ar climate control automat‐
ical ly #
Select REAR AUTO .
Re ar climate control is controlled automati‐
call y.
Deactivating rear climate control #
Select REAR OFF.
Re ar climate control is deactivated. Ac
tivating/deactivating the climate control
syn chro nisation function via the control
panel Climate control can be set centrally using
the
synchronisation function. The temp erature and 16 8
Climate cont rol
Page 172 of 697
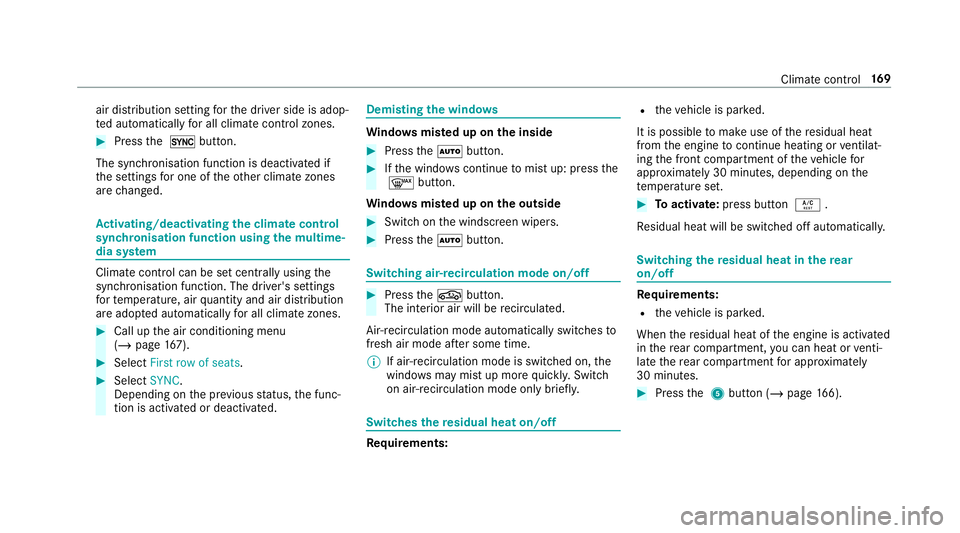
air distribution setting
forth e driver side is adop‐
te d automatically for all clima tecontrol zones. #
Press the 0 button.
The synchronisation function is deactivated if
th e settings for one of theot her climate zones
are changed. Ac
tivating/deactivating the climate control
syn chro nisation function using the multime‐
dia sy stem Climate control can be set centrally using
the
synchronisation function. The driver's settings
fo rte mp erature, air quantity and air distribution
are adop ted automatically for all clima tezones. #
Call up the air conditioning menu
(/ page 167). #
Select First row of seats. #
Select SYNC.
Depending on the pr evious status, the func‐
tion is activated or deactivated. Demisting
the windo ws Wi
ndo wsmis ted up on the inside #
Press theà button. #
Ifth e windo wscontinue tomist up: press the
¬ button.
Wi ndo wsmis ted up on the outside #
Switch on the windscreen wipers. #
Press theà button. Switching air-recirculation mode on/off
#
Press theg button.
The interior air will be recirculated.
Air-reci rculation mode automatically swit ches to
fresh air mode af ter some time.
% If air-recirculation mode is switched on, the
windo wsmay mist up more quickl y.Switch
on ai r-re circulation mode only brie fly. Switches
there sidual heat on/off Re
quirements: R
theve hicle is par ked.
It is possible tomake use of there sidual heat
from the engine tocontinue heating or ventilat‐
ing the front compartment of theve hicle for
appr oximately 30 minutes, depending on the
te mp erature set. #
Toactivate: press button Á.
Re sidual heat will be switched off automaticall y. Switching
there sidual heat in there ar
on/off Re
quirements:
R theve hicle is par ked.
When there sidual heat of the engine is activated
in there ar compartment, you can heat or venti‐
la te there ar compartment for appro ximately
30 minutes. #
Press the 5 button (/ page166). Clima
tecontrol 16 9
Page 174 of 697
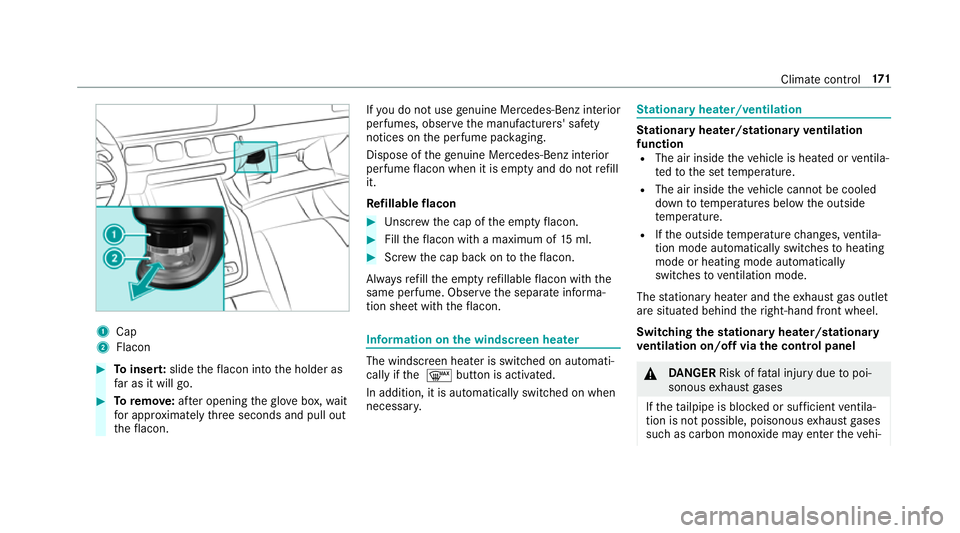
1
Cap
2 Flacon #
Toinser t:slide theflacon into the holder as
fa r as it will go. #
Toremo ve:af te r opening theglov e box, wait
fo r appro ximately thre e seconds and pull out
th eflacon. If
yo u do not use genuine Mercedes-Benz interior
pe rfumes, obse rveth e manufacturers' saf ety
notices on the perfume pac kaging.
Dispose of thege nuine Mercedes-Benz interior
pe rfume flacon when it is em pty and do not refill
it.
Re fillable flacon #
Unscr ew the cap of the em ptyflacon. #
Filltheflacon with a maximum of 15ml. #
Screw the cap back on totheflacon.
Alw aysre fill th e em ptyre fillable flacon with the
same perfume. Obser vethe separate informa‐
tion sheet with theflacon. Information on
the windscreen heater The windscreen heater is swit
ched on automati‐
cally if the ¬ button is activated.
In addition, it is automatically switched on when
necessar y. St
ationary heater/ventilation St
ationary heater/stationary ventilation
function R The air inside theve hicle is heated or ventila‐
te dto the set temp erature.
R The air inside theve hicle cannot be cooled
down totemp eratures below the outside
te mp erature.
R Ifth e outside temp erature changes, ventila‐
tion mode au tomatical lyswitches toheating
mode or heating mode automatically
switches toventilation mode.
The stationary heater and theex haust gas outlet
are situated behind theright-hand front wheel.
Switching thest ationary heater/stationary
ve ntilation on/off via the control panel &
DANG ER Risk of fata l injury due topoi‐
sonous exhaust gases
If th eta ilpipe is bloc ked or suf ficient ventila‐
tion is not possible, poisonous exhaust gases
such as carbon monoxide may enter theve hi‐ Climate control
171