2019 MERCEDES-BENZ GLE COUPE display
[x] Cancel search: displayPage 141 of 370
Individual drive program
In the
Individual drive program, the following
properties of the drive program can be selected:
R the drive (engine and transmission manage-
ment)
R the transmission
R the suspension (vehicles with AIRMATIC)
R all vehicles (except Mercedes-AMG vehicles):
the steering
To select the gears in the Individualdrive pro-
gram permanently using the steering wheel pad-
dle shifters, select the permanent manual gear- shift program.
Information about configuring the Individual
drive program with the multimedia system can
be found in the Digital Operator's Manual. Manual gearshifting
General notes You can change gear yourself using the steering
wheel paddle shifters. The transmission must be
in position 005Bto do this.
Depending on which steering wheel paddle
shifter is pulled, the automatic transmission
immediately shifts into the next gear down or
up, if permitted.
To use manual shifting, you have two options:
R temporary setting
R permanent setting
If you activate manual gearshifting, the current
gear appears in the multifunction display
instead of transmission position 005B.
If manual gearshifting is deactivated, the gears
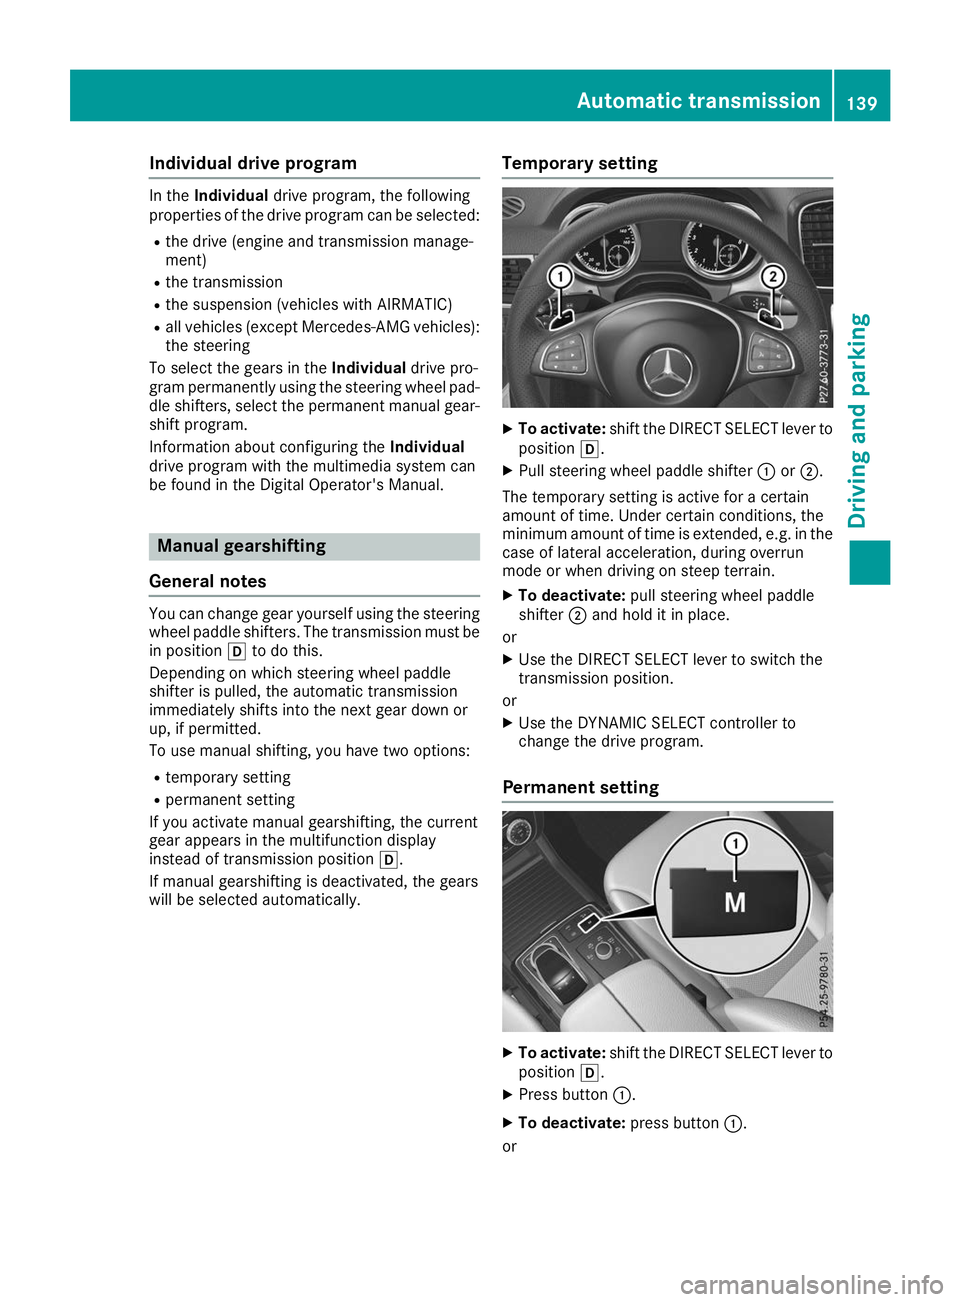
will be selected automatically. Temporary setting X
To activate: shift the DIRECT SELECT lever to
position 005B.
X Pull steering wheel paddle shifter 0043or0044.
The temporary setting is active for a certain
amount of time. Under certain conditions, the
minimum amount of time is extended, e.g. in the
case of lateral acceleration, during overrun
mode or when driving on steep terrain.
X To deactivate: pull steering wheel paddle
shifter 0044and hold it in place.
or
X Use the DIRECT SELECT lever to switch the
transmission position.
or X Use the DYNAMIC SELECT controller to
change the drive program.
Permanent setting X
To activate: shift the DIRECT SELECT lever to
position 005B.
X Press button 0043.
X To deactivate: press button0043.
or Automatic transmission
139Driving and parking Z
Page 142 of 370
X
All vehicles (except Mercedes-AMG vehicles):
use the DYNAMIC SELECT controller to
change the drive program.
X Mercedes-AMG vehicles: use the DYNAMIC
SELECT controller to switch to the Individual
drive program.
Shifting gears !
Mercedes-AMG vehicles:
the automatic
transmission does not shift up automatically
even when the engine limiting speed for the
current gear is reached. When the engine lim- iting speed is reached, the fuel supply is cut to
prevent the engine from overrevving. Always
make sure that the engine speed does not
reach the red area of the tachometer. There is
otherwise a risk of engine damage. X
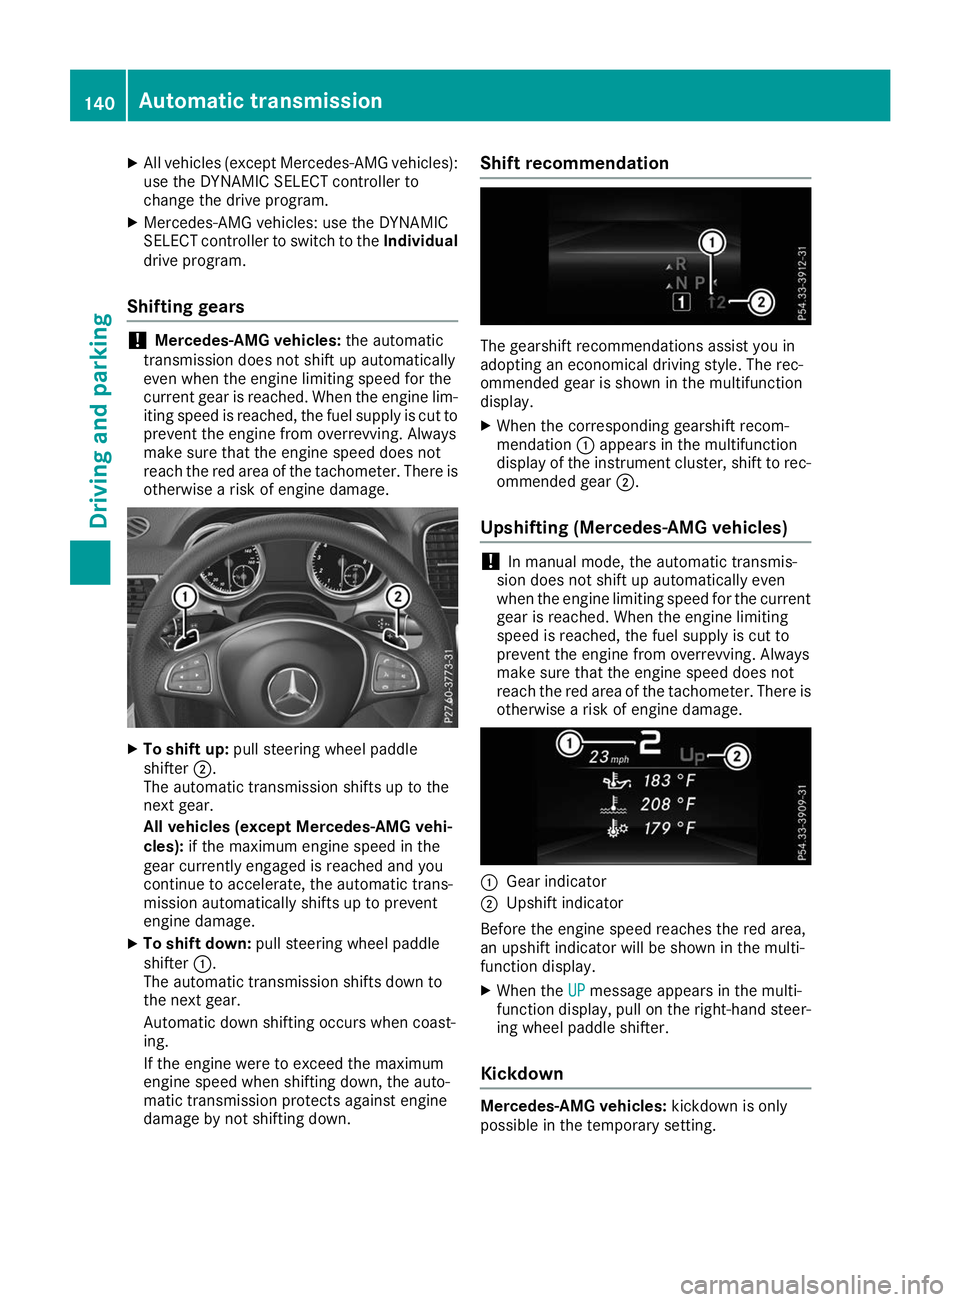
To shift up: pull steering wheel paddle
shifter 0044.
The automatic transmission shifts up to the
next gear.
All vehicles (except Mercedes-AMG vehi-
cles): if the maximum engine speed in the
gear currently engaged is reached and you
continue to accelerate, the automatic trans-
mission automatically shifts up to prevent
engine damage.
X To shift down: pull steering wheel paddle
shifter 0043.
The automatic transmission shifts down to
the next gear.
Automatic down shifting occurs when coast-
ing.
If the engine were to exceed the maximum
engine speed when shifting down, the auto-
matic transmission protects against engine
damage by not shifting down. Shift recommendation
The gearshift recommendations assist you in
adopting an economical driving style. The rec-
ommended gear is shown in the multifunction
display.
X When the corresponding gearshift recom-
mendation 0043appears in the multifunction
display of the instrument cluster, shift to rec-
ommended gear 0044.
Upshifting (Mercedes-AMG vehicles) !
In manual mode, the automatic transmis-
sion does not shift up automatically even
when the engine limiting speed for the current
gear is reached. When the engine limiting
speed is reached, the fuel supply is cut to
prevent the engine from overrevving. Always
make sure that the engine speed does not
reach the red area of the tachometer. There is
otherwise a risk of engine damage. 0043
Gear indicator
0044 Upshift indicator
Before the engine speed reaches the red area,
an upshift indicator will be shown in the multi-
function display. X When the UP
UP message appears in the multi-
function display, pull on the right-hand steer- ing wheel paddle shifter.
Kickdown Mercedes-AMG vehicles:
kickdown is only
possible in the temporary setting. 140
Automatic transmissionDriving an
d parking
Page 144 of 370
Refueling
Important safety notes
G
WARNING
Fuel is highly flammable. Risk of fire and
explosion by improper handling of fuel.
You must avoid fire, open flames, smoking
and creating sparks. Switch off the ignition
before refueling and, if present, switch off the auxiliary heating. G
WARNING
Fuels are toxic and harmful to health. There is a risk of injury.
You must avoid fuels coming into contact with
skin, eyes and clothes or being swallowed.
Do not inhale the fuel vapors. Keep children
away from fuels.
Keep doors and windows closed during the
refueling process.
If you or others come into contact with fuel,
observe the following points:
R Immediately rinse the fuel off your skin with
soap and water.
R If you get fuel into your eyes, immediately
rinse your eyes throughly with clean water.
Seek medical attention immediately.
R Seek medical attention immediately if fuel
has been swallowed. Do not induce vomit-
ing.
R Immediately change out of clothing which
has come into contact with fuel. G
WARNING
Electrostatic charging can lead to the creation
of sparks and ignite fuel vapor. There is a risk of fire and explosion.
Touch the metallic body of the vehicle before
you open the fuel filler cap or handle the pump nozzle. Any possible electrostatic charge
present will in this way be depleted.
Do not get into the vehicle again during the
refueling process. Otherwise, electrostatic
charge could build up again. !
Do not use diesel to refuel vehicles with a
gasoline engine. Do not switch on the ignition if you accidentally refuel with the wrong fuel.
Otherwise, the fuel will enter the fuel system. Even small amounts of the wrong fuel could
result in damage to the fuel system and the
engine. Notify a qualified specialist workshop
and have the fuel tank and fuel lines drained
completely.
! Overfilling the fuel tank could damage the
fuel system.
! Take care not to spill any fuel on painted
surfaces. You could otherwise damage the
paintwork.
! Use a filter when adding fuel from a fuel can.
The fuel lines and/or the fuel injection system could otherwise be blocked by particles fromthe fuel can.
Do not get into the vehicle again during the refu-
eling process. Otherwise, electrostatic charge
could build up again.
If you overfill the fuel tank, fuel could spray out
when the fuel pump nozzle is removed.
For further information on fuel and fuel quality
(Y page 360). Refueling
General information Pay attention to the important safety notes
(Y
page 142).
The fuel filler flap is unlocked or locked auto-
matically when you unlock or lock the vehicle
with the SmartKey or using KEYLESS-GO.
The position of the fuel filler cap is displayed
00B6 in the instrument cluster. The arrow next
to the filling pump indicates the side of the vehi- cle. 142
RefuelingDriving and parking
Page 145 of 370
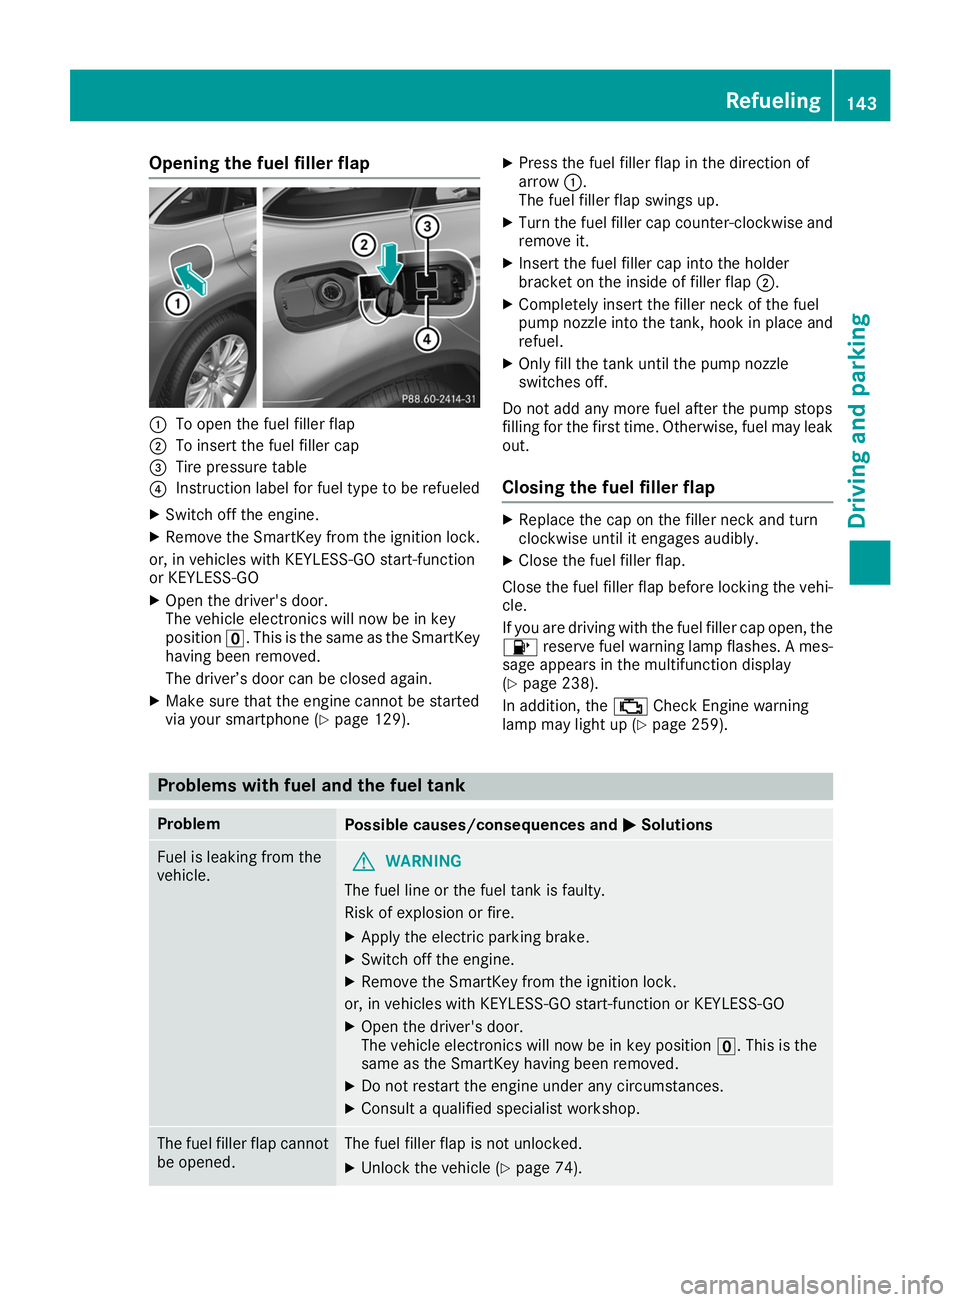
Opening the fuel filler flap
0043
To open the fuel filler flap
0044 To insert the fuel filler cap
0087 Tire pressure table
0085 Instruction label for fuel type to be refueled
X Switch off the engine.
X Remove the SmartKey from the ignition lock.
or, in vehicles with KEYLESS-GO start-function
or KEYLESS‑GO
X Open the driver's door.
The vehicle electronics will now be in key
position 0092. This is the same as the SmartKey
having been removed.
The driver’s door can be closed again.
X Make sure that the engine cannot be started
via your smartphone (Y page 129).X
Press the fuel filler flap in the direction of
arrow 0043.
The fuel filler flap swings up.
X Turn the fuel filler cap counter-clockwise and
remove it.
X Insert the fuel filler cap into the holder
bracket on the inside of filler flap 0044.
X Completely insert the filler neck of the fuel
pump nozzle into the tank, hook in place and
refuel.
X Only fill the tank until the pump nozzle
switches off.
Do not add any more fuel after the pump stops
filling for the first time. Otherwise, fuel may leak out.
Closing the fuel filler flap X
Replace the cap on the filler neck and turn
clockwise until it engages audibly.
X Close the fuel filler flap.
Close the fuel filler flap before locking the vehi-
cle.
If you are driving with the fuel filler cap open, the 00B6 reserve fuel warning lamp flashes. A mes-
sage appears in the multifunction display
(Y page 238).
In addition, the 00B9Check Engine warning
lamp may light up (Y page 259). Problems with fuel and the fuel tank
Problem
Possible causes/consequences and
0050 0050Solutions Fuel is leaking from the
vehicle.
G
WARNING
The fuel line or the fuel tank is faulty.
Risk of explosion or fire. X Apply the electric parking brake.
X Switch off the engine.
X Remove the SmartKey from the ignition lock.
or, in vehicles with KEYLESS-GO start-function or KEYLESS ‑GO
X Open the driver's door.
The vehicle electronics will now be in key position 0092. This is the
same as the SmartKey having been removed.
X Do not restart the engine under any circumstances.
X Consult a qualified specialist workshop. The fuel filler flap cannot
be opened. The fuel filler flap is not unlocked.
X Unlock the vehicle (Y page 74). Refueling
143Driving and parking Z
Page 150 of 370
Certain engine systems are designed to keep
the level of poisonous components in exhaust
fumes within legal limits.
These systems only work at peak efficiency if
they are serviced exactly in accordance with the manufacturer's specifications. Always have
work on the engine carried out at a qualified
specialist workshop. Mercedes-Benz recom-
mends that you use an authorized Mercedes-
Benz Center for this purpose. In particular, work
relevant to safety or on safety-related systems
must be carried out at a qualified specialist
workshop.
The engine settings must not be changed under
any circumstances. Furthermore, all specific
service work must be carried out at regular
intervals and in accordance with the Mercedes- Benz service requirements.
You can obtain current information concerning
the servicing of your vehicle at any time from a
qualified specialist workshop. This could be an
overview of the maintenance work or any addi-
tional maintenance work, for example. ECO display
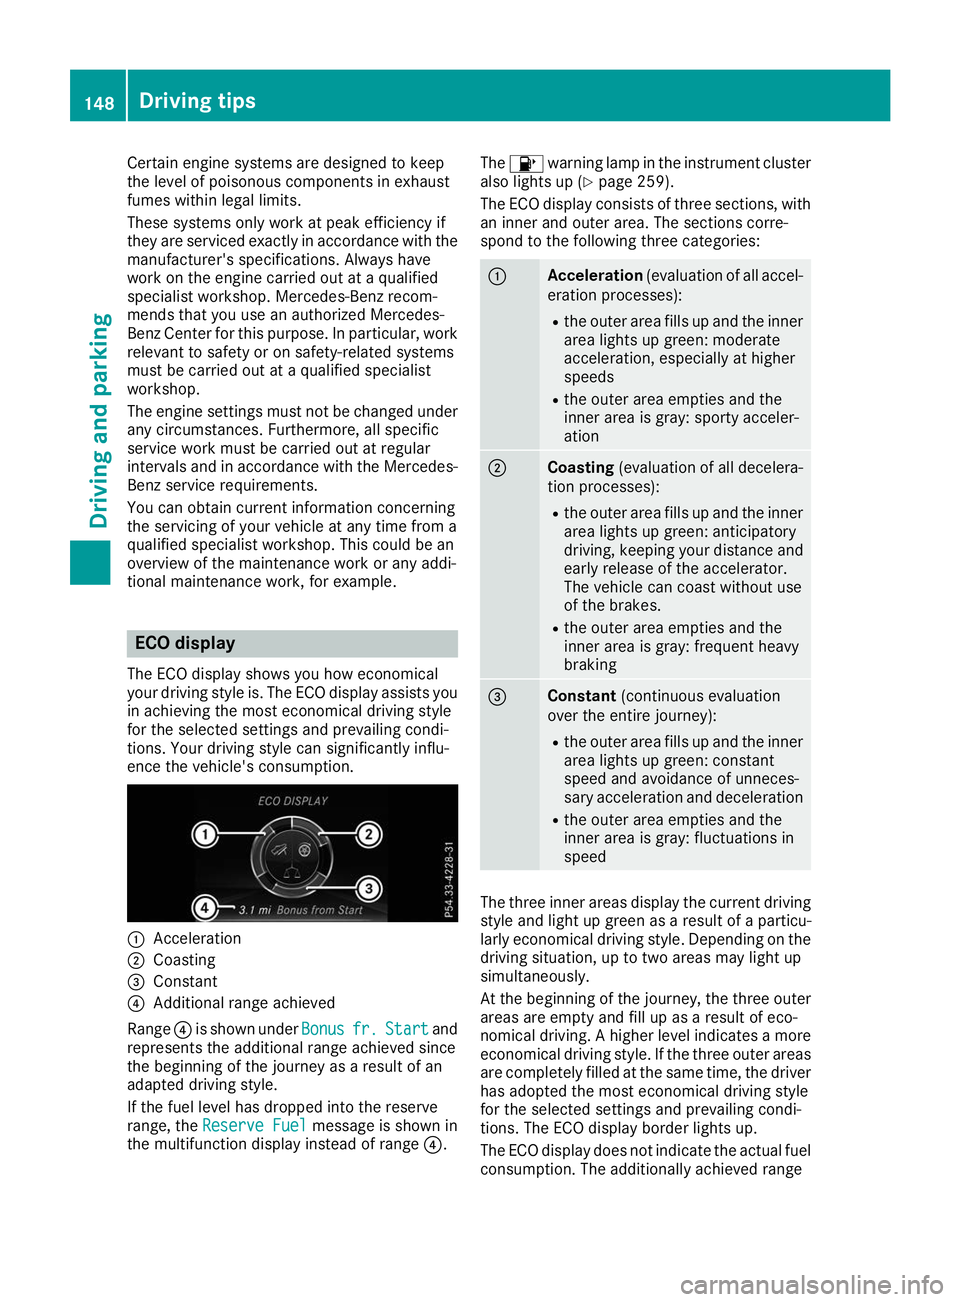
The ECO display shows you how economical
your driving style is. The ECO display assists you in achieving the most economical driving style
for the selected settings and prevailing condi-
tions. Your driving style can significantly influ-
ence the vehicle's consumption. 0043
Acceleration
0044 Coasting
0087 Constant
0085 Additional range achieved
Range 0085is shown under Bonus Bonusfr. fr.Start
Start and
represents the additional range achieved since
the beginning of the journey as a result of an
adapted driving style.
If the fuel level has dropped into the reserve
range, the Reserve Fuel Reserve Fuel message is shown in
the multifunction display instead of range 0085.The
00B6 warning lamp in the instrument cluster
also lights up (Y page 259).
The ECO display consists of three sections, with an inner and outer area. The sections corre-
spond to the following three categories: 0043
Acceleration
(evaluation of all accel-
eration processes):
R the outer area fills up and the inner
area lights up green: moderate
acceleration, especially at higher
speeds
R the outer area empties and the
inner area is gray: sporty acceler-
ation 0044
Coasting
(evaluation of all decelera-
tion processes):
R the outer area fills up and the inner
area lights up green: anticipatory
driving, keeping your distance and
early release of the accelerator.
The vehicle can coast without use
of the brakes.
R the outer area empties and the
inner area is gray: frequent heavy
braking 0087
Constant
(continuous evaluation
over the entire journey):
R the outer area fills up and the inner
area lights up green: constant
speed and avoidance of unneces-
sary acceleration and deceleration
R the outer area empties and the
inner area is gray: fluctuations in
speed The three inner areas display the current driving
style and light up green as a result of a particu-
larly economical driving style. Depending on the driving situation, up to two areas may light up
simultaneously.
At the beginning of the journey, the three outer
areas are empty and fill up as a result of eco-
nomical driving. A higher level indicates a more
economical driving style. If the three outer areas
are completely filled at the same time, the driver
has adopted the most economical driving style
for the selected settings and prevailing condi-
tions. The ECO display border lights up.
The ECO display does not indicate the actual fuel consumption. The additionally achieved range 148
Driving tipsDriving and parking
Page 151 of 370
displayed under
Bonus fr. Start
Bonus fr. Start does not
indicate a fixed consumption reduction.
In addition to driving style, the actual consump- tion is affected by other factors, such as:
R load
R tire pressure
R cold start
R choice of route
R electrical consumers switched on
These factors are not included in the ECO dis-
play.
An economical driving style specially requires
driving at moderate engine speeds.
Achieving a higher value in the categories
"Acceleration" and "Constant":
R observe the gearshift recommendations.
R drive the vehicle in the Comfortdrive pro-
gram.
On long journeys at a constant speed, e.g. on the highway, only the outer area for "constant" will
change.
The ECO display summarizes the driving style
from the start of the journey to its completion.
Therefore, there are more marked changes in
the outer areas at the start of a journey. On lon-
ger journeys, there are fewer changes. For more
marked changes, perform a manual rest
(Y page 212).
For further information on the ECO display, see (Y page 212). Braking
Important safety notes G
WARNING
If you shift down on a slippery road surface in an attempt to increase the engine's braking
effect, the drive wheels could lose their grip.
There is an increased danger of skidding and
accidents.
Do not shift down for additional engine brak-
ing on a slippery road surface.
Downhill gradients !
On long and steep gradients, you must
reduce the load on the brakes by shifting to a
lower gear in good time. This allows you to take advantage of the engine's braking effect.
This helps you to avoid overheating the
brakes and wearing them out excessively.
When you take advantage of engine braking, a drive wheel may not turn for some time, e.g.
on a slippery road surface. This could cause
damage to the drive train. This type of damage
is not covered by the Mercedes-Benz war-
ranty.
Do not depress the brake pedal continuously
while the vehicle is in motion, e.g. causing the
brakes to rub by constantly applying light pres-
sure to the pedal. This results in excessive and
premature wear to the brake pads.
Use the left-hand steering wheel paddle shifter
to shift into a lower gear in good time on long
and steep downhill gradients. This is especially
important if the vehicle is laden.
This also applies if you have activated cruise
control, the limiter or Active Distance Assist
DISTRONIC.
This will use the braking effect of the engine, so that less braking will be required to maintain the
speed. This relieves the load on the brake sys-
tem and prevents the brakes from overheating
and wearing too quickly.
Heavy and light loads G
WARNING
If you rest your foot on the brake pedal while
driving, the braking system can overheat. This increases the stopping distance and can even
cause the braking system to fail. There is a
risk of an accident.
Never use the brake pedal as a footrest. Never
depress the brake pedal and the accelerator
pedal at the same time.
! Depressing the brake pedal constantly
results in excessive and premature wear to
the brake pads.
If the brakes have been subjected to a heavy
load, do not stop the vehicle immediately. Drive on for a short while. This allows the airflow to
cool the brakes more quickly. Driving tips
149Driving and parking Z
Page 152 of 370
Wet roads
If you have driven for a long time in heavy rain
without braking, there may be a delayed reac-
tion from the brakes when braking for the first
time. This may also occur after the vehicle has
been washed or driven through deep water.
You then have to depress the brake pedal more
firmly. Maintain a greater distance from the
vehicle in front.
After driving on a wet road or having the vehicle washed, brake firmly while paying attention to
the traffic conditions. This will warm up the
brake discs, thereby drying them more quickly
and protecting them against corrosion.
Limited braking performance on salt-
treated roads If you drive on salted roads, a layer of salt resi-
due may form on the brake discs and brake
pads. This can result in a significantly longer
braking distance.
R Brake occasionally to remove any possible
salt residue. Make sure that you do not
endanger other road users when doing so.
R Carefully depress the brake pedal and the
beginning and end of a journey.
R Maintain a greater distance to the vehicle
ahead.
Servicing the brakes !
The brake fluid level may be too low, if:
R if the red brake warning lamp lights up in
the instrument cluster and
R you hear a warning tone while the engine is
running
Observe additional warning messages in the
multifunction display.
The brake fluid level may be too low due to
brake pad wear or leaking brake lines.
Have the brake system checked immediately.
Consult a qualified specialist workshop to
arrange this.
! A function or performance test should only
be carried out on a 2-axle dynamometer. If
you wish to operate the vehicle on such a
dynamometer, please consult a qualified spe-
cialist workshop in advance. You could oth-
erwise damage the drive train or the brake
system. !
Because ESP ®
is an automatic system, the
engine and ignition must be switched off
(SmartKey in position 0or 1or Start/Stop
button in position 0or 1) when the electric
parking brake is being tested on a brake dyna-
mometer (maximum 10 seconds).
Braking triggered automatically by ESP ®
may
seriously damage the brake system.
All checks and maintenance work on the brake
system must be carried out at a qualified spe-
cialist workshop.
Have brake pads installed and brake fluid
replaced at a qualified specialist workshop.
If the brake system has only been subject to
moderate loads, you should test the functional-
ity of your brakes at regular intervals. To do so,
depress the brake pedal firmly when driving at a high speed. This improves the grip of the brake
pads.
You can find a description of Brake Assist (BAS)
on (Y page 65) or of BAS PLUS on (Y page 70).
Mercedes-Benz recommends that you only have brake pads/linings installed on your vehicle
which have been approved for Mercedes-Benz
vehicles or which correspond to an equivalent
quality standard. Brake pads/linings which have
not been approved for Mercedes-Benz vehicles
or which are not of an equivalent quality could
affect your vehicle's operating safety.
Mercedes-Benz recommends that you only use
brake fluid that has been specially approved for your vehicle by Mercedes-Benz, or which corre-
sponds to an equivalent quality standard. Brake fluid which has not been approved for
Mercedes-Benz vehicles or which is not of an
equivalent quality could affect your vehicle's
operating safety. Driving on wet roads
Hydroplaning If water has accumulated to a certain depth on
the road surface, there is a danger of hydro-
planing occurring, even if:
R you drive at low speeds
R the tires have adequate tread depth 150
Driving tipsDriving and parking
Page 155 of 370
vehicle rectified immediately at a qualified spe-
cialist workshop.
Do not shift into transmission position 005Cwhen
driving off-road. You could lose control of the
vehicle if you attempt to brake the vehicle using
the service brake. If the gradient is too steep for
your vehicle, drive back down in reverse gear.
General notes H
Environmental note
Protection of the environment is of primary
importance. Treat nature with respect.
Observe all prohibiting signs.
Read this section carefully before driving your
vehicle off-road. Practice by driving over more
gentle off-road terrain first.
Familiarize yourself with the characteristics of
your vehicle and the gear shift operation before
driving through difficult terrain.
The following driving systems are specially
adapted to off-road driving:
R AIRMATIC package (vehicle level)
(Y page 168)
R DSR (Downhill Speed Regulation)
(Y page 167)
Observe the following notes:
R Select a vehicle level that is suitable for the
terrain. To avoid damaging the vehicle, make
sure there is always sufficient ground clear-
ance.
R Check that items of luggage and loads are
stowed safely and are well secured
(Y page 276).
R Always keep the engine running and in gear
when driving on a downhill gradient. Activate
DSR (Y page 167).
R Always keep the engine running and in gear
when driving down an incline.
R Adapt your speed to the terrain. The rougher,
steeper or more ruts on the terrain, the slower
your speed should be.
R Do not jump with the vehicle as this will inter-
rupt the vehicle's propulsion.
R Drive with extreme care on unfamiliar off-road
routes where visibility is poor. For safety rea- sons, get out of the vehicle first and survey
the off-road route.
R Look out for obstacles, such as rocks, holes,
tree stumps and furrows. R
Take care when turning on an uphill or down-
hill slope or when driving across a slope. The
vehicle could otherwise tip over.
R Always keep the doors, the tailgate, the side
windows and the sliding sunroof closed while
the vehicle is in motion.
R Do not shift the automatic transmission to
position 005C.
R Observe the notes on off-road fording
(Y page 151).
i Information about retrofitting special all-ter-
rain tires is available from any qualified spe-
cialist workshop.
i Do not use the HOLD function when driving
off-road, on steep uphill or downhill gradients
or on slippery or loose surfaces. The HOLD
function cannot hold the vehicle on such sur- faces.
Checklist before driving off-road !
If the engine oil warning lamp lights up while
the vehicle is in motion, stop the vehicle in a
safe place as soon as possible. Check the
engine oil level. The engine oil warning lamp
warning must not be ignored. Continuing the
journey while the symbol is displayed could
lead to engine damage.
X Engine oil level: check the engine oil level
and add engine oil if necessary.
When you drive on steep gradients, the engine
oil level must be sufficiently high to ensure
that oil is supplied correctly in the vehicle.
X Tire-changing tool kit: check that the jack is
working and make sure you have the lug
wrench, a robust tow cable and a folding
spade in the vehicle.
X Wheels and tires: check the tread depth and
pressure of the tires.
X Check for damage and remove any foreign
objects, e.g. small stones, from the wheels/
tires.
X Replace any missing valve caps.
X Replace dented or damaged wheels.
X Rims: dented or bent rims can result in a loss
of tire pressure and damage the tire bead.
Before driving off-road, check the wheels and replace them if necessary. Driving tips
153Driving and parking Z