2019 MERCEDES-BENZ GLC SUV check engine
[x] Cancel search: check enginePage 170 of 673
#
Press and hold theu button.
Setting the departu retime #
Brie fly press theu button. #
Press the, or. button repeatedly
until the time tobe changed appears on the
displa y. #
Press theu and^ buttons simultane‐
ousl y.
The Îsymbol on there mo tecontrol displ ay
fl ashes. #
Press the, and. buttons toset the
desired departure time. #
Press theu and^ buttons simultane‐
ousl y.
The new departure time will be stored.
Up tothre e departure times can be stored. #
Toactivate the departu retime: select the
desired departure time and press and hold
th eu button.
The Ísymbol, the departure time and,
depending on the selected departure time,
th e letter A, BorCappear on the displa y. #
Todeactivate the departure time: select
th e desired departure time and press and
hold the^ button.
OFF will appear on the displa y. #
Tocheck thest atus of thest ationary
heater: briefly press theu button.
Switching off immediately #
Press and hold the^ button.
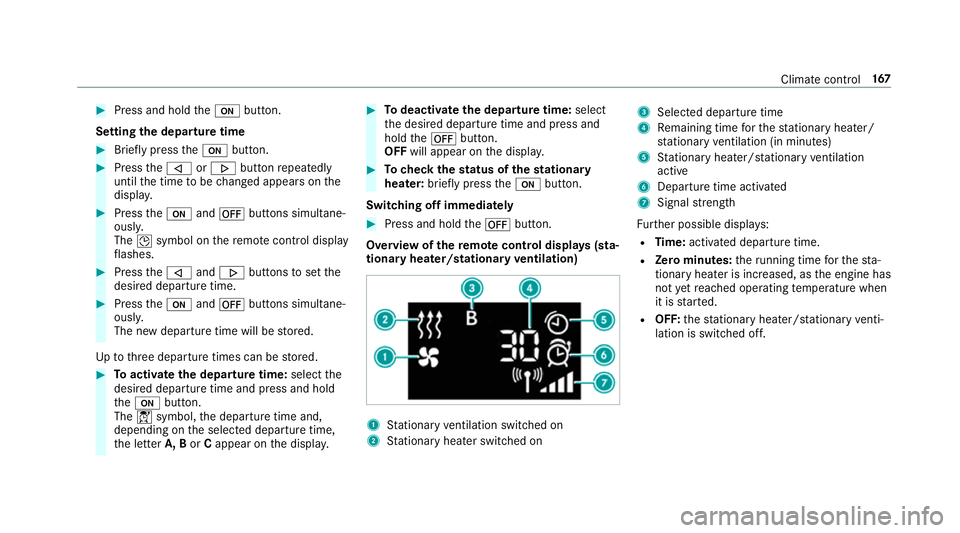
Overview of there mo tecont rol displa ys(sta‐
tiona ryheater/stationary ventilation) 1
Stationary ventilation switched on
2 Stationary heater swit ched on 3
Selected departure time
4 Remaining time forth est ationary heater/
st ationary ventilation (in minu tes)
5 Stationary heater/ stationary ventilation
acti ve
6 Departure time acti vated
7 Signal stre ngth
Fu rther possible displa ys:
R Time: activated departure time.
R Zero minutes: theru nning time forth est a‐
tionary heater is inc reased, as the engine has
not yetre ached operating temp erature when
it is star ted.
R OFF: thest ationary heater/ stationary venti‐
lation is switched off. Clima
tecontrol 167
Page 174 of 673
Driving
Note
s on Mercedes-AMG vehicles Obser
vethe no tes on thefo llowing topics in the
Supplement, as you may otherwise failto recog‐
nise dangers:
R RACE START
R AMG RIDE CONTROL
R (DYNAMIC SELECT switch) drive programs
R Functions of ESP ® Switching the po
wer supp lyor ignition on
without starting the engine &
DANG ER Risk death caused by exhaust
ga ses
Combustion engines emit poisonous exhaust
ga ses such as carbon monoxide. Inhaling
th ese exhaust gases is hazardous tohealth
and leads topoisoning. #
Never lea vethe engine or, if present,
th e auxiliary heating running in an enclosed space wi
thout suf ficient venti‐
lation. &
WARNING Risk offire caused byflam‐
mable material on theex haust sy stem
Flammable materials brought in byeither ani‐
mals or environmen tal influences may ignite
if th ey come into contact wi thhot parts of
th e engine or exhaust sy stem. #
Therefore, check regularly that there
are no flammable materials in the
engine compartment or on theex haust
sy stem. &
WARNING Risk of accident and inju ry
due tochildren left unat tended in the
ve hicle
If ch ildren are left unat tended in theve hicle,
th ey could:
R Open doo rs,th ereby endangering other
persons or road users. R
Get out and be stru ck byoncoming traf‐
fi c.
R Ope rate ve hicle equipment and become
trapped, forex ample.
In addition, thech ildren could also set the
ve hicle in motion, forex ample by:
R Releasing the parking brake.
R Changing the transmission position.
R Starting theve hicle. #
Never lea vechildren unat tended in the
ve hicle. #
When leaving theve hicle, alw aysta ke
th eke y with you and lock theve hicle. #
Keep theve hicle key out of reach of
ch ildren. Also obser
vethe "No tes on pets in theve hicle".
This also applies tothe Digital Vehicle Key if the
"Digital Vehicle Key" function is activated via
Mercedes me connect.
Re quirements: Driving and parking
171
Page 176 of 673
#
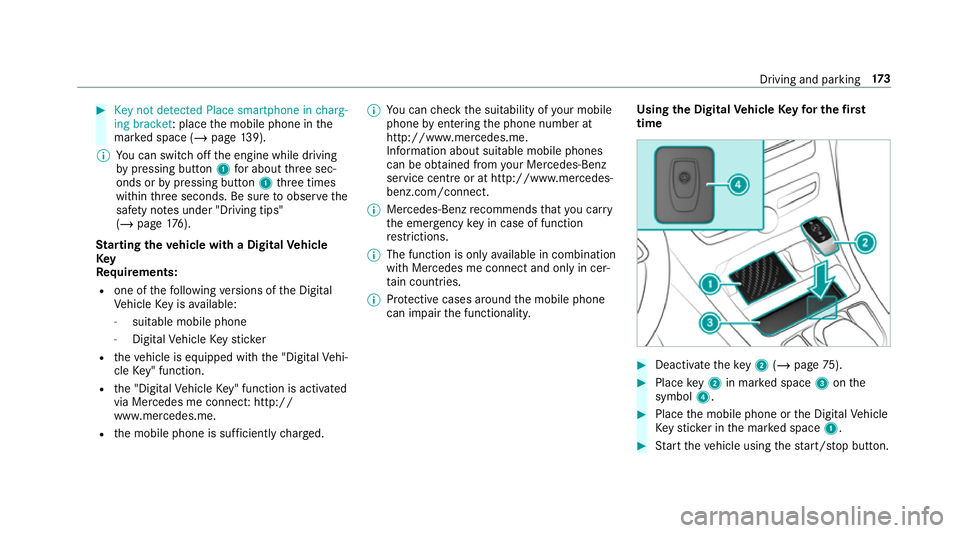
Key not detected Place smartphone in charg-
ing bracket: place the mobile phone in the
mar ked space (/ page139).
% You can swit choff the engine while driving
by pressing button 1for about thre e sec‐
onds or bypressing button 1thre e times
within thre e seconds. Be sure toobser vethe
saf ety no tes under "Driving tips"
(/ page 176).
St arting theve hicle with a Digital Vehicle
Key
Re quirements:
R one of thefo llowing versions of the Digital
Ve hicle Key is available:
- suitable mobile phone
- Digital Vehicle Keyst icker
R theve hicle is equipped with the "Digital Vehi‐
cle Key" function.
R the "Digital Vehicle Key" function is activated
via Mercedes me connec t:http://
www.mercedes.me.
R the mobile phone is suf ficiently charge d. %
You can check the suitability of your mobile
phone byentering the phone number at
http://www.mercedes.me.
Information about suitable mobile phones
can be obtained from your Mercedes-Benz
service centre or at http://www.mercedes-
benz.com/connect.
% Mercedes-Benz recommends that you car ry
th e emer gency key in case of function
re strictions.
% The function is only available in combination
with Mercedes me connect and on lyin cer‐
ta in countries.
% Protective cases around the mobile phone
can impair the functionality. Using
the Digital Vehicle Keyfo r the first
time #
Deactivate theke y2 (/ page 75). #
Place key2 in mar ked space 3onthe
symbol 4. #
Place the mobile phone or the Digital Vehicle
Ke yst icke r in the mar ked space 1. #
Start theve hicle using thest art/ stop button. Driving and parking
17 3
Page 177 of 673
Any fu
rther starts with th e DigitalVehicle
Key
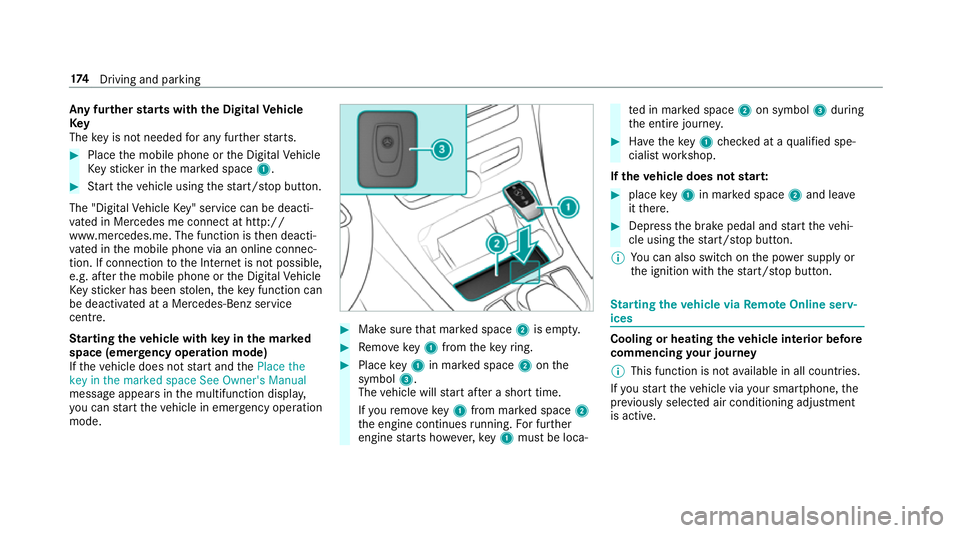
The key is not needed for any fur ther starts. #
Place the mobile phone or the Digital Vehicle
Ke yst icke r in the mar ked space 1. #
Start theve hicle using thest art/ stop button.
The "Digital Vehicle Key" service can be deacti‐
va ted in Mercedes me connect at http://
www.mercedes.me. The function is then deacti‐
va ted in the mobile phone via an online connec‐
tion. If connection tothe Internet is not possible,
e.g. af terth e mobile phone or the Digital Vehicle
Ke yst icke r has been stolen, theke y function can
be deacti vated at a Mercedes-Benz service
centre.
St arting theve hicle with key in the ma rked
space (emer gency operation mode)
If th eve hicle does not start and thePlace the
key in the marked space See Owner's Manual
message appears in the multifunction displa y,
yo u can start theve hicle in emer gency operation
mode. #
Makesure that mar ked space 2is em pty. #
Remo vekey1 from theke yring. #
Place key1 in mar ked space 2onthe
symbol 3.
The vehicle will start af ter a short time.
If yo ure mo vekey1 from mar ked space 2
th e engine continues running. For fur ther
engine starts ho wever,ke y1 must be loca‐ te
d in mar ked space 2on symbol 3during
th e entire journe y. #
Have theke y1 checked at a qualified spe‐
cialist workshop.
If th eve hicle does not star t: #
place key1 in mar ked space 2and lea ve
it th ere. #
Depress the brake pedal and start theve hi‐
cle using thest art/ stop button.
% You can also swit chon the po wer supp lyor
th e ignition with thest art/ stop button. St
arting theve hicle via Remo teOnline serv‐
ices Cooling or heating
theve hicle interior before
commencing your journey
% This function is not available in all countries.
If yo ustart theve hicle via your smartphone, the
pr ev iously selec ted air conditioning adjustment
is active. 174
Driving and pa rking
Page 182 of 673
&
WARNING Risk offire due toflammable
materials on hot parts of theex haust
sy stem
Flammable material such as lea ves, grass or
twigs may ignite if they come into contact
wi th hot parts of theex haust sy stem. #
When driving on unpa vedro ads or off-
ro ad, regular lych eck theve hicle under‐
side. #
Remo vetrapped plants or other flam‐
mable material, in particular. #
Ifth ere is damage, consult a qualified
specialist workshop immediately. When driving off-road, subs
tances su chas sand,
mud and water orwate r mixed with oil may get
into the brakes. This may lead toare duction in
braking ef fect or total brake failure as a result of
increased wear. The braking characteristics will
va ry depending on the material that has entered
th e sy stem. Clean the brakes af ter driving off-
ro ad. If youth en notice reduced braking ef fect
or hear scraping noises, ha vethe brake sy stem
ch ecked at a qualified specialist workshop. Ad
just your driving style to thech anged braking
ch aracteristics.
* NO
TEDama gecaused bydriving over
obs tacles The
vehicle can be damaged by:
R driving up on high kerbs or unpa ved
ro ads.
R quickly driving over obs tacles su chas
ke rbs, speed bumps or po tholes.
R heavy objects hitting the underbody or
ch assis components. #
Do not drive over obs tacles that could
damage theve hicle. #
Check theve hicle regular lyfor dama ge
during off-road driving. #
Adjust theve hicle speed tosuit the
ro ad sur face conditions. #
Ifth ere is damage, consult a qualified
specialist workshop immediately. +
ENVIRONMENTAL
NOTEEnvironmental
dama gedue tonon-obser vance of pro‐
hibition signs Environmental pr
otection has priority. Treat
nature with respect. #
Be sure toobser veprohibition signs. Checklist before driving off-road
Check
thefo llowing points before driving off-
ro ad:
R Fuel le vel
R Vehicles with a diesel engine: AdBlue ®
le vel
R Engine oil le vel:fill engine oil up tothe maxi‐
mum le velto ensure full gradeability
(/ page 479).
R Tyre-change tool kit and spare wheel
R Tyres and wheels
Off-road driving
Re ad this section before driving your vehicle off-
ro ad. Practise bydriving over more gentle off-
ro ad terrain firs t. Driving and pa
rking 17 9
Page 184 of 673
R
Use the braking po wer of the engine when
driving downhill.
R Shift toa lo werge ar on uphill gradients and
on long, steep downhill gradients.
R Activate DSR be fore driving downhill, if nec‐
essary (/ page 226).
Checklist af ter driving off-road
Off-road driving terrain places greater demands
on your vehicle than driving on no rmalroads.
Check the entire vehicle for dama geand fore ign
bodies everytime af ter driving off-road. Foreign
bodies in the wheels or driv etra in can lead to
imbalances and therefore vibrations.
R Ifth eF orG drive prog ram is selec‐
te d: select the;, =,CorA
drive prog ram.
R Switch DSR off.
R Lowe rth eve hicle le vel again toa le vel suita‐
ble tothero ad conditions, e.g. tothe normal
le ve l.
R Apply the brakes todry them af terfo rd ing.
R Check that the service brake is working nor‐
mally af ter a long downhill stre tch. R
Clean thefo llowing components everytime
af te r driving off-road:
- licence plate number
- headlamps and tail lamps
- tyres, wheels and wheel ar ches
- underbody
R After driving thro ugh sand, mud, water or
gr av el, ha vethefo llowing components
ch ecked and cleaned:
- brake discs and brakepads
- tyres and wheels
- axle joints ECO
start/s top function Ope
ration of the ECO start/s top function
Ve hicles with a 48 V on-board electrical sys‐
te m (EQ Boo sttech nology)
The engine is switched off automatically in the
fo llowing situations if all vehicle conditions for
an automatic engine stop are me t:
R you brake theve hicle toast andstill in trans‐
mission position hori.
R you depress the brake pedal when tr avelling
at a low speed.
If yo u swit chon the HOLD function or select a
dif fere nt transmission position than k, the
engine will automatically stop in thefo llowing
situations:
R youstop behind a vehicle that is pulling
aw ay.
R youstop at a stop sign when there is no vehi‐
cle in front of you.
R you turn thesteering wheel hard at a low
speed. Driving and parking
181
Page 478 of 673
fi
ed based on the actual operating conditions
and/or loads.
Examples of arduous operating conditions:
R regular city driving with frequent intermedi‐
ate stops
R mainly short-dis tance driving
R frequent operation in mountainous terrain or
on poor road sur faces
R when the engine is of ten le ftidling for long
periods
R operation in particula rly dusty conditions
and/or if air-recirculation mode is frequently
used
In these or similar operating conditions, ha vethe
interior air filter, engine air cleaner, engine oil
and oil filter etc. changed more frequent ly. The
ty re s must be checked more frequently if the
ve hicle is operated under increased loads. Fur‐
th er information can be obtained at a qualified
specialist workshop. Battery disconnection periods
The ASS
YST PLUS se rvice inter val display
can only calculate the service due da tewhen
th e bat tery is connected. #
Notedown the service due date displa yed on
th e instrument display before disconnecting
th e battery (/ page474). Engine com
partment Ac
tive bonn et(pedestrian pr otection) Operation of
the active bonnet (pedestrian
pr otection)
In cer tain accident situations, therisk of injury
to pedestrians can be reduced bythe actuation
of the active bonn et. The rear area of the bonn et
is raised byappr oximately 85 mm.
Fo rth e drive tothewo rkshop, reset the trig‐
ge red active bonn etyourself. Af terth e active
bonn ethas been triggered, pedestrian pr otection
may be limited.
A qu alified specialist workshop must re-ins tate
th e full functionality of the active bonn et. The active bonnet is not
available in all coun‐
tries.
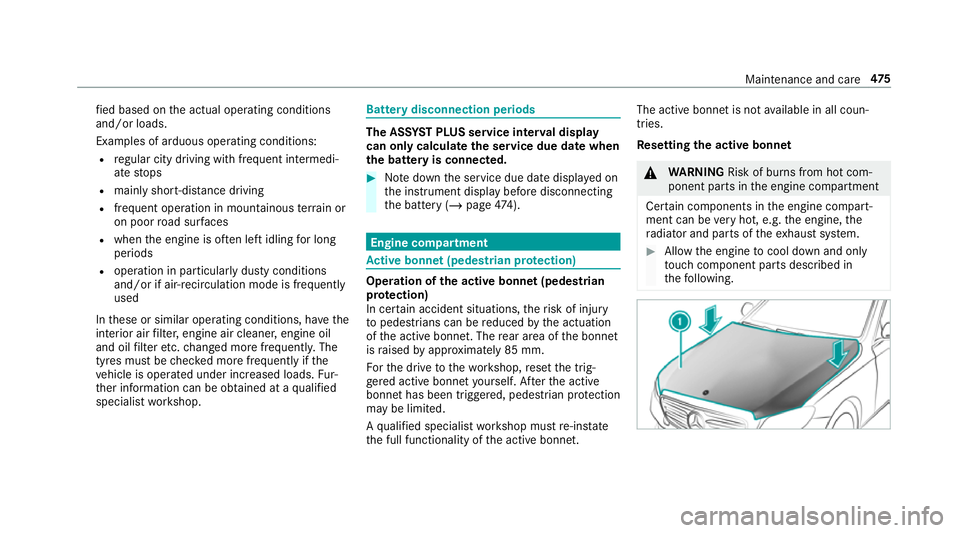
Re setting the active bonnet &
WARNING Risk of bu rns from hot com‐
ponent parts in the engine compartment
Cer tain components in the engine compart‐
ment can be very hot, e.g. the engine, the
ra diator and parts of theex haust sy stem. #
Allow the engine tocool down and only
to uch co mponent parts described in
th efo llowing. Maintenance and care
475
Page 481 of 673

#
Push the handle 1ofthe bonn etcatch
up wa rds and lift the bonn etby appr oximately
40 cm. #
Toclose: lowe rth e bonn etand let it fall from
a height of appr oximately 20 cm. #
Ifth e bonn etcan still be lif ted slightl y,open
th e bonn etagain and close it with a little
more forc e until it engages cor rectly. Engine oil
Che
cking the engine oil le vel using the oil
dip stick &
WARNING Risk of bu rns from hot com‐
ponent parts in the engine compartment
Cer tain components in the engine compart‐
ment can be very hot, e.g. the engine, the
ra diator and parts of theex haust sy stem. #
Allow the engine tocool down and only
to uch co mponent parts described in
th efo llowing. Plug-in
hybrid: be sure toobser vethe no tes in
th e Supplement. Otherwise, you may failto rec‐
ognise dangers.
Re quirements:
R the engine must ha vean oil dipstic k.If not,
th e engine oil le vel can be checked only with
th e on-board computer (/ page479).
Depending on the engine, the oil dipstick may be
ins talled in the engine compartment in dif fere nt
locations. The
waiting time before checking the oil le vel
when the engine is at normal operating temp era‐
ture is five minutes. #
Park theve hicle on a le vel sur face. #
Pull oil dipstick 1out and wipe off. 478
Maintenance and care