2019 MERCEDES-BENZ GLC SUV reset
[x] Cancel search: resetPage 144 of 673

Exterior lighting
Note
s onchanging the lights when driving
abroad Ve
hicles with static LED headlamps: it is not
necessa ryto change the headlamps. The legal
re qu irements are also met in countries in which
traf fic drives on theot her side of thero ad.
Ve hicles with Intelligent Light Sy stem: before
crossing the border into count ries in which traf‐
fi c drives on theot her side of thero ad, it is nec‐
essary toset the headlamps tosymmetrical low
beam (/ page149).
On ce the headlamps ha vebeen changed:
R oncoming traf fic will not be dazzled
R the edge of thero ad will not be illuminated
as far or as high
R the "mo torw ay mode" and "enhanced fog
light" functions will not be available
The headlamps must be reset toasymm etrical
low beam when youre turn from ab road. Information about lighting sy
stems and your
re sponsibility The
various lighting sy stems of theve hicle are
only aids. The driver of theve hicle is responsible
fo r cor rect vehicle illumination in accordance
with the pr evailing light and visibility conditions,
legal requirements and traf fic situation. Light switch
Ope
rating the light switch 1
W Left-hand pa rking lights
2 X Right-hand parking lights
3 T Standing lights and licence plate light‐
ing
4 Ã Automatic driving lights (prefer red light
switch position) Light and sight
141
Page 153 of 673
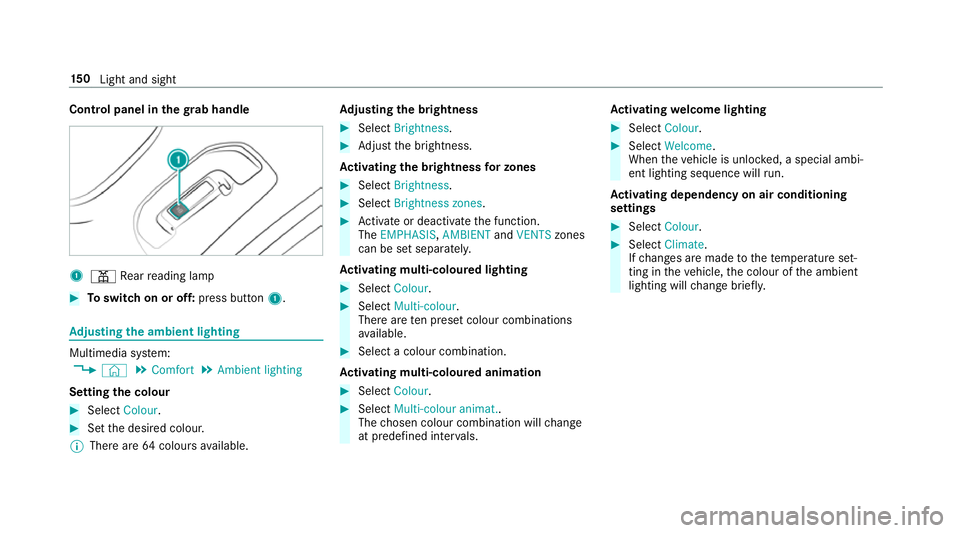
Control panel in
thegr ab handle 1
p Rear reading lamp #
Toswitch on or off: press button1. Ad
justing the ambient lighting Multimedia sy
stem:
4 © 5
Comfort 5
Ambient lighting
Setting the colour #
Select Colour. #
Set the desired colour.
% There are 64colours available. Ad
justing the brightness #
Select Brightness . #
Adjust the brightness.
Ac tivating the brightness for zones #
Select Brightness . #
Select Brightness zones . #
Activate or deacti vate the function.
The EMPHASIS, AMBIENTandVENTS zones
can be set separatel y.
Ac tivating multi-coloured lighting #
Select Colour. #
Select Multi-colour.
The reare ten preset colour combinations
av ailable. #
Select a colour combination.
Ac tivating multi-coloured animation #
Select Colour. #
Select Multi-colour animat..
The chosen colour combination will change
at predefined inter vals. Ac
tivating welcome lighting #
Select Colour. #
Select Welcome.
When theve hicle is unloc ked, a special ambi‐
ent lighting sequence will run.
Ac tivating dependency on air conditioning
settings #
Select Colour. #
Select Climate.
If ch anges are made tothete mp erature set‐
ting in theve hicle, the colour of the ambient
lighting will change brief ly. 15 0
Light and sight
Page 158 of 673
#
Foldthe wiper arm from there placement
position back onto there ar wind ow. Mir
rors Operating
the outside mir rors &
WARNING Risk of inju rythro ugh adjust‐
ing vehicle settings while theve hicle is in
motion
Yo u could lose cont rol of theve hicle in the
fo llowing situations:
R ifyo u adjust the driver's seat, the head
re stra ints, thesteering wheel or the mir‐
ro r while theve hicle is in motion
R ifyo ufast enyour seat belt while theve hi‐
cle is in motion #
Before starting the engine: adjust the
driver's seat, the head restra ints, the
st eering wheel or the mir ror and fasten
yo ur seat belt. &
WARNING Risk of accident due tomis‐
judgement of dis tances when using the
outside mir ror
The outside mir rors reflect objects on a
smaller scale. The objects in view are in fact
closer than they appear.
As a result, you may misjud gethe dis tance
between you and thero ad user driving
behind you, e.g. when changing lanes. #
Therefore, alw ays look over your shoul‐
der in order toensure that you are
aw are of the actual dis tance between
yo u and thero ad users driving behind
yo u. Fo
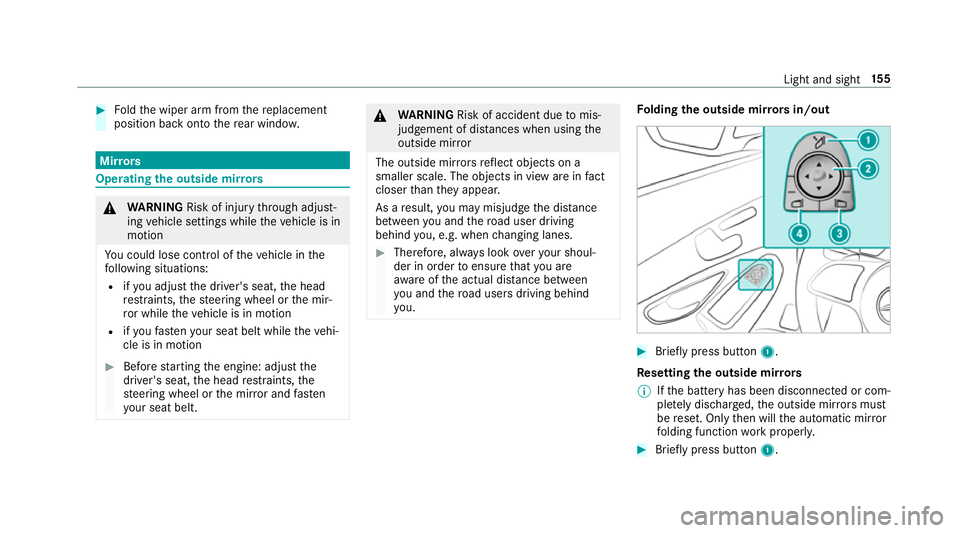
lding the outside mir rors in/out #
Brief lypress button 1.
Re setting the outside mir rors
% Ifth e battery has been disconnected or com‐
ple tely discharged, the outside mir rors must
be reset. Only then will the automatic mir ror
fo lding function workproperly. #
Brief lypress button 1. Light and sight
15 5
Page 293 of 673
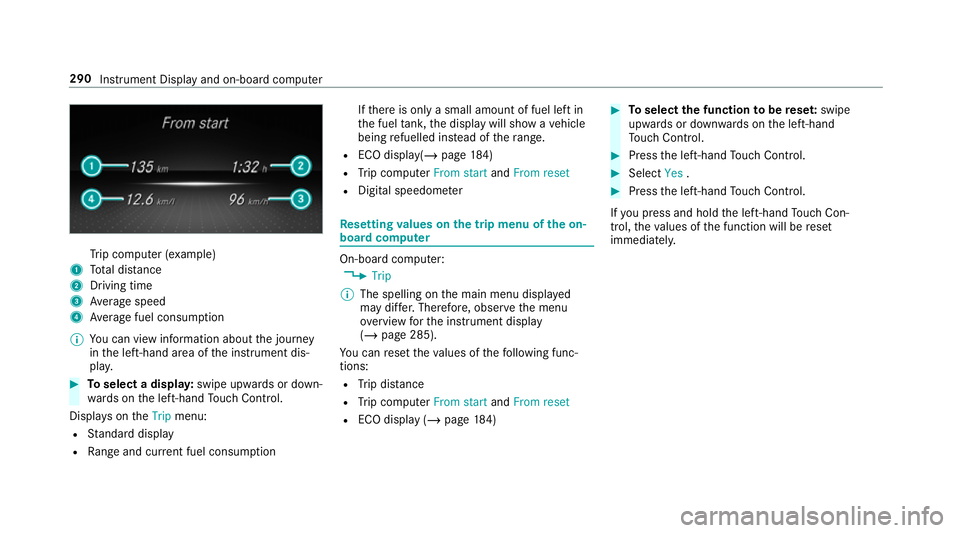
Tr
ip computer (e xamp le)
1 Total dis tance
2 Driving time
3 Average speed
4 Average fuel consum ption
% You can view information about the journey
in the left-hand area of the instrument dis‐
pla y. #
Toselect a displa y:swipe upwards or down‐
wa rds on the left-hand Touch Control.
Displa yson theTrip menu:
R Standard display
R Range and cur rent fuel consu mption If
th ere is only a small amount of fuel left in
th e fuel tank, the display will show a vehicle
being refuelled ins tead of thera nge.
R ECO displ ay(/ page 184)
R Trip computer From startandFrom reset
R Digital speedom eter Re
setting values on the trip menu of the on-
board compu ter On-board computer:
4 Trip
% The spelling on the main menu displa yed
may dif fer. Therefore, obser vethe menu
ove rview forth e instrument display
(/ page 285).
Yo u can reset theva lues of thefo llowing func‐
tions:
R Trip dis tance
R Trip computer From startandFrom reset
R ECO display (/ page184) #
Toselect the function tobe rese t:swipe
upwards or down wards on the left-hand
To uch Control. #
Press the left-hand Touch Control. #
Select Yes. #
Press the left-hand Touch Control.
If yo u press and hold the left-hand Touch Con‐
trol, theva lues of the function will be reset
immediatel y. 290
Instrument Display and on-board computer
Page 295 of 673
If
ro ute guidance has already been activated,
a qu ery will appear asking whe ther you wish
to end the cur rent route guidance. #
Select Yes. #
Press the left-hand Touch Control.
Ro ute guidance will start. Selecting
radio stations using the on-boa rd
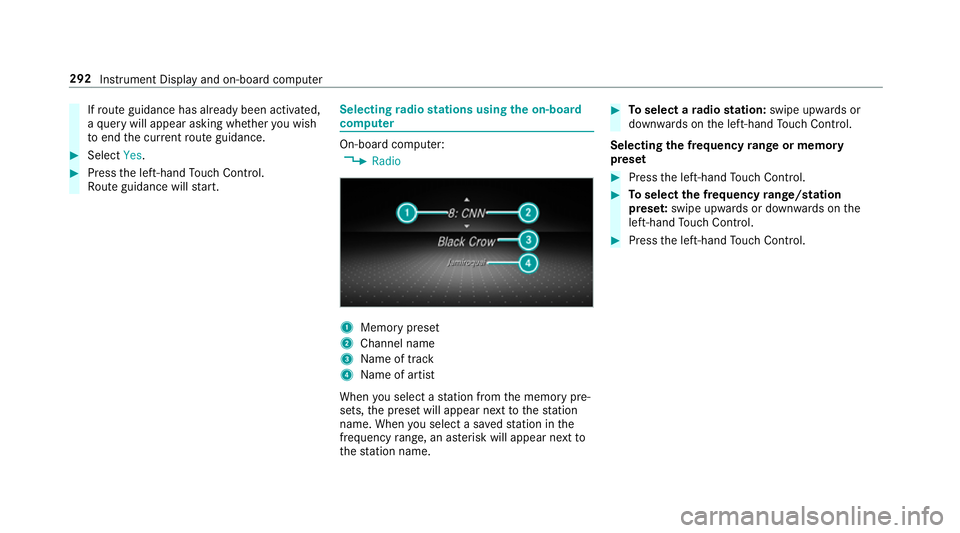
compu ter On-board computer:
4 Radio 1
Memory preset
2 Channel name
3 Name of track
4 Name of artist
When you select a station from the memory pre‐
sets, the preset will appear next tothest ation
name. When you select a sa vedstation in the
frequency range, an as terisk will appear next to
th est ation name. #
Toselect a radio station: swipe upwards or
down wards on the left-hand Touch Control.
Selecting the frequency range or memory
preset #
Press the left-hand Touch Control. #
Toselect the frequency range/station
prese t:swipe upwards or down wards on the
left-hand Touch Control. #
Press the left-hand Touch Control. 292
Instru ment Display and on-board computer
Page 335 of 673
R
The personalisation service is activated.
Fo r additional users of theve hicle:
R You ha vea Mercedes me user account.
R The vehicle owner has invited youto connect
yo ur user account on Mercedes me with that
of his vehicle.
R You ha veaccep tedth e invitation.
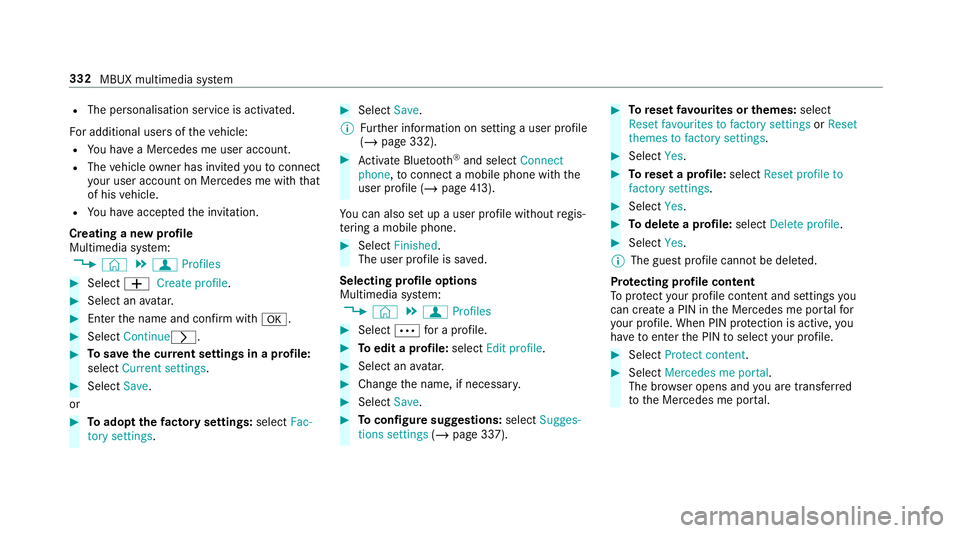
Creating a new profile
Multimedia sy stem:
4 © 5
f Profiles #
Select WCreate profile .#
Select an avatar. #
Enterth e name and confi rmwith a. #
Select Continuer .#
Tosave the cur rent settings in a profile:
select Current settings. #
Select Save.
or #
Toadopt thefa ctory settings: selectFac-
tory settings. #
Select Save.
% Further information on setting a user profile
(/ page 332). #
Activate Blu etoo th®
and select Connect
phone, toconnect a mobile phone wi th the
user profile (/ page413).
Yo u can also set up a user profile without regis‐
te ring a mobile phone. #
Select Finished.
The user profile is sa ved.
Selecting profile options
Multimedia sy stem:
4 © 5
f Profiles #
Select Äfor a profile. #
Toedit a profile: selectEdit profile . #
Select an avatar. #
Chan gethe name, if necessar y. #
Select Save. #
Toconfigure suggestions: selectSugges-
tions settings (/page 337). #
Toreset favo urites or themes: select
Reset favourites to factory settings orReset
themes to factory settings. #
Select Yes. #
Toreset a profile: selectReset profile to
factory settings. #
Select Yes. #
Todel ete a profile: selectDelete profile . #
Select Yes.
% The guest profile cannot be dele ted.
Pr otecting profile content
To protect your profile content and settings you
can crea tea PIN in the Mercedes me por talfor
yo ur profile. When PIN pr otection is active, you
ha ve toenter the PIN toselect your profile. #
Select Protect content . #
Select Mercedes me portal.
The br owser opens and you are trans ferred
to the Mercedes me por tal. 332
MBUX multimedia sy stem
Page 340 of 673
Calling up suggestions
Re
quirements:
R A profile has been created and is selected
(/ page 333). #
Tap on © inthe media displa y.
The home screen is shown. #
Swipe up until theSUGGESTIONS menu is
shown. #
Select a navigation destination, a media
source, a radio station or a con tact.
If ro ute guidance is already active, you can‐
not start a new route guidance or set an
intermediate destination forth eex isting
ro ute.
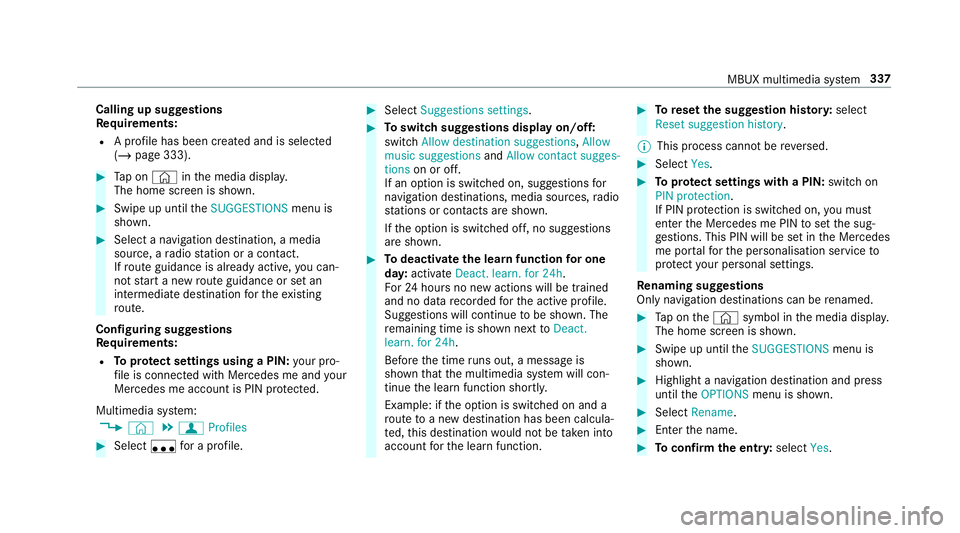
Configuring sug gestions
Re quirements:
R Toprotect settings using a PIN: your pro‐
fi le is connec ted with Mercedes me and your
Mercedes me account is PIN pr otected.
Multimedia sy stem:
4 © 5
f Profiles #
Select ufor a profile. #
Select Suggestions settings . #
Toswitch suggestions display on/off:
switch Allow destination suggestions ,Allow
music suggestions andAllow contact sugges-
tions on or off.
If an option is switched on, suggestions for
navigation de stinations, media sources, radio
st ations or con tacts are shown.
If th e option is switched off, no suggestions
are shown. #
Todeactivate the learn function for one
da y:activate Deact. learn. for 24h .
Fo r24 hours no new actions will be trained
and no data recorded forth e active profile.
Suggestions will continue tobe shown. The
re maining time is shown next toDeact.
learn. for 24h .
Before the time runs out, a messa geis
shown that the multimedia sy stem will con‐
tinue the learn function shortl y.
Example: if the option is switched on and a
ro ute toa new destination has been calcula‐
te d, this destination would not be take n into
account forth e learn function. #
Toreset the suggestion his tory:select
Reset suggestion history.
% This process cannot be reve rsed. #
Select Yes. #
Toprotect settings with a PIN: switchon
PIN protection.
If PIN pr otection is switched on, you must
en terth e Mercedes me PIN toset the sug‐
ge stions. This PIN will be set in the Mercedes
me por talfo rth e personalisation service to
pr otect your personal settings.
Re naming suggestions
Only navigation destinations can be renamed. #
Tap on the© symbol in the media displa y.
The home screen is shown. #
Swipe up until theSUGGESTIONS menu is
shown. #
Highlight a navigation destination and press
until theOPTIONS menu is shown. #
Select Rename. #
Ente rth e name. #
Toconfirm the entr y:select Yes. MBUX multimedia sy
stem 337
Page 363 of 673
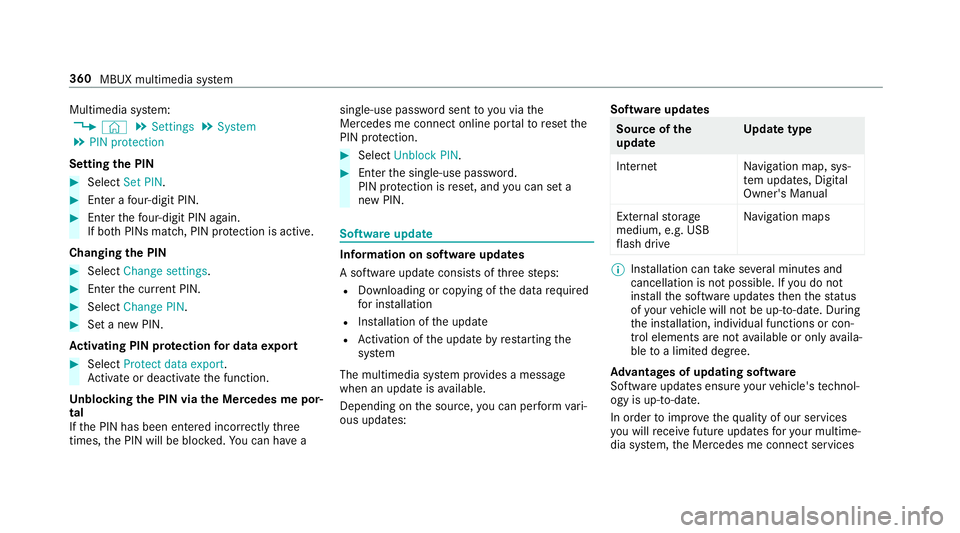
Multimedia sy
stem:
4 © 5
Settings 5
System
5 PIN protection
Setting the PIN #
Select Set PIN. #
Enter a four-digit PIN. #
Enterth efo ur-digit PIN again.
If bo thPINs match, PIN pr otection is active.
Changing the PIN #
Select Change settings. #
Enterth e cur rent PIN. #
Select Change PIN . #
Set a new PIN.
Ac tivating PIN pr otection for data export #
Select Protect data export .
Ac tivate or deacti vate the function.
Un blocking the PIN via the Mercedes me por‐
tal
If th e PIN has been entered incor rectly three
times, the PIN will be bloc ked. You can ha ve a single-use password sent
to you via the
Mercedes me connect online por talto reset the
PIN pr otection. #
Select Unblock PIN. #
Ente rth e single-use password.
PIN pr otection is reset, and you can set a
new PIN. Software upda
te Information on software upda
tes
A software upda teconsi sts of thre esteps:
R Downloading or copying of the data requ ired
fo r ins tallation
R Installation of the update
R Activation of the update byrestarting the
sy stem
The multimedia sy stem pr ovides a message
when an update is available.
Depending on the source, you can per form vari‐
ous updates: Software updates Source of
the
update Up
date type
Interne tN avigation map, sys‐
te m updates, Digital
Owner's Manual
External storage
medium, e.g. USB
fl ash drive Na
vigation maps %
Installation can take several minutes and
cancellation is not possible. If you do not
ins tallth e software updates then thest atus
of your vehicle will not be up-to-date. During
th e ins tallation, individual functions or con‐
trol elements are not available or on lyavaila‐
ble toa limited deg ree.
Ad vantages of updating software
Software updates ensure your vehicle's tech nol‐
ogy is up-to-date.
In order toimpr oveth equ ality of our services
yo u will recei vefuture updates foryo ur multime‐
dia sy stem, the Mercedes me connect services 360
MBUX multimedia sy stem