2019 MERCEDES-BENZ GLC oil pressure
[x] Cancel search: oil pressurePage 23 of 370
Summer tires
In winter ........................................332
Sun visor............................................ 290
Suspension settings
AIR BODY CONTROL ......................172
Suspension tuning
AMG sports suspension based on
AIR BODY CONTROL ......................174
SETUP (on-board computer,
Mercedes-AMG vehicles) ...............224
Switching air-recirculation mode
on/off................................................. 126
Switching on media mode
Via the device list.......................... 276
T
Tachometer........................................ 209
Tail lamps
Display message ............................ 239
Tailgate
Display message ............................ 254
Emergency unlocking ....................... 89
HANDS-FREE ACCESS ..................... 87
Important safety notes .................... 84
Limiting the opening angle ............... 89
object detection............................... 85
Opening dimensions ...................... 363
Opening/closing (automatically
from inside) ...................................... 88
Opening/closing (automatically
from outside) ................................... 85
Reversing feature ............................. 85
Tank content
Fuel gauge ....................................... 36
Technical data
Capacities ...................................... 358
Drawbar load (maximum) ............... 364
Information .................................... 356
Trailer loads................................... 364
Vehicle data ................................... 363
Telephone
Accepting a call (multifunction
steering wheel) .............................. 218
Authorizing a mobile phone (con-
necting) ......................................... 275
Connecting a mobile phone
(device manager) ........................... 275
Display message ............................ 255
Introduction ................................... 218
Menu (on-board computer) ............ 218
Number from the phone book ........ 218
Redialing ........................................ 219
Rejecting/ending a call ................. 218
see also Digital Operator's Man-
ual .................................................. 268
see Mobile phone
Temperature
Coolant (display in the instrument
cluster) .......................................... 209
Engine oil (on-board computer,
Mercedes-AMG vehicles) ............... 223
Outside temperature ...................... 209
Setting (climate control)................ 123
Transmission oil (on-board com-
puter, Mercedes-AMG vehicles) ..... 223
Timing (RACETIMER)......................... 225
Tire pressure
Calling up (on-board computer) ..... 337
Checking manually ........................ 336
Display message ............................ 250
Maximum ....................................... 336
Not reached (TIREFIT) .................... 318
Notes ............................................. 334
Reached (TIREFIT) .......................... 318
Recommended ............................... 333
Using the TIREFIT kit ...................... 317
Tire pressure loss warning system
General notes ................................ 336
Important safety notes .................. 336
Restarting ...................................... 337
Tire pressure monitor
Checking the tire pressure elec-
tronically ........................................ 339
Function/notes............................. 337
General notes ................................ 337
Important safety notes .................. 338
Radio type approval for the tire
pressure monitor ........................... 340
Restarting ...................................... 339
Warning lamp ................................. 266
Warning message .......................... 339
Tire pressure sensors
Display message ............................ 251
Tire-change tool kit........................... 314
Index21
Page 304 of 370
Mercedes-Benz Specifications for ServiceProducts is available at any authorizedMercedes-Benz Center.
The following cause engine failure or damageto the exhaust system:
RUse of engine oils and oil filters that havenot been expressly approved for the servicesystem
RReplacement of engine oil and oil filter afterthe replacement interval specified by theservice system has expired
RUse of engine oil additives
!Do not add too much oil. adding too muchengine oil can result in damage to the engineor to the catalytic converter. Have excessengine oil siphoned off.
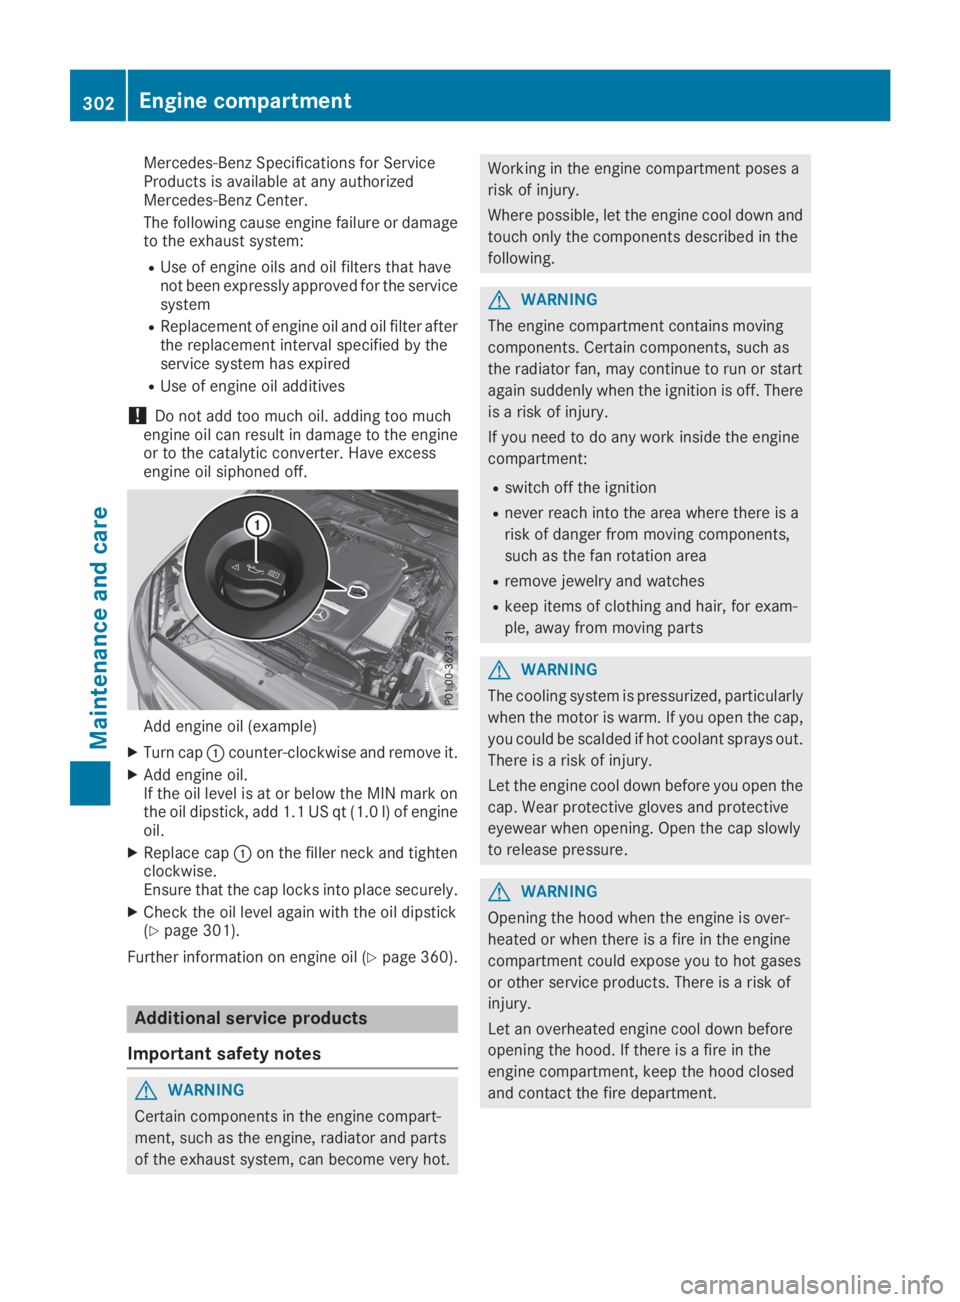
Add engine oil (example)
XTurn cap�Ccounter-clockwise and remove it.
XAdd engine oil.If the oil level is at or below the MIN mark onthe oil dipstick, add 1.1 US qt (1.0l)of engineoil.
XReplace cap�Con the filler neck and tightenclockwise.Ensure that the cap locks into place securely.
XCheck the oil level again with the oil dipstick(Ypage 301).
Further information on engine oil (Ypage 360).
Additional service products
Important safety notes
GWARNING
Certain components in the engine compart-
ment, such as the engine, radiator and parts
of the exhaust system, can become very hot.
Working in the engine compartment poses a
risk of injury.
Where possible, let the engine cool down and
touch only the components described in the
following.
GWARNING
The engine compartment contains moving
components. Certain components, such as
the radiator fan, may continue to run or start
again suddenly when the ignition is off. There
is a risk of injury.
If you need to do any work inside the engine
compartment:
Rswitch off the ignition
Rnever reach into the area where there is a
risk of danger from moving components,
such as the fan rotation area
Rremove jewelry and watches
Rkeep items of clothing and hair, for exam-
ple, away from moving parts
GWARNING
The cooling system is pressurized, particularly
when the motor is warm. If you open the cap,
you could be scalded if hot coolant sprays out.
There is a risk of injury.
Let the engine cool down before you open the
cap. Wear protective gloves and protective
eyewear when opening. Open the cap slowly
to release pressure.
GWARNING
Opening the hood when the engine is over-
heated or when there is a fire in the engine
compartment could expose you to hot gases
or other service products. There is a risk of
injury.
Let an overheated engine cool down before
opening the hood. If there is a fire in the
engine compartment, keep the hood closed
and contact the fire department.
302Engine compartment
Maintenance and care
Page 312 of 370
chrome trims must not be polished with achrome polish as this will cause them to losetheir black shine. For optimal care, the face-plates should be rubbed with a lightly oiledcloth after every car wash. Commerciallyavailable engine and care oils are suitable forthis.
For heavier soiling, you can apply a fine paint-work polish with a microfiber cloth. Removethe excess polish residue after polishing.
Impurities combined with the effects of road gritand corrosive environmental factors may causeflash rust to form on the surface. You canrestore the original shine of the exhaust pipe bycleaning it regularly, especially in winter andafter washing.
XClean the exhaust pipe with a care producttested and approved by Mercedes-Benz.
Cleaning the trailer tow hitch
HEnvironmental note
Dispose of rags soaked in oil and grease in an
environmentally responsible manner.
!Please note the care instructions in thetrailer coupling manufacturer's operatinginstructions.
The ball coupling must be cleaned if it becomesdirty or corroded.
XRemove rust on the ball, e.g. with a wirebrush.
XRemove dirt with a clean, lint-free cloth or abrush.
XAfter cleaning, lightly oil or grease the ballcoupling.
XCheck that the vehicle's trailer tow hitch isworking properly.
You can also have the maintenance work on theball coupling and the trailer tow hitch carried outby a qualified specialist workshop.
Interior care
Cleaning the display
!For cleaning, do not use any of the following:
Ralcohol-based thinner or gasoline
Rabrasive cleaning agents
Rcommercially-available household cleaningagents
These may damage the display surface. Donot put pressure on the display surface whencleaning. This could lead to irreparable dam-age to the display.
XBefore cleaning the display, make sure that itis switched off and has cooled down.
XClean the display surface using a commer-cially available microfiber cloth and TFT/LCDdisplay cleaner.
XDry the display surface using a dry microfibercloth.
Cleaning the plastic trim
GWARNING
Care products and cleaning agents containing
solvents cause surfaces in the cockpit to
become porous. As a result, plastic parts may
come loose in the event of air bag deploy-
ment. There is a risk of injury.
Do not use any care products and cleaning
agents to clean the cockpit.
!Never attach the following to plastic surfa-ces:
Rstickers
Rfilms
Rperfume oil container or similar
You could otherwise damage the plastic.
!Do not allow cosmetics, insect repellent orsunscreen to come into contact with the plas-tic trim. This maintains the high-quality look ofthe surfaces.
XWipe the plastic trim with a damp, lint-freecloth, e.g. a microfiber cloth.
XHeavy soiling:use care and cleaning prod-ucts recommended and approved byMercedes-Benz.The surface may change color temporarily.Wait until the surface is dry again.
310Care
Maintenance and care
Page 320 of 370
have attained a pressure of at least 200 kPa(2.0 bar/29 psi).
If a pressure of 200 kPa (2.0 bar/29 psi) hasbeen attained after five minutes, see "Tire pres-sure reached" (Ypage 318).
If a tire pressure of 200 kPa (2.0 bar/29 psi) hasnot been attained after five minutes, see "Tirepressure not reached" (Ypage 318).
If tire sealant has escaped, clean it off affectedareas as quickly as possible. It is preferable touse clean water.
If your clothes are soiled with tire sealant, havethem cleaned with perchloroethylene at a drycleaner as soon as possible.
Tire pressure not reached
If a tire pressure of 200 kPa (2.0 bar/29 psi) hasnot been attained after ten minutes:
XSwitch off the tire inflation compressor.
XUnscrew the filler hose from the valve of thefaulty tire.Tire sealant may escape when the filler hose isunscrewed.
XVery slowly drive forwards or reverse approx-imately 30 ft (10 m).
XPump up the tire again.
After a maximum of ten minutes, the tire pres-sure must be at least 200 kPa (2.0 bar/29 psi).
GWARNING
If the required tire pressure is not reached
after the specified time, the tire is too badly
damaged. The tire sealant cannot repair the
tire in this instance. Damaged tires and a tire
pressure that is too low can significantly
impair the vehicle's braking and driving char-
acteristics. There is a risk of accident.
Do not continue driving. Contact a qualified
specialist workshop.
Tire pressure reached
GWARNING
A tire temporarily sealed with tire sealant
impairs the driving characteristics and is not
suitable for higher speeds. There is a risk of
accident.
You should therefore adapt your driving style
accordingly and drive carefully. Do not exceed
the specified maximum speed with a tire that
has been repaired using tire sealant.
The maximum permissible speed for a tiresealed with tire sealant is 50 mph (80 km/h).The upper part of the TIREFIT sticker must beaffixed to the instrument cluster in the driver'sfield of vision.
If a tire pressure of 200 kPa (2.0 bar/29 psi) hasbeen attained after ten minutes:
XSwitch off the tire inflation compressor.
XUnscrew the filler hose from the valve of thefaulty tire.Tire sealant may escape when the filler hose isunscrewed.
XStow the tire sealant bottle and the tire infla-tion compressor.
XPull away immediately.
XStop after driving for approximately tenminutes and check the tire pressure with thetire inflation compressor.The tire pressure must now be at least130 kPa (1.3 bar/19 psi).
GWARNING
If the required tire pressure is not reached
after driving for a short period, the tire is too
badly damaged. The tire sealant cannot repair
the tire in this instance. Damaged tires and a
tire pressure that is too low can significantly
impair the vehicle's braking and driving char-
acteristics. There is a risk of accident.
Do not continue driving. Contact a qualified
specialist workshop.
In cases such as the one mentioned above, con-tact an authorized Mercedes-Benz Center. Orcall 1-800-FOR-MERCedes (in the USA) or1-800-387-0100 (in Canada).
XCorrect the tire pressure if it is still at least130 kPa (1.3 bar/19 psi). See the Tire andLoading Information placard on the B-pillar onthe driver's side or the tire pressure table inthe fuel filler flap for values.
XTo increase the tire pressure:switch on thetire inflation compressor.
318Flat tire
Breakdown assistance
Page 351 of 370
Speed rating
The speed rating is part of the tire identification.It specifies the speed range for which the tire isapproved.
GVW (Gross Vehicle Weight)
The gross vehicle weight includes the weight ofthe vehicle including fuel, tools, the spare wheel,accessories installed, occupants, luggage andthe drawbar noseweight, if applicable. The grossvehicle weight must not exceed the gross vehi-cle weight rating GVWR as specified on the vehi-cle identification plate on the B-pillar on thedriver's side.
GVWR (Gross Vehicle Weight Rating)
The GVWR is the maximum permissible grossweight of a fully loaded vehicle (the weight of thevehicle including all accessories, occupants,fuel, luggage and the drawbar noseweight, ifapplicable). The gross vehicle weight rating isspecified on the vehicle identification plate onthe B-pillar on the driver's side.
Maximum loaded vehicle weight
The maximum weight is the sum of:
Rthe curb weight of the vehicle
Rthe weight of the accessories
Rthe load limit
Rthe weight of the factory installed optionalequipment
Kilopascal (kPa)
Metric unit for tire pressure. 6.9 kPa corre-sponds to 1 psi. Another unit for tire pressure isbar. 100 kilopascals (kPa) are the equivalent of1 bar.
Load index
In addition to the load-bearing index, the loadindex may also be imprinted on the sidewall ofthe tire. This specifies the load-bearing capacitymore precisely.
Curb weight
The weight of a vehicle with standard equipmentincluding the maximum capacity of fuel, oil andcoolant. It also includes the air-conditioning sys-tem and optional equipment if these are instal-led in the vehicle, but does not include passen-gers or luggage.
Maximum load rating
The maximum tire load is the maximum permis-sible weight in kilograms or lbs for which a tire isapproved.
Maximum permissible tire pressure
Maximum permissible tire pressure for one tire.
Maximum load on one tire
Maximum load on one tire. This is calculated bydividing the maximum axle load of one axle bytwo.
PSI (pounds per square inch)
A standard unit of measure for tire pressure.
Aspect ratio
Relationship between tire height and tire widthin percent.
Tire pressure
This is pressure inside the tire applying an out-ward force to each square inch of the tire's sur-face. The tire pressure is specified in pounds persquare inch (psi), in kilopascal (kPa) or in bar.The tire pressure should only be corrected whenthe tires are cold.
Cold tire pressure
The tires are cold:
Rif the vehicle has been parked with the tiresout of direct sunlight for at least three hoursand
Rif the vehicle has not been driven further than1 mile (1.6 km)
Tread
The part of the tire that comes into contact withthe road.
Bead
The tire bead ensures that the tire sits securelyon the wheel. There are several steel wires in thebead to prevent the tire from coming loose fromthe wheel rim.
Sidewall
The part of the tire between the tread and thebead.
All about wheels and tires349
Wheels and tires
Z