2019 MERCEDES-BENZ GLC manual transmission
[x] Cancel search: manual transmissionPage 185 of 370
Rif there is a sudden change in temperature,e.g. when driving into a heated garage in win-ter
Rif the camera lens is dirty or obstructed.Observe the notes on cleaning(Ypage 309)
Rif the rear of your vehicle is damaged. In thiscase, have the camera position and settingchecked at a qualified specialist workshop
The field of vision and other functions of the rearview camera may be restricted due to additionalaccessories on the rear of the vehicle (e.g.license plate holder, rear bicycle rack).
The rear view camera is protected from rain-drops and dust by means of a flap. When the rearview camera is activated, this flap opens.
The flap closes again when:
Ryou have finished the maneuvering process
Ryou switch off the engine
Ryou open the cargo compartment
Observe the notes on cleaning (Ypage 309).
For technical reasons, the flap may remain openbriefly after the rear view camera has beendeactivated.
Activating/deactivating the rear view
camera
XTo activate:make sure that theActiva‐Activa‐
tion by R geartion by R gearfunction is selected in themultimedia system (see the Digital Operator'sManual).
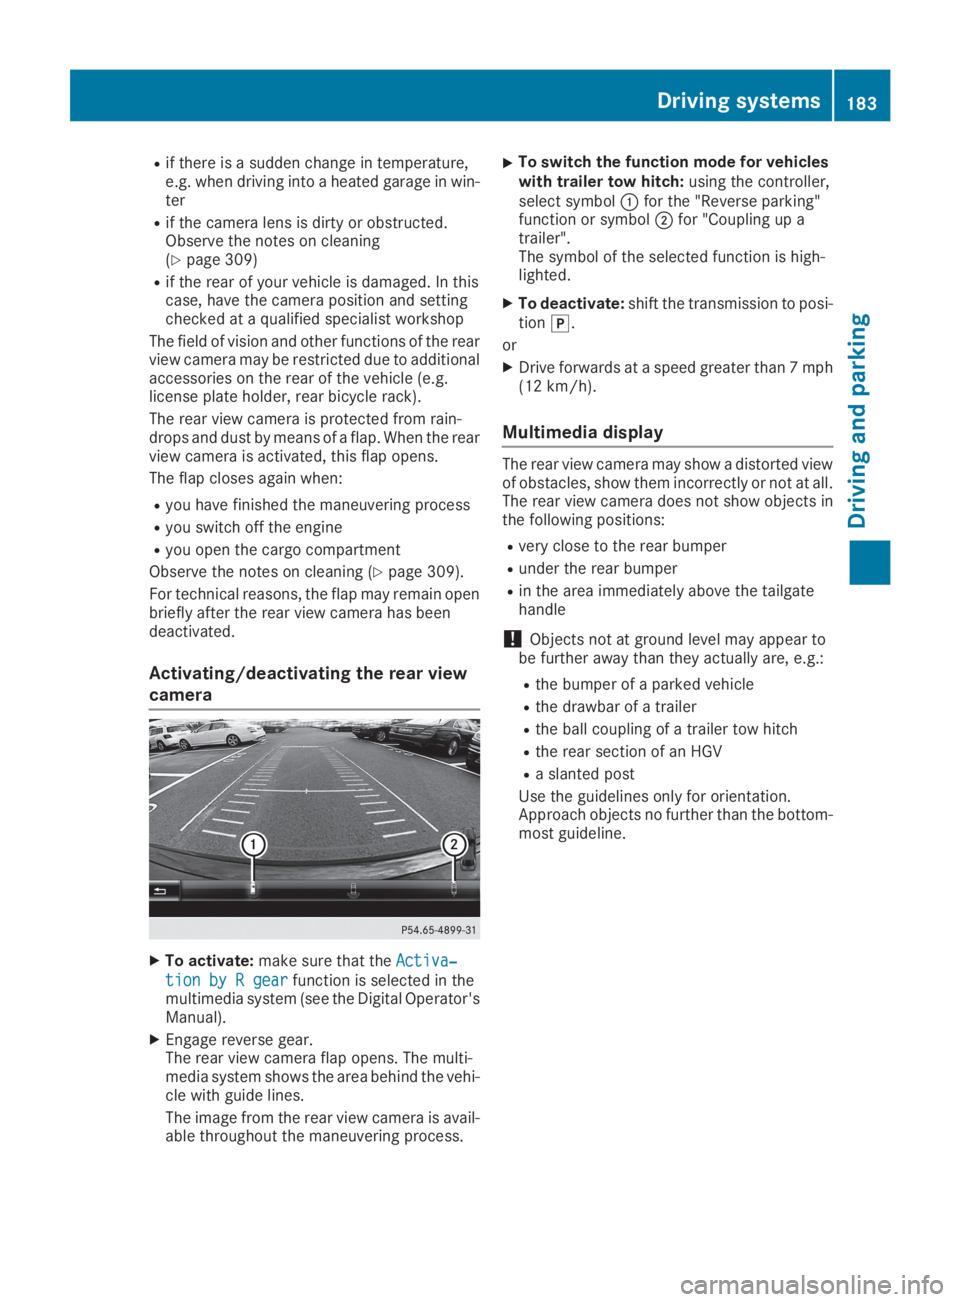
XEngage reverse gear.The rear view camera flap opens. The multi-media system shows the area behind the vehi-cle with guide lines.
The image from the rear view camera is avail-able throughout the maneuvering process.
XTo switch the function mode for vehicleswith trailer tow hitch:using the controller,select symbol�Cfor the "Reverse parking"function or symbol�Dfor "Coupling up atrailer".The symbol of the selected function is high-lighted.
XTo deactivate:shift the transmission to posi-tion�].
or
XDrive forwards at a speed greater than 7 mph(12 km/h).
Multimedia display
The rear view camera may show a distorted viewof obstacles, show them incorrectly or not at all.The rear view camera does not show objects inthe following positions:
Rvery close to the rear bumper
Runder the rear bumper
Rin the area immediately above the tailgatehandle
!Objects not at ground level may appear tobe further away than they actually are, e.g.:
Rthe bumper of a parked vehicle
Rthe drawbar of a trailer
Rthe ball coupling of a trailer tow hitch
Rthe rear section of an HGV
Ra slanted post
Use the guidelines only for orientation.Approach objects no further than the bottom-most guideline.
Driving systems183
Driving and parking
Z
Page 189 of 370
Object detection only works in wide-angle view.
To ensure that you can use the function, it mustbe switched on in the multimedia system (seethe Digital Operator's Manual).
360° Camera
General notes
The 360° camera is a system consisting of fourcameras.
The system processes images from the follow-ing cameras:
RRear view camera
RFront camera
RTwo side cameras in the exterior mirrors
The cameras cover the immediate surroundingsof the vehicle. The system supports you, forexample when parking or if vision is restricted atan exit.
You can show images from the 360° camera infull-screen mode or in seven different split-screen views on the multimedia system. A split-screen view also includes a top view of the vehi-cle. This view is calculated from the data sup-plied by the installed cameras (virtual camera).
The seven split-screen views are:
RTop view and picture from the rear view cam-era (130° viewing angle)
RTop view and image from the front camera(130° viewing angle without displaying themaximum steering wheel angle)
RTop view and enlarged rear view
RTop view and enlarged front view
RTop view and trailer view (vehicles with trailertow hitch)
RTop view and images from the rear-facing sidecameras (rear wheel view)
RTop view and images from the forward-facingside cameras (front wheel view)
When the function is active and you shift thetransmission from�[or�^to�\\, the guidelines on the multimedia system are hidden.
When you shift between transmission positions�[and�^, you see the previously selected frontor rear view.
Distances measured by Parking AssistPARKTRONIC will also be optically displayed:
Rin split screen view as red or yellow bracketsaround the vehicle icon in the top view, or
Rat the bottom right as red or yellow bracketsaround the vehicle symbol in full-screen mode
The line thickness and color of the bracketsshow how far the vehicle is from an object.
Ryellow brackets with thin lines: Parking AssistPARKTRONIC is active
Ryellow brackets with normal lines: an object ispresent in close range of the vehicle
Rred line: an object is present in the immediateclose range of the vehicle
Important safety notes
The 360°camera is only an aid and may show adistorted view of obstacles, show them incor-rectly or not at all. The 360°camera is not asubstitute for attentive driving.
You are always responsible for safe maneuver-ing and parking. Make sure that there are nopersons, animals or objects in the maneuveringarea while maneuvering and parking in parkingspaces.
You are always responsible for safety, and mustalways pay attention to your surroundings whenparking and maneuvering. This applies to theareas behind, in front of and beside the vehicle.You could otherwise endanger yourself and oth-ers.
The 360° camera will not function or will func-tion in a limited manner:
Rif the doors are open
Rif the exterior mirrors are folded in
Rif the tailgate is open
Rin heavy rain, snow or fog
Rat night or in very dark places
Rif the cameras are exposed to very bright light
Rif the area is lit by fluorescent bulbs or LEDlighting (the display may flicker)
Rif the camera lenses fog up, e.g. when drivinginto a heated garage in winter, causing a rapidchange in temperature
Rif the camera lenses are dirty or covered
Rif the vehicle components in which the cam-eras are installed are damaged. In this case,have the camera position and setting checkedat a qualified specialist workshop
Driving systems187
Driving and parking
Z
Page 190 of 370
Do not use the 360° camera in this case. Youcan otherwise injure others or cause damage toobjects or the vehicle.
The guide lines in the multimedia system displayshow the distances to your vehicle. The distan-ces only apply to road level.
In trailer mode, the guide lines are shown at thelevel of the trailer tow hitch.
The camera in the rear area is protected bymeans of a flap. This flap opens when the 360°camera is activated. Observe the notes oncleaning (Ypage 309). For technical reasons,the flap may remain open briefly after the 360°camera has been deactivated.
The field of vision and other functions of thecamera system may be restricted due to addi-tional attachments (e.g. license plate holder,rear bicycle carrier).
On vehicles with height-adjustable chassis,depending on technical conditions, leaving thestandard height can result in:
Rinaccuracies in the guide lines
Rinaccuracies in the display of generatedimages (top view)
Activation conditions
The image from the 360° camera appears if:
Rthe multimedia system is switched on
Rthe360° Camera360° Camerafunction is switched on
If you are driving faster than at a moderatespeed and you turn on the 360° camera, a warn-ing message appears.
The warning message disappears if:
Ryou are again driving at a moderate speed The360° camera is then activated
Rthe message is confirmed with the�8but-ton
Switching the 360° camera on and off
using the button
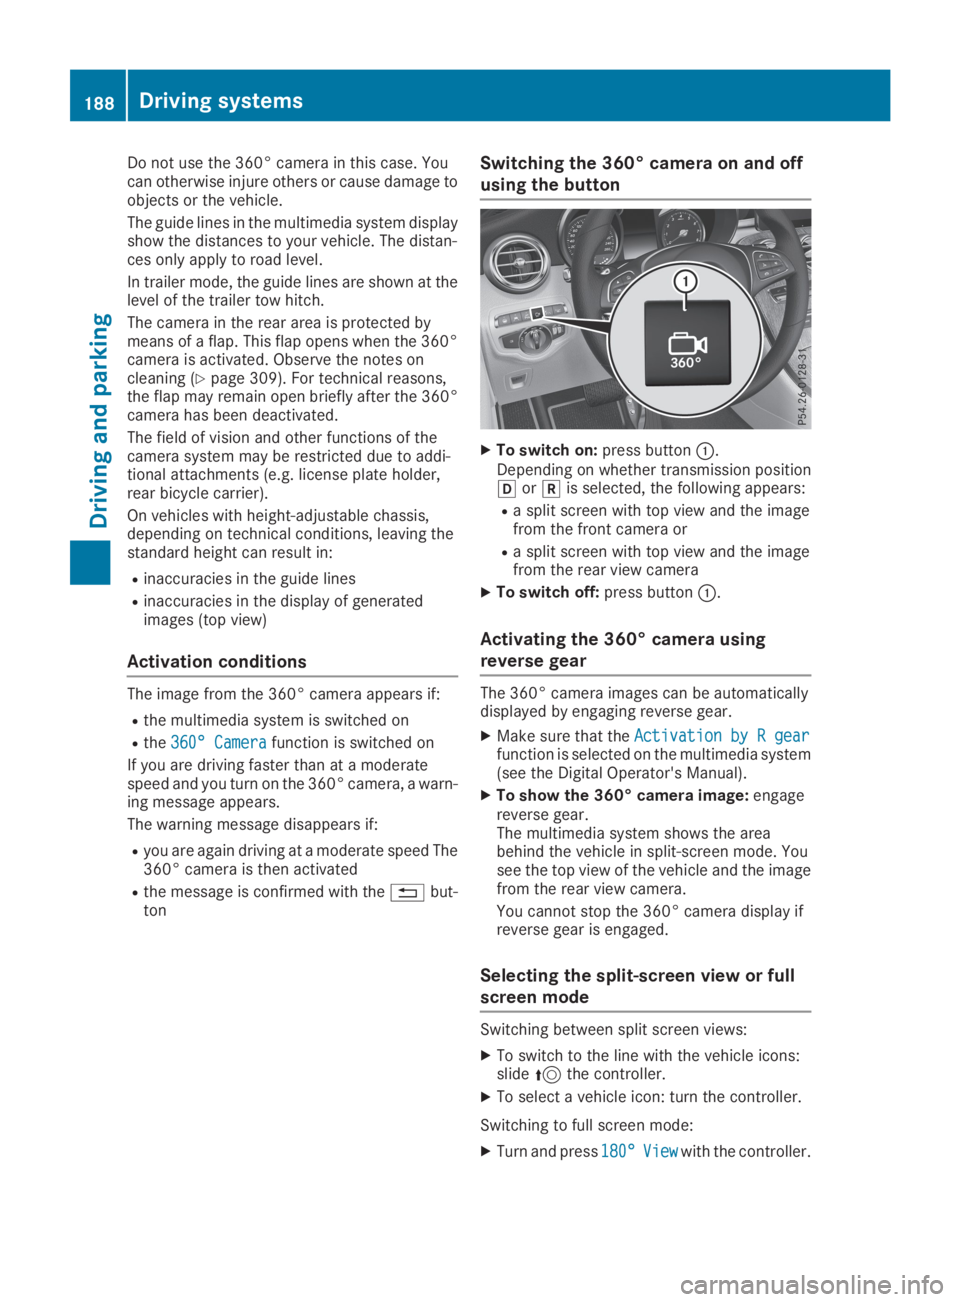
XTo switch on:press button�C.Depending on whether transmission position�[or�^is selected, the following appears:
Ra split screen with top view and the imagefrom the front camera or
Ra split screen with top view and the imagefrom the rear view camera
XTo switch off:press button�C.
Activating the 360° camera using
reverse gear
The 360° camera images can be automaticallydisplayed by engaging reverse gear.
XMake sure that theActivation by R gearActivation by R gearfunction is selected on the multimedia system(see the Digital Operator's Manual).
XTo show the 360° camera image:engagereverse gear.The multimedia system shows the areabehind the vehicle in split-screen mode. Yousee the top view of the vehicle and the imagefrom the rear view camera.
You cannot stop the 360° camera display ifreverse gear is engaged.
Selecting the split-screen view or full
screen mode
Switching between split screen views:
XTo switch to the line with the vehicle icons:slide5the controller.
XTo select a vehicle icon: turn the controller.
Switching to full screen mode:
XTurn and press180°180°ViewViewwith the controller.
188Driving systems
Driving an d parking
Page 206 of 370
which the maximum permissible speed for vehi-cle/trailer combinations is above 60 mph(100 km/h).
When towing a trailer, your vehicle's handlingcharacteristics will be different in comparison towhen driving without a trailer and it will con-sume more fuel.
Shift to a lower gear on long and steep downhillgradients.
This also applies to:
Ractivated DISTRONIC PLUS
Ractivated cruise control
This will use the braking effect of the engine, sothat less braking will be required to maintain thespeed. This relieves the load on the brake sys-tem and prevents the brakes from overheatingand wearing too quickly. If you need additionalbraking, depress the brake pedal repeatedlyrather than continuously.
Driving tips
If the trailer swings from side to side:
XDo not accelerate.
XDo not counter-steer.
XBrake if necessary.
RMaintain a greater distance from the vehiclein front than when driving without a trailer.
RAvoid braking abruptly. If possible, brake gen-tly at first to allow the trailer to run on. Then,increase the braking force rapidly.
RThe values given for gradient-climbing capa-bilities from a standstill refer to sea level.When driving in mountainous areas, note thatthe power output of the engine and, conse-quently, the vehicle's gradient-climbing capa-bility, decreases with increasing altitude.
Installing the ball coupling
GWARNING
If the ball coupling is not correctly installed
and secured, it could come loose while driving
and endanger other road users. There is a risk
of an accident and injury.
Install and secure the ball coupling as descri-
bed in the ball coupling manufacturer's instal-
lation instructions. Make sure that the ball
coupling is correctly installed and secured
before every journey.
GWARNING
If the ball coupling is not installed and secured
correctly the trailer may come loose. There is
a risk of an accident.
Install and secure the ball coupling as descri-
bed in the ball coupling installation instruc-
tions. Make sure that the ball coupling is
installed and secured correctly before every
journey.
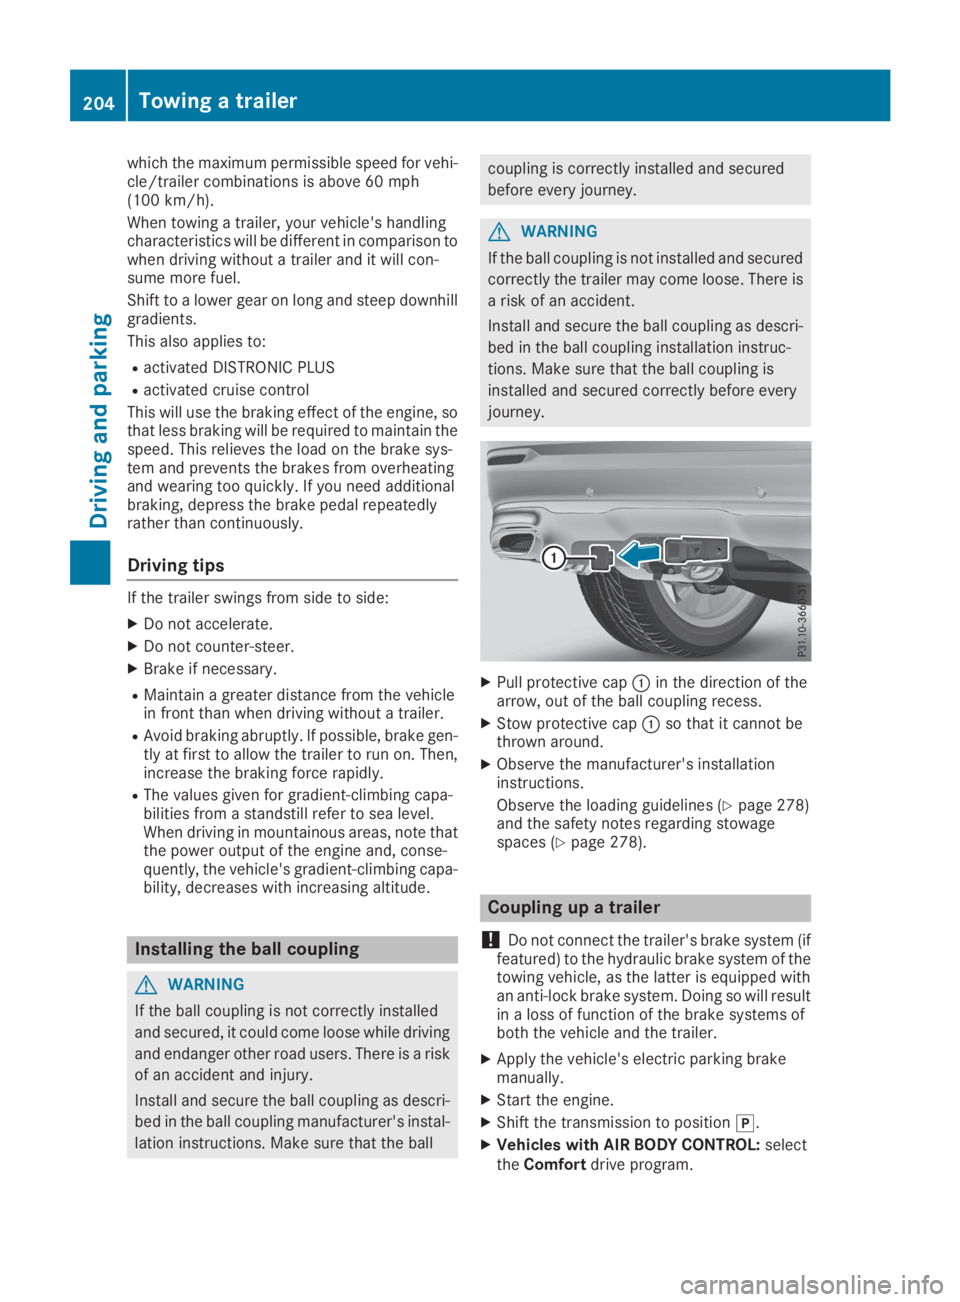
XPull protective cap�Cin the direction of thearrow, out of the ball coupling recess.
XStow protective cap�Cso that it cannot bethrown around.
XObserve the manufacturer's installationinstructions.
Observe the loading guidelines (Ypage 278)and the safety notes regarding stowagespaces (Ypage 278).
Coupling up a trailer
!Do not connect the trailer's brake system (iffeatured) to the hydraulic brake system of thetowing vehicle, as the latter is equipped withan anti-lock brake system. Doing so will resultin a loss of function of the brake systems ofboth the vehicle and the trailer.
XApply the vehicle's electric parking brakemanually.
XStart the engine.
XShift the transmission to position�].
XVehicles with AIR BODY CONTROL:selecttheComfortdrive program.
204Towing a trailer
Driving and parking
Page 208 of 370
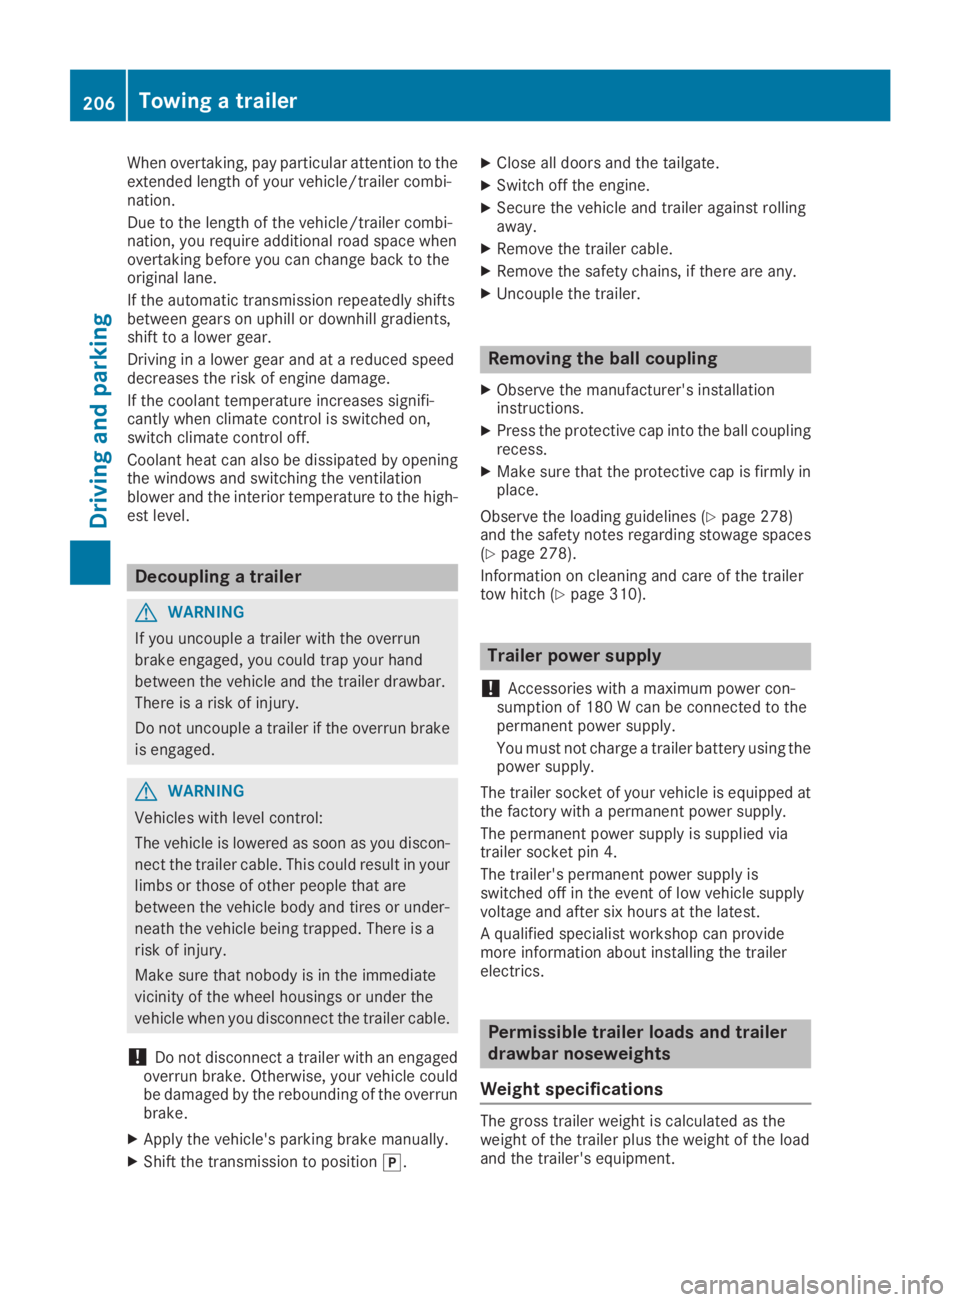
When overtaking, pay particular attention to theextended length of your vehicle/trailer combi-nation.
Due to the length of the vehicle/trailer combi-nation, you require additional road space whenovertaking before you can change back to theoriginal lane.
If the automatic transmission repeatedly shiftsbetween gears on uphill or downhill gradients,shift to a lower gear.
Driving in a lower gear and at a reduced speeddecreases the risk of engine damage.
If the coolant temperature increases signifi-cantly when climate control is switched on,switch climate control off.
Coolant heat can also be dissipated by openingthe windows and switching the ventilationblower and the interior temperature to the high-est level.
Decoupling a trailer
GWARNING
If you uncouple a trailer with the overrun
brake engaged, you could trap your hand
between the vehicle and the trailer drawbar.
There is a risk of injury.
Do not uncouple a trailer if the overrun brake
is engaged.
GWARNING
Vehicles with level control:
The vehicle is lowered as soon as you discon-
nect the trailer cable. This could result in your
limbs or those of other people that are
between the vehicle body and tires or under-
neath the vehicle being trapped. There is a
risk of injury.
Make sure that nobody is in the immediate
vicinity of the wheel housings or under the
vehicle when you disconnect the trailer cable.
!Do not disconnect a trailer with an engagedoverrun brake. Otherwise, your vehicle couldbe damaged by the rebounding of the overrunbrake.
XApply the vehicle's parking brake manually.
XShift the transmission to position�].
XClose all doors and the tailgate.
XSwitch off the engine.
XSecure the vehicle and trailer against rollingaway.
XRemove the trailer cable.
XRemove the safety chains, if there are any.
XUncouple the trailer.
Removing the ball coupling
XObserve the manufacturer's installationinstructions.
XPress the protective cap into the ball couplingrecess.
XMake sure that the protective cap is firmly inplace.
Observe the loading guidelines (Ypage 278)and the safety notes regarding stowage spaces(Ypage 278).
Information on cleaning and care of the trailertow hitch (Ypage 310).
Trailer power supply
!Accessories with a maximum power con-sumption of 180 W can be connected to thepermanent power supply.
You must not charge a trailer battery using thepower supply.
The trailer socket of your vehicle is equipped atthe factory with a permanent power supply.
The permanent power supply is supplied viatrailer socket pin 4.
The trailer's permanent power supply isswitched off in the event of low vehicle supplyvoltage and after six hours at the latest.
A qualified specialist workshop can providemore information about installing the trailerelectrics.
Permissible trailer loads and trailer
drawbar noseweights
Weight specifications
The gross trailer weight is calculated as theweight of the trailer plus the weight of the loadand the trailer's equipment.
206Towing a trailer
Driving and parking
Page 233 of 370
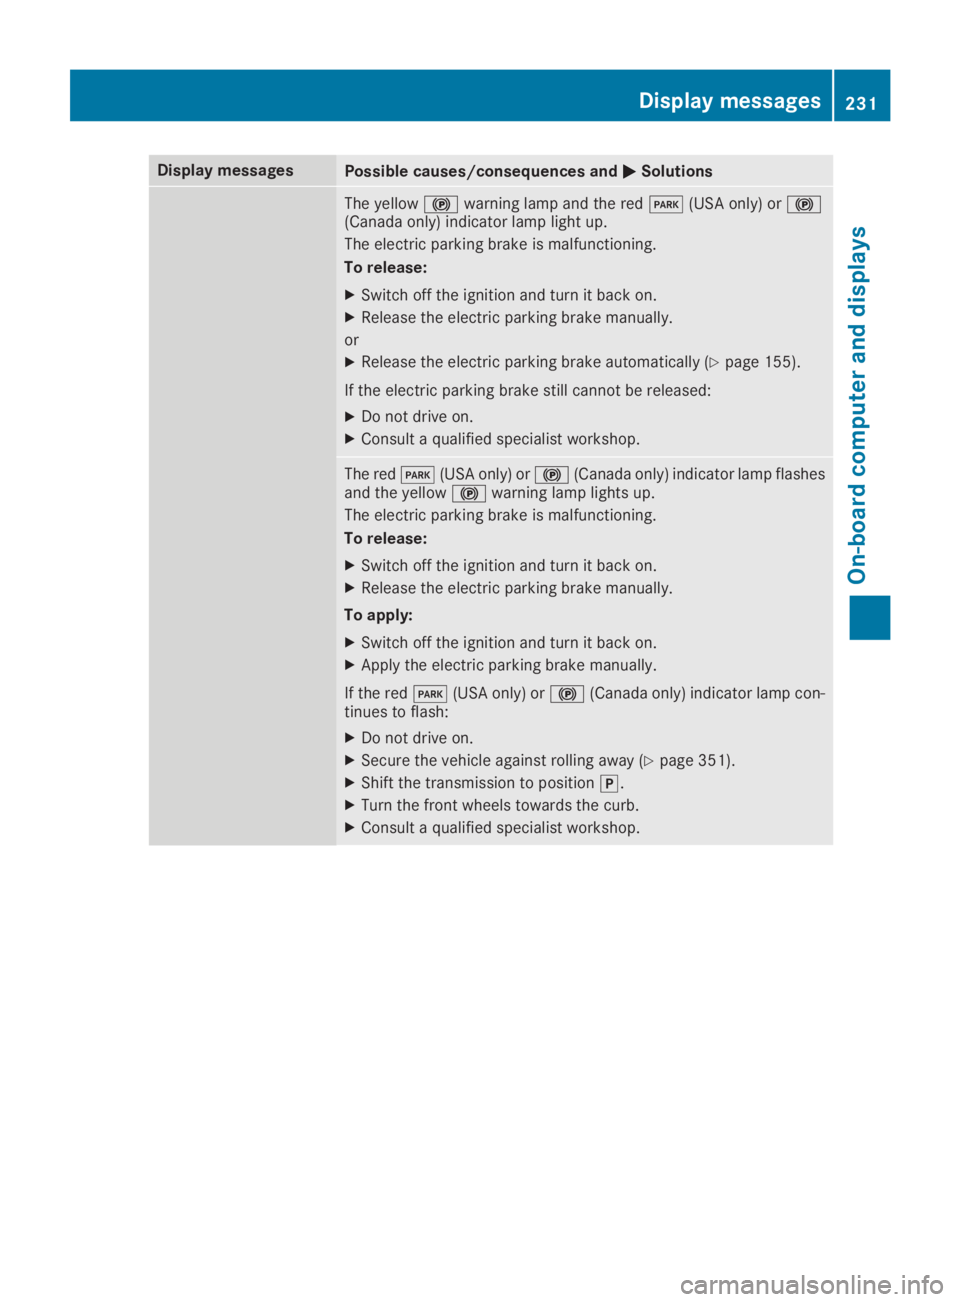
Display messagesPossible causes/consequences and�P�PSolutions
The yellow�$warning lamp and the red�I(USA only) or�$(Canada only) indicator lamp light up.
The electric parking brake is malfunctioning.
To release:
XSwitch off the ignition and turn it back on.
XRelease the electric parking brake manually.
or
XRelease the electric parking brake automatically (Ypage 155).
If the electric parking brake still cannot be released:
XDo not drive on.
XConsult a qualified specialist workshop.
The red�I(USA only) or�$(Canada only) indicator lamp flashesand the yellow�$warning lamp lights up.
The electric parking brake is malfunctioning.
To release:
XSwitch off the ignition and turn it back on.
XRelease the electric parking brake manually.
To apply:
XSwitch off the ignition and turn it back on.
XApply the electric parking brake manually.
If the red�I(USA only) or�$(Canada only) indicator lamp con-tinues to flash:
XDo not drive on.
XSecure the vehicle against rolling away (Ypage 351).
XShift the transmission to position�].
XTurn the front wheels towards the curb.
XConsult a qualified specialist workshop.
Displaymessages231
On-b oard computer and displays
Z
Page 234 of 370
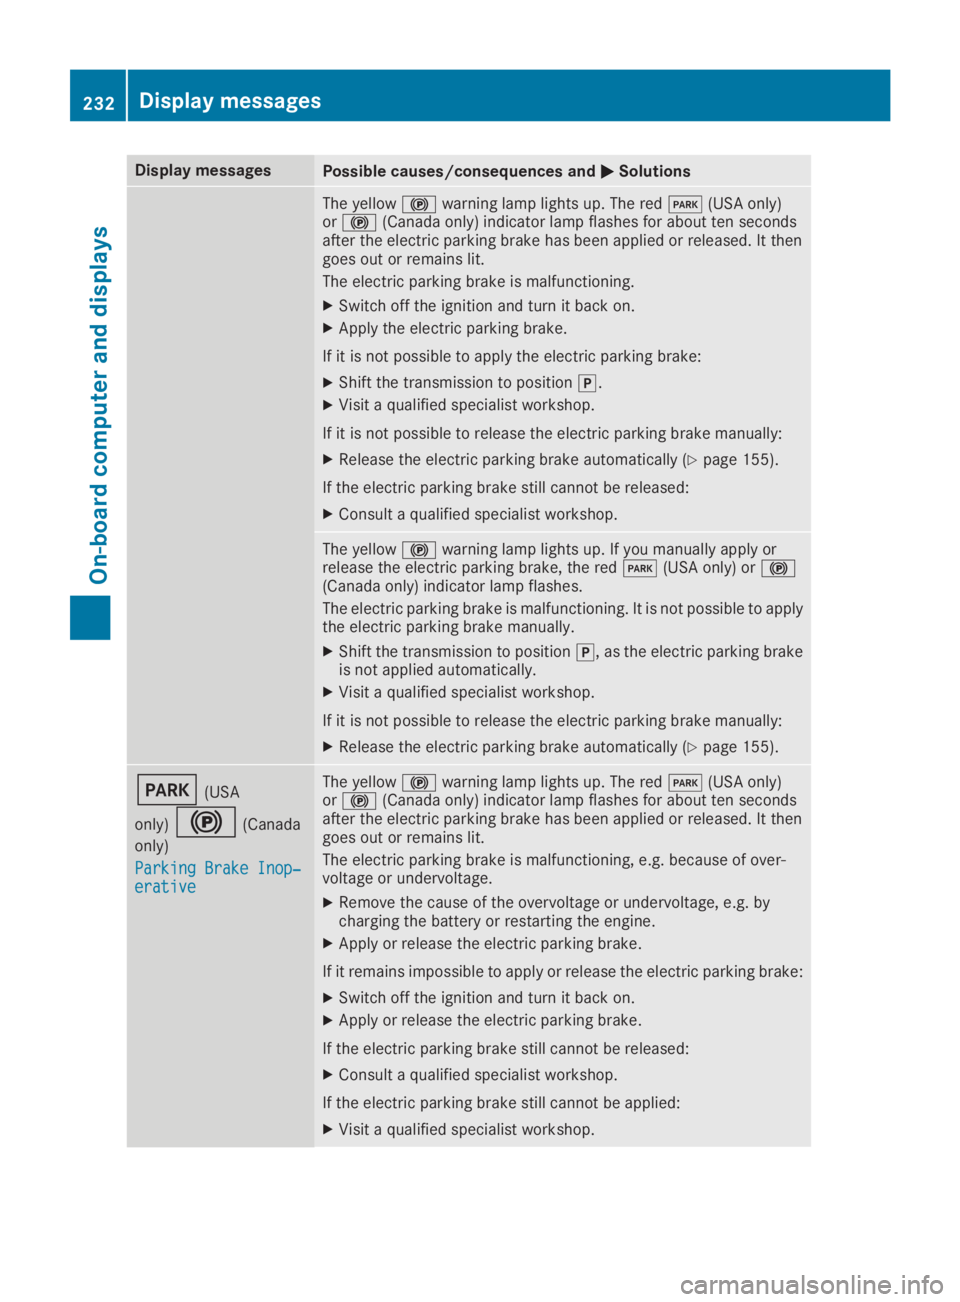
Display messagesPossible causes/consequences and�P�PSolutions
The yellow�$warning lamp lights up. The red�I(USA only)or�$(Canada only) indicator lamp flashes for about ten secondsafter the electric parking brake has been applied or released. It thengoes out or remains lit.
The electric parking brake is malfunctioning.
XSwitch off the ignition and turn it back on.
XApply the electric parking brake.
If it is not possible to apply the electric parking brake:
XShift the transmission to position�].
XVisit a qualified specialist workshop.
If it is not possible to release the electric parking brake manually:
XRelease the electric parking brake automatically (Ypage 155).
If the electric parking brake still cannot be released:
XConsult a qualified specialist workshop.
The yellow�$warning lamp lights up. If you manually apply orrelease the electric parking brake, the red�I(USA only) or�$(Canada only) indicator lamp flashes.
The electric parking brake is malfunctioning. It is not possible to applythe electric parking brake manually.
XShift the transmission to position�], as the electric parking brakeis not applied automatically.
XVisit a qualified specialist workshop.
If it is not possible to release the electric parking brake manually:
XRelease the electric parking brake automatically (Ypage 155).
�I(USA
only)�$(Canada
only)
Parking Brake Inop‐Parking Brake Inop‐erativeerative
The yellow�$warning lamp lights up. The red�I(USA only)or�$(Canada only) indicator lamp flashes for about ten secondsafter the electric parking brake has been applied or released. It thengoes out or remains lit.
The electric parking brake is malfunctioning, e.g. because of over-voltage or undervoltage.
XRemove the cause of the overvoltage or undervoltage, e.g. bycharging the battery or restarting the engine.
XApply or release the electric parking brake.
If it remains impossible to apply or release the electric parking brake:
XSwitch off the ignition and turn it back on.
XApply or release the electric parking brake.
If the electric parking brake still cannot be released:
XConsult a qualified specialist workshop.
If the electric parking brake still cannot be applied:
XVisit a qualified specialist workshop.
232Displaymessages
On-b oard computer and displays
Page 235 of 370
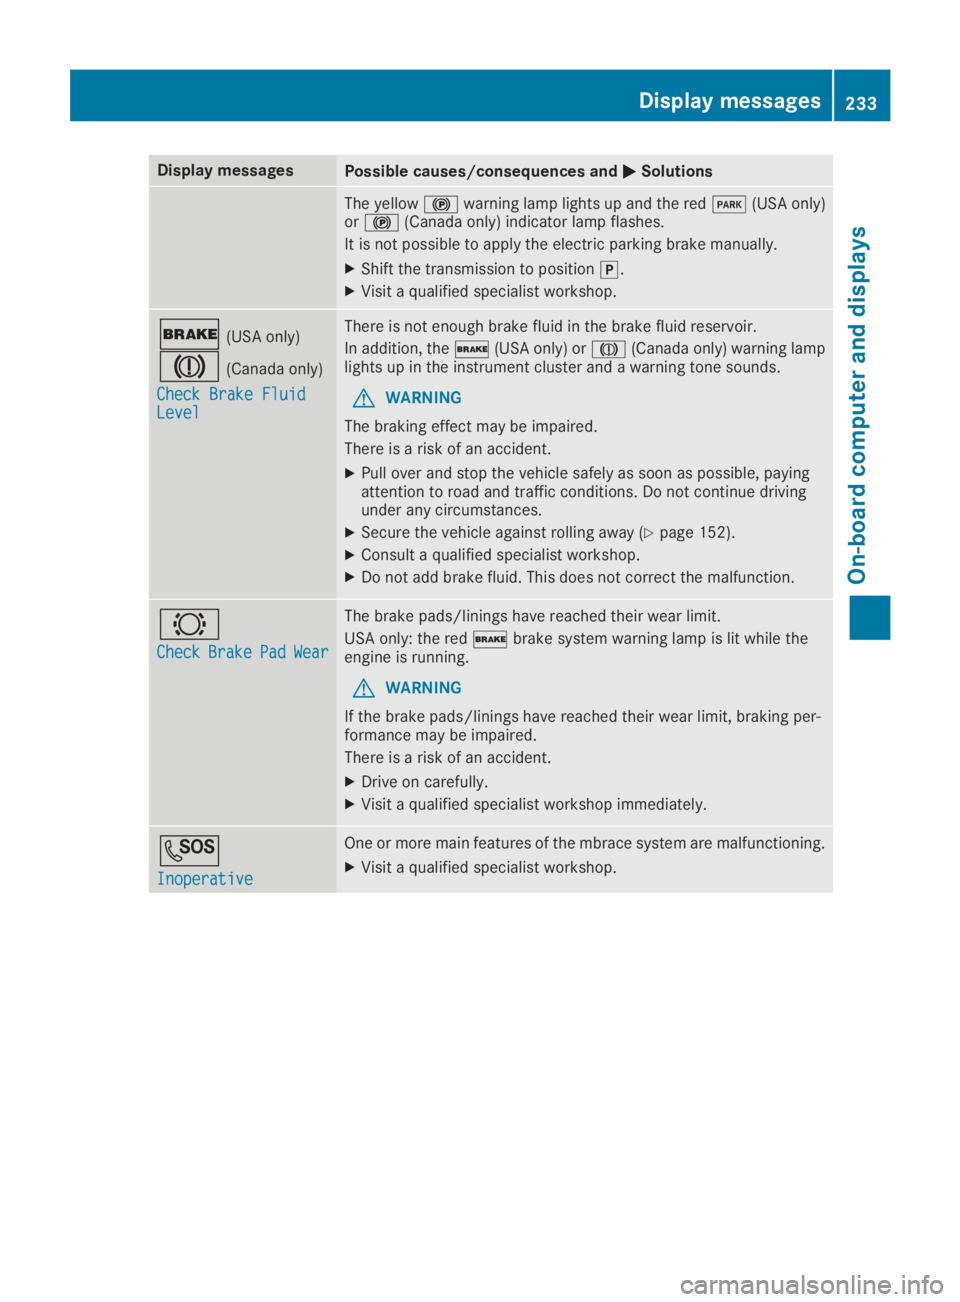
Display messagesPossible causes/consequences and�P�PSolutions
The yellow�$warning lamp lights up and the red�I(USA only)or�$(Canada only) indicator lamp flashes.
It is not possible to apply the electric parking brake manually.
XShift the transmission to position�].
XVisit a qualified specialist workshop.
�'(USA only)
�M(Canada only)
Check Brake FluidCheck Brake FluidLevelLevel
There is not enough brake fluid in the brake fluid reservoir.
In addition, the�'(USA only) or�M(Canada only) warning lamplights up in the instrument cluster and a warning tone sounds.
GWARNING
The braking effect may be impaired.
There is a risk of an accident.
XPull over and stop the vehicle safely as soon as possible, payingattention to road and traffic conditions. Do not continue drivingunder any circumstances.
XSecure the vehicle against rolling away (Ypage 152).
XConsult a qualified specialist workshop.
XDo not add brake fluid. This does not correct the malfunction.
�&
CheckCheckBrakeBrakePadPadWearWear
The brake pads/linings have reached their wear limit.
USA only: the red�'brake system warning lamp is lit while theengine is running.
GWARNING
If the brake pads/linings have reached their wear limit, braking per-formance may be impaired.
There is a risk of an accident.
XDrive on carefully.
XVisit a qualified specialist workshop immediately.
�S
InoperativeInoperative
One or more main features of the mbrace system are malfunctioning.
XVisit a qualified specialist workshop.
Displaymessages233
On-b oard computer and displays
Z