Page 127 of 657
#
Pull load compartment floor 1backwards
slightl y,tilt it tothe side and remo veit from
th e load compartment. #
Place load compartment floor 1down on a
clean sur face. #
Stretch rubber band 4overth e front sec‐
tion of load compartment floor 1. In the
process, place rubber band 4directly under
fi ttings 3.
Ta b2 isfacing up wards. #
Fold load compartment floor 1toge ther and
slide it horizon tally into the load compart‐
ment as far as it will go. #
Swing load compartment floor 1upwards
so that fittings 3audibly engage in guides
6 on bo thsides. #
Ensure that rubber band 4runs undernea th
support 5. 124
Seats and stowing
Page 133 of 657
#
Only fold there ar armrest back when
th e cup holder is closed. #
Toopen: press cup holder 1or2.
Cup holder 1or2 extends au tomatical ly. #
Toclose: push cup holder 1or2 back
until it engages. Asht
ray and cigar ette lighter Using
the ashtr ayinthe front centre console *
NO
TEDama getothestow age compart‐
ment under the ashtr aydue tointense
heat The
stow age compartment under the ashtray
is not heat resis tant and could be dama ged if
yo ure st a lit cigar ette on it. #
Make sure that the ashtr ayis fully
engaged. #
Toopen: push up the co ver2 ofthe ash‐
tray on its right or left side. #
Toremo vethe inser t:press the insert 1
fo rw ards slightly and pull it out upwards. #
Torefit the inse rt:press the insert 1into
th e holder until it engages. 13 0
Seats and stowing
Page 134 of 657

Using
the ashtr ayinthe door stow age com‐
partment #
During a journe y:place the closed ashtray
in the front door stowage compartment while
th eve hicle is in motion. #
Check that it is seated firm ly. #
Comply with the no tes on loading theve hicle
(/ page 114). #
Toopen: fold the lid 1upwards.
% Twist theto p part of the ashtray toremo veit
fo r cleaning, e.g. with clean, luk ewarmwate r,
or for em ptying. Using
the cigar ette lighter in the front centre
console &
WARNING ‑ Risk of fire and injury from
th e hot cigar ette lighter
Yo u can burn yourself if youto uch the hot
heating element or the soc ket of the ciga‐
re tte lighter.
In addition, flammable materials may ignite
if:
R you drop the hot cigar ette lighter
R ach ild holds the hot cigar ette lighter to
objects, forex ample #
Alw ays hold the cigar ette lighter bythe
knob. #
Alw ays make sure that the cigar ette
lighter is out of reach of children. #
Never lea vechildren unat tended in the
ve hicle. Re
quirements:
R The ignition is switched on. #
Press in cigar ette lighter 1.
The cigar ette lighter will pop out automati‐
cally when the heating element is red-hot. Using
the cigar ette lighter in there ar com‐
partment Re
quirements:
R The ignition is switched on. Seats and
stowing 131
Page 135 of 657

#
Toopen: pull co ver2 out byits top handle
edge. #
Press in cigar ette lighter 1.
The cigar ette lighter will pop out automati‐
cally when the heating element is red-hot. Soc
kets Using the
12V so cket inthe front centre
console Re
quirements:
R Only devices up toa maximum of 180 W
(15 A) are permissible. #
Lift up soc ket cap 1. #
Inse rtthe plug of the device.
If yo u ha veconnected a device tothe12 V
soc ket, le ave the co ver of thestow age compart‐
ment open. Using
the12 V so cket inthere ar passenger
comp artment Re
quirements:
R Only connect devices up toa maximum of
18 0 W (15 A). #
Pull co ver2 out byits top handle edge. #
Fold up the cap of soc ket1. Using the 230 V so
cket inthere ar passenger
comp artment &
DANG ER Risk of fata l injury due todam‐
aged connecting cables or soc kets
When a suitable device is connected, the
230 V power soc ket will be car rying a high
vo ltage. You could recei vean electric shock
if th e connecting cable or the 230 V po wer
soc ket is pulled out of the trim or is damaged
or we t. 13 2
Seats and stowing
Page 136 of 657

#
Use only connecting cables that are dry
and free of damage. #
When the ignition is switched off, make
sure that the 230 V po wer soc ket is dr y. #
Immedia tely ha ve the 230 V po wer
soc ketch ecked or replaced at a quali‐
fi ed specialised workshop if it is dam‐
aged or has been pulled out of the trim. #
Never plug the connecting cable into a
230 V po wer soc ketth at is damaged or
has been pulled out of the trim. &
DANG ER Risk of fata l injury due toincor‐
re ct handling of the soc ket
Yo u could recei vean electric shock:
R ifyo ure ach into the soc ket.
R ifyo u insert unsuitable devices or objects
into the soc ket. #
Do not reach into the soc ket. #
Only connect suitable devices tothe
soc ket. Re
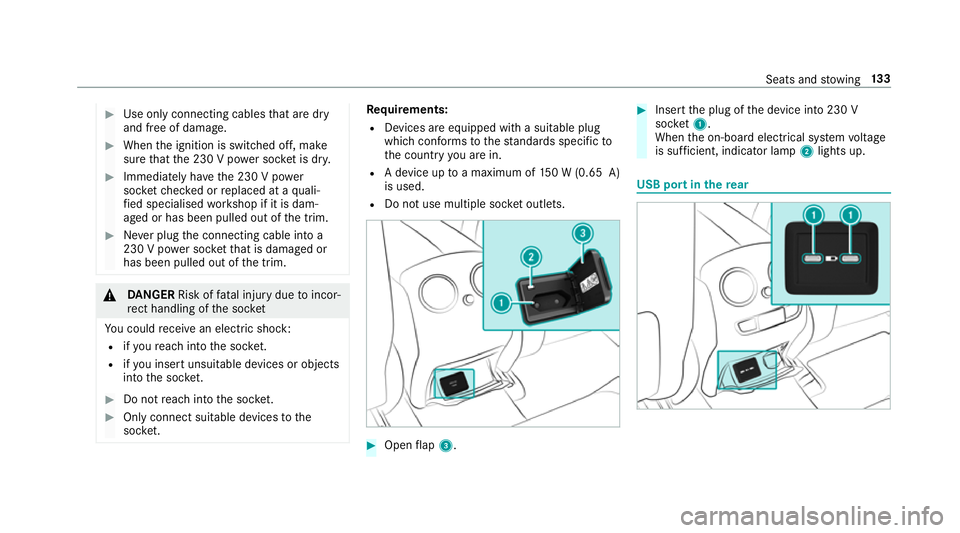
quirements:
R Devices are equipped with a suitable plug
which con form sto thest andards specific to
th e count ryyou are in.
R A device up toa maximum of 150 W (0.65 A)
is used.
R Do not use multiple soc ket outlets. #
Open flap 3. #
Insert the plug of the device into 230 V
soc ket1.
When the on-board electrical sy stem voltage
is suf ficient, indicator la mp2lights up. USB port in
there ar Seats and
stowing 13 3
Page 140 of 657

Exterior lighting
Note
s onchanging the lights when driving
abroad Ve
hicles with static LED headlamps: it is not
necessa ryto change the headlamps. The legal
re qu irements are also met in countries in which
traf fic drives on theot her side of thero ad.
Ve hicles with Intelligent Light Sy stem: before
crossing the border into count ries in which traf‐
fi c drives on theot her side of thero ad, it is nec‐
essary toset the headlamps tosymmetrical low
beam (/ page145).
On ce the headlamps ha vebeen changed:
R oncoming traf fic will not be dazzled
R the edge of thero ad will not be illuminated
as far or as high
R the "mo torw ay mode" and "enhanced fog
light" functions will not be available
The headlamps must be reset toasymm etrical
low beam when youre turn from ab road. Information about lighting sy
stems and your
re sponsibility The
various lighting sy stems of theve hicle are
only aids. The driver of theve hicle is responsible
fo r cor rect vehicle illumination in accordance
with the pr evailing light and visibility conditions,
legal requirements and traf fic situation. Light switch
Ope
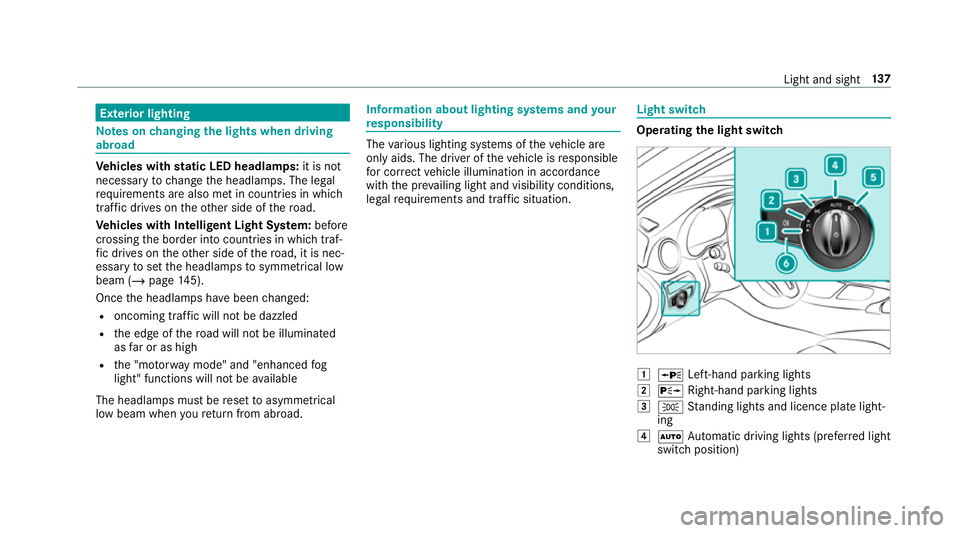
rating the light switch 1
W Left-hand pa rking lights
2 X Right-hand parking lights
3 T Standing lights and licence plate light‐
ing
4 Ã Automatic driving lights (prefer red light
switch position) Light and sight
137
Page 141 of 657

5
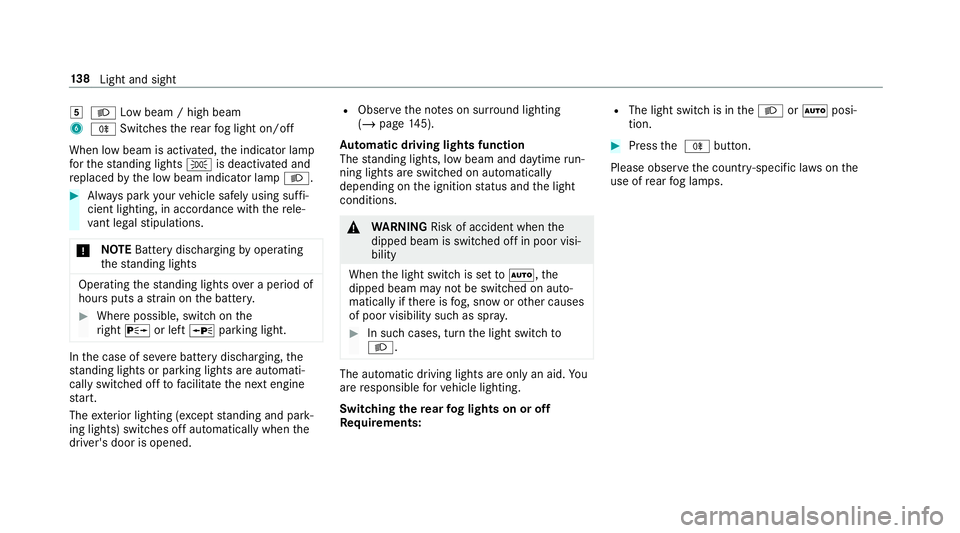
L Low beam / high beam
6 R Switches there ar fog light on/off
When low beam is activated, the indicator lamp
fo rth est anding lights Tis deactivated and
re placed bythe low beam indicator lamp L.#
Alw ays park your vehicle safely using suf fi‐
cient lighting, in acco rdance with there le‐
va nt le galst ipulations.
* NO
TEBattery discharging byoperating
th est anding lights Operating
thest anding lights over a period of
hours puts a stra in on the batter y. #
Where possible, switch on the
ri ght X or left Wparking light. In
the case of se vere battery discharging, the
st anding lights or parking lights are automati‐
cally swit ched off tofacilitate the next engine
st art.
The exterior lighting (e xcept standing and park‐
ing lights) swit ches off automatically when the
driver's door is opened. R
Obser vethe no tes on sur round lighting
(/ page 145).
Au tomatic driving lights function
The standing lights, low beam and daytime run‐
ning lights are switched on au tomatically
depending on the ignition status and the light
conditions. &
WARNING Risk of accident when the
dipped beam is switched off in poor visi‐
bility
When the light switch is set toà ,the
dipped beam may not be switched on auto‐
matically if there is fog, snow or other causes
of poor visibility such as spr ay. #
In such cases, turn the light switch to
L . The automatic driving lights are only an aid.
Yo u
are responsible forve hicle lighting.
Switching there ar fog lights on or off
Re quirements: R
The light switch is in theL orà posi‐
tion. #
Press the R button.
Please obser vethe count ry-specific la wsonthe
use of rear fog lamps. 13 8
Light and sight
Page 142 of 657

Operating
the combination switch for the
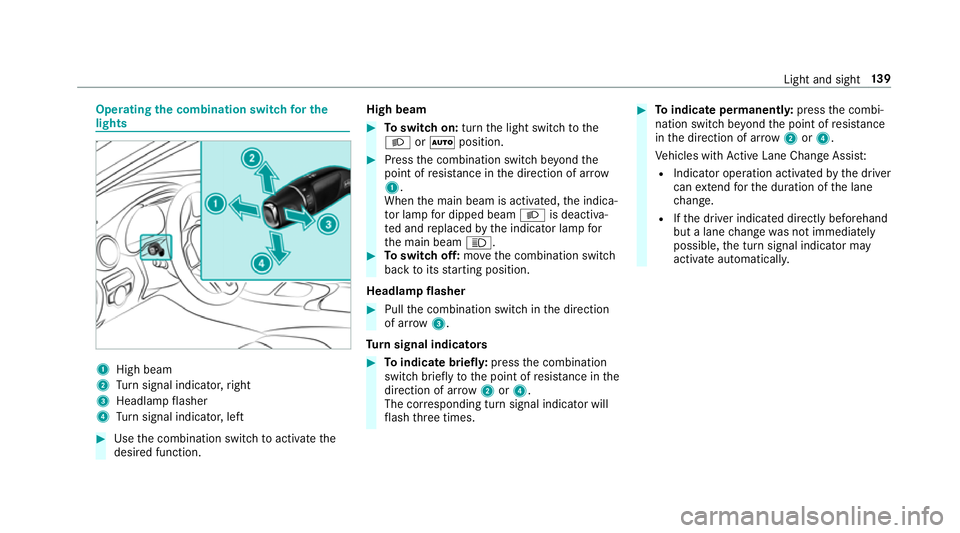
lights 1
High beam
2 Turn signal indicator, right
3 Headlamp flasher
4 Turn signal indicator, left #
Use the combination switch toactivate the
desired function. High beam #
Toswitch on: turnthe light switch tothe
L orà position. #
Press the combination switch be yond the
point of resis tance in the direction of ar row
1 .
When the main beam is activated, the indica‐
to r lamp for dipped beam Lis deactiva‐
te d and replaced bythe indicator lamp for
th e main beam K. #
Toswitch off: movethe combination switch
back toits starting position.
Headla mpflasher #
Pull the combination switch in the direction
of ar row3.
Tu rn signal indicators #
Toindicate briefl y:press the combination
switch briefly tothe point of resis tance in the
direction of ar row2or4.
The cor responding turn signal indicator will
fl ash thre e times. #
Toindicate permanentl y:press the combi‐
nation switch be yond the point of resis tance
in the direction of ar row2or4.
Ve hicles with Active Lane Change Assi st:
R Indicator operation activated bythe driver
can extend forth e duration of the lane
ch ange.
R Ifth e driver indicated directly beforehand
but a lane change was not immediately
possible, the turn signal indicator may
activate automaticall y. Light and sight
13 9