2019 MERCEDES-BENZ CLA Engine
[x] Cancel search: EnginePage 93 of 330
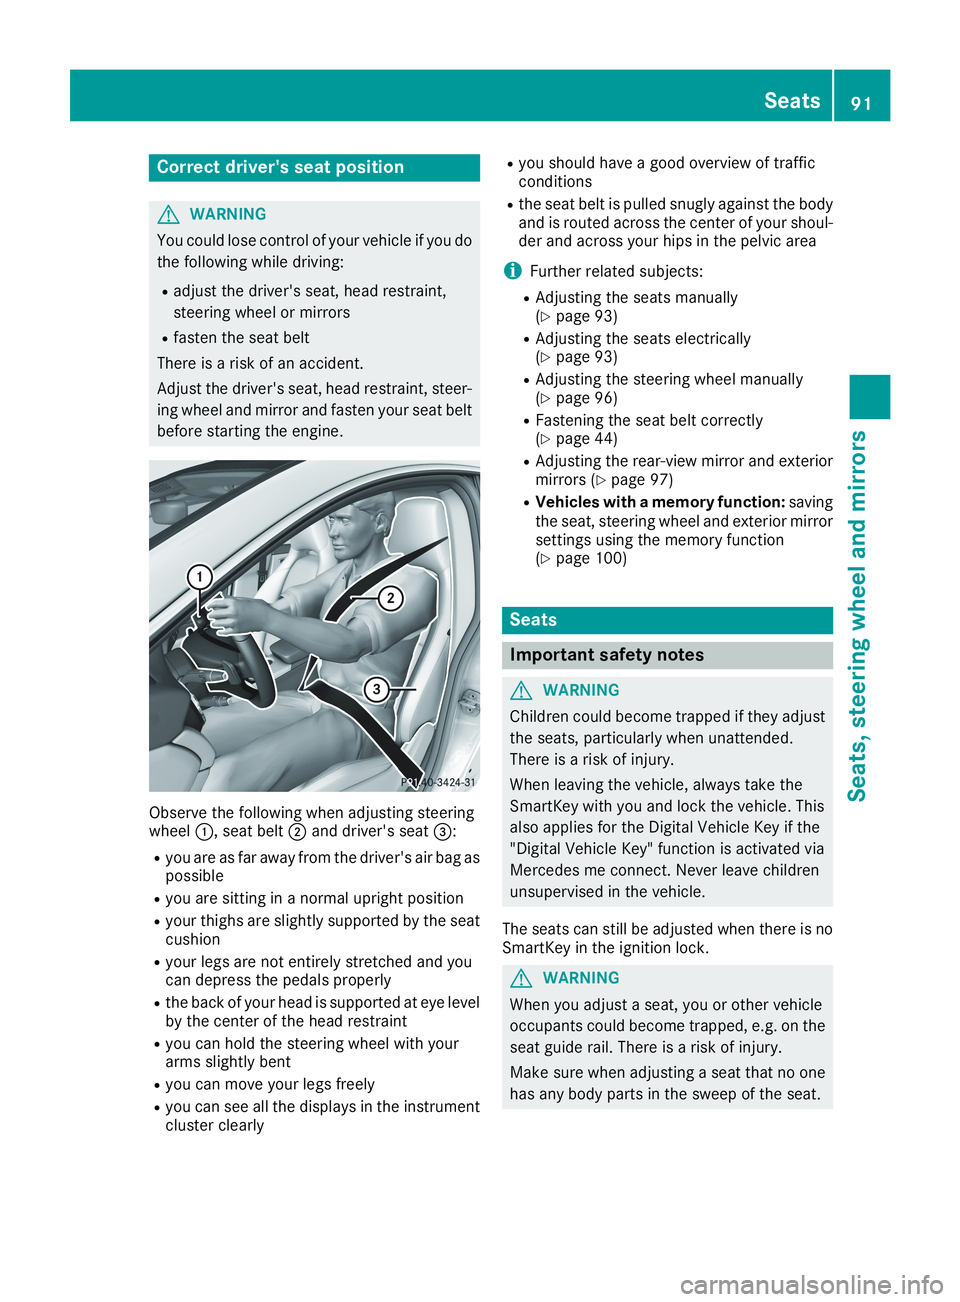
Correct driver's seat position
GWARNING
You could lose control of your vehicle if you do
the following while driving:
Radjust the driver's seat, head restraint,
steering wheel or mirrors
Rfasten the seat belt
There is a risk of an accident.
Adjust the driver's seat, head restraint, steer-
ing wheel and mirror and fasten your seat belt
before starting the engine.
Observe the following when adjusting steeringwheel�C, seat belt�Dand driver's seat�
Page 94 of 330
GWARNING
If the driver's seat is not engaged, it could
move forwards as far as the next catch during
movement such as braking or abrupt changes
of direction. As a result, you would be pushed
against your seat belt by the unsecured driv-
er's seat.
This could cause you to lose control of the
vehicle. The seat belt cannot protect as inten-
ded and could result in additional injury.
There is a risk of an accident and injury.
Before every journey, make sure that the driv-
er's seat is fully engaged.
Observe the safety notes on "Air bags"(Ypage 45) and "Children in the vehicle"(Ypage 54).
GWARNING
If the driver's seat is not engaged, it could
move unexpectedly while the vehicle is in
motion. This could cause you to lose control of
the vehicle. There is a risk of an accident.
Always make sure that the driver's seat is
engaged before starting the vehicle.
GWARNING
You could lose control of your vehicle if you do
the following while driving:
Radjust the driver's seat, head restraint,
steering wheel or mirrors
Rfasten the seat belt
There is a risk of an accident.
Adjust the driver's seat, head restraint, steer-
ing wheel and mirror and fasten your seat belt
before starting the engine.
GWARNING
If you adjust the seat height carelessly, you or
other vehicle occupants could be trapped and
thereby injured. Children in particular could
accidentally press the electrical seat adjust-
ment buttons and become trapped. There is a
risk of injury.
While moving the seats, make sure that your
hands or other body parts do not get under the
lever assembly of the seat adjustment sys-
tem.
!To prevent damage to the seats and the seatheating, observe the following notes:
RDo not spill liquids onto the seats. Dry theseats as soon as possible if liquid does getspilled on the seats.
RIf the seat covers are damp or wet, do notswitch on the seat heating. Also, do not usethe seat heating to dry the seats.
RClean the seat covers as recommended;see the "Interior care" section.
RDo not transport heavy loads on the seats.Do not place pointed objects on the seatcushions such as knives, nails or tools.Where possible, use the seats only for car-rying passengers.
RWhen operating the seat heating, do notcover the seats with insulating materials,e.g. blankets, coats, bags, protective cov-ers, child seats or booster seats.
RWhen the seat heating is switched on, theseat surface can be damaged as a result ofobjects being placed on the seats, forexample, seat cushions, child seats andprotective covers not approved byMercedes-Benz.
!Make sure that there are no objects in thefootwell under or behind the seats when mov-ing the seats back. There is a risk that theseats and/or the objects could be damaged.
iFurther related subjects:
RCargo compartment enlargement (foldingdown the rear seats) (Ypage 242)
92Seats
Seats, steering wheel and mirrors
Page 96 of 330

Adjusting the head restraints
Important safety notes
GWARNING
You could lose control of your vehicle if you do
the following while driving:
Radjust the driver's seat, head restraint,
steering wheel or mirrors
Rfasten the seat belt
There is a risk of an accident.
Adjust the driver's seat, head restraint, steer-
ing wheel and mirror and fasten your seat belt
before starting the engine.
GWARNING
If the head restraints are not installed or not
adjusted correctly, they cannot provide pro-
tection as intended. There is an increased risk
of injury in the head and neck area, e.g. in the
event of an accident or when braking.
Always drive with the head restraints instal-
led. Before driving off, make sure for every
vehicle occupant that the center of the head
restraint supports the back of the head at
about eye level.
Using the fore-and-aft adjustment, adjust thehead restraint so that it is as close as possible toyour head.
General notes
For vehicles with sports seats you cannot adjustthe front head restraints or the outer rear headrestraints.
Adjusting the head restraints manually
Adjusting the head restraint height
XTo raise:pull the head restraint up to thedesired position.
XTo lower:press release catch�Cin the direc-tion of the arrow and push the head restraintdown to the desired position.
Adjusting the fore/aft position of the
head restraint
With this function you can adjust the distancebetween the head restraint and the back of theseat occupant's head.
XTo move forwards:pull the head restraintforwards in the direction of the arrow until itengages.There are several notches.
XTo move backwards:press and hold releasebutton�Cand push the head restraint back-wards.
XWhen the head restraint is in the desired posi-tion, release the button and make sure thatthe head restraint is engaged in position.
94Seats
Seats , ste ering wheel and mirrors
Page 98 of 330
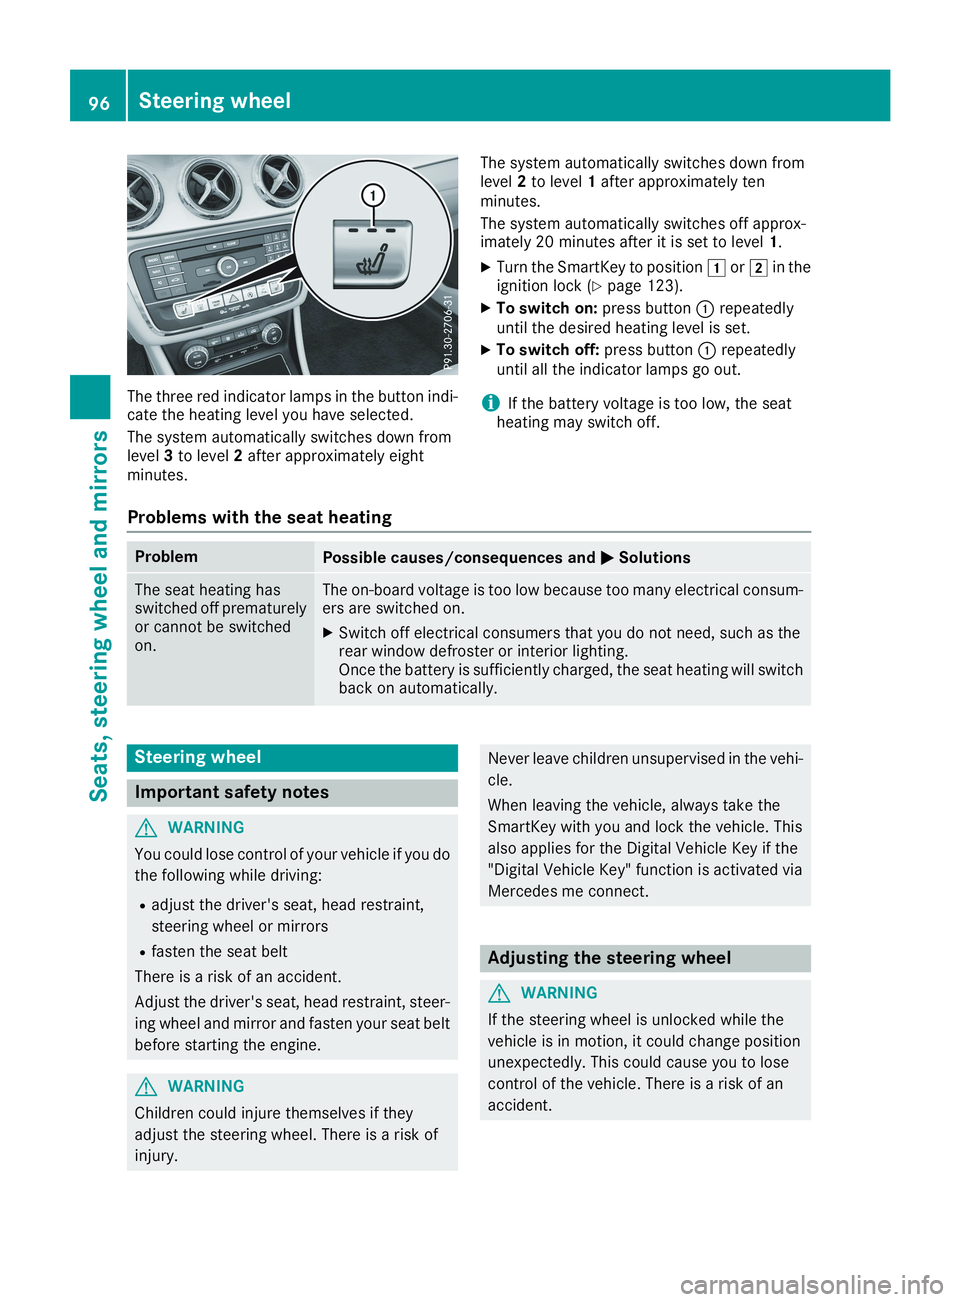
The three red indicator lamps in the button indi-cate the heating level you have selected.
The system automatically switches down fromlevel3to level2after approximately eightminutes.
The system automatically switches down fromlevel2to level1after approximately tenminutes.
The system automatically switches off approx-imately 20 minutes after it is set to level1.
XTurn the SmartKey to position�Gor�Hin theignition lock (Ypage 123).
XTo switch on:press button�Crepeatedlyuntil the desired heating level is set.
XTo switch off:press button�Crepeatedlyuntil all the indicator lamps go out.
iIf the battery voltage is too low, the seatheating may switch off.
Problems with the seat heating
ProblemPossible causes/consequences and�P�PSolutions
The seat heating hasswitched off prematurelyor cannot be switchedon.
The on-board voltage is too low because too many electrical consum-ers are switched on.
XSwitch off electrical consumers that you do not need, such as therear window defroster or interior lighting.Once the battery is sufficiently charged, the seat heating will switchback on automatically.
Steering wheel
Important safety notes
GWARNING
You could lose control of your vehicle if you do
the following while driving:
Radjust the driver's seat, head restraint,
steering wheel or mirrors
Rfasten the seat belt
There is a risk of an accident.
Adjust the driver's seat, head restraint, steer-
ing wheel and mirror and fasten your seat belt
before starting the engine.
GWARNING
Children could injure themselves if they
adjust the steering wheel. There is a risk of
injury.
Never leave children unsupervised in the vehi-
cle.
When leaving the vehicle, always take the
SmartKey with you and lock the vehicle. This
also applies for the Digital Vehicle Key if the
"Digital Vehicle Key" function is activated via
Mercedes me connect.
Adjusting the steering wheel
GWARNING
If the steering wheel is unlocked while the
vehicle is in motion, it could change position
unexpectedly. This could cause you to lose
control of the vehicle. There is a risk of an
accident.
96Steering wheel
Seats, steering wheel and mirrors
Page 104 of 330
take precedence over the daytime runninglamps.
USA only:
The daytime running lamps improve the visibilityof your vehicle during the day. To do this, thedaytime running lamps function must beswitched on using the on-board computer(Ypage 189).
If the engine is running and you turn the lightswitch to the�`or�Xposition, the manualsettings take precedence over the daytime run-ning lamps.
Low-beam headlamps
Even if the light sensor does not detect that it isdark, the parking lamps and low-beam head-lamps switch on when the ignition is switched onand the light switch is set to the�Xposition.This is a particularly useful function in the eventof rain and fog.
XTo switch on the low-beam headlamps:turn the SmartKey to position�Hin the igni-tion lock or start the engine.
XTurn the light switch to�X.The green�Xindicator lamp in the instru-ment cluster lights up.
Rear fog lamp
The rear fog lamp improves visibility of yourvehicle for the traffic behind in the event of thickfog. Please take note of the country-specificregulations for the use of rear fog lamps.
XTo switch on the rear fog lamp:turn theSmartKey in the ignition lock to position�Horstart the engine.
XTurn the light switch to�Xor�X.
XPress the�^button.The yellow�^indicator lamp in the instru-ment cluster lights up.
XTo switch off the rear fog lamp:press the�^button.The yellow�^indicator lamp in the instru-ment cluster goes out.
iWhen the rear fog lamp is switched on, thecenter brake lamp in the tail lamp switches offdue to a legal requirement.
Parking lamps
!If the battery charge is very low, the parkinglamps or standing lamps are automaticallyswitched off to enable the next engine start.Always park your vehicle safely and in a well lit
area, in accordance with the relevant legalstipulations. Avoid using the�`parkinglamps over a period of several hours. If pos-sible, switch on the right-hand�dor left-hand�cstanding lamps.
XTo switch on:turn the light switch to�`.The green�`indicator lamp in the instru-ment cluster lights up.
Standing lamps
Switching on the standing lamps ensures thecorresponding side of the vehicle is illuminated.
XTo switch on the standing lamps:theSmartKey is not in the ignition lock or it is inposition�Zin the ignition lock.
XTurn the light switch to�c(left-hand side ofthe vehicle) or�d(right-hand side of thevehicle).
Combination switch
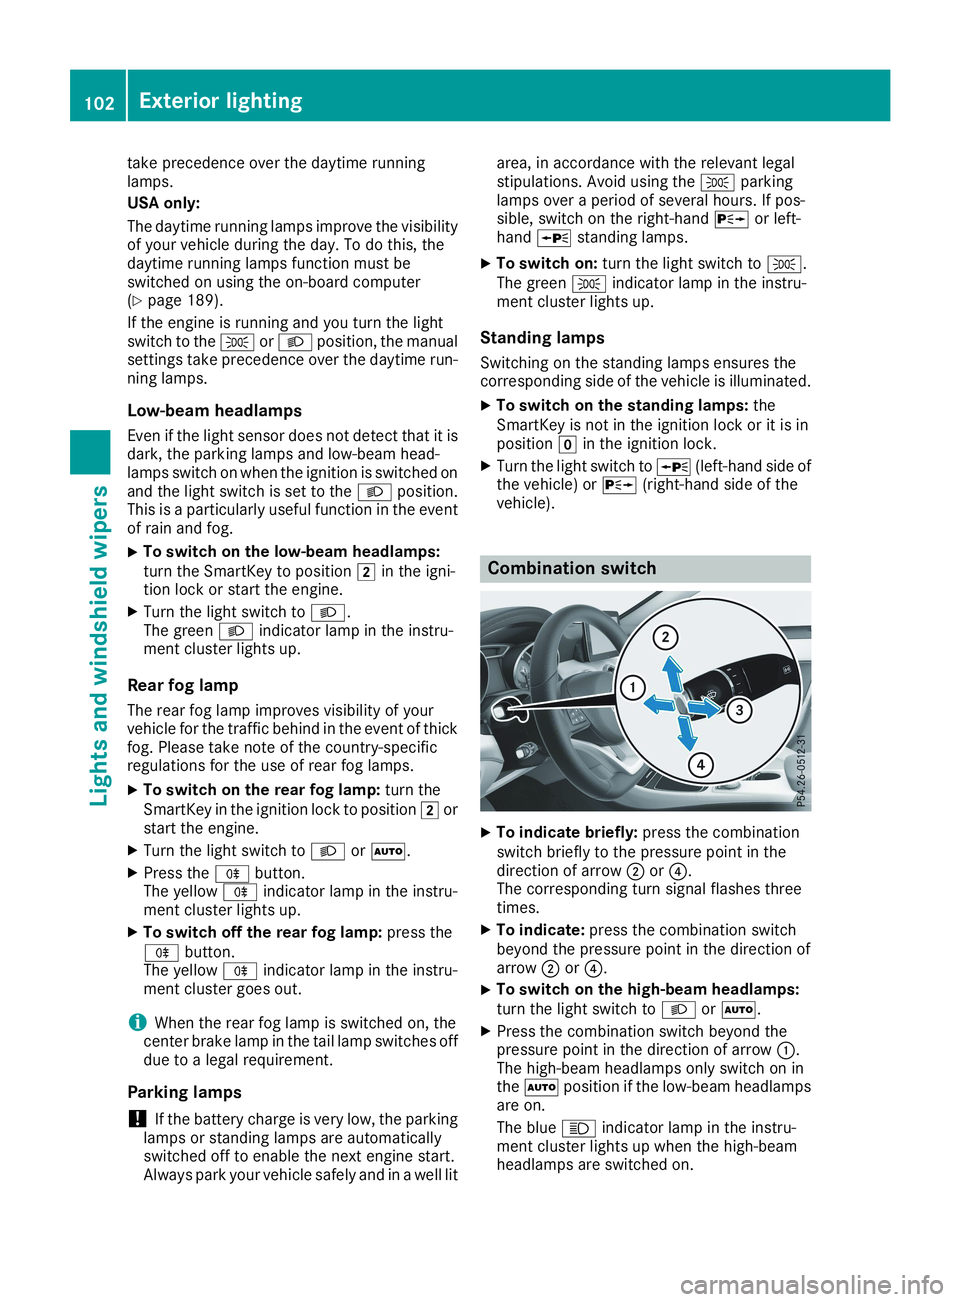
XTo indicate briefly:press the combinationswitch briefly to the pressure point in thedirection of arrow�Dor�
Page 111 of 330
Replacing the wiper blades
Important safety notes
GWARNING
If the windshield wipers begin to move while
you are changing the wiper blades, you could
be trapped by the wiper arm. There is a risk of
injury.
Always switch off the windshield wipers and
ignition before changing the wiper blades.
!To avoid damaging the wiper blades, makesure that you touch only the wiper arm of thewiper.
!Never open the hood if a windshield wiperarm has been folded away from the wind-shield.
Never fold a windshield wiper arm without awiper blade back onto the windshield.
Hold the windshield wiper arm firmly whenyou change the wiper blade. If you release thewindshield wiper arm without a wiper bladeand it falls onto the windshield, the windshieldmay be damaged by the force of the impact.
Mercedes-Benz recommends that you havethe wiper blades changed at a qualified spe-cialist workshop.
Changing the windshield wiper blades
Removing the wiper blades
XVehicles without KEYLESS-GO or KEY-LESS-GO start function:remove the Smart-Key from the ignition lock.
XVehicles with KEYLESS-GO or KEYLESS-GO start function:switch off the engine.
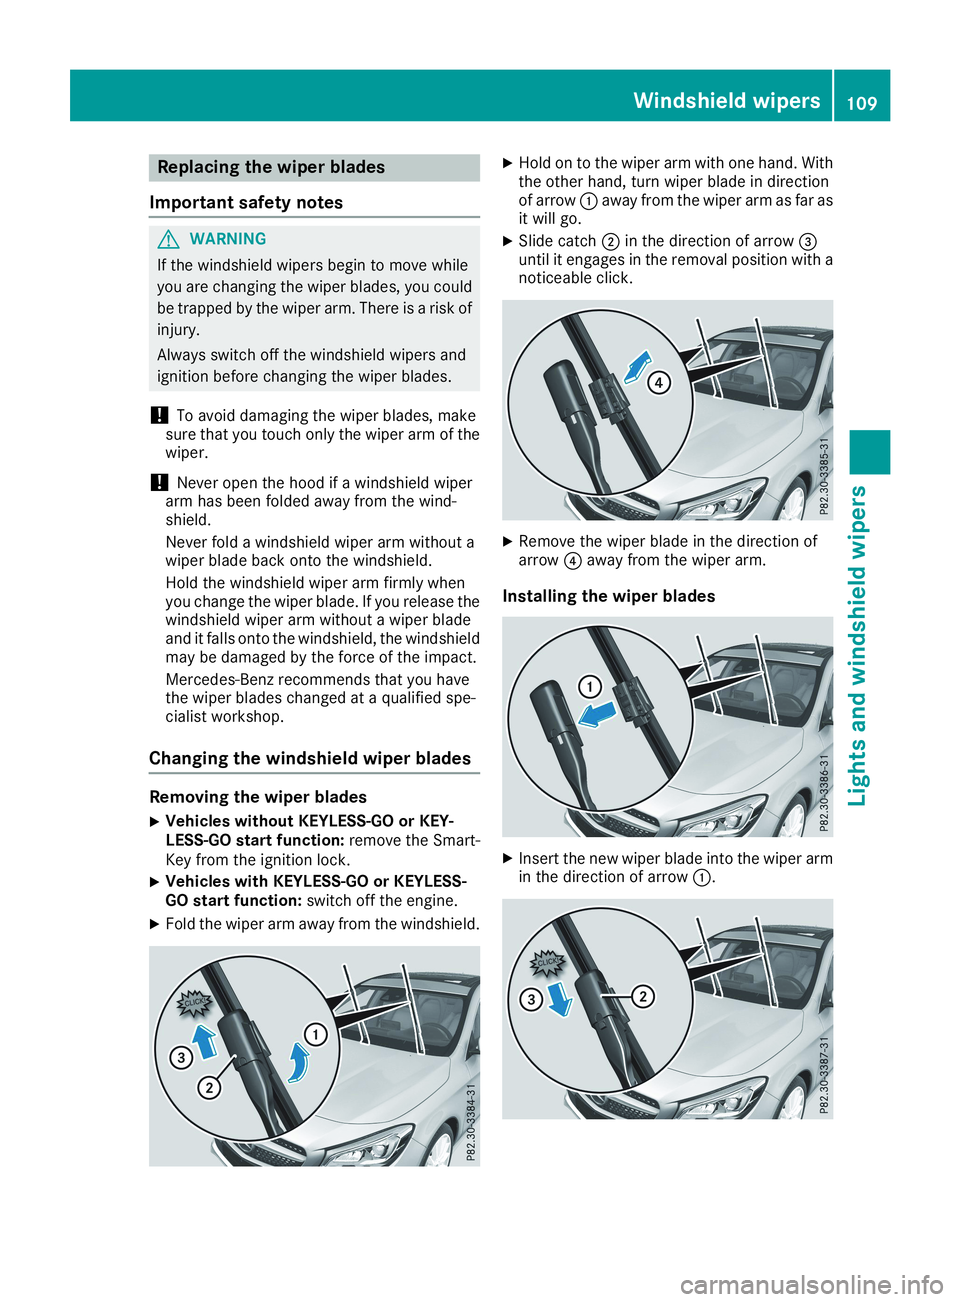
XFold the wiper arm away from the windshield.
XHold on to the wiper arm with one hand. Withthe other hand, turn wiper blade in directionof arrow�Caway from the wiper arm as far asit will go.
XSlide catch�Din the direction of arrow�
Page 113 of 330
Overview of climate control systems
General notes
Observe the settings recommended on the fol-lowing pages. The windows could otherwise fogup.
To prevent the windows from fogging up:
Rswitch off climate control only briefly
Rswitch on air-recirculation mode only briefly
Rswitch on the cooling with air dehumidifica-tion function
Rswitch on the defrost windshield functionbriefly, if required
The air-conditioning system or dual-zone auto-matic climate control regulates the temperatureand the humidity of the vehicle interior and fil-ters undesirable substances from the air.
The air-conditioning system or dual-zone auto-matic climate control can only be operatedwhen the engine is running. Optimum operationis only achieved with the side windows and pan-orama roof with power tilt/sliding panel closed.
If you start the engine using your smartphone,the last selected climate control setting is reac-tivated (Ypage 83).
The residual heat function can only be activatedor deactivated with the ignition switched off(Ypage 120).
Always keep the ventilation flaps behind theside trim panel in the cargo compartment clear(Ypage 107). Otherwise the vehicle will not beventilated correctly.
iVentilate the vehicle for a brief period duringwarm weather, e.g. using the convenienceopening feature (Ypage 83). This will speedup the cooling process and the desired inte-rior temperature will be reached morequickly.
iThe integrated filter filters out most parti-cles of dust and soot and completely filtersout pollen. It also reduces gaseous pollutantsand odors. A clogged filter reduces theamount of air supplied to the vehicle interior.For this reason, you should always observethe interval for replacing the filter, which isspecified in the Maintenance Booklet. As itdepends on environmental conditions, e.g.heavy air pollution, the interval may beshorter than stated in the Maintenance Book-let.
iIt is possible that under certain circumstan-ces the residual heat function may be activa-ted automatically an hour after the SmartKeyhas been removed in order to dry the auto-matic climate control. The vehicle is then ven-tilated for 30 minutes.
Overview of climate control systems111
Climate control
Page 118 of 330
ual. You will see the current settings of thevarious climate control functions.
DYNAMIC SELECT button (except
Mercedes-AMG vehicles)
You can choose between various drive programswith the DYNAMIC SELECT button(Ypage 129).
If you have selected drive programE:
Rwhen heating, the electrical heater booster isdeactivated and in the warming-up phaseheat output is reduced
Rthe rear window defroster running time isreduced
Depending on the configuration, climate set-tings may also be influenced in the drive pro-gramI.
If you have selected drive programCorS, cli-mate settings are not influenced.
ECO start/stop function
During automatic engine switch-off, the climatecontrol system only operates at a reduced capa-city. If you require the full climate control output,you can switch off the ECO start/stop functionby pressing the ECO button (Ypage 128).
Operating the climate control sys-
tems
Activating/deactivating climate con-
trol
General notes
When the climate control is switched off, the airsupply and air circulation are also switched off.The windows could fog up. Therefore, switch offclimate control only briefly
Air-conditioning system
XTurn the SmartKey to position�Hin the igni-tion lock (Ypage 123).
XTo switch on:turn control�