2019 MERCEDES-BENZ CLA lock
[x] Cancel search: lockPage 289 of 330
Permitted towing methods
Mercedes-Benz recommends transporting yourvehicle in the case of a breakdown, rather thantowing it away.
When towing away, use a towing rope or a tow-ing bar with both axles on the ground. Do not useany tow bar systems.
Transporting the vehicle
Vehicles with automatic transmission
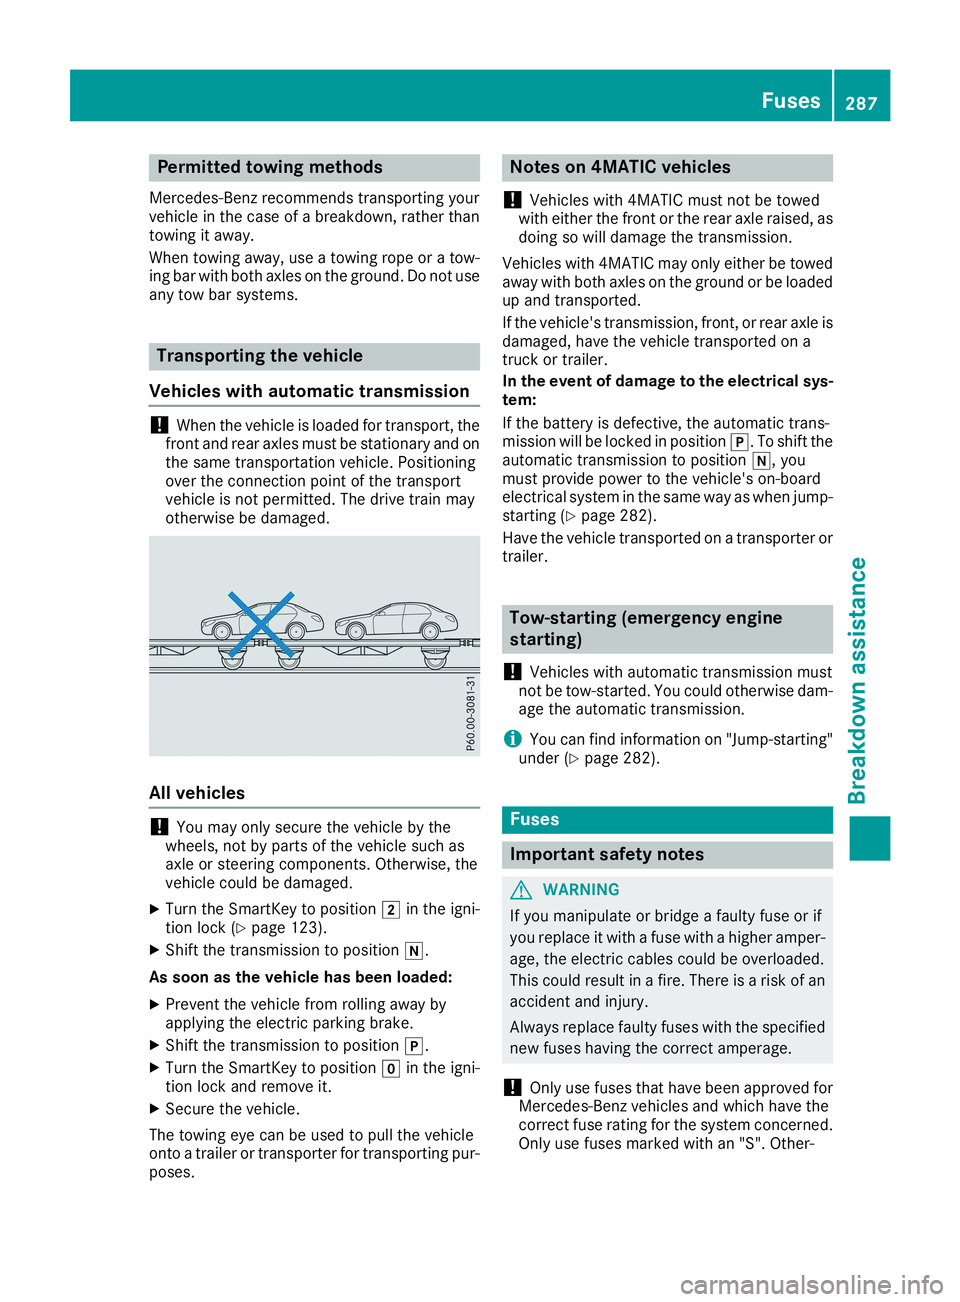
!When the vehicle is loaded for transport, thefront and rear axles must be stationary and onthe same transportation vehicle. Positioningover the connection point of the transportvehicle is not permitted. The drive train mayotherwise be damaged.
All vehicles
!You may only secure the vehicle by thewheels, not by parts of the vehicle such asaxle or steering components. Otherwise, thevehicle could be damaged.
XTurn the SmartKey to positionHin the igni-tion lock (Ypage 123).
XShift the transmission to position\\.
As soon as the vehicle has been loaded:
XPrevent the vehicle from rolling away byapplying the electric parking brake.
XShift the transmission to position].
XTurn the SmartKey to positionZin the igni-tion lock and remove it.
XSecure the vehicle.
The towing eye can be used to pull the vehicleonto a trailer or transporter for transporting pur-poses.
Notes on 4MATIC vehicles
!Vehicles with 4MATIC must not be towedwith either the front or the rear axle raised, asdoing so will damage the transmission.
Vehicles with 4MATIC may only either be towedaway with both axles on the ground or be loadedup and transported.
If the vehicle's transmission, front, or rear axle isdamaged, have the vehicle transported on atruck or trailer.
In the event of damage to the electrical sys-tem:
If the battery is defective, the automatic trans-mission will be locked in position]. To shift theautomatic transmission to position\\, youmust provide power to the vehicle's on-boardelectrical system in the same way as when jump-starting (Ypage 282).
Have the vehicle transported on a transporter ortrailer.
Tow-starting (emergency engine
starting)
!Vehicles with automatic transmission mustnot be tow-started. You could otherwise dam-age the automatic transmission.
iYou can find information on "Jump-starting"under (Ypage 282).
Fuses
Important safety notes
GWARNING
If you manipulate or bridge a faulty fuse or if
you replace it with a fuse with a higher amper-
age, the electric cables could be overloaded.
This could result in a fire. There is a risk of an
accident and injury.
Always replace faulty fuses with the specified
new fuses having the correct amperage.
!Only use fuses that have been approved forMercedes-Benz vehicles and which have thecorrect fuse rating for the system concerned.Only use fuses marked with an "S". Other-
Fuses287
Breakdown assistance
Z
Page 290 of 330
wise, components or systems could be dam-aged.
!Make sure that no moisture can enter thefuse box when the cover is open.
!When closing the cover, make sure that it islying correctly on the fuse box. Moisture seep-ing in or dirt could otherwise impair the oper-ation of the fuses.
The fuses in your vehicle serve to close downfaulty circuits. If a fuse blows, all the compo-nents on the circuit and their functions stopoperating.
Blown fuses must be replaced with fuses of thesame rating, which you can recognize by thecolor and value. The fuse ratings are listed in thefuse allocation chart.
The fuse allocation chart is in the fuse box in thefront-passenger footwell (Ypage 289).
If a newly inserted fuse also blows, have thecause traced and rectified at a qualified special-ist workshop, e.g. an authorized Mercedes-BenzCenter.
Before changing a fuse
XSecure the vehicle against rolling away(Ypage 142).
XSwitch off all electrical consumers.
XVehicles without KEYLESS-GO:remove theSmartKey from the ignition lock.
XVehicles with KEYLESS-GO start-functionor KEYLESS-GO:open the driver's door.The vehicle electronics are now in positionZ. This corresponds to the SmartKey beingremoved from the ignition.
The fuses are located in various fuse boxes:
RFuse box in the engine compartment on theleft-hand side of the vehicle, when viewed inthe direction of travel
RFuse box in the front-passenger footwell
The fuse allocation chart is on the fuse box in thefront-passenger footwell (Ypage 289).
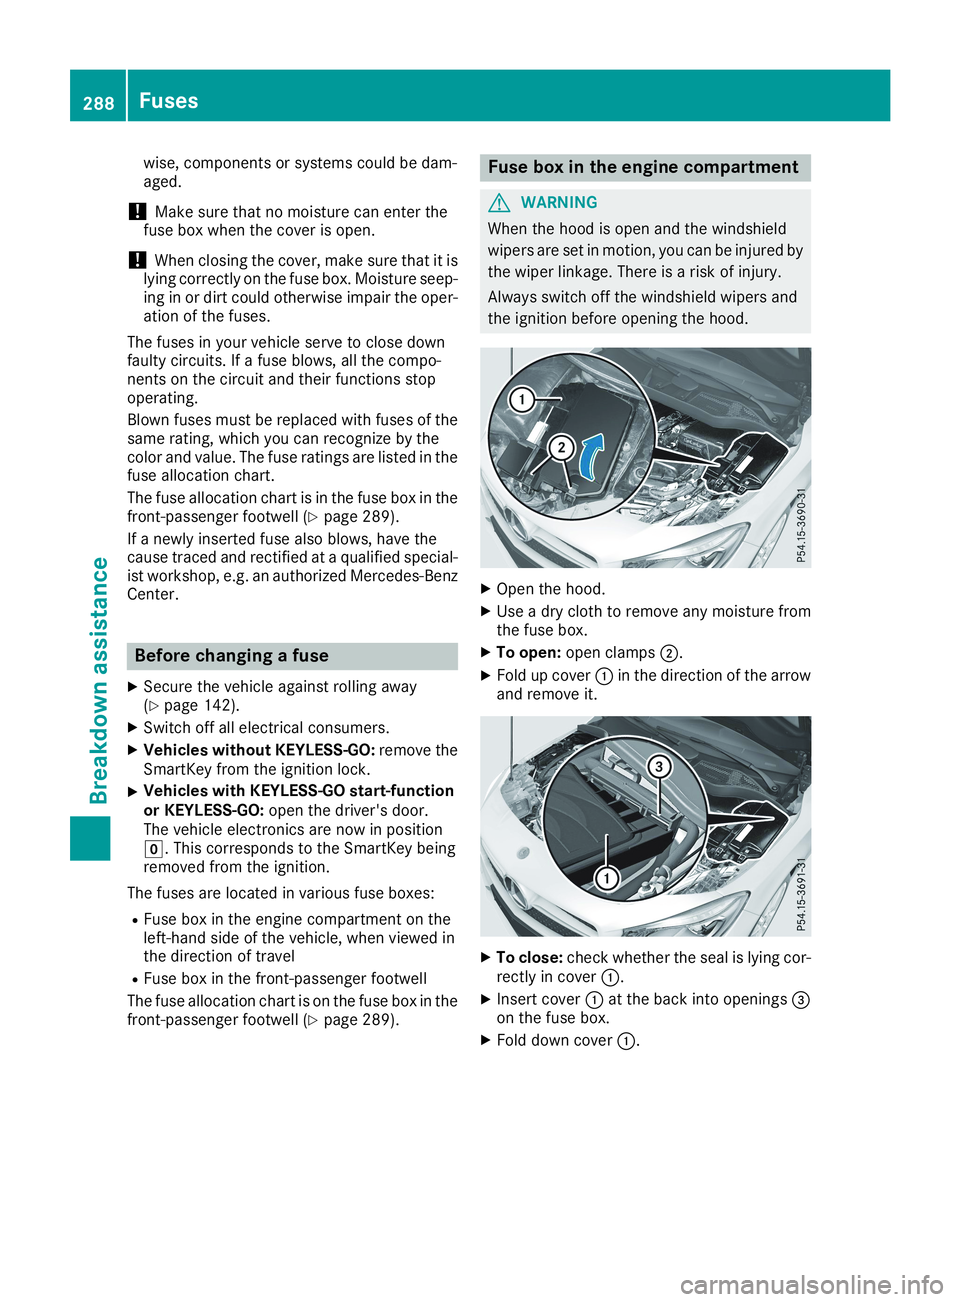
Fuse box in the engine compartment
GWARNING
When the hood is open and the windshield
wipers are set in motion, you can be injured by
the wiper linkage. There is a risk of injury.
Always switch off the windshield wipers and
the ignition before opening the hood.
XOpen the hood.
XUse a dry cloth to remove any moisture fromthe fuse box.
XTo open:open clampsD.
XFold up coverCin the direction of the arrowand remove it.
XTo close:check whether the seal is lying cor-rectly in coverC.
XInsert coverCat the back into openings
Page 293 of 330
Check wheels and tires for damage at least oncea month. Check wheels and tires after drivingoff-road or on rough roads. Damaged wheelscan cause a loss of tire pressure. Pay particularattention to damage such as:
RCuts in the tires
RPunctures in the tires
RTears in the tires
RBulges on tires
RDeformation or severe corrosion on wheels
Regularly check the tire tread depth and thecondition of the tread across the whole width ofthe tire (Ypage 291). If necessary, turn thefront wheels to full lock in order to inspect theinner side of the tire surface.
All wheels must have a valve cap to protect thevalve against dirt and moisture. Do not mountanything onto the valve other than the standardvalve cap or other valve caps approved byMercedes-Benz for your vehicle. Do not use anyother valve caps or systems, e.g. tire pressuremonitoring systems.
Regularly check the pressure of all the tires par-ticularly prior to long trips. Adjust the tire pres-sure as necessary (Ypage 293).
Observe the notes on the emergency sparewheel (Ypage 315).
The service life of tires depends, among otherthings, on the following factors:
RDriving style
RTire pressure
RDistance covered
Notes on tire tread
GWARNING
Insufficient tire tread will reduce tire traction.
The tire is no longer able to dissipate water.
This means that on wet road surfaces, the risk
of hydroplaning increases, in particular where
speed is not adapted to suit the driving con-
ditions. There is a risk of accident.
If the tire pressure is too high or too low, tires
may exhibit different levels of wear at differ-
ent locations on the tire tread. Thus, you
should regularly check the tread depth and
the condition of the tread across the entire
width of all tires.
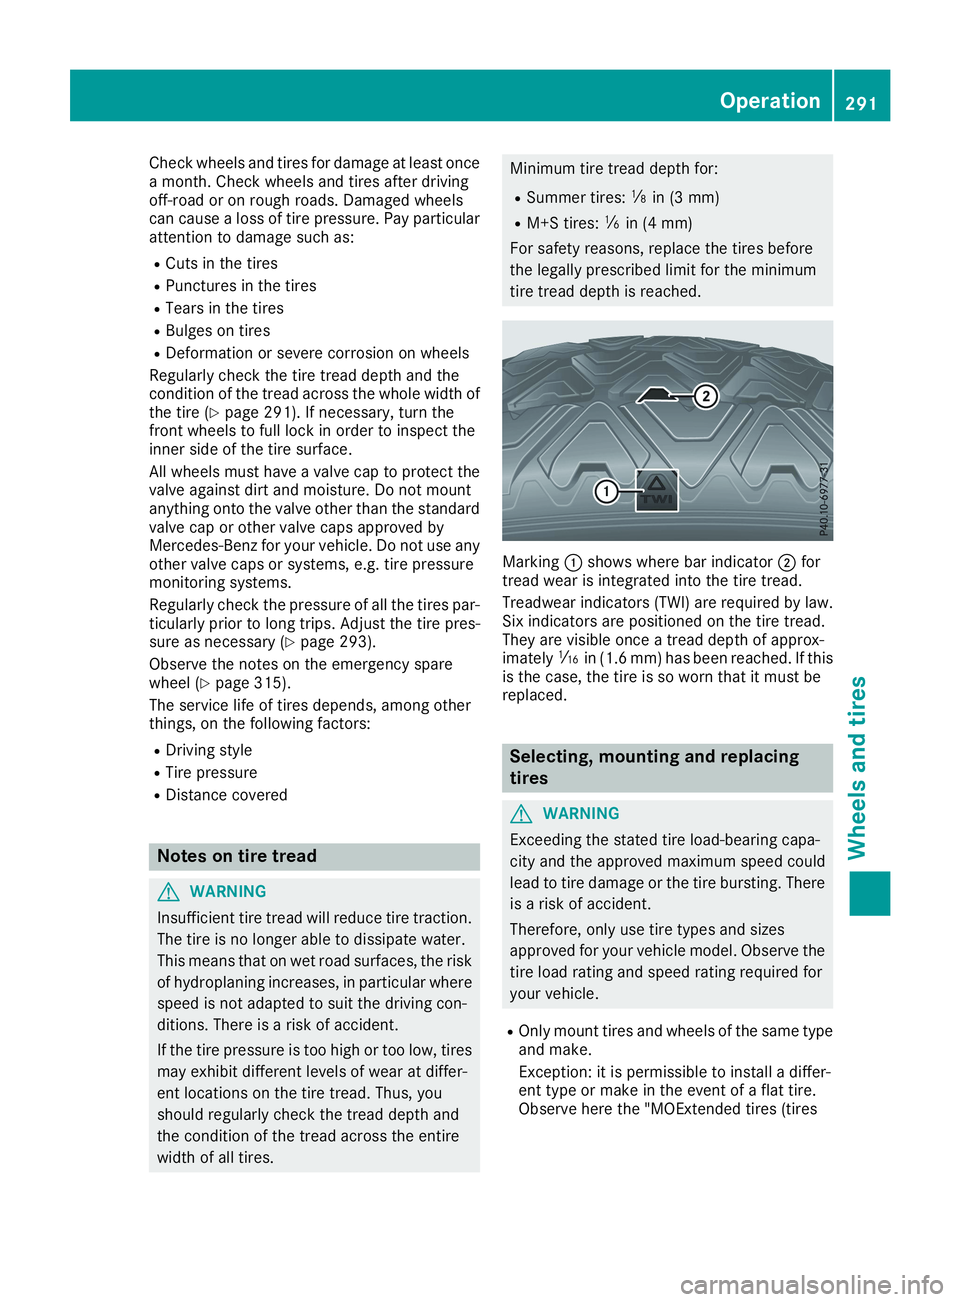
Minimum tire tread depth for:
RSummer tires:
Page 299 of 330
a corresponding warning message will appear inthe multifunction display.
You can recognize the tire pressure loss warningby theRun Flat Indicator Active PressRun Flat Indicator Active Press'OK''OK'totoRestartRestartmessage in the multifunctiondisplay in theServ.Serv.menu. Information on themessage display can be found in the "Restartingthe tire pressure loss warning" section(Ypage 297).
Important safety notes
The tire pressure warning system does not warnyou of an incorrectly set tire pressure. Observethe notes on the recommended tire pressure(Ypage 293).
The tire pressure loss warning does not replacethe need to regularly check the tire pressure. Aneven loss of pressure on several tires at thesame time cannot be detected by the tire pres-sure loss warning system.
The tire pressure monitor is not able to warn youof a sudden loss of pressure, e.g. if the tire ispenetrated by a foreign object. In the event of asudden loss of pressure, bring the vehicle to ahalt by braking carefully. Avoid abrupt steeringmovements.
The function of the tire pressure loss warningsystem is limited or delayed if:
Rsnow chains are mounted on your vehicle'stires.
Rroad conditions are wintry.
Ryou are driving on sand or gravel.
Ryou adopt a very sporty driving style (corner-ing at high speeds or driving with high rates ofacceleration).
Ryou are driving with a heavy load (in the vehi-cle or on the roof)
Restarting the tire pressure loss warn-
ing system
Restart the tire pressure loss warning system ifyou have:
Rchanged the tire pressure
Rchanged the wheels or tires
Rmounted new wheels or tires
XBefore restarting, make sure that the tirepressures are set properly on all four tires forthe respective operating conditions.
The recommended tire pressure can be foundon the Tire and Loading Information placard
on the B-pillar. Additionally, a tire pressuretable is attached to the fuel filler flap. The tirepressure loss warning system can only givereliable warnings if you have set the correcttire pressure. If an incorrect tire pressure isset, these incorrect values will be monitored.
XAlso observe the notes in the section on tirepressures (Ypage 293).
XMake sure that the SmartKey is in positionHin the ignition lock (Ypage 123).
XPressYoreon the steering wheel toselect theServ.Serv.menu.
XPress thecordbutton to selectTire PressureTire Pressure.
XPress thevbutton.TheRun Flat Indicator Active PressRun Flat Indicator Active Press'OK' to Restart'OK' to Restartmessage appears in themultifunction display.
If you wish to confirm the restart:
XPress thevbutton.TheTire Pressure Now OK?Tire Pressure Now OK?messageappears in the multifunction display.
XPress thecordbutton to selectYesYes.
XPress thevbutton.TheRun Flat Indicator RestartedRun Flat Indicator Restartedmes-sage appears in the multifunction display.
After a teach-in period, the tire pressure losswarning system will monitor the set tire pres-sures of all four tires.
If you wish to cancel the restart:
XPress the8button.
or
XIf theTire Pressure Now OK?Tire Pressure Now OK?messageappears, press thecordbutton toselectCancelCancel.
XPress thevbutton.The tire pressure values stored at the lastrestart will continue to be monitored.
Tire pressure monitor (Canada only)
General notes
If a tire pressure monitor is installed, the vehi-cle's wheels have sensors that monitor the tirepressures in all four tires. The tire pressure mon-itor warns you if the pressure drops in one ormore of the tires. The tire pressure monitor onlyfunctions if the corresponding sensors areinstalled in all wheels.
Tire pressure297
Wheels and tires
Z
Page 301 of 330
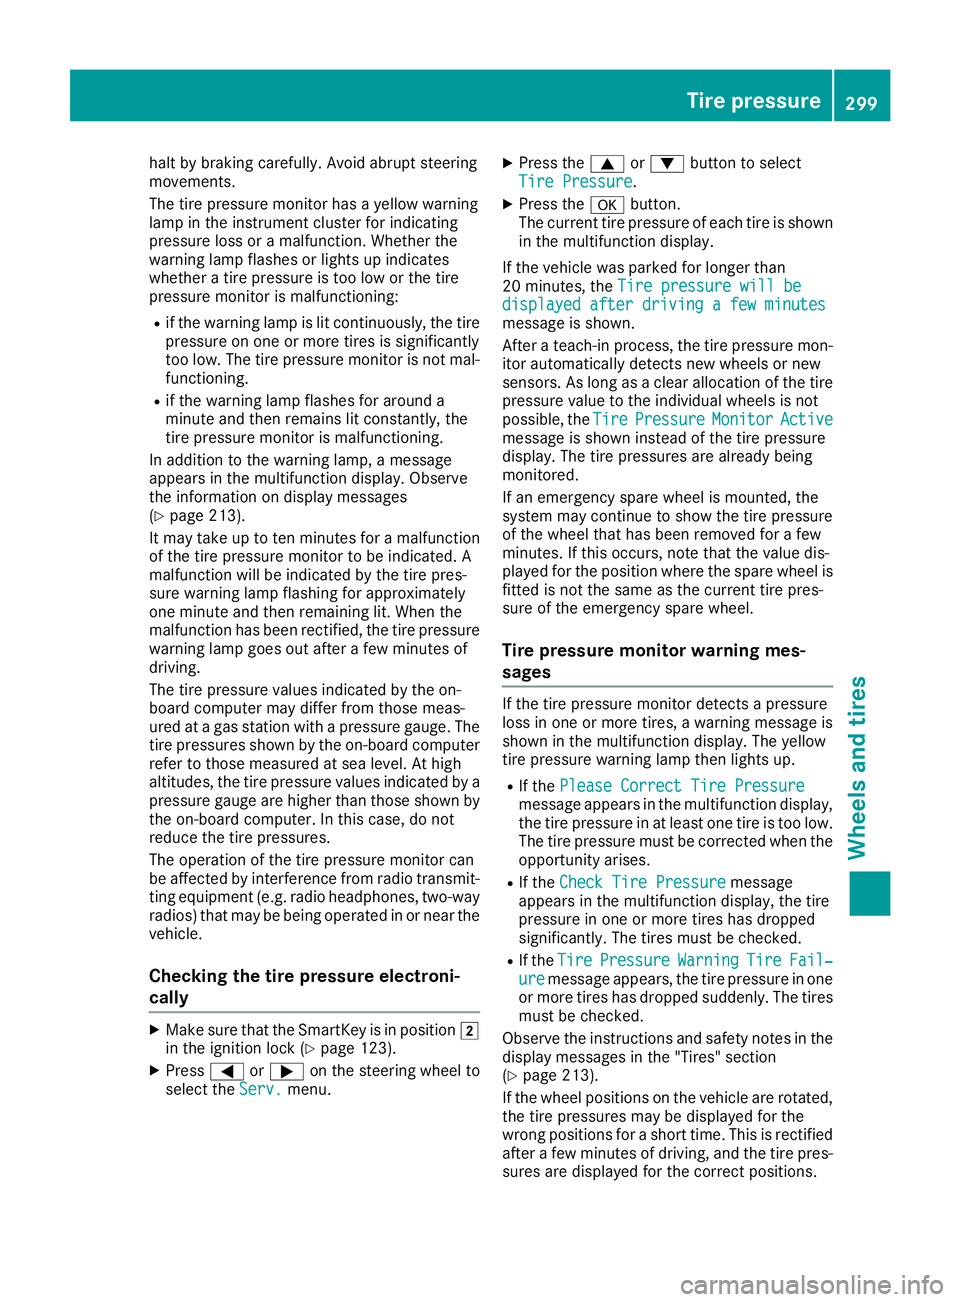
halt by braking carefully. Avoid abrupt steeringmovements.
The tire pressure monitor has a yellow warninglamp in the instrument cluster for indicatingpressure loss or a malfunction. Whether thewarning lamp flashes or lights up indicateswhether a tire pressure is too low or the tirepressure monitor is malfunctioning:
Rif the warning lamp is lit continuously, the tirepressure on one or more tires is significantlytoo low. The tire pressure monitor is not mal-functioning.
Rif the warning lamp flashes for around aminute and then remains lit constantly, thetire pressure monitor is malfunctioning.
In addition to the warning lamp, a messageappears in the multifunction display. Observethe information on display messages(Ypage 213).
It may take up to ten minutes for a malfunctionof the tire pressure monitor to be indicated. Amalfunction will be indicated by the tire pres-sure warning lamp flashing for approximatelyone minute and then remaining lit. When themalfunction has been rectified, the tire pressurewarning lamp goes out after a few minutes ofdriving.
The tire pressure values indicated by the on-board computer may differ from those meas-ured at a gas station with a pressure gauge. Thetire pressures shown by the on-board computerrefer to those measured at sea level. At highaltitudes, the tire pressure values indicated by apressure gauge are higher than those shown bythe on-board computer. In this case, do notreduce the tire pressures.
The operation of the tire pressure monitor canbe affected by interference from radio transmit-ting equipment (e.g. radio headphones, two-wayradios) that may be being operated in or near thevehicle.
Checking the tire pressure electroni-
cally
XMake sure that the SmartKey is in positionHin the ignition lock (Ypage 123).
XPressYoreon the steering wheel toselect theServ.Serv.menu.
XPress thecordbutton to selectTire PressureTire Pressure.
XPress thevbutton.The current tire pressure of each tire is shownin the multifunction display.
If the vehicle was parked for longer than20 minutes, theTire pressure will beTire pressure will bedisplayed after driving a few minutesdisplayed after driving a few minutesmessage is shown.
After a teach-in process, the tire pressure mon-itor automatically detects new wheels or newsensors. As long as a clear allocation of the tirepressure value to the individual wheels is notpossible, theTireTirePressurePressureMonitorMonitorActiveActivemessage is shown instead of the tire pressuredisplay. The tire pressures are already beingmonitored.
If an emergency spare wheel is mounted, thesystem may continue to show the tire pressureof the wheel that has been removed for a fewminutes. If this occurs, note that the value dis-played for the position where the spare wheel isfitted is not the same as the current tire pres-sure of the emergency spare wheel.
Tire pressure monitor warning mes-
sages
If the tire pressure monitor detects a pressureloss in one or more tires, a warning message isshown in the multifunction display. The yellowtire pressure warning lamp then lights up.
RIf thePlease Correct Tire PressurePlease Correct Tire Pressuremessage appears in the multifunction display,the tire pressure in at least one tire is too low.The tire pressure must be corrected when theopportunity arises.
RIf theCheck Tire PressureCheck Tire Pressuremessageappears in the multifunction display, the tirepressure in one or more tires has droppedsignificantly. The tires must be checked.
RIf theTireTirePressurePressureWarningWarningTireTireFail‐Fail‐ureuremessage appears, the tire pressure in oneor more tires has dropped suddenly. The tiresmust be checked.
Observe the instructions and safety notes in thedisplay messages in the "Tires" section(Ypage 213).
If the wheel positions on the vehicle are rotated,the tire pressures may be displayed for thewrong positions for a short time. This is rectifiedafter a few minutes of driving, and the tire pres-sures are displayed for the correct positions.
Tire pressure299
Wheels and tires
Z
Page 302 of 330

Restarting the tire pressure monitor
When you restart the tire pressure monitor, allexisting warning messages are deleted and thewarning lamps go out. The monitor uses the cur-rently set tire pressures as the reference valuesfor monitoring. In most cases, the tire pressuremonitor will automatically detect the new refer-ence values after you have changed the tirepressure. However, you can also set referencevalues manually as described here. The tirepressure monitor then monitors the new tirepressure values.
XSet the tire pressure to the value recommen-ded for the corresponding driving situation onthe Tire and Loading Information placard onthe driver's side B-pillar (Ypage 293).
You can find more tire pressure values forvarious operating conditions in the tire pres-sure table inside the fuel filler flap(Ypage 141).
XMake sure that the tire pressure is correct onall four wheels.
XMake sure that the SmartKey is in positionHin the ignition lock (Ypage 123).
XPressYoreon the steering wheel toselect theServ.Serv.menu.
XPress thecordbutton to selectTire PressureTire Pressure.
XPress thevbutton.The multifunction display shows the currenttire pressure for each tire or theTire pres‐Tire pres‐suresurewillwillbebedisplayeddisplayedafterafterdrivingdrivinga few minutesa few minutesmessage.
XPress thedbutton.The multifunction display shows theUseUseCurrent Pressures as New ReferenceCurrent Pressures as New ReferenceValuesValuesmessage.
If you wish to confirm the restart:
XPress thevbutton.TheTireTirePress.Press.MonitorMonitorRestartedRestartedmes-sage appears in the multifunction display.
After driving for a few minutes, the systemchecks whether the current tire pressures arewithin the specified range. The new tire pres-sures are then accepted as reference valuesand monitored.
If you wish to cancel the restart:
XPress the8button.The tire pressure values stored at the lastrestart will continue to be monitored.
Radio type approval for the tire pres-
sure monitor
CountryRadio type approval number
USAFCC ID: MRXMW2433A
FCCIC ID:MRXGG4 This devicecomplies with part 15 of the FCCrules and with license exemptRSS standards of Industry Can-ada. Operation is subject to thefollowing conditions. (1) Thisdevice may not cause harmfulinterference, and (2) This devicemust accept any interferencereceived, including interferencethat may cause undesired oper-ation. Le present appareil estconforme d'industrie Canadaapplicables aux appareils radioexempts de licence. L'exploita-tion est authorisee aux deux con-ditions suivantes. (1). L'appareilne doit pas produire de brouil-lage, et (2) L'autisateur de l'ap-pareil doit accepter tout brouil-lage radioelectrique subi, memesi le brouillage est susceptibled'en compromettre le fonc-tionnement. WARNING: Changesor modifications not expressivelyapproved by the party responsi-ble for compliance could void theusers authority to operate theequipment. The term "IC:" beforethe radio certification numberonly signifies Canada technicalspecifications were met.
FCC ID:MRXMC34MA4 Thisdevice complies with part 15 ofthe FCC rules and with licenseexempt RSS standards of Indus-try Canada. Operation is subjectto the following conditions. (1)This device may not cause harm-ful interference, and (2) Thisdevice must accept any interfer-ence received, including interfer-ence that may cause undesiredoperation. Le present appareilest conforme d'industrie Canadaapplicables aux appareils radioexempts de license. L'exploita-tion est authorisee aux deux con-ditions suivantes. (1). L'appareil
300Tire pressure
Wheels and tires
Page 313 of 330
Tire-mounting tools should not be used nearthe valve. This could damage the electroniccomponents.
Only have tires changed at a qualified spe-cialist workshop.
Observe the instructions and safety notes in the"Changing a wheel" section (Ypage 310).
The wear patterns on the front and rear tiresdiffer, depending on the operating conditions.Rotate the wheels before a clear wear patternhas formed on the tires. Front tires typicallywear more on the shoulders and the rear tires inthe center.
On vehicles that have the same size front andrear wheels, you can rotate the wheels accord-ing to the intervals in the tire manufacturer'swarranty book in your vehicle documents. If nowarranty book is available, the tires should berotated every 3,000 to 6,000 miles (5,000 to10,000 km). Depending on tire wear, this maybe required earlier. Do not change the directionof wheel rotation.
Clean the contact surfaces of the wheel and thebrake disc thoroughly every time a wheel is rota-ted. Check the tire pressure and, if necessary,restart the tire pressure loss warning system(Canada only) or the tire pressure monitor (USAonly).
Direction of rotation
Tires with a specified direction of rotation haveadditional benefits, e.g. if there is a risk of hydro-planing. These advantages can only be gained ifthe tires are installed corresponding to thedirection of rotation.
An arrow on the sidewall of the tire indicates itscorrect direction of rotation.
Storing wheels
Store wheels that are not being used in a cool,dry and preferably dark place. Protect the tiresfrom oil, grease, gasoline and diesel.
Mounting a wheel
Preparing the vehicle
XStop the vehicle on solid, non-slippery andlevel ground.
XApply the electric parking brake manually.
XBring the front wheels into the straight-aheadposition.
XShift the transmission to position].
XSwitch off the engine.
XVehicles without KEYLESS-GO:remove theSmartKey from the ignition lock.
XVehicles with KEYLESS-GO start-functionor KEYLESS-GO:open the driver's door.The vehicle electronics are now in position
Page 325 of 330

Coolant
Important safety notes
GWARNING
If antifreeze comes into contact with hot com-
ponents in the engine compartment, it may
ignite. There is a risk of fire and injury.
Let the engine cool down before you add anti-
freeze. Make sure that antifreeze is not spilled
next to the filler neck. Thoroughly clean the
antifreeze from components before starting
the engine.
!Only add coolant that has been premixedwith the desired antifreeze protection. Youcould otherwise damage the engine.
You can find additional notes on the coolant inthe following places:
Rin the Mercedes-Benz Specifications forService Products, MB BeVo 310.1
-on the Internet athttp://bevo.mercedes-benz.com
-on the Mercedes-Benz BeVo app
Ra qualified specialized workshop
!Always use a suitable coolant mixture, evenin countries where high temperatures prevail.
Otherwise, the engine cooling system is notsufficiently protected from corrosion andoverheating.
iHave the coolant regularly replaced at aqualified specialist workshop and the replace-ment confirmed in the Maintenance Booklet.
Comply with the important safety notes for ser-vice products when handling coolant(Ypage 319).
The coolant is a mixture of water and corrosioninhibitor/antifreeze concentrate. It performsthe following tasks:
Ranti-corrosion protection
Rantifreeze protection
Rraising the boiling point
If the coolant has antifreeze protection down to-35 ‡ (-37 †), the boiling point of the coolantduring operation is approximately 266 ‡(130 †).
The antifreeze concentrate/corrosion inhibitorconcentration in the engine cooling systemshould:
Rbe at least 50%. This will protect the enginecooling system against freezing down toapproximately -35 ‡ (-37 †)
Rnot exceed 55% (antifreeze protection downto -49‡[-45 †]). Otherwise, heat will not bedissipated as effectively
Mercedes-Benz recommends a coolant or cor-rosion inhibitor/antifreeze concentrate inaccordance withMB Specifications for Service Products 310.1.
iWhen the vehicle is first delivered, it is filledwith a coolant mixture that ensures adequateantifreeze and anti-corrosion protection.
iThe coolant is checked with every mainte-nance interval at a qualified specialist work-shop.
Filling capacities
ModelCapacity
Mercedes‑AMGvehiclesApprox. 12.6 US qt(11.9l)
All other modelsApprox. 8.2 US qt(7.8 l)
Windshield washer system
Important safety notes
GWARNING
Windshield washer concentrate could ignite if
it comes into contact with hot engine compo-
nents or the exhaust system. There is a risk of
fire and injury.
Make sure that no windshield washer con-
centrate is spilled next to the filler neck.
!Only MB SummerFit and MB WinterFitwasher fluid should be mixed together. Thespray nozzles may otherwise becomeblocked.
Do not use distilled or de-ionized water. Other-wise, the level sensor may give a false reading.
Service products and filling capacities323
Technical data
Z