2019 MERCEDES-BENZ CLA COUPE ECO mode
[x] Cancel search: ECO modePage 25 of 645
Mercedes-Benz Genuine
Parts
+ ENVIRONMENTAL
NOTEEnvironmental
dama gecaused bynot using recycled
re conditioned components Daimler
AGoffers recycled reconditioned
components and pa rts with the same quality
as new parts. The same entitlement from the
implied warranty is valid as for new parts. #
Use recycled reconditioned compo‐
nents and pa rts from Daimler AG.*
NO
TEImpairment of the operating ef fi‐
ciency of there stra int sy stems from
ins talling accessory parts or from repairs
or we lding Airbags and seat belt
tensioners, as well as
control units and sensors forth ere stra int
sy stems, may be ins talled in thefo llowing
areas of your vehicle:
R doors
R door pillars R
door sills
R seats
R cockpit
R instrument clus ter
R centre console
R late ra lro of frame #
Do not ins tall accessory parts such as
audio sy stems in these areas. #
Do not car ryout repairs or welding. #
Have accesso ries retrofitted at a quali‐
fi ed specialist workshop. Yo
u could jeopardise the operating saf ety of your
ve hicle if you use parts, tyres and wheels as well
as accessories releva nt tosaf ety which ha venot
been appr ovedby Mercedes-Benz. Saf ety-re le‐
va nt sy stems, e.g. the brake sy stem, may mal‐
function. Only use Mercedes-Benz Genuine Parts
or parts of equal qualit y.Only use tyres, wheels
and accessories that ha vebeen specifically
appr ovedfo ryo ur vehicle model. Mercedes-Benz
tests original parts and con ver‐
sion parts and accessories that ha vebeen spe‐
cifically appr ovedfo ryo ur vehicle model forth eir
re liability, saf ety and suitabilit y.Despite ongoing
ma rket resear ch, Mercedes-Benz is unable to
assess other parts. Mercedes-Benz therefore
accepts no responsibility forth e use of such
parts in Mercedes-Benz vehicles, even if they
ha ve been of ficially appr oved or independently
appr ovedby ate sting centre.
Cer tain parts are only of ficially appr ovedfor
ins tallation or modification if they comply wi th
legal requirements. All Mercedes-Benz Genuine
Pa rts meet the appr oval requ irements. The use
of non-appr oved parts may in validate theve hi‐
cle's general operating pe rmit.
This is the case in thefo llowing situations:
R theve hicle type is dif fere nt from that for
which theve hicle's general operating pe rmit
wa s granted.
R other road users could be endangered.
R theex haust gas or noise le velge ts wo rse. 22
General no tes
Page 70 of 645
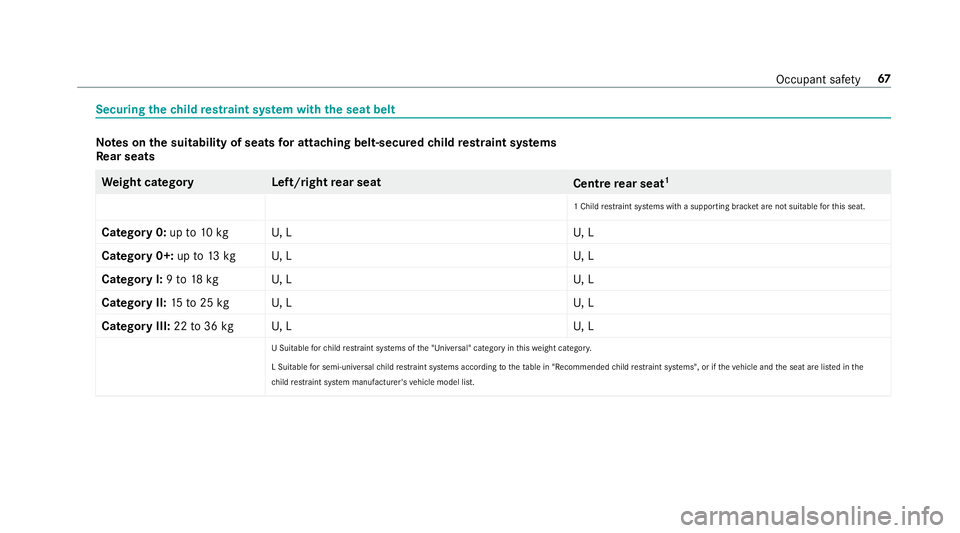
Securing
thech ild restra int sy stem with the seat belt Note
s onthe suitability of seats for attaching belt-secured child restra int sy stems
Re ar seats We
ight categor yL eft/rightrear seat
Centrerear seat 1
1 Child restrai nt sy stems with a supporting brac ket are not sui table forth is seat.
Category 0: upto10 kg U, LU , L
Category 0+: upto13 kg U, LU , L
Category I: 9to 18 kg U, LU , L
Category II: 15to25 kg U, LU , L
Category III: 22to36 kg U, LU , L
U Suitable forch ild restrai nt sy stems of the "Universal" category in this we ight categor y.
L Suitable for semi-universal child restrai nt sy stems according totheta ble in "Recommended child restrai nt sy stems", or if theve hicle and the seat are lis ted in the
ch ild restrai nt sy stem manufacturer's vehicle model list. Occupant saf
ety67
Page 149 of 645
Overview of climate control sy
stems Note
s on climate control An interior air
filter in combination with the pre‐
fi lter in the engine compartment must alw ays be
used so that the air conditioning sy stem, pollu‐
tion lebutton vel monitoring and the air filtration
wo rkcor rectly. Ma kesure that thefilter is ins tal‐
led cor rectly and thefilter housing in the engine
compartment is closed cor rectly using the cap
and alw ays tightly sealed when in operation. Use
fi lters recommended and appr ovedby
Mercedes-Benz. Alw ays ha veservice workcar‐
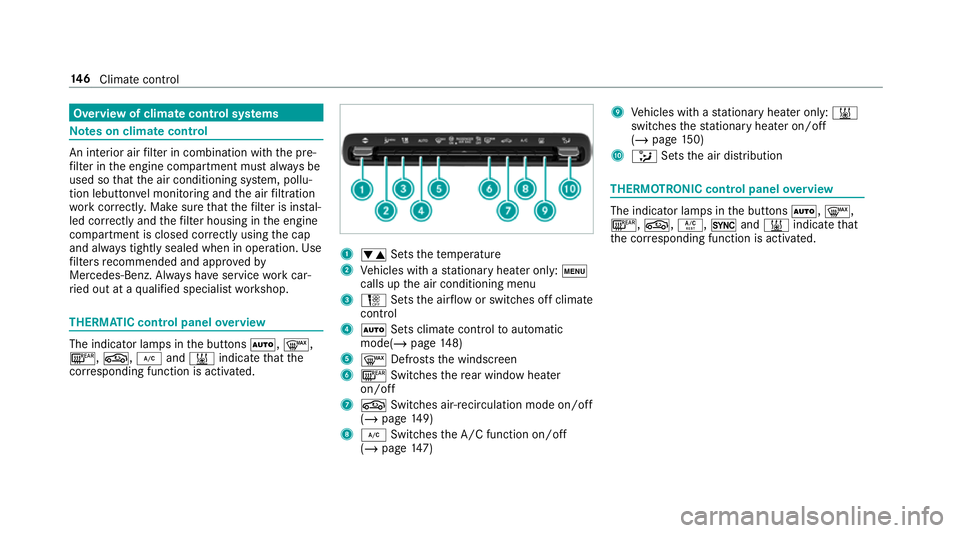
ri ed out at a qualified specialist workshop. THERMATIC control panel
overview The indicator lamps in
the buttons Ã,¬,
¤, g,¿and& indicate that the
cor responding function is activated. 1
w Setsthete mp erature
2 Vehicles with a stationary heater on ly:t
calls upthe air conditioning menu
3 H Setsthe air flow or switches off climate
control
4 Ã Sets climate control toautomatic
mode(/ page148)
5 ¬ Defrosts the windscreen
6 ¤ Switches there ar wind owheater
on/off
7 g Switches air-recirculation mode on/off
(/ page 149)
8 ¿ Switches the A/C function on/off
(/ page 147) 9
Vehicles with a stationary heater on ly:&
swit ches thest ationary heater on/off
(/ page 150)
A _ Setsthe air distribution THERMOTRONIC control panel
overview The indicator lamps in
the buttons Ã,¬,
¤, g,Á,0and& indicate that
th e cor responding function is activated. 14 6
Climate cont rol
Page 150 of 645
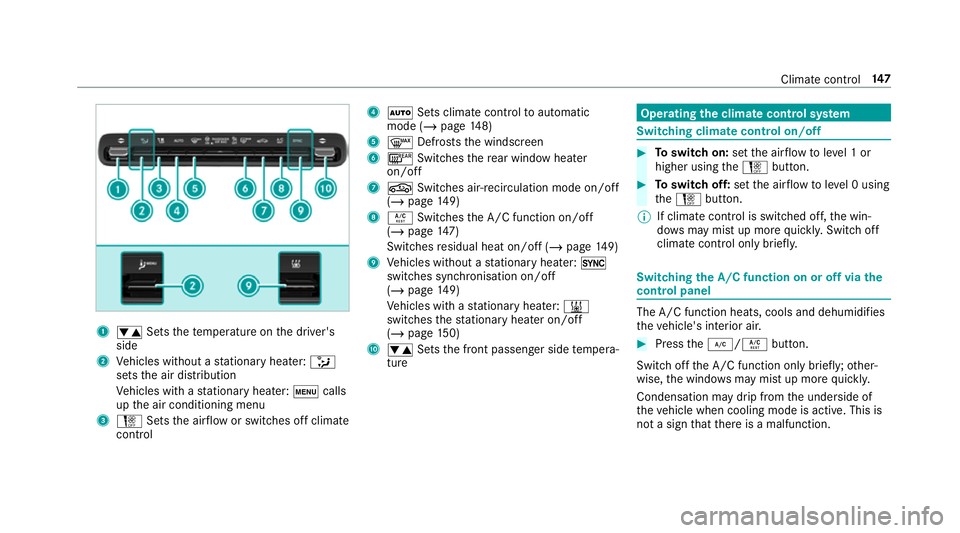
1
w Setsthete mp erature on the driver's
side
2 Vehicles without a stationary heater: _
sets the air distribution
Ve hicles with a stationary heater: tcalls
up the air conditioning menu
3 H Setsthe air flow or switches off climate
control 4
à Sets climate control toautomatic
mode (/ page148)
5 ¬ Defrosts the windscreen
6 ¤ Switches there ar wind owheater
on/off
7 g Switches air-recirculation mode on/off
(/ page 149)
8 Á Switches the A/C function on/off
(/ page 147)
Switches residual heat on/off (/ page149)
9 Vehicles without a stationary heater: 0
swit ches synchronisation on/off
(/ page 149)
Ve hicles with a stationary heater: &
swit ches thest ationary heater on/off
(/ page 150)
A w Setsthe front passenger side temp era‐
ture Operating
the clima tecont rol sy stem Switching clima
tecont rol on/off #
Toswitch on: setthe air flow toleve l 1 or
higher using theH button. #
Toswitch off: setthe air flow toleve l 0 using
th eH button.
% If climate control is switched off, the win‐
do ws may mist up more quickl y.Switch off
climate control only brie fly. Switching
the A/C function on or off via the
cont rol panel The A/C function heats, cools and dehumidifies
th
eve hicle's interior air. #
Press the¿/Á button.
Switch off the A/C function only brief ly;ot her‐
wise, the windo wsmay mist up more quickl y.
Condensation may drip from the underside of
th eve hicle when cooling mode is active. This is
not a sign that there is a malfunction. Climate control
147
Page 151 of 645
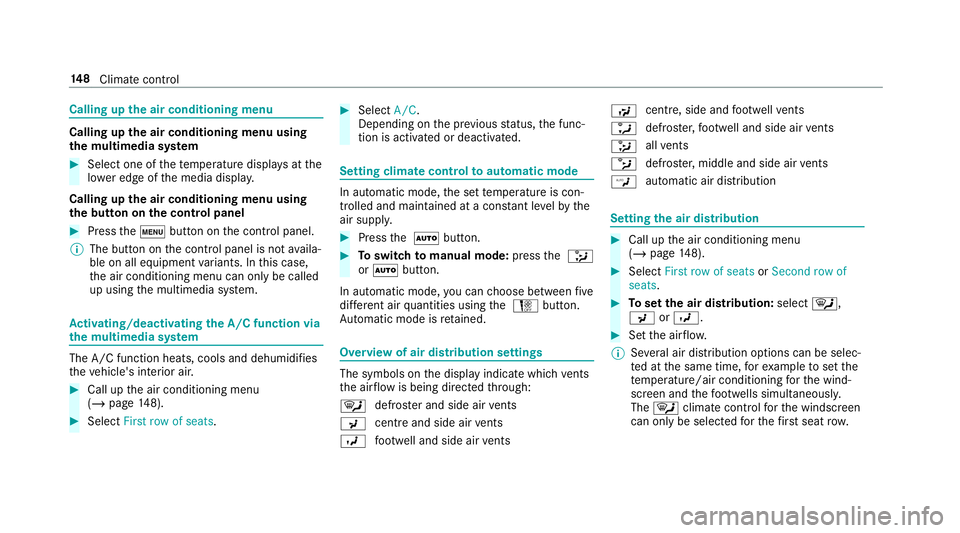
Calling up
the air conditioning menu Calling up
the air conditioning menu using
th e multimedia sy stem #
Select one of thete mp erature displa ysatthe
lo we r edge of the media displa y.
Calling up the air conditioning menu using
th e but ton on the control panel #
Press thet button on the control panel.
% The button on the control panel is not availa‐
ble on all equipment variants. In this case,
th e air conditioning menu can only be called
up using the multimedia sy stem. Ac
tivating/deactivating the A/C function via
the multimedia sy stem The A/C function heats, cools and dehumidifies
th eve hicle's interior air. #
Call up the air conditioning menu
(/ page 148). #
Select First row of seats. #
Select A/C.
Depending on the pr evious status, the func‐
tion is activated or deactivated. Setting climate control
toautomatic mode In auto
matic mode, the set temp erature is con‐
trolled and maintained at a const ant levelby the
air suppl y. #
Press the à button. #
Toswitch tomanual mode: pressthe _
or à button.
In automatic mode, you can choose between five
dif fere nt air quantities using the H button.
Au tomatic mode is retained. Overview of air distribution settings
The symbols on
the display indicate which vents
th e air flow is being directed thro ugh:
¯ def
rost er and side air vents
P centre and side air
vents
O fo
ot we ll and side air vents S
centre, side and
foot we llve nts
a defros
ter,fo ot we ll and side air vents
_ all
vents
b defros
ter,middle and side air vents
W au
tomatic air distribution Setting
the air distribution #
Call up the air conditioning menu
(/ page 148). #
Select First row of seats orSecond row of
seats. #
Toset the air distribution: select¯,
P orO. #
Set the air flow.
% Several air distribution options can be selec‐
te d at the same time, forex ample toset the
te mp erature/air conditioning forth e wind‐
screen and thefo ot we lls simultaneousl y.
The ¯ climate contro lfo rth e windscreen
can only be selected forth efirs t seat row. 14 8
Climate cont rol
Page 153 of 645
mode or heating mode auto
matically
switches toventilation mode.
The stationary heater and theex haust gas outlet
are situated in front of theright-hand front
wheel.
Switching thest ationary heater/stationary
ve ntilation on/off via the control panel &
DANG ER Risk of fata l injury due topoi‐
sonous exhaust gases
If th eta ilpipe is bloc ked or suf ficient ventila‐
tion is not possible, poisonous exhaust gases
such as carbon monoxide may enter theve hi‐
cle. This is the case in enclosed spaces or if
th eve hicle getsst uck in sn ow,fo rex ample. #
Alw ays switch thest ationary heater off
in enclosed spaces without an air
ex traction sy stems, e.g. in garage s. #
Keep theta ilpipe and the area around
th eve hicle free from snow when the
engine or thest ationary heater are run‐
ning. #
Open a window on the windward side of
th eve hicle toensure an adequate sup‐
ply of fresh air. &
WARNING Risk offire due tohot station‐
ary heater components
When thest ationary heater is swit ched on,
parts of theve hicle can become very hot,
e.g. thest ationary heater exhaust sy stem.
Flammable materials such as lea ves, grass or
twigs may ignite if they come into contact
wi th:
R hot parts of thest ationary heater exhaust
sy stem
R theex haust gas itself
There is a risk of fire. #
When thest ationary heater is swit ched
on, make sure that:
R hot vehicle parts do not come into
contact with flammable materials. R
theex haust gas can flow out of the
st ationary heater exhaust pipe
unhindered.
R theex haust gas does not come into
contact with flammable materials. *
NO
TEBattery discharge caused bysta‐
tionary heater or stationary ventilation
operation Ope
rating thest ationary heater or stationary
ve ntilation drains the batter y. #
After heating or ventilating theve hicle
twice, drive for a longer period of time. Re
quirements:
R The fuel tank has been filled toat least Õ. 15 0
Climate cont rol
Page 161 of 645
If
th eve hicle still does not start, one of thefo l‐
lowing display messages appears in the multi‐
function display: #
Place the key in the marked space See Own-
er's Manual :st art theve hicle in emer gency
operation mode (/ page 159).
or #
Key not detected Place smartphone in charg-
ing bracket: place the mobile phone in the
mar ked space (/ page126).
Yo u can swit choff the engine while driving by
pressing button 1for about thre e seconds or
by pressing button 1thre e times within a sec‐
ond. Be sure toobser vethe saf ety no tes under
"Driving tips".
St arting theve hicle with a Digital Vehicle
Key
Requ irements:
R one of thefo llowing versions of the Digital
Ve hicle Key is available:
- suitable mobile phone
- Digital Vehicle Keyst icker R
theve hicle is equipped with the "Digital Vehi‐
cle Key" function.
R the "Digital Vehicle Key" function is activated
via Mercedes me connec t:http://
www.mercedes.me.
R the mobile phone is suf ficiently charge d.
% You can check the suitability of your mobile
phone byentering the phone number at
http://www.mercedes.me.
Information about suitable mobile phones
can be obtained from your Mercedes-Benz
Service Centre or at http://www.mercedes-
benz.com/connect.
% Mercedes-Benz recommends that you car ry
th e emer gency key in case of function
re strictions.
% The function is only available in combination
with Mercedes me connect and on lyin cer‐
ta in countries.
% Protective cases around the mobile phone
can impair the functionality. Using
the Digital Vehicle Keyfo r the first
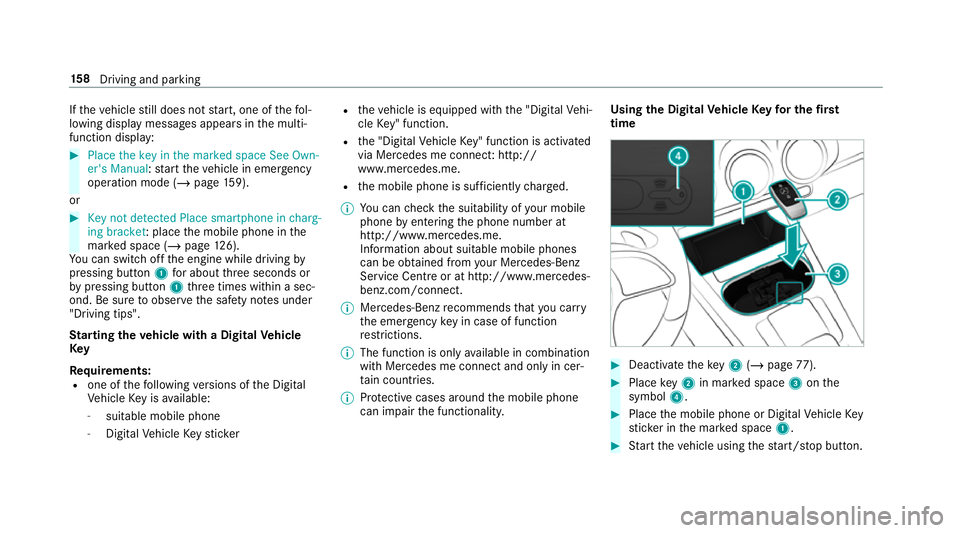
time #
Deactivate theke y2 (/ page 77). #
Place key2 in mar ked space 3onthe
symbol 4. #
Place the mobile phone or Digital Vehicle Key
st icke r in the mar ked space 1. #
Start theve hicle using thest art/ stop button. 15 8
Driving and pa rking
Page 168 of 645
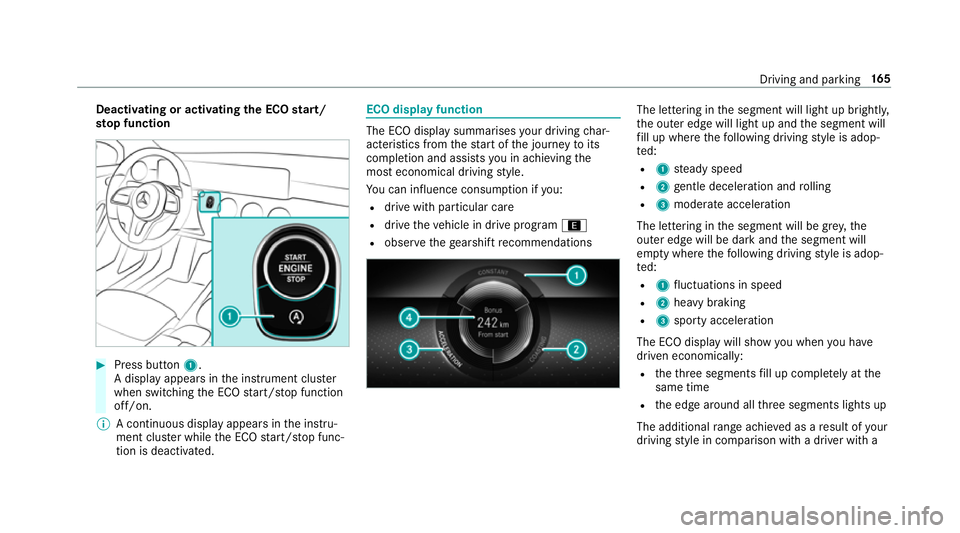
Deactivating or activating
the ECO start/
sto p function #
Press button 1.
A displ ayappears in the instrument clus ter
when swit ching the ECO start/ stop function
off/on.
% A continuous display appears in the instru‐
ment clus ter while the ECO start/ stop func‐
tion is deactivated. ECO display function
The ECO display summarises
your driving char‐
acteristics from thest art of the journey toits
completion and assists you in achieving the
most economical driving style.
Yo u can influence consum ption if you:
R drive with particular care
R drive theve hicle in drive program ;
R obser vethege arshift recommendations The lettering in
the segment will light up brightl y,
th e outer edge will light up and the segment will
fi ll up where thefo llowing driving style is adop‐
te d:
R 1 steady speed
R 2 gentle deceleration and rolling
R 3 moderate acceleration
The lettering in the segment will be gr ey,the
outer edge will be dark and the segment will
em pty where thefo llowing driving style is adop‐
te d:
R 1 fluctuations in speed
R 2 heavy braking
R 3 sporty acceleration
The ECO displ aywill show you when you ha ve
driven economically:
R theth re e segments fill up comple tely at the
same time
R the edge around all thre e segments lights up
The additional range achi eved as a result of your
driving style in comparison with a driver with a Driving and parking
16 5