Page 402 of 692

Mode selector switch
The desired airflow mode can be selected.
Refer to Selecting the Airflow Mode on
page 5-12.
▼ Operation of Automatic Air
Conditioner
Operation from front seats
1. Turn the front air conditioner on.
2. Press the rear switch. The rear air
conditioner operates.
3. Selection of the airflow mode, airflow
amount and temperature will be
automatically controlled to the same
temperature setting as the front air
conditioner for the driver's side.
NOTE
If the AUTO switch is pressed while
the front A/C switch is off, the rear
air conditioner operates only to
circulate air.
Setting the temperature to the
maximum high or low will not
provide the desired temperature at a
faster rate.
When selecting heat, the system will
restrict airflow until it has warmed
to prevent cold air from blowing out
of the vents.
When the rear air conditioner is
controlled to the same temperature
setting as the fron t air conditioner
for the driver's side, “SYNC” is
displayed on the rear screen.
When operating the fan switch of the
front air conditioner while the rear
air conditioner is operating
automatically, the airflow amount of
the rear air conditioner may change.
Operation from rear seats
1. Turn the front air conditioner on.
2. Press the AUTO switch. The selection of the airflow mode and airflow
amount will be automatically
controlled.
3. Use the temperature control switch to set the desired temperature.
NOTE
If the AUTO switch is pressed while
the front A/C switch is off, the rear
air conditioner operates only to
circulate air.
Setting the temperature to the
maximum high or low will not
provide the desired temperature at a
faster rate.
When selecting heat, the system will
restrict airflow until it has warmed
to prevent cold air from blowing out
of the vents.
When the rear air conditioner is
operated automatic ally, “AUTO” is
displayed on the rear screen.
When the rear air conditioner is
controlled to the same temperature
setting as the front air conditioner
for the driver's side, “SYNC” is
displayed on the rear screen.
To turn off the system, press the Power
switch.
Interior Features
Climate Control System
5-14
CX-9_8HB2-EA-18G_Edition1 2018-5-11 13:09:27
Page 407 of 692

Basic Operation Method
NOTE
The explanation of functions described in this manual may differ from the actual
operation, and the shapes of screens and buttons and the letters and characters displayed
may also differ from the actual appearance.
Additionally, depending on future software updates, the content may successively change
without notice.
For additional information regarding Mazda Connect, please refer to the following
We b s i t e .
http://infotainment.mazdahandsfree.com/
Audio Set has 3 different human interfaces.
Commander switch
Touch panel
Voice recognition with steering switch and microphone
Refer to Voice Recognition on page 5-74.
▼ Commander switch operation
NOTE
For safety reasons, some operations are disabled while the vehicle is being driven.
Volume dial operation
Volume dial
Press the volume dial to switch the audio MUTE on and off.
Turn the volume dial to adjust t
he volume. The volume increases by turning the dial
clockwise, and decreases by t urning it counterclockwise.
Interior Features
Audio Set
5-19
CX-9_8HB2-EA-18G_Edition1 2018-5-11 13:09:27
Page 408 of 692

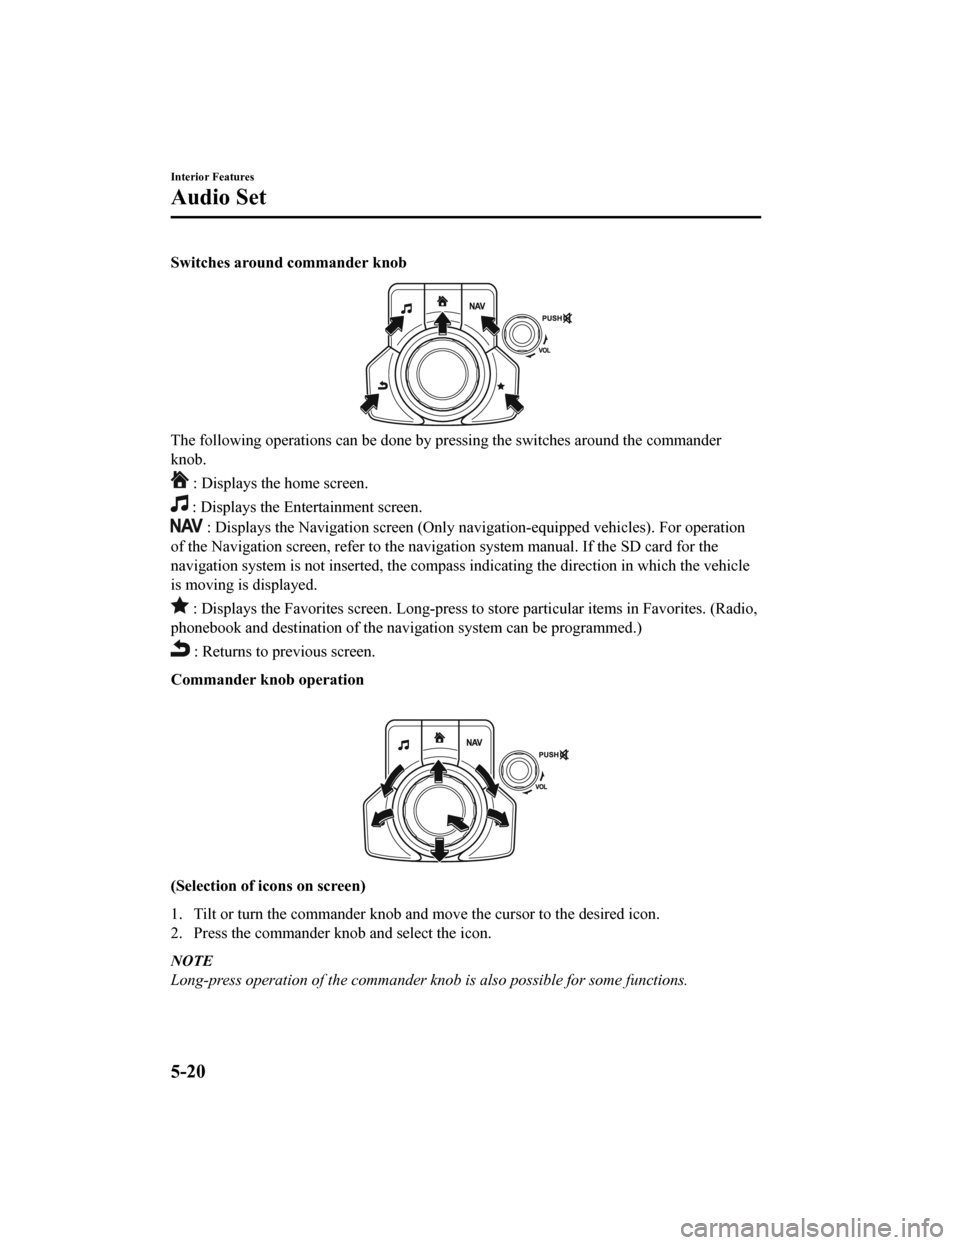
Switches around commander knob
The following operations can be done by pressing the switches around the commander
knob.
: Displays the home screen.
: Displays the En tertainment screen.
: Displays the Navigation screen (Only navigation-equipped veh icles). For operation
of the Navigation screen, refer to the navigation system manual . If the SD card for the
navigation system is not inserted, the compass indicating the d irection in which the vehicle
is moving is displayed.
: Displays the Favorites screen. Long-press to store particula r items in Favorites. (Radio,
phonebook and destination of the navigation system can be progr ammed.)
: Returns to previous screen.
Commander knob operation
(Selection of icons on screen)
1. Tilt or turn the commander knob and move the cursor to the de sired icon.
2. Press the commander knob and select the icon.
NOTE
Long-press operation of the commander knob is also possible for some functions.
Interior Features
Audio Set
5-20
CX-9_8HB2-EA-18G_Edition1 2018-5-11 13:09:27
Page 409 of 692
▼Touch panel operation
CAUTION
Do not press the screen strongly or press it wi
th a sharp-pointed object. Otherwise, the screen
could be damaged.
NOTE
For safety reasons, operation of the center di splay is disabled while the vehicle is being
driven. However, items not displayed in gray can be operated using the commander switch
while the vehicle is being driven.
Touch & Tap
1. Touch or tap on the item indicated on the screen.
2. The operation is launched and the next item is displayed.
Interior Features
Audio Set
5-21
CX-9_8HB2-EA-18G_Edition1 2018-5-11 13:09:27
Page 410 of 692
Slide (USB audio only)
1. Touch the setting item displaying a slider bar.
2. Touch the slider with your finger and move to the desired level.
Swipe
1. Touch the screen with your finger and move up or down.
2. Items which were not displayed can be displayed.
Return to previous screen
1. Touch the
.
Displaying the home screen
1. Touch the
.
Interior Features
Audio Set
5-22
CX-9_8HB2-EA-18G_Edition1 2018-5-11 13:09:27
Page 411 of 692

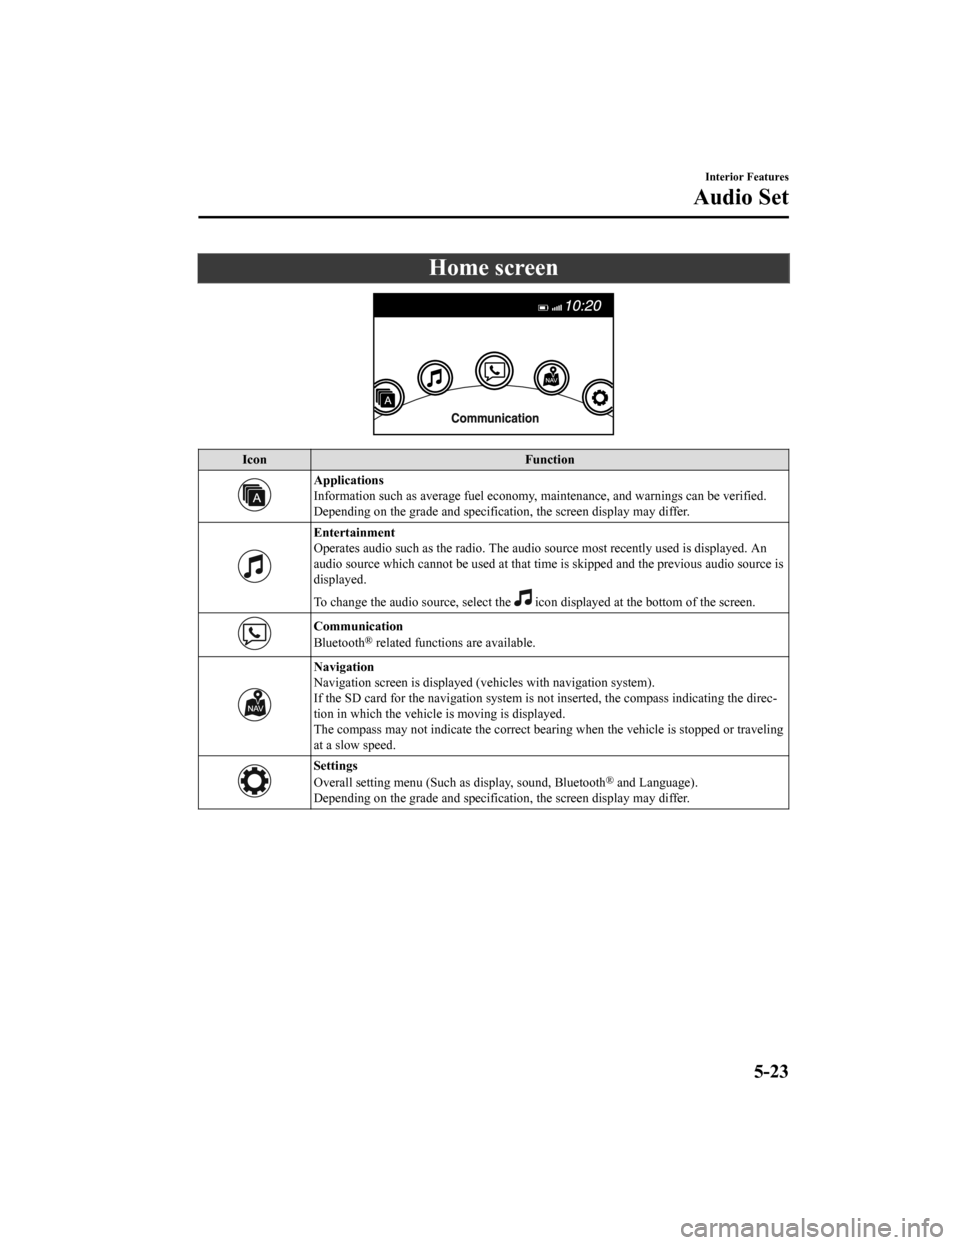
Home screen
IconFunction
Applications
Information such as average fuel economy, maintenance, and warn ings can be verified.
Depending on the grade and specification, the screen display ma y differ.
Entertainment
Operates audio such as the radio. The audio source most recentl y used is displayed. An
audio source which cannot be used at that time is skipped and t he previous audio source is
displayed.
To change the audio source, select the
icon displayed at the bottom of the screen.
Communication
Bluetooth® related functions are available.
Navigation
Navigation screen is displayed (v ehicles with navigation system).
If the SD card for the navigation system is not inserted, the compass indicating the direc‐
tion in which the vehicle is moving is displayed.
The compass may not indicate th e correct bearing when the vehicle is stopped or traveling
at a slow speed.
Settings
Overall setting menu (Such a s display, sound, Bluetooth® and Language).
Depending on the grade and specification, the screen display ma y differ.
Interior Features
Audio Set
5-23
CX-9_8HB2-EA-18G_Edition1 2018-5-11 13:09:27
Page 412 of 692

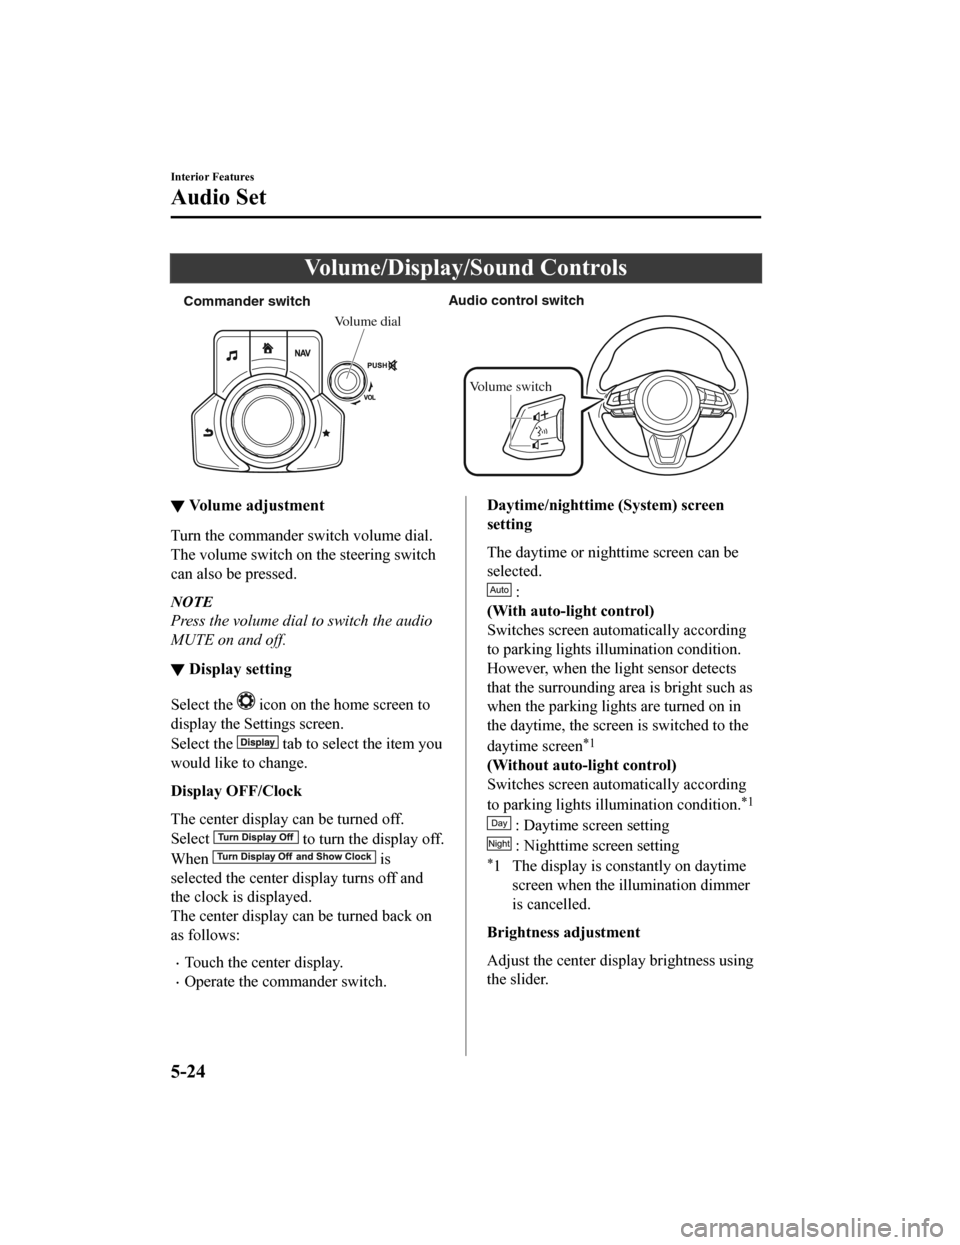
Volume/Display/Sound Controls
Commander switchAudio control switch
Volume dial
Volume switch
▼ Volume adjustment
Turn the commander switch volume dial.
The volume switch on the steering switch
can also be pressed.
NOTE
Press the volume dial to switch the audio
MUTE on and off.
▼Display setting
Select the icon on the home screen to
display the Settings screen.
Select the
tab to select the item you
would like to change.
Display OFF/Clock
The center display can be turned off.
Select
to turn the display off.
When
is
selected the center di splay turns off and
the clock is displayed.
The center display can be turned back on
as follows:
Touch the center display.
Operate the commander switch.
Daytime/nighttime (System) screen
setting
The daytime or nighttime screen can be
selected.
:
(With auto-light control)
Switches screen automatically according
to parking lights illumination condition.
However, when the li ght sensor detects
that the surrounding area is bright such as
when the parking lights are turned on in
the daytime, the screen is switched to the
daytime screen
*1
(Without auto-light control)
Switches screen automatically according
to parking lights illumination condition.
*1
: Daytime screen setting
: Nighttime screen setting
*1 The display is constantly on daytime screen when the il lumination dimmer
is cancelled.
Brightness adjustment
Adjust the center display brightness using
the slider.
Interior Features
Audio Set
5-24
CX-9_8HB2-EA-18G_Edition1 2018-5-11 13:09:27
Page 413 of 692

Contrast adjustment
Adjust the center display contrast using
the slider.
Display setting reset
All of the screen setting values can be
reset to their initial settings.
1. Select
.
2. Select
.
▼ Audio sound adjustment
Select the icon on the home screen to
display the Settings screen.
Select the
tab to select the item you
would like to change.
Indication Setting value
Bass
(Low pitch sound)
Side: Low pitch en‐
hancement
Side: Low pitch re‐
duction
Treble
(Treble sound)
Side: Treble enhance‐
ment
Side: Treble reduction
Fade
(Front/Rear volume bal‐
ance) Front: Front speaker vol‐
ume enhancement
Rear: Rear speaker vol‐
ume enhancement
Balance
(Left/right volume bal‐
ance) Right: Right speaker
volume enhancement
Left: Left speaker vol‐
ume enhancement
Guidance Volume
*
(Volume adjustment dur‐
ing route guidance on
navigation screen) Left: Low volume
Right: High volume
ALC
*1
(Automatic volume ad‐
justment) Off―Adjustment at sev‐
en levels
Bose
® Centerpoint*2
(Automatic surround
level adjustment) On/Off
Indication
Setting value
Bose
® AudioPilot*2
(Automatic volume ad‐
justment) On/Off
Beep
(Audio operation sound) On/Off
*1 Standard audio*2Bose® sound system
ALC (Automatic volume adjustment)
The automatic level
control (ALC) is a
feature that automatically adjusts audio
volume and sound quality according to the
vehicle speed. The volume increases in
accordance with the increase in vehicle
speed, and decreases as vehicle speed
decreases.
Bose
® Centerpoint (Automatic
surround level adjustment)
Centerpoint
®*3 lets vehicle owners enjoy a
Bose
® surround sound experience from
their existing MP3s and satellite radio.
Specifically engineered to meet the unique
demands of reproducing surround sound in
a vehicle.
Converts stereo signals to multiple
channels allowing greater precision when
reproducing the sound.
An enhanced algorithm to simultaneously
create a wider, more spacious sound field.
*3 Centerpoint
® is a registered trademark
of Bose Corporation.
Bose
® AudioPilot (Automatic volume
adjustment)
When driving, background noise can
interfere with enjoying music.
AudioPilot
®*4 noise compensation
technology continuously adjusts the music
to compensate for background noise and
vehicle speed.
Interior Features
Audio Set
*Some models.5-25
CX-9_8HB2-EA-18G_Edition1 2018-5-11 13:09:27