2019 MASERATI QUATTROPORTE engine
[x] Cancel search: enginePage 178 of 396

steering wheel, or through the button
on the central console or through the
relevant soft-key of the MTC+. See
chapter “Automatic Start&Stop
System” of section “Driving” for
further information.
Start&Stop Failure Warning Light
This warning light illuminates
when there is a failure in the
Start&Stop system. Switch the
engine on or off using the
normal procedure with the ignition
device START/STOP and have the
vehicle checked at an Authorized
Maserati Dealer .
Scheduled Maintenance (Service)
Indicator
This indicator illuminates and
a message flashes on the
display for approximately 5
seconds after an acoustic
signal to indicate that the next
scheduled maintenance is due or is
already overdue.
Unless reset, the message will continue
to display each time you cycle the
ignition to the RUN position.
To turn off the message temporarily,
press and release the
button on the
steering wheel. To reset the service
indicator system, please visit an
Authorized Maserati Dealer . ADAS Status Indicators (if equipped)
When you are not viewing the
“Drive Assist” page, the
indicators at the top left-hand
side of the display indicate
status of individual ADAS system or
the combination of them (see
examples).
For further details, refer to
“Adaptive Cruise Control -
ACC”, “Lane Keeping Assist -
LKA” and “Highway Assist - HAS” in
section “Driving”.
Forward Collision Warning (FCW) Off
(if equipped)
This warning light informs the
driver that Forward Collision
Warning (FCW) is disabled.
This might occur when front
sensor and/or the ACC/FCW system
sensors are malfunctioning and need
cleaning or servicing and when
ACC/FCW system is not available due
to a system error (for further details,
refer to “Adaptive Cruise Control –
ACC” in section “Driving”). This
warning light will light even when the
activation of another driver assistance
feature or drive mode (such as “
-ESC
OFF”) disables the FCW. Forward Collision Warning (FCW) Fault
(if equipped)
This warning light informs that
FCW is in fault state. If this
light occurs together with
other specific messages, take
your vehicle to an Authorized Maserati
Dealer for service. It is nevertheless
possible to drive the vehicle without
using this function (for further details,
refer to “Forward Collision Warning -
FCW” in section “Driving”).
AWD Failure Warning Light (on AWD
version only)
This warning light turns on to
indicate a fault of the AWD
system otherwise a fault or
overheating due to excessive
wheel spin. Contact an Authorized
Maserati Dealer as soon as possible,
and avoid using the vehicle in heavy
duty conditions.
Set Passive Speed Limit
This indicator light indicates
the passive speed limit set via
the controls on the RH side of
the steering wheel (for further
details, refer to “TFT Display: Menus
and Settings” in this chapter).Dashboard Instruments and Controls
4
174
Page 190 of 396
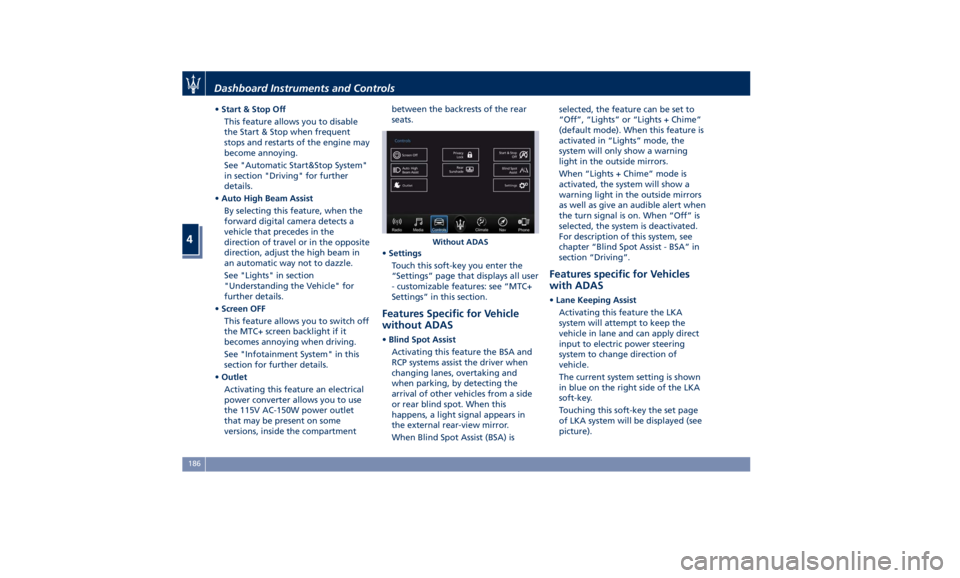
• Start & Stop Off
This feature allows you to disable
the Start & Stop when frequent
stops and restarts of the engine may
become annoying.
See "Automatic Start&Stop System"
in section "Driving" for further
details.
• Auto High Beam Assist
By selecting this feature, when the
forward digital camera detects a
vehicle that precedes in the
direction of travel or in the opposite
direction, adjust the high beam in
an automatic way not to dazzle.
See "Lights" in section
"Understanding the Vehicle" for
further details.
• Screen OFF
This feature allows you to switch off
the MTC+ screen backlight if it
becomes annoying when driving.
See "Infotainment System" in this
section for further details.
• Outlet
Activating this feature an electrical
power converter allows you to use
the 115V AC-150W power outlet
that may be present on some
versions, inside the compartment between the backrests of the rear
seats.
• Settings
Touch this soft-key you enter the
“Settings” page that displays all user
- customizable features: see “MTC+
Settings” in this section.
Features Specific for Vehicle
without ADAS • Blind Spot Assist
Activating this feature the BSA and
RCP systems assist the driver when
changing lanes, overtaking and
when parking, by detecting the
arrival of other vehicles from a side
or rear blind spot. When this
happens, a light signal appears in
the external rear-view mirror.
When Blind Spot Assist (BSA) is selected, the feature can be set to
“Off”, “Lights” or “Lights + Chime”
(default mode). When this feature is
activated in “Lights” mode, the
system will only show a warning
light in the outside mirrors.
When “Lights + Chime” mode is
activated, the system will show a
warning light in the outside mirrors
as well as give an audible alert when
the turn signal is on. When “Off” is
selected, the system is deactivated.
For description of this system, see
chapter “Blind Spot Assist - BSA” in
section “Driving”.
Features specific for Vehicles
with ADAS • Lane Keeping Assist
Activating this feature the LKA
system will attempt to keep the
vehicle in lane and can apply direct
input to electric power steering
system to change direction of
vehicle.
The current system setting is shown
in blue on the right side of the LKA
soft-key.
Touching this soft-key the set page
of LKA system will be displayed (see
picture).Without ADASDashboard Instruments and Controls
4
186
Page 193 of 396

MTC+ Settings Customer Programmable
Features The MTC+ System uses a combination
of keys able to access and change the
customer programmable features
present in the “Settings” and
“Controls” page (see also “MTC+
“Controls” Screen” in this section).
Access programmable features
touching “Settings” soft-key in the
“Controls” screen page, or using
manual controls on central console
(refer to “Infotainment System” in this
section).
Turn the tune/scroll knob to scroll
through menus and change settings
on MTC+ display, touch the enter
upper button to confirm the selection. NOTE:
• For further details refer also to the
“Maserati Touch Control Plus
(MTC+)” guide.
• All settings must be edited with
ignition device set to RUN position.
To display the programmable features
menu on MTC+, you can also touch
soft-key to view all available
applications and then select
“Settings”. In this mode the MTC+ System allows
you to access the following
programmable features (some of them
are optional or for a specific
model/version and may not be
available on your vehicle): Display,
Units, Voice Commands, Clock, Safety
& Driving Assistant, Lights, Doors &
Locks, Auto-On Comfort & Remote
Start, Engine Off Options, Audio,
Phone/Bluetooth, SiriusXM Setup,
Restore Settings and Clear Personal
Data.
NOTE:
• Only one touch screen area/soft-key
may be selected at a time.
• Menu navigation indications refer to
the use of soft-keys on MTC+ display:
the same operations can be
performed using the manual
controls on central console.Without ADAS With ADASDashboard Instruments and Controls
4
189
Page 194 of 396
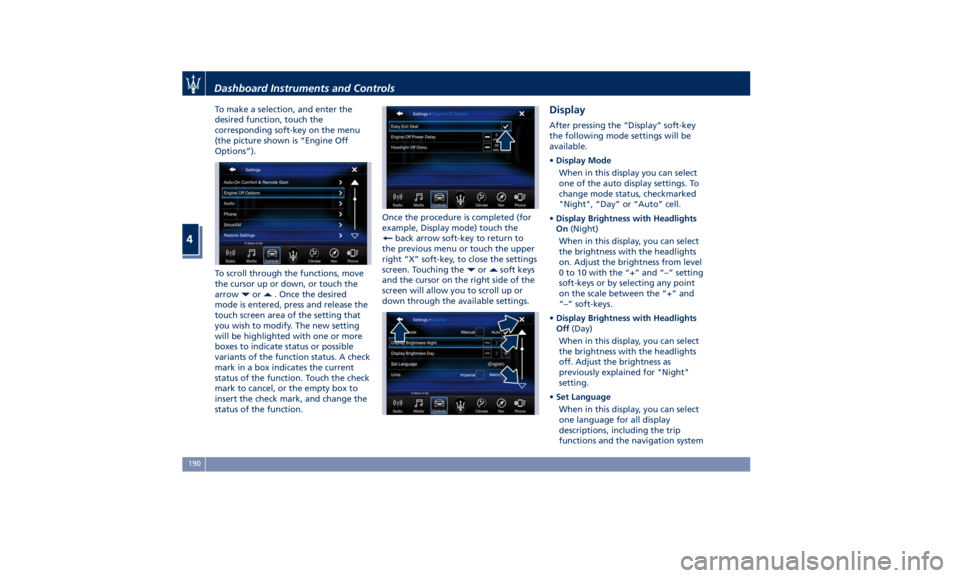
To make a selection, and enter the
desired function, touch the
corresponding soft-key on the menu
(the picture shown is “Engine Off
Options”).
To scroll through the functions, move
the cursor up or down, or touch the
arrow
or . Once the desired
mode is entered, press and release the
touch screen area of the setting that
you wish to modify. The new setting
will be highlighted with one or more
boxes to indicate status or possible
variants of the function status. A check
mark in a box indicates the current
status of the function. Touch the check
mark to cancel, or the empty box to
insert the check mark, and change the
status of the function. Once the procedure is completed (for
example, Display mode) touch the
back arrow soft-key to return to
the previous menu or touch the upper
right “X” soft-key, to close the settings
screen. Touching the
or soft keys
and the cursor on the right side of the
screen will allow you to scroll up or
down through the available settings. Display After pressing the “Display” soft-key
the following mode settings will be
available.
• Display Mode
When in this display you can select
one of the auto display settings. To
change mode status, checkmarked
"Night", “Day” or “Auto” cell.
• Display Brightness with Headlights
On (Night)
When in this display, you can select
the brightness with the headlights
on. Adjust the brightness from level
0 to 10 with the “+” and “–” setting
soft-keys or by selecting any point
on the scale between the “+” and
“–” soft-keys.
• Display Brightness with Headlights
Off (Day)
When in this display, you can select
the brightness with the headlights
off. Adjust the brightness as
previously explained for "Night"
setting.
• Set Language
When in this display, you can select
one language for all display
descriptions, including the trip
functions and the navigation systemDashboard Instruments and Controls
4
190
Page 198 of 396

• Rain Sensing Auto Wipers
By selecting this feature, the system
will automatically activate the
windshield wipers if it senses
moisture on the windshield. The
feature can be set to “On” or “Off”.
• Hill Start Assist
This feature allows you to disable
the HSA system. The feature can be
set to “On” or “Off”. See “Brake
and Stability Control System” in
section “Driving” for further details.
Lights Press the “Lights” soft-key to set the
following modes.
• Headlight Off Delay
By selecting this feature, the driver
can choose to have the headlight off
or lit for 30, 60, or 90 seconds when
the engine is shut off. To change the
current headlight off delay status,
touch and release the “0”, “30”,
“60” or “90” soft-key to select the
desired time range. • Headlight Illumination on Approach
By selecting this feature, the driver
can choose to have the headlight off
or lit for 30, 60, or 90 seconds when
the doors are unlocked with the key
fob RKE transmitter.
• Headlights with Wipers
By selecting this feature, while the
headlight lever is in “AUTO”
position, the headlight will turn on
approximately 10 seconds after the
wipers are activated. The headlight
will also turn off when the wipers
deactivate if they were activated in
the current mode. The feature can
be set to “On” or “Off”.
• Auto Dim High Beams
By selecting this feature, the high
beam headlight will deactivate
automatically under certain
conditions. See “Lights” in section “Understanding the Vehicle” for
further information.
• Headlight Dip - Traffic Changeover (if
equipped)
By selecting this feature, the
headlights will change their light
distribution when a left-hand-drive
vehicle enter a Country with
right-hand-drive system and vice
versa. The feature can be set to
“On” or “Off”.
• Daytime Running Lights (DRL)
By selecting and check-mark this
feature, the DRL lights will turn on
whenever the engine running. The
feature can be set to “On” or “Off”.
• Adaptive Front Light (if equipped)
By selecting this feature, the system
turn off the beam shaping and
bending. See “Lights” in section
“Understanding the Vehicle” for
further details.
Doors & Locks Press the “Doors & Locks” soft-key to
set the following modes.
• Auto Door Locks
When this feature is selected, all
doors will automatically lock when
the vehicle is in motion. The feature
can be set to “On” or “Off”.Dashboard Instruments and Controls
4
194
Page 199 of 396
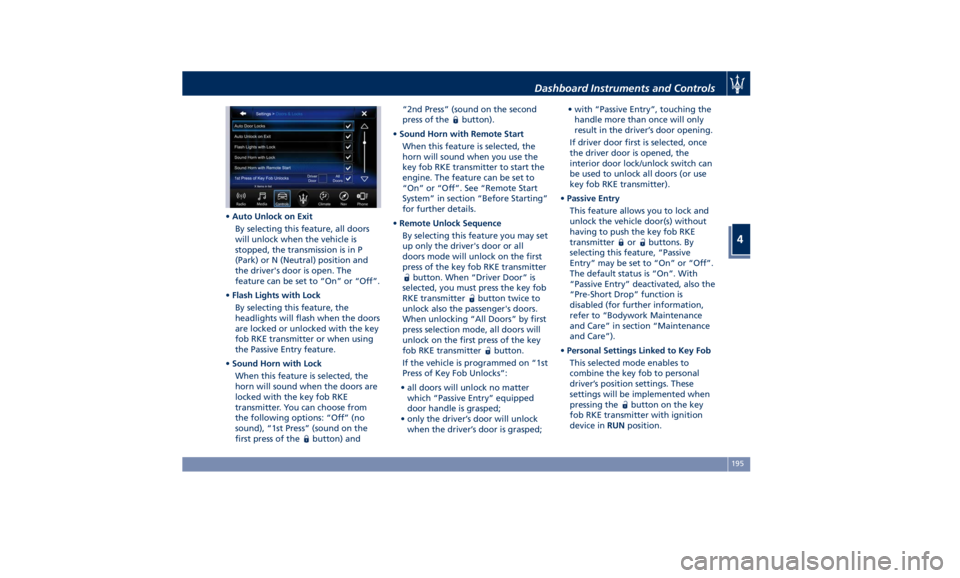
• Auto Unlock on Exit
By selecting this feature, all doors
will unlock when the vehicle is
stopped, the transmission is in P
(Park) or N (Neutral) position and
the driver's door is open. The
feature can be set to “On” or “Off”.
• Flash Lights with Lock
By selecting this feature, the
headlights will flash when the doors
are locked or unlocked with the key
fob RKE transmitter or when using
the Passive Entry feature.
• Sound Horn with Lock
When this feature is selected, the
horn will sound when the doors are
locked with the key fob RKE
transmitter. You can choose from
the following options: “Off” (no
sound), “1st Press” (sound on the
first press of the
button) and “2nd Press” (sound on the second
press of the
button).
• Sound Horn with Remote Start
When this feature is selected, the
horn will sound when you use the
key fob RKE transmitter to start the
engine. The feature can be set to
“On” or “Off”. See “Remote Start
System” in section “Before Starting”
for further details.
• Remote Unlock Sequence
By selecting this feature you may set
up only the driver's door or all
doors mode will unlock on the first
press of the key fob RKE transmitter
button. When “Driver Door” is
selected, you must press the key fob
RKE transmitter
button twice to
unlock also the passenger's doors.
When unlocking “All Doors” by first
press selection mode, all doors will
unlock on the first press of the key
fob RKE transmitter
button.
If the vehicle is programmed on “1st
Press of Key Fob Unlocks”:
• all doors will unlock no matter
which “Passive Entry” equipped
door handle is grasped;
• only the driver’s door will unlock
when the driver’s door is grasped; • with “Passive Entry”, touching the
handle more than once will only
result in the driver’s door opening.
If driver door first is selected, once
the driver door is opened, the
interior door lock/unlock switch can
be used to unlock all doors (or use
key fob RKE transmitter).
• Passive Entry
This feature allows you to lock and
unlock the vehicle door(s) without
having to push the key fob RKE
transmitter
or buttons. By
selecting this feature, “Passive
Entry” may be set to “On” or “Off”.
The default status is “On”. With
“Passive Entry” deactivated, also the
“Pre-Short Drop” function is
disabled (for further information,
refer to “Bodywork Maintenance
and Care” in section “Maintenance
and Care”).
• Personal Settings Linked to Key Fob
This selected mode enables to
combine the key fob to personal
driver’s position settings. These
settings will be implemented when
pressing the
button on the key
fob RKE transmitter with ignition
device in RUN position.Dashboard Instruments and Controls
4
195
Page 200 of 396
• Power Liftgate Alert
When this feature is selected,
further to turn indicators flashing,
an acoustic warning will also be
triggered when opening and closing
the liftgate/trunk lid. The feature
can be set to “On” or “Off”.
• Hands Free Power Liftgate
To prevent the accidental opening
of the Power Trunk Lid/Hands Free
(optional) with the movement of
the foot, it is possible to disable the
“Hands Free” function. The feature
can be set to “On” or “Off”. This
operation is recommended when
you have to wash the car (for
further information, refer to “Power
Trunk Lid Operation” in section
“Before Starting”).
Auto-On Comfort & Remote
Start • Auto-on Driver Heated/Vented Seat
& Steering
This feature allows to activate the
comfort of the driving seat when
starting the engine.
If equipped, the driver’s
heated/vented seat and/or heated
steering wheel will automatically
activate by temperatures below 40°F
(4°C). When temperatures are above 80°F (26°C) the driver vented seat
will turn on.
• Remote Start
You can choose from the following
options: “Off”, “Remote Start”
(activation of this function when
you use the key fob RKE transmitter
to start the engine) and “All Starts”
(activation of this function when
you start the engine in all modes).
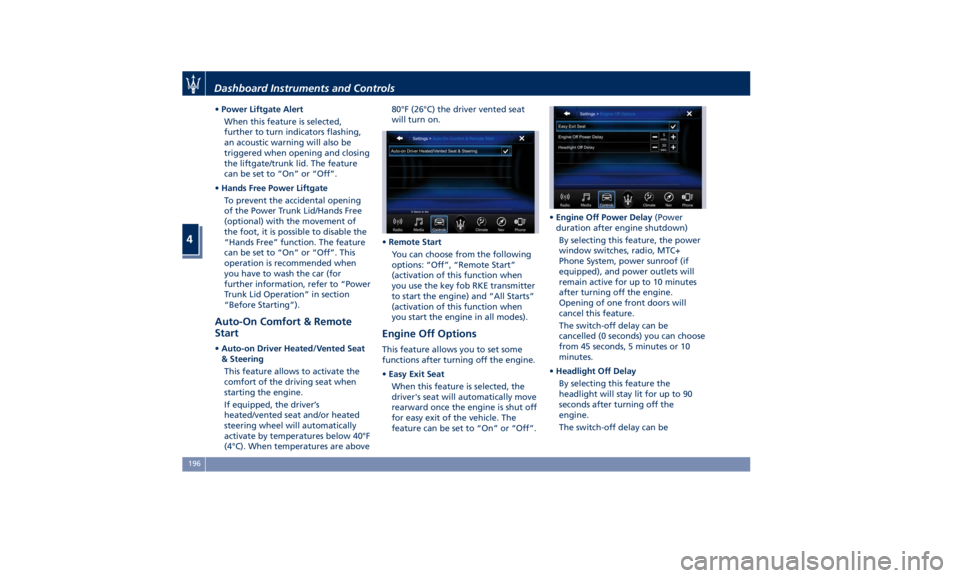
Engine Off Options This feature allows you to set some
functions after turning off the engine.
• Easy Exit Seat
When this feature is selected, the
driver's seat will automatically move
rearward once the engine is shut off
for easy exit of the vehicle. The
feature can be set to “On” or “Off”. • Engine Off Power Delay (Power
duration after engine shutdown)
By selecting this feature, the power
window switches, radio, MTC+
Phone System, power sunroof (if
equipped), and power outlets will
remain active for up to 10 minutes
after turning off the engine.
Opening of one front doors will
cancel this feature.
The switch-off delay can be
cancelled (0 seconds) you can choose
from 45 seconds, 5 minutes or 10
minutes.
• Headlight Off Delay
By selecting this feature the
headlight will stay lit for up to 90
seconds after turning off the
engine.
The switch-off delay can beDashboard Instruments and Controls
4
196
Page 210 of 396
the air flow rate and the air
distribution respectively on the driver
and on the passenger zone. Press
“AUTO” to switch the ATC between
manual and automatic mode. The LED
on the button and the “AUTO”
soft-key illuminates when the “AUTO”
function is activated. See “Automatic
Temperature Control (ATC)” in this
chapter for more information.
9. MAX defrosting/demisting
Press the
button or the MTC+
soft-key to switch the airflow setting
to the windshield and the front side
windows to get quick defrosting/
defogging. The LED on the button and
the MTC+ soft-key illuminates when
this feature is activated. Operating this
function will cause the ATC to switch
into manual mode: so the “AUTO” LED
on the button and the MTC+ soft-key
will turn off. With engine off, the
blower will run at minimum speed (1)
and can be increased manually: with
engine on, the blower speed will
gradually increase to the higher speed
(8). MAX defrosting/demisting shall
also involve REAR defrosting/demisting
function. If this function is turned off
the climate system will return to the
previous setting, switching on the A/C
(“A/C” LED on the button and the
MTC+ soft-key illuminated). 10. REAR defrosting/demisting
Press the
button or the MTC+
soft-key to turn on the rear window
defroster and the heated outside
mirrors. The LED on the button and
the MTC+ soft-key will illuminate
when the rear window defroster and
the heated external mirrors are on.
The rear window defroster and the
heated external mirrors automatically
turn off after 10 minutes.
CAUTION!
Failure to observe the following
cautions may cause damage to the rear
windows defroster:
• Use care when washing the inside of
the rear window. Do not use abrasive
window cleaners on the interior
surface of the window. Use a soft
cloth and a mild washing solution,
wiping parallel to the heating
elements. Labels can be peeled off
after soaking with warm water.
• Do not use scrapers, sharp
instruments, or abrasive window
cleaners on the interior surface of
the window.
• Keep all objects inside the vehicle at
a safe distance from the window. 11. MAX A/C
By
pressing the “MAX A/C” button or
the MTC+ soft-key, the system
automatically switches to get the
maximum cold air flow in both zones.
12 - 13. Air flow distribution modes
The airflow distribution mode,
respectively on the driver and on the
passenger zone, can be adjusted so air
comes from the dashboard vents, vents
under the dashboard in direction of
the floor, vents under the front seats
and demist/defrost vents.
The MTC+ display contains the
relevant soft-keys used to set these
modes for each zone. The climate
control panel features a single button
for each zone: press it several times to
select and set the required airflow
distribution mode.
Available settings are as follows:
• “Floor” mode
Air for each zone comes from the
front vents, located under the
dashboard and under the front
seats. A small portion of the airflow
is directed through the
defrost/demist vents to prevent
windows fogging.
• “Dashboard” mode
Air flows for each zone from four
adjustable vents of the dashboard,Dashboard Instruments and Controls
4
206