2019 MASERATI QUATTROPORTE tow
[x] Cancel search: towPage 283 of 396

detect pedestrians, cyclists, or
animals.
• Even if your vehicle is equipped
with the BSA system, always check
your vehicle’s outside and rearview
mirrors for any vehicles approaching
from behind or overtaking.
• Use your turn signal before
changing lanes.
RCP - Rear Cross Path The Rear Cross Path (RCP) feature is
intended to aid the drivers when gear
in reverse of parking spaces where
their vision of oncoming vehicles may
be blocked.
The RCP system monitors the rear
detection zones on both sides of the
vehicle. Using sensors located on
either side of the rear bumper, it
detects any vehicles or objects that are
moving toward the side of the vehicle
with a minimum speed of
approximately 1 to 2 mph (1 km/h to
3 km/h) to a maximum of
approximately 10 mph (16 km/h), such
as in parking lot situations. NOTE:
In a parking lot situation, oncoming
vehicles can be obscured by vehicles
parked on either side. If the sensors
are blocked by other structures or
vehicles, the system will not be able to
alert the driver.
Proceed slowly and cautiously out of
the parking space until the rear end of
the vehicle is moderately exposed.
The RCP system will then have a clear
view of the cross traffic. If an
oncoming vehicle is detected, the RCP
system will alert the driver using both
the visual and audible alarms. If the
radio is on, it will also reduce the
radio volume.
WARNING!
RCP is not a Back Up Aid system. More specifically, it is intended to be used
to help a driver detect an oncoming
vehicle in a parking lot situation.
Drivers must be careful when backing
up, even when using RCP. Always
check carefully behind your vehicle,
look behind you, and be sure to check
for pedestrians, animals, other
vehicles, obstructions, and blind spots
before backing up. Failure to do so
can result in serious injury or death.
BSA and RCP Setting Setting modes can be selected from
the MTC+ System.
Touch “Controls” soft-key and then
“Blind Spot Assist” soft-key to enter
the setting page.
Refer to chapter “MTC+ “Controls”
Screen” in section “Dashboard
Instruments and Controls” for further
information.Driving
5
279
Page 299 of 396
Loading
The vehicle maximum load on the tire
must not exceed the load carrying
capacity of the tire on your vehicle.
You will not exceed the tire's load
carrying capacity if you adhere to the
loading conditions, tire size, and cold
tire inflation pressures specified on
the “Tire and Loading Information
Label” and in the “Features and
Specifications” section.
NOTE:
Under a maximum loaded vehicle
condition, gross axle weight ratings
(GAWRs) for the front and rear axles
must not be exceeded.
To determine the maximum loading
conditions of your vehicle, locate the
statement “The combined weight of
occupants and cargo should never
exceed XXX lbs/XXX kg” on the tire
and loading information label. The
combined weight of occupants and
cargo/luggage should never exceed
the weight referenced here.
Steps For Determining Correct Load
Limit
• Locate the statement “The combined
weight of occupants and cargo
should never exceed XXX
lbs/XXX kg” on the vehicle's label. • Determine the combined weight of
the driver and passengers that will
be riding in the vehicle.
• Subtract the combined weight of the
driver and passengers from
XXX lbs/XXX kg.
• The resulting figure equals the
available amount of cargo and
luggage load capacity. For example,
if “XXX amount equals
1,400 lbs/635 kg and there will be
five 150 lbs/68 kg passengers in your
vehicle, the amount of available
cargo and luggage load capacity is
650 lbs/295 kg (since 5 x 150/68 =
750/340, and 1,400/635– 750/340 =
650 lbs/295 kg).
• Determine the combined weight of
luggage and cargo being loaded on
the vehicle. That weight may not
safely exceed the available cargo
and luggage load capacity calculated
in previous Step.
• If your vehicle will be towing a
trailer, load from your trailer will be
transferred to your vehicle. Consult
this manual to determine how this
reduces the available cargo and
luggage load capacity of your
vehicle. Tires
Driving over rough or damaged road
surfaces, as well as debris, curbs and
other obstacles can cause serious
damage to wheels, tires, and
suspension parts.
This is more likely to occur with
low-profile tires, which provide less
cushioning between the wheel and
the road.
Be careful to avoid road hazards and
reduce your speed, especially if your
vehicle is equipped with low profile
tires.
WARNING!
Overloading of your tires is
dangerous. Overloading can cause tire
failure, affect vehicle handling, and
increase the stopping distance. Use
tires of the recommended load
capacity for your vehicle. Never
overload them.Driving
5
295
Page 317 of 396
6 – In an Emergency ToolKit .............................................. 314
Hazard Warning Flashers ................................. 315
In the Event of an Accident ............................... 315
In case of a Punctured Tire ................................ 316
Emergency Release of the Parking Brake ..................... 321
Transmission Manual Release of P (Park) Position ............... 322
Auxiliary Jump-Start Procedure ............................ 322
Towing a Disabled Vehicle ................................ 325
313
Page 318 of 396
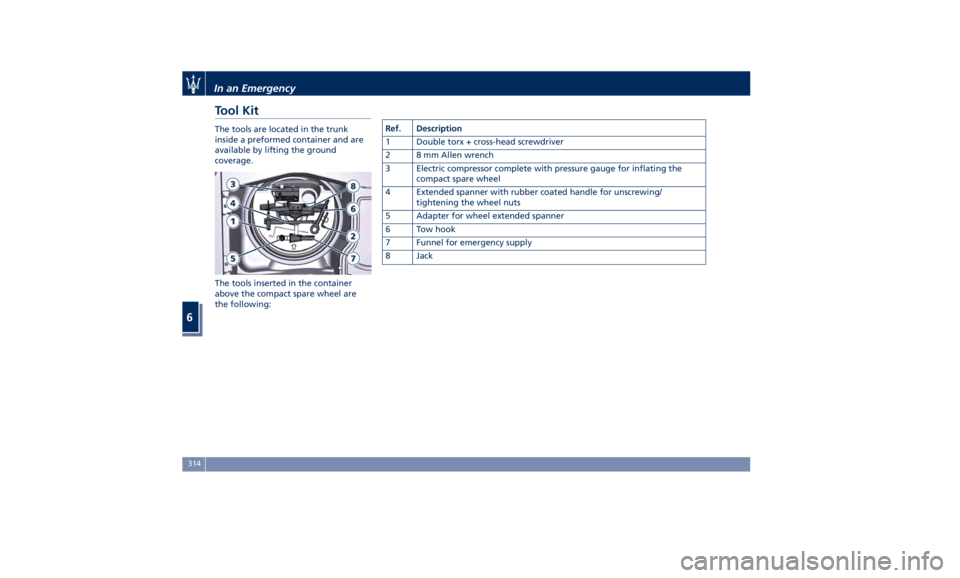
Tool Kit The tools are located in the trunk
inside a preformed container and are
available by lifting the ground
coverage.
The tools inserted in the container
above the compact spare wheel are
the following: Ref. Description
1 Double torx + cross-head screwdriver
2 8 mm Allen wrench
3 Electric compressor complete with pressure gauge for inflating the
compact spare wheel
4 Extended spanner with rubber coated handle for unscrewing/
tightening the wheel nuts
5 Adapter for wheel extended spanner
6 Tow hook
7 Funnel for emergency supply
8 JackIn an Emergency
6
314
Page 325 of 396
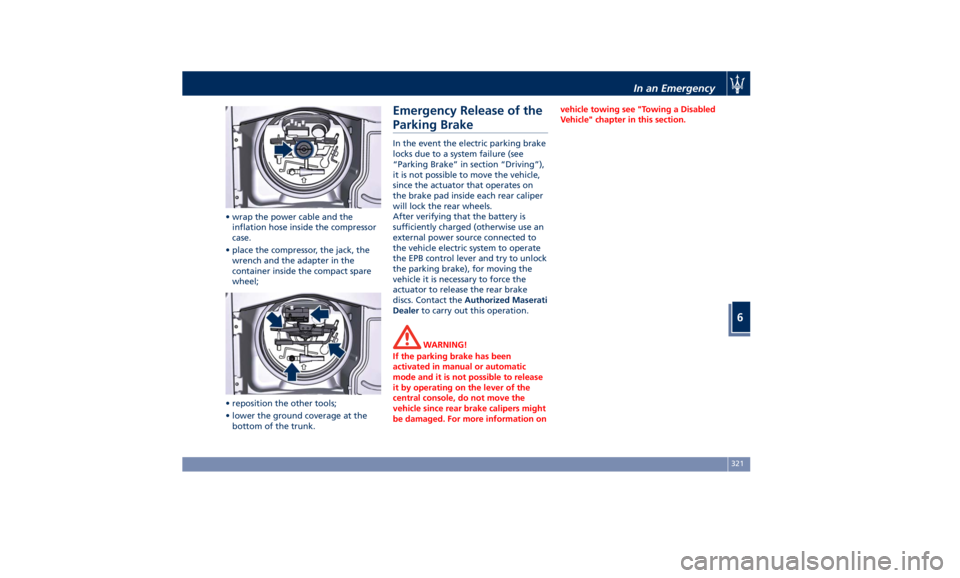
• wrap the power cable and the
inflation hose inside the compressor
case.
• place the compressor, the jack, the
wrench and the adapter in the
container inside the compact spare
wheel;
• reposition the other tools;
• lower the ground coverage at the
bottom of the trunk. Emergency Release of the
Parking Brake In the event the electric parking brake
locks due to a system failure (see
“Parking Brake” in section “Driving”),
it is not possible to move the vehicle,
since the actuator that operates on
the brake pad inside each rear caliper
will lock the rear wheels.
After verifying that the battery is
sufficiently charged (otherwise use an
external power source connected to
the vehicle electric system to operate
the EPB control lever and try to unlock
the parking brake), for moving the
vehicle it is necessary to force the
actuator to release the rear brake
discs. Contact the Authorized Maserati
Dealer to carry out this operation.
WARNING!
If the parking brake has been
activated in manual or automatic
mode and it is not possible to release
it by operating on the lever of the
central console, do not move the
vehicle since rear brake calipers might
be damaged. For more information on vehicle towing see "Towing a Disabled
Vehicle" chapter in this section.
In an Emergency
6
321
Page 326 of 396
Transmission Manual
Release of P (Park)
Position The manual disengagement of the
shift from P (Park) has the purpose to
allow towing the vehicle if not
normally possible using the shift lever
(such as inability to start the engine).
This procedure is exclusively intended
for emergency situations, only!
WARNING!
Always secure your vehicle by fully
applying the parking brake, before
activating the manual park release.
Activating the manual park release
could allow your vehicle to roll away
if it is not secured by the parking
brake. Activating the manual park
release on an unsecured vehicle could
lead to serious injury or death for
those in or around the vehicle.
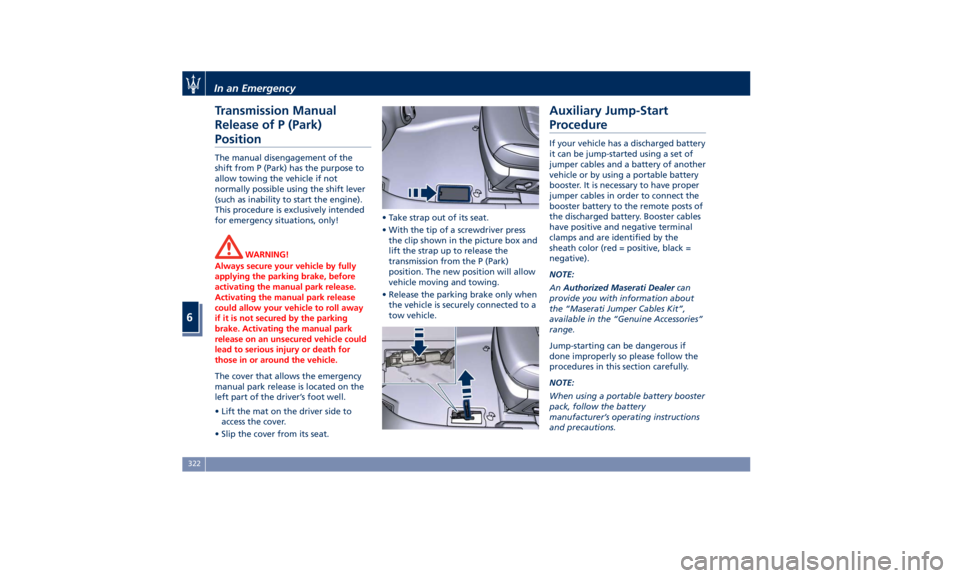
The cover that allows the emergency
manual
park release
is located on the
left part of the driver’s foot well.
• Lift the mat on the driver side to
access the cover.
• Slip the cover from its seat. • Take strap out of its seat.
• With the tip of a screwdriver press
the clip shown in the picture box and
lift the strap up to release the
transmission from the P (Park)
position. The new position will allow
vehicle moving and towing.
• Release the parking brake only when
the vehicle is securely connected to a
tow vehicle.Auxiliary Jump-Start
Procedure If your vehicle has a discharged battery
it can be jump-started using a set of
jumper cables and a battery of another
vehicle or by using a portable battery
booster. It is necessary to have proper
jumper cables in order to connect the
booster battery to the remote posts of
the discharged battery. Booster cables
have positive and negative terminal
clamps and are identified by the
sheath color (red = positive, black =
negative).
NOTE:
An Authorized Maserati Dealer can
provide you with information about
the “Maserati Jumper Cables Kit”,
available in the “Genuine Accessories”
range.
Jump-starting can be dangerous if
done improperly so please follow the
procedures in this section carefully.
NOTE:
When using a portable battery booster
pack, follow the battery
manufacturer’s operating instructions
and precautions.In an Emergency
6
322
Page 329 of 396
• Disconnect the terminal clamp of the
positive jumper cable from the
remote positive (+) post of the
discharged vehicle.
NOTE:
If frequent jump-starting is required
to start your vehicle you should have
the battery and charging system
inspected at an Authorized Maserati
Dealer center.
WARNING!
California Proposition 65
Operating, servicing and maintaining
a passenger vehicle or off-road vehicle
can expose you to chemicals including
such as, engine exhaust, carbon
monoxide, phthalates and lead, that
which are known to the State of
California to cause cancer and birth
defects or other reproductive harm. To
minimize exposure, avoid breathing
exhaust, do not idle the engine except
as necessary, service your vehicle in a
well-ventilated area and wear gloves
or wash your hands frequently when
servicing your vehicle. For more
information go to:
www.P65Warnings.ca.gov/passenger-
vehicle Towing a Disabled Vehicle Proper towing or lifting equipment is
required to prevent damage to your
vehicle.
CAUTION!
Any improper maneuver and use of
unsuitable equipment for recovering
vehicle in an emergency from off road
location could seriously damage the
vehicle. Contact an Authorized
Maserati Dealer .
Manual Release of
Transmission with Low Battery In order to push or tow the vehicle if
unable to shift the transmission out of
P (Park) (such as a discharged battery),
a manual park release is available. In
this case it is necessary to manually
release the shift lever and release the
parking brake if inserted (see
“Emergency Release of the Parking
Brake” in this section).
Follow the steps as indicated in
“Transmission Manual Release of P
(Park) Position” in this section to
manually disengage the transmission. Vehicle Towing Conditions Maserati only allows vehicle towing
either on a flatbed or with all four
wheels off the ground.
Towing an RWD Vehicle
If flatbed equipment is not available,
and the transmission is still operable, a
RWD vehicle may be flat towed (with
all four wheels on the ground) under
the following conditions.
• The shift lever must be in N
(Neutral).
• The distance to be traveled must not
exceed 30 mi (50 km).
• The towing speed must not exceed
30 mph (50 km/h).
If the transmission is not operable, or
the RWD vehicle must be towed faster
than 30 mph (50 km/h) or farther than
30 mi (50 km) (for example on a
highway), tow with the rear driving
wheels off the ground and on a
platform of a rescue vehicle, or with
the rear wheels raised using a wheel
lift.
CAUTION!
If you have to tow the RWD vehicle
with 2 wheels raised, ensure that the
(Continued)In an Emergency
6
325
Page 330 of 396
(Continued)
ignition switch is in the OFF position. If
this is not observed, when the ESC is
active, the ECU will store a
malfunction and the relative warning
light
will illuminate on the
instrument cluster display. This
requires the intervention of an
Authorized Maserati Dealer to reset
the system.
Towing an AWD Vehicle
WARNING!
Single axle towing or use of a tow
dolly is not allowed since it will
severely damage components of an
AWD vehicle.
WARNING!
Use of a tow dolly on front wheels is
strictly forbidden since front wheels
may still receive a residual amount of
torque and disengage the vehicle from
the tow dolly and affect safety of
both rescuers and other road users. Use the Tow Hook of the Tool
Kit CAUTION!
The tow hook should only be used for
towing the car on flat roads. Do not
use the tow hook to remove the car
that is stuck on off road stretches.
The tow hook is also used to tow the
vehicle
on the
platform of a tow truck.
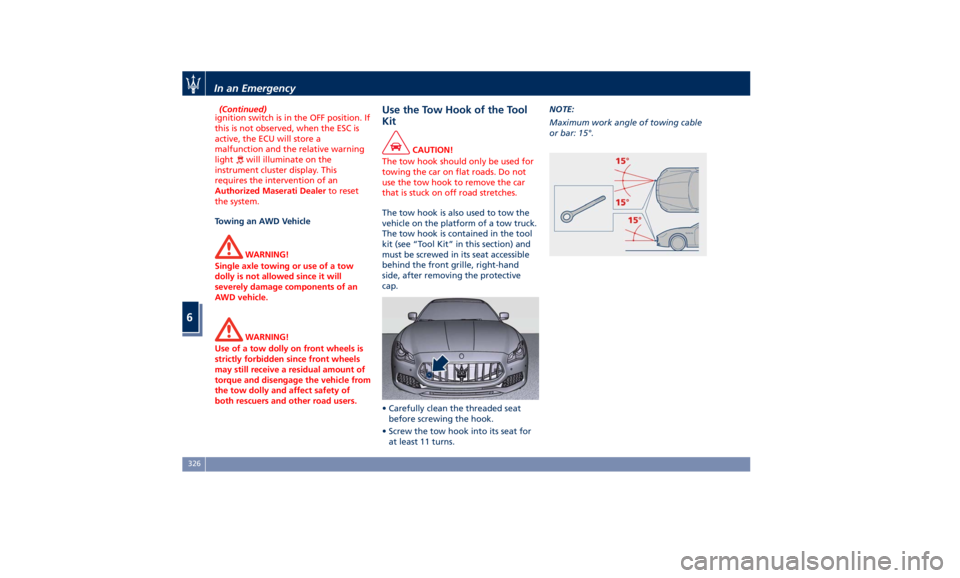
The tow hook is contained in the tool
kit (see “Tool Kit” in this section) and
must be screwed in its seat accessible
behind the front grille, right-hand
side, after removing the protective
cap.
• Carefully clean the threaded seat
before screwing the hook.
• Screw the tow hook into its seat for
at least 11 turns. NOTE:
Maximum work angle of towing cable
or bar: 15°.
In an Emergency
6
326