2019 MASERATI QUATTROPORTE child seat
[x] Cancel search: child seatPage 82 of 396
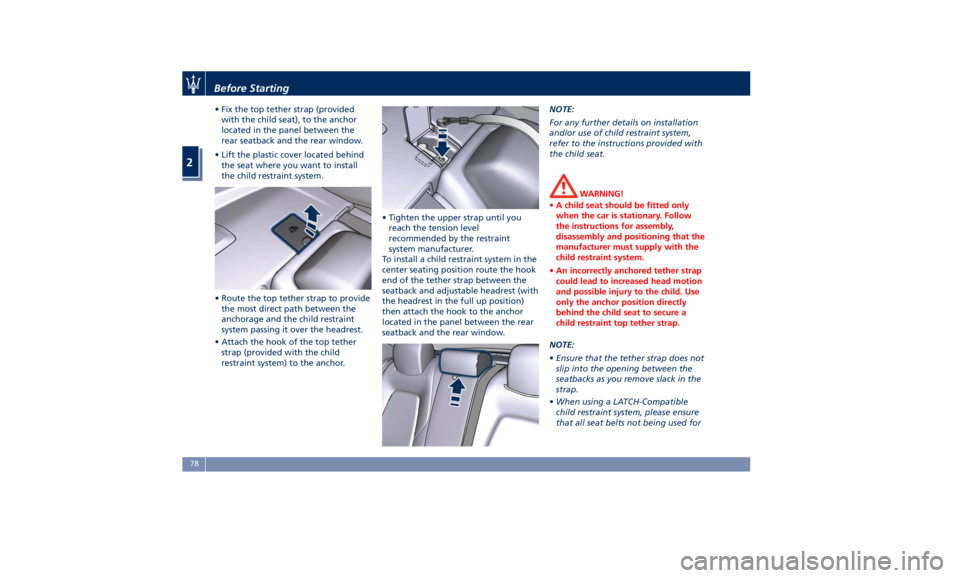
• Fix the top tether strap (provided
with the child seat), to the anchor
located in the panel between the
rear seatback and the rear window.
• Lift the plastic cover located behind
the seat where you want to install
the child restraint system.
• Route the top tether strap to provide
the most direct path between the
anchorage and the child restraint
system passing it over the headrest.
• Attach the hook of the top tether
strap (provided with the child
restraint system) to the anchor. • Tighten the upper strap until you
reach the tension level
recommended by the restraint
system manufacturer.
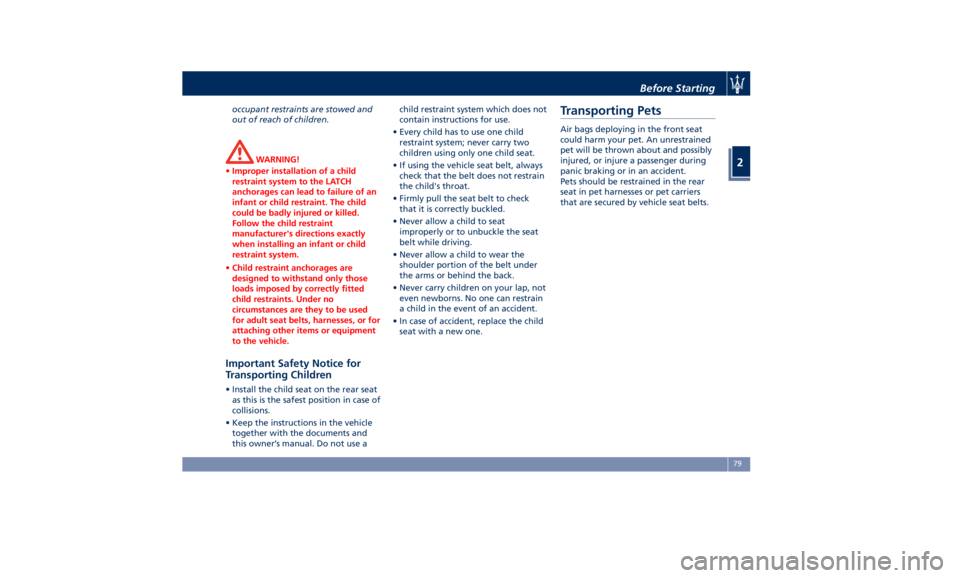
To install a child restraint system in the
center seating position route the hook
end of the tether strap between the
seatback and adjustable headrest (with
the headrest in the full up position)
then attach the hook to the anchor
located in the panel between the rear
seatback and the rear window. NOTE:
For any further details on installation
and/or use of child restraint system,
refer to the instructions provided with
the child seat.
WARNING!
• A child seat should be fitted only
when the car is stationary. Follow
the instructions for assembly,
disassembly and positioning that the
manufacturer must supply with the
child restraint system.
• An incorrectly anchored tether strap
could lead to increased head motion
and possible injury to the child. Use
only the anchor position directly
behind the child seat to secure a
child restraint top tether strap.
NOTE:
• Ensure
that the tether strap does not
slip into the opening between the
seatbacks as you remove slack in the
strap.
• When using a LATCH-Compatible
child restraint system, please ensure
that all seat belts not being used forBefore Starting
2
78
Page 83 of 396
occupant restraints are stowed and
out of reach of children.
WARNING!
• Improper installation of a child
restraint system to the LATCH
anchorages can lead to failure of an
infant or child restraint. The child
could be badly injured or killed.
Follow the child restraint
manufacturer's directions exactly
when installing an infant or child
restraint system.
• Child restraint anchorages are
designed to withstand only those
loads imposed by correctly fitted
child restraints. Under no
circumstances are they to be used
for adult seat belts, harnesses, or for
attaching other items or equipment
to the vehicle.
Important Safety Notice for
Transporting Children • Install the child seat on the rear seat
as this is the safest position in case of
collisions.
• Keep the instructions in the vehicle
together with the documents and
this owner’s manual. Do not use a child restraint system which does not
contain instructions for use.
• Every child has to use one child
restraint system; never carry two
children using only one child seat.
• If using the vehicle seat belt, always
check that the belt does not restrain
the child's throat.
• Firmly pull the seat belt to check
that it is correctly buckled.
• Never allow a child to seat
improperly or to unbuckle the seat
belt while driving.
• Never allow a child to wear the
shoulder portion of the belt under
the arms or behind the back.
• Never carry children on your lap, not
even newborns. No one can restrain
a child in the event of an accident.
• In case of accident, replace the child
seat with a new one.Transporting Pets Air bags deploying in the front seat
could harm your pet. An unrestrained
pet will be thrown about and possibly
injured, or injure a passenger during
panic braking or in an accident.
Pets should be restrained in the rear
seat in pet harnesses or pet carriers
that are secured by vehicle seat belts.Before Starting
2
79
Page 93 of 396
cameras are unable to view every
obstacle or object in your drive path.
• To avoid vehicle damage, the vehicle
must be driven slowly when using
the camera system with surround
view, to be able to stop in time
when an obstacle is seen. It is
recommended that the driver looks
frequently over his/her shoulder
when using this system.
NOTE:
If
snow , ice, mud, or any other
substance builds up on the camera
lens, clean the lens, rinse with water,
and dry with a soft cloth. Do not cover
the lens.
WARNING!
California Proposition 65
Operating, servicing and maintaining
a passenger vehicle or off-road vehicle
can expose you to chemicals including
such as, engine exhaust, carbon
monoxide, phthalates and lead, that
which are known to the State of
California to cause cancer and birth
defects or other reproductive harm. To
minimize exposure, avoid breathing
exhaust, do not idle the engine except as necessary, service your vehicle in a
well-ventilated area and wear gloves
or wash your hands frequently when
servicing your vehicle. For more
information go to:
www.P65Warnings.ca.gov/passenger-
vehicle
Safety Tips Transporting Passengers WARNING!
• Do not leave children or animals
inside parked vehicles in hot
weather. Interior heat build-up may
cause serious injury.
• Never ride in a cargo area, inside of
a vehicle.
• Do not allow people to ride in any
area of your vehicle that is not
equipped with seats and seat belts.
• Be sure everyone in your vehicle is
in a seat and using a seat belt
properly.Before Starting
2
89
Page 102 of 396
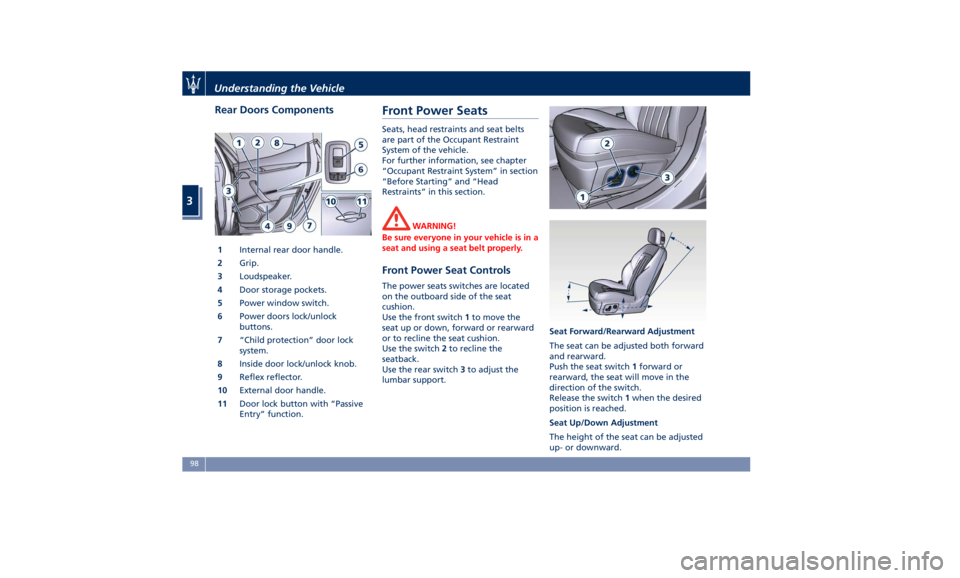
Rear Doors Components
1 Internal rear door handle.
2 Grip.
3 Loudspeaker.
4 Door storage pockets.
5 Power window switch.
6 Power doors lock/unlock
buttons.
7 “Child protection” door lock
system.
8 Inside door lock/unlock knob.
9 Reflex reflector.
10 External door handle.
11 Door lock button with “Passive
Entry” function. Front Power Seats Seats, head restraints and seat belts
are part of the Occupant Restraint
System of the vehicle.
For further information, see chapter
“Occupant Restraint System” in section
“Before Starting” and “Head
Restraints” in this section.
WARNING!
Be sure everyone in your vehicle is in a
seat and using a seat belt properly.
Front Power Seat Controls The power seats switches are located
on the outboard side of the seat
cushion.
Use the front switch 1 to move the
seat up or down, forward or rearward
or to recline the seat cushion.
Use the switch 2 to recline the
seatback.
Use the rear switch 3 to adjust the
lumbar support. Seat Forward/Rearward Adjustment
The seat can be adjusted both forward
and rearward.
Push the seat switch 1 forward or
rearward, the seat will move in the
direction of the switch.
Release the switch 1 when the desired
position is reached.
Seat Up/Down Adjustment
The height of the seat can be adjusted
up- or downward.Understanding the Vehicle
3
98
Page 108 of 396
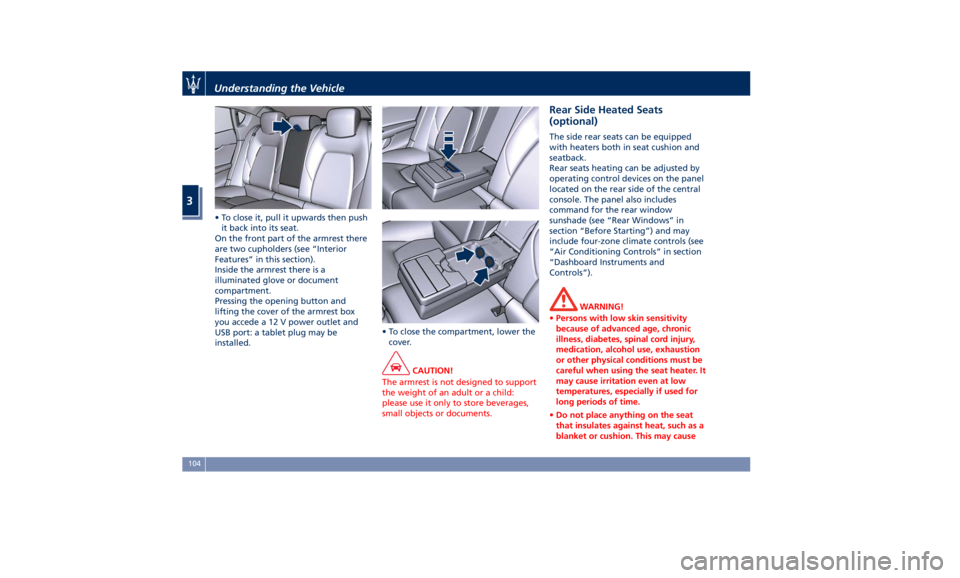
• To close it, pull it upwards then push
it back into its seat.
On the front part of the armrest there
are two cupholders (see “Interior
Features” in this section).
Inside the armrest there is a
illuminated glove or document
compartment.
Pressing the opening button and
lifting the cover of the armrest box
you accede a 12 V power outlet and
USB port: a tablet plug may be
installed. • To close the compartment, lower the
cover.
CAUTION!
The armrest is not designed to support
the weight of an adult or a child:
please use it only to store beverages,
small objects or documents. Rear Side Heated Seats
(optional) The side rear seats can be equipped
with heaters both in seat cushion and
seatback.
Rear seats heating can be adjusted by
operating control devices on the panel
located on the rear side of the central
console. The panel also includes
command for the rear window
sunshade (see “Rear Windows” in
section “Before Starting”) and may
include four-zone climate controls (see
“Air Conditioning Controls” in section
“Dashboard Instruments and
Controls”).
WARNING!
• Persons with low skin sensitivity
because of advanced age, chronic
illness, diabetes, spinal cord injury,
medication, alcohol use, exhaustion
or other physical conditions must be
careful when using the seat heater. It
may cause irritation even at low
temperatures, especially if used for
long periods of time.
• Do not place anything on the seat
that insulates against heat, such as a
blanket or cushion. This may causeUnderstanding the Vehicle
3
104
Page 140 of 396
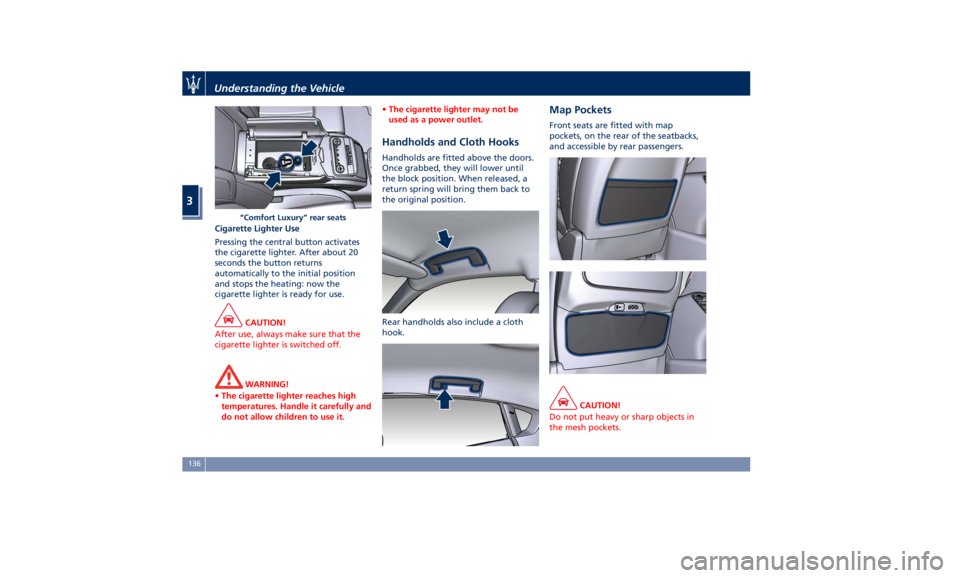
Cigarette Lighter Use
Pressing the central button activates
the cigarette lighter. After about 20
seconds the button returns
automatically to the initial position
and stops the heating: now the
cigarette lighter is ready for use.
CAUTION!
After use, always make sure that the
cigarette lighter is switched off.
WARNING!
• The cigarette lighter reaches high
temperatures. Handle it carefully and
do not allow children to use it. • The cigarette lighter may not be
used as a power outlet.
Handholds and Cloth Hooks Handholds are fitted above the doors.
Once grabbed, they will lower until
the block position. When released, a
return spring will bring them back to
the original position.
Rear handholds also include a cloth
hook. Map Pockets Front seats are fitted with map
pockets, on the rear of the seatbacks,
and accessible by rear passengers.
CAUTION!
Do not put heavy or sharp objects in
the mesh pockets.“Comfort Luxury” rear seatsUnderstanding the Vehicle
3
136
Page 144 of 396

NOTE:
The Authorized Maserati Dealer can
provide you with information about
the available “Genuine Accessories”
for the trunk.
Loading with Rear Seatbacks
Folded Down The 60/40 split-folding rear seat with
folding option on the smaller side
only, provides cargo-carrying
versatility.
The seatback fold down easily by
pulling tab between the seatback and
the bolster. The seat folded down, provides a
continuous nearly-flat extension of the
load floor able to accommodate large
sized equipment and objects (such as
the “Maserati Ski and Snowboard
Bag”) that may not fit with the normal
dimensions of the trunk.
Ski and Snowboard Bag Housing
To safely store the Ski and Snowboard
Bag:
• Tilt forward the short seatback side. • Secure the rear hook of the bag to
the eyelet located on the rear wall of
the trunk.
• Wrap the belt around the seat back
of the folded seat and fasten the belt
buckle.
• Tighten the belt as much as necessary
to prevent the bag from moving.
When the seatback is folded to the
upright position, make sure it is
latched by strongly pulling on the top
of the seatback above the seat strap.
WARNING!
• Make sure that the seatback is
securely locked into position. If the
seatback is not securely locked into
position, the seat will not provide
the proper stability for child seats
and/or passengers. An improperlyUnderstanding the Vehicle
3
140
Page 145 of 396
latched seat could cause serious
injury.
• The cargo area in the rear of the
vehicle with the rear seatbacks in
the folded down position should not
be used as a play area by children
when the vehicle is in motion. They
could be seriously injured in a
collision. Children should be seated
and use proper restraint system.
Power Sunroof with
Sunshade The sunroof is power controlled and
can only be operated with the ignition
switch in RUN position.
It can slide lengthways and be raised
at the rear (tilting).
By opening the sunroof a front flap
rises automatically in order to deviate
the air flow.
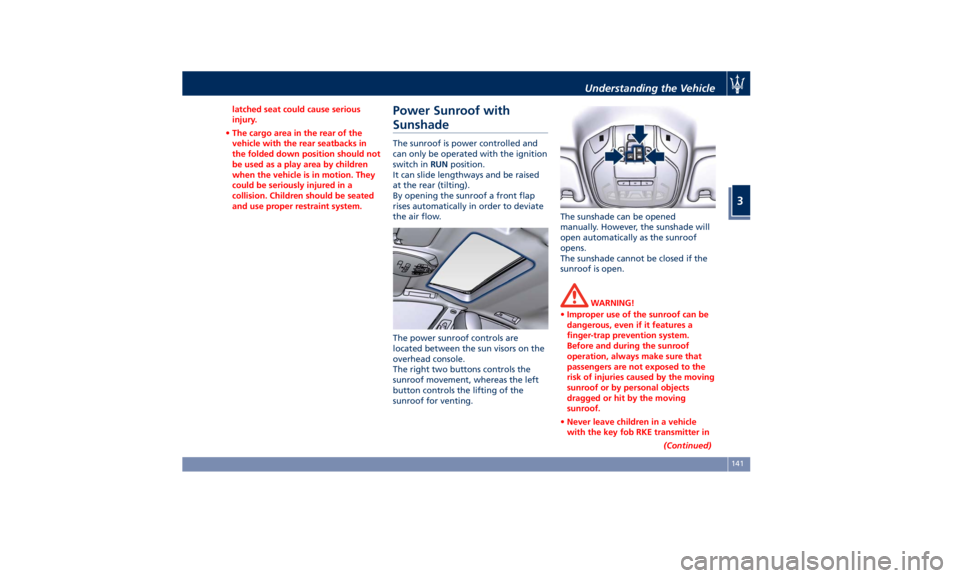
The power sunroof controls are
located between the sun visors on the
overhead console.
The right two buttons controls the
sunroof movement, whereas the left
button controls the lifting of the
sunroof for venting. The sunshade can be opened
manually. However, the sunshade will
open automatically as the sunroof
opens.
The sunshade cannot be closed if the
sunroof is open.
WARNING!
• Improper use of the sunroof can be
dangerous, even if it features a
finger-trap prevention system.
Before and during the sunroof
operation, always make sure that
passengers are not exposed to the
risk of injuries caused by the moving
sunroof or by personal objects
dragged or hit by the moving
sunroof.
• Never leave children in a vehicle
with the key fob RKE transmitter in
(Continued)Understanding the Vehicle
3
141