2019 MASERATI QUATTROPORTE roof
[x] Cancel search: roofPage 129 of 396
The right regulator has 2 different
positions:
0
(OFF) Stable position: front seat
lighting and front dome light
LED are turned off.
1 st
Dimmable position: allows
minimum to maximum
brightness tuning of the
front dome light LED and the
front seats lighting.
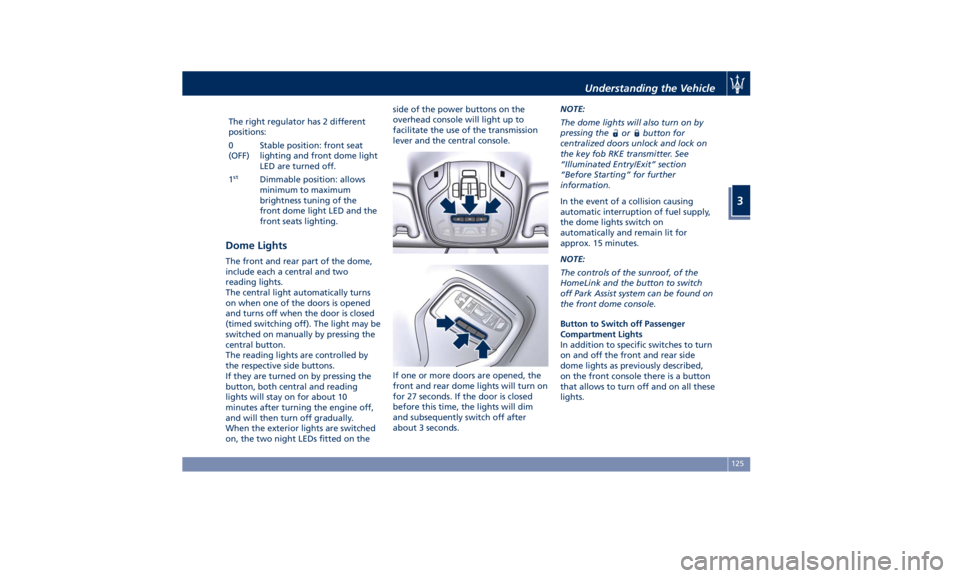
Dome Lights The front and rear part of the dome,
include each a central and two
reading lights.
The central light automatically turns
on when one of the doors is opened
and turns off when the door is closed
(timed switching off). The light may be
switched on manually by pressing the
central button.
The reading lights are controlled by
the respective side buttons.
If they are turned on by pressing the
button, both central and reading
lights will stay on for about 10
minutes after turning the engine off,
and will then turn off gradually.
When the exterior lights are switched
on, the two night LEDs fitted on the side of the power buttons on the
overhead console will light up to
facilitate the use of the transmission
lever and the central console.
If one or more doors are opened, the
front and rear dome lights will turn on
for 27 seconds. If the door is closed
before this time, the lights will dim
and subsequently switch off after
about 3 seconds. NOTE:
The dome lights will also turn on by
pressing the
or button for
centralized doors unlock and lock on
the key fob RKE transmitter. See
“Illuminated Entry/Exit” section
“Before Starting” for further
information.
In the event of a collision causing
automatic interruption of fuel supply,
the dome lights switch on
automatically and remain lit for
approx. 15 minutes.
NOTE:
The controls of the sunroof, of the
HomeLink and the button to switch
off Park Assist system can be found on
the front dome console.
Button to Switch off Passenger
Compartment Lights
In addition to specific switches to turn
on and off the front and rear side
dome lights as previously described,
on the front console there is a button
that allows to turn off and on all these
lights.Understanding the Vehicle
3
125
Page 136 of 396
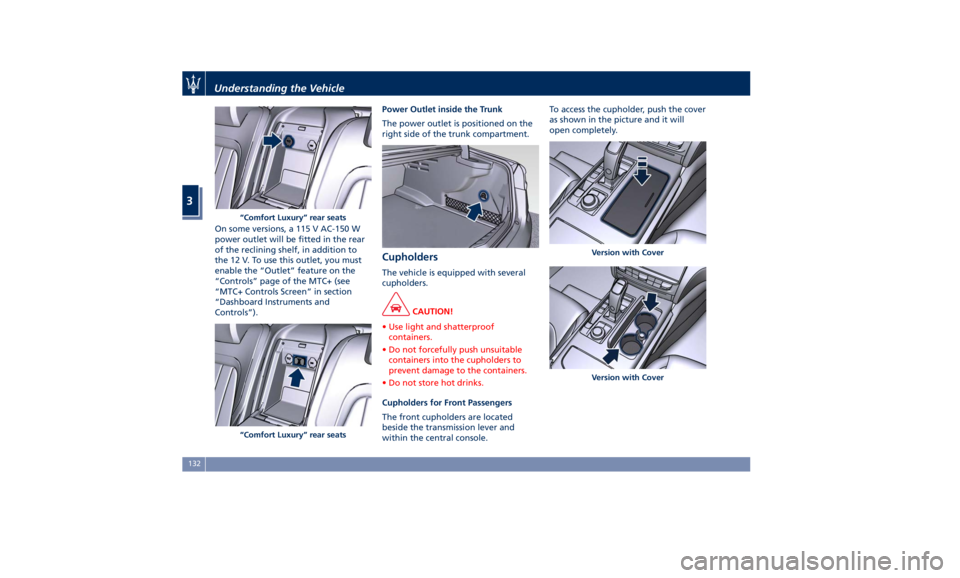
On some versions, a 115 V AC-150 W
power outlet will be fitted in the rear
of the reclining shelf, in addition to
the 12 V. To use this outlet, you must
enable the “Outlet” feature on the
“Controls” page of the MTC+ (see
“MTC+ Controls Screen” in section
“Dashboard Instruments and
Controls”). Power Outlet inside the Trunk
The power outlet is positioned on the
right side of the trunk compartment.
Cupholders The vehicle is equipped with several
cupholders.
CAUTION!
• Use light and shatterproof
containers.
• Do not forcefully push unsuitable
containers into the cupholders to
prevent damage to the containers.
• Do not store hot drinks.
Cupholders for Front Passengers
The
front cupholders are located
beside the transmission lever and
within the central console. To access the cupholder, push the cover
as shown in the picture and it will
open completely.
“Comfort Luxury” rear seats
“Comfort Luxury” rear seats Version with Cover
Version with CoverUnderstanding the Vehicle
3
132
Page 145 of 396
latched seat could cause serious
injury.
• The cargo area in the rear of the
vehicle with the rear seatbacks in
the folded down position should not
be used as a play area by children
when the vehicle is in motion. They
could be seriously injured in a
collision. Children should be seated
and use proper restraint system.
Power Sunroof with
Sunshade The sunroof is power controlled and
can only be operated with the ignition
switch in RUN position.
It can slide lengthways and be raised
at the rear (tilting).
By opening the sunroof a front flap
rises automatically in order to deviate
the air flow.
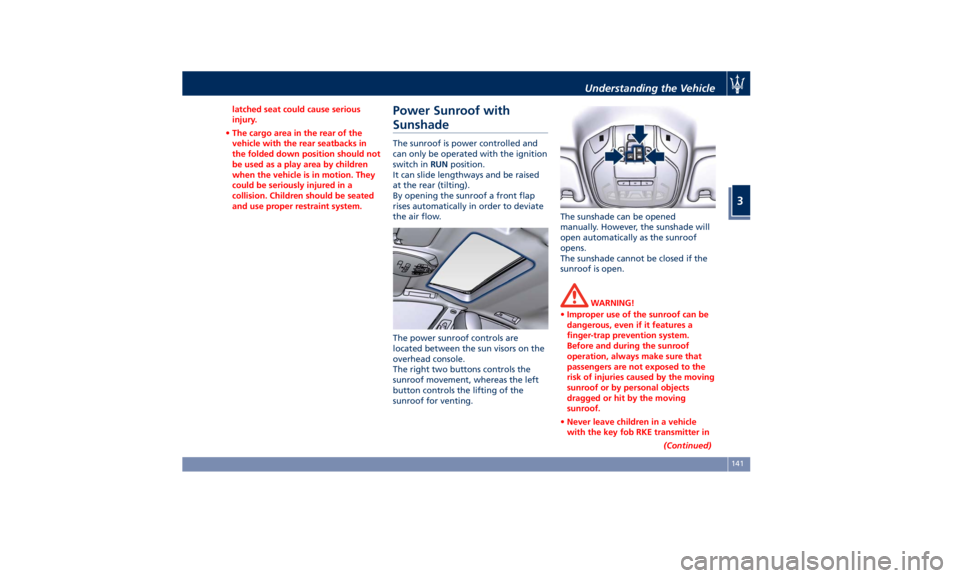
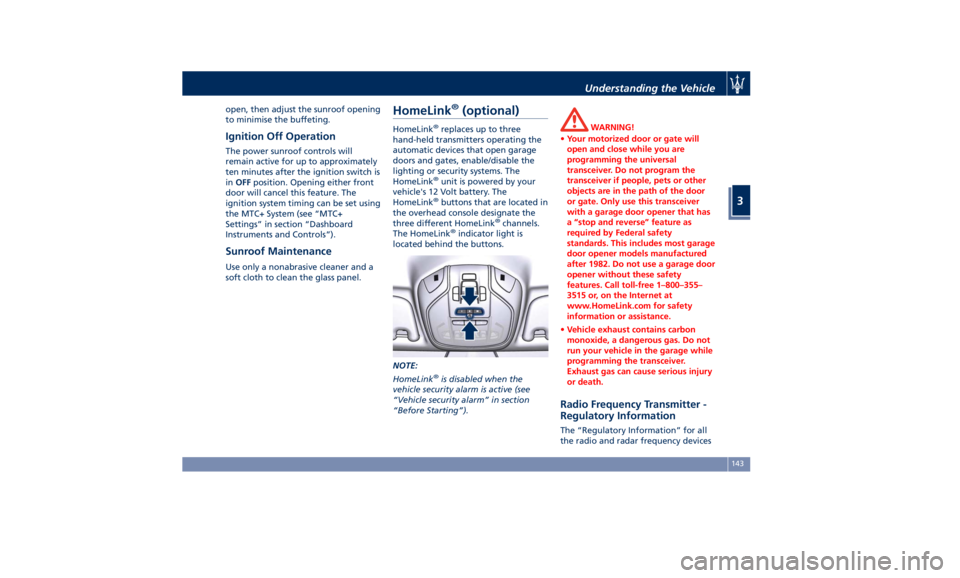
The power sunroof controls are
located between the sun visors on the
overhead console.
The right two buttons controls the
sunroof movement, whereas the left
button controls the lifting of the
sunroof for venting. The sunshade can be opened
manually. However, the sunshade will
open automatically as the sunroof
opens.
The sunshade cannot be closed if the
sunroof is open.
WARNING!
• Improper use of the sunroof can be
dangerous, even if it features a
finger-trap prevention system.
Before and during the sunroof
operation, always make sure that
passengers are not exposed to the
risk of injuries caused by the moving
sunroof or by personal objects
dragged or hit by the moving
sunroof.
• Never leave children in a vehicle
with the key fob RKE transmitter in
(Continued)Understanding the Vehicle
3
141
Page 146 of 396
(Continued)
the passenger compartment.
• In a collision, there is a greater risk
of being thrown from the vehicle if
the sunroof is open. Always fasten
your seat belt properly and make
sure all passengers are properly
secured too.
• Do not allow small children to
operate the sunroof. Never insert
fingers, other body parts, or any
object through the opening sunroof.
CAUTION!
• In the event of rain, always close the
sunroof to prevent water infiltrations
from staining the fabric/leather
upholstery.
• Do not open the sunroof if there is
ice on it: risk of damage.
Slide Opening Sunroof • Full automatic express opening
Press the right rear button for more
than half second and the sunroof
will open automatically regardless
of any previous position. The
sunroof will open fully and stop
automatically. During this operation, if any sunroof button is pressed, the
sunroof will stop.
• Full or partial manual opening
To open the sunroof manually press
the right rear button for less than
half second to move step by step the
sunroof panel.
Venting Sunroof Press and release the left button, and
the sunroof will open to the vent
position. This is called “Express Vent”,
and will occur regardless of sunroof
position. During this opening
operation, any movement of the
button will stop the sunroof.
Pinch Protect Feature This feature will detect an obstruction
in the opening of the sunroof during
express close operation. If an
obstruction is detected, the sunroof
will automatically retract. If this occurs,
remove the obstruction then press the
right front button and release to
express close. NOTE:
If three consecutive attempts to close
in express mode the sunroof result in
pinch protect reversals, the fourth
attempt will be manual, with pinch
protect feature disabled.
Pinch Protect Override
If any obstruction (ice, debris, etc.)
prevents closing the sunroof, press the
right front button and hold for two
seconds after the reversal occurs. This
allows the sunroof to move toward the
closed position.
NOTE:
Pinch protection is disabled while
pressing the right front button.
Wind Buffeting Wind buffeting can be described as
the perception of pressure or a
helicopter-type sound. Your vehicle
may exhibit wind buffeting with the
windows down, or the sunroof in
certain open or partially open
positions. This is a normal occurrence
and can be minimised. If the buffeting
occurs with the rear windows open,
then open the front and rear windows
together to minimise the buffeting. If
the buffeting occurs with the sunroofUnderstanding the Vehicle
3
142
Page 147 of 396
open, then adjust the sunroof opening
to minimise the buffeting.
Ignition Off Operation The power sunroof controls will
remain active for up to approximately
ten minutes after the ignition switch is
in OFF position. Opening either front
door will cancel this feature. The
ignition system timing can be set using
the MTC+ System (see “MTC+
Settings” in section “Dashboard
Instruments and Controls”).
Sunroof Maintenance Use only a nonabrasive cleaner and a
soft cloth to clean the glass panel. HomeLink ®
(optional) HomeLink ®
replaces up to three
hand-held transmitters operating the
automatic devices that open garage
doors and gates, enable/disable the
lighting or security systems. The
HomeLink ®
unit is powered by your
vehicle's 12 Volt battery. The
HomeLink ®
buttons that are located in
the overhead console designate the
three different HomeLink ®
channels.
The HomeLink ®
indicator light is
located behind the buttons.
NOTE:
HomeLink ®
is disabled when the
vehicle security alarm is active (see
“Vehicle security alarm” in section
“Before Starting”). WARNING!
• Your motorized door or gate will
open and close while you are
programming the universal
transceiver. Do not program the
transceiver if people, pets or other
objects are in the path of the door
or gate. Only use this transceiver
with a garage door opener that has
a “stop and reverse” feature as
required by Federal safety
standards. This includes most garage
door opener models manufactured
after 1982. Do not use a garage door
opener without these safety
features. Call toll-free 1–800–355–
3515 or, on the Internet at
www.HomeLink.com for safety
information or assistance.
• Vehicle exhaust contains carbon
monoxide, a dangerous gas. Do not
run your vehicle in the garage while
programming the transceiver.
Exhaust gas can cause serious injury
or death.
Radio Frequency Transmitter -
Regulatory Information The “Regulatory Information” for all
the radio and radar frequency devicesUnderstanding the Vehicle
3
143
Page 200 of 396
• Power Liftgate Alert
When this feature is selected,
further to turn indicators flashing,
an acoustic warning will also be
triggered when opening and closing
the liftgate/trunk lid. The feature
can be set to “On” or “Off”.
• Hands Free Power Liftgate
To prevent the accidental opening
of the Power Trunk Lid/Hands Free
(optional) with the movement of
the foot, it is possible to disable the
“Hands Free” function. The feature
can be set to “On” or “Off”. This
operation is recommended when
you have to wash the car (for
further information, refer to “Power
Trunk Lid Operation” in section
“Before Starting”).
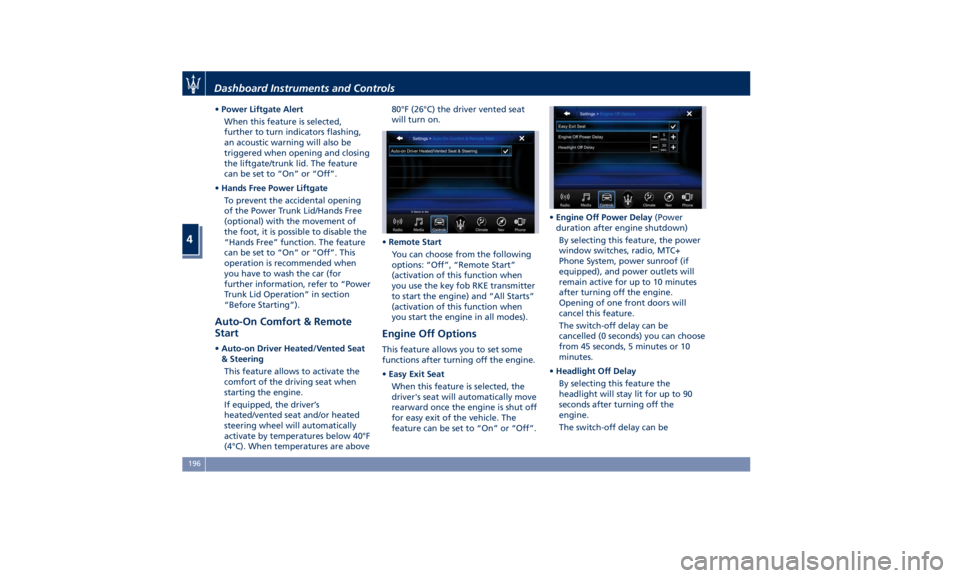
Auto-On Comfort & Remote
Start • Auto-on Driver Heated/Vented Seat
& Steering
This feature allows to activate the
comfort of the driving seat when
starting the engine.
If equipped, the driver’s
heated/vented seat and/or heated
steering wheel will automatically
activate by temperatures below 40°F
(4°C). When temperatures are above 80°F (26°C) the driver vented seat
will turn on.
• Remote Start
You can choose from the following
options: “Off”, “Remote Start”
(activation of this function when
you use the key fob RKE transmitter
to start the engine) and “All Starts”
(activation of this function when
you start the engine in all modes).
Engine Off Options This feature allows you to set some
functions after turning off the engine.
• Easy Exit Seat
When this feature is selected, the
driver's seat will automatically move
rearward once the engine is shut off
for easy exit of the vehicle. The
feature can be set to “On” or “Off”. • Engine Off Power Delay (Power
duration after engine shutdown)
By selecting this feature, the power
window switches, radio, MTC+
Phone System, power sunroof (if
equipped), and power outlets will
remain active for up to 10 minutes
after turning off the engine.
Opening of one front doors will
cancel this feature.
The switch-off delay can be
cancelled (0 seconds) you can choose
from 45 seconds, 5 minutes or 10
minutes.
• Headlight Off Delay
By selecting this feature the
headlight will stay lit for up to 90
seconds after turning off the
engine.
The switch-off delay can beDashboard Instruments and Controls
4
196
Page 356 of 396
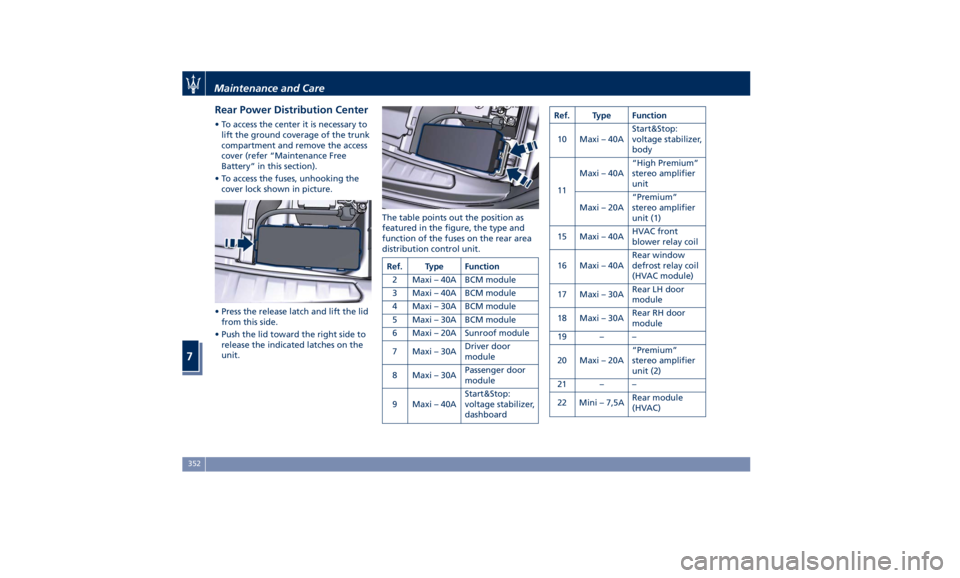
Rear Power Distribution Center • To access the center it is necessary to
lift the ground coverage of the trunk
compartment and remove the access
cover (refer “Maintenance Free
Battery” in this section).
• To access the fuses, unhooking the
cover lock shown in picture.
• Press the release latch and lift the lid
from this side.
• Push the lid toward the right side to
release the indicated latches on the
unit. The table points out the position as
featured in the figure, the type and
function of the fuses on the rear area
distribution control unit.
Ref. Type Function
2 Maxi – 40A BCM module
3 Maxi – 40A BCM module
4 Maxi – 30A BCM module
5 Maxi – 30A BCM module
6 Maxi – 20A Sunroof module
7 Maxi – 30A Driver door
module
8 Maxi – 30A Passenger door
module
9 Maxi – 40A Start&Stop:
voltage stabilizer,
dashboard Ref. Type Function
10 Maxi – 40A Start&Stop:
voltage stabilizer,
body
11 Maxi – 40A “High Premium”
stereo amplifier
unit
Maxi – 20A “Premium”
stereo amplifier
unit (1)
15 Maxi – 40A HVAC front
blower relay coil
16 Maxi – 40A Rear window
defrost relay coil
(HVAC module)
17 Maxi – 30A Rear LH door
module
18 Maxi – 30A Rear RH door
module
19 – –
20 Maxi – 20A “Premium”
stereo amplifier
unit (2)
21 – –
22 Mini – 7,5A Rear module
(HVAC)Maintenance and Care
7
352
Page 358 of 396

Ref. Type Function
49 Mini – 10A Internal
temperature
sensor, internal
mirror and HALF
50 – –
51 Mini – 25A Rear seat and
steering wheel
heater module
52 – –
53 Mini – 25A Rear seat vented
module
54 Mini – 7,5A Blind Spot
module
55 – –
56 Mini – 7,5A Blower front
HVAC coil relay
57 Mini – 7,5A Blower rear
HVAC coil relay
58 – –
59 Mini – 10A SDC module,
transmission
lever, ASBM, rear
tunnel stack
switch
60 Mini – 10A SDC module Ref. Type Function
61 Mini – 25A Front console
power outlet and
cigar lighter
62 Mini – 7,5A Front HVAC
module
63 Mini – 20A Blower rear
HVAC
64 Mini – 10A Wi-fi, rear HVAC
module
65 Mini – 10A Intelligent
battery sensor
66 Mini – 10A Wi-fi, RSE
67 Mini – 7,5A USB charge
outlet, sunroof
68 Mini – 20A Rear sunshade
module
69 Mini – 25A Rear console
power outlet and
cigar lighter
70 Mini – 10A Front HVAC
module and
Parking Aid
Module (PAM)Fuse Box under the Dashboard This box is located in an internal area
that can be accessed only by removing
the glove compartment on the
dashboard left side. Considering the
complexity of this operation, we
recommend having the fuses replaced
by an Authorized Maserati Dealer .
The table points out the position as
featured in the figure, the type and
function of the fuses in the box under
the dashboard.
Ref. Type Function
1 Mini – 7,5A Cluster module,
CSS, SGW and
DSRC - Japan
version
2 Mini – 15A Cluster module,
clock
3 Mini – 10A DSRC and DTV
system (Japan
version only)
4 Mini – 5A E-call
5 Mini – 7,5A Security Gateway
6 Mini – 25A Radio
7 Mini – 10A Column software
module, CSS, USB
auxiliary portMaintenance and Care
7
354