2019 MASERATI QUATTROPORTE battery
[x] Cancel search: batteryPage 39 of 396

Key fob Battery Replacement NOTE:
A low charge level of the key fob
battery will be indicated on the
instrument cluster display.
The recommended replacement
battery type is: CR2032.
To replace the battery proceed as
follows:
• Remove the emergency key as
indicated in “Keys” chapter of the
current section.
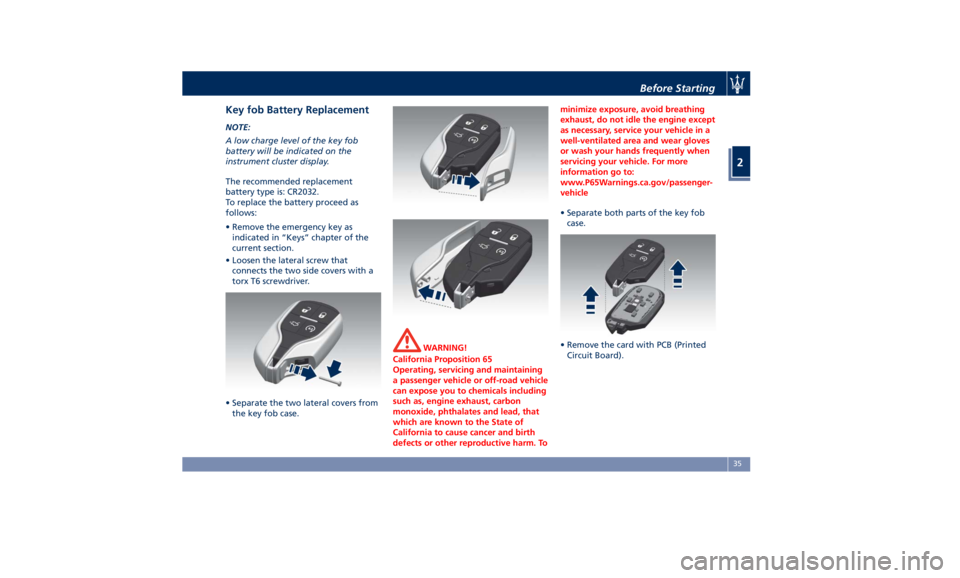
• Loosen the lateral screw that
connects the two side covers with a
torx T6 screwdriver.
• Separate the two lateral covers from
the key fob case. WARNING!
California Proposition 65
Operating, servicing and maintaining
a passenger vehicle or off-road vehicle
can expose you to chemicals including
such as, engine exhaust, carbon
monoxide, phthalates and lead, that
which are known to the State of
California to cause cancer and birth
defects or other reproductive harm. To minimize exposure, avoid breathing
exhaust, do not idle the engine except
as necessary, service your vehicle in a
well-ventilated area and wear gloves
or wash your hands frequently when
servicing your vehicle. For more
information go to:
www.P65Warnings.ca.gov/passenger-
vehicle
• Separate both parts of the key fob
case.
•
Remove the
card with PCB (Printed
Circuit Board).Before Starting
2
35
Page 40 of 396

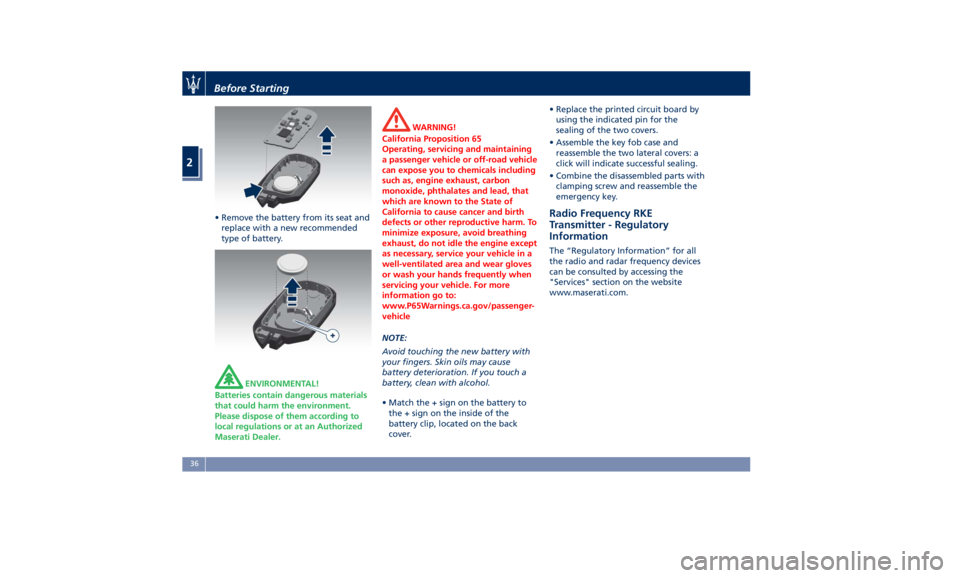
• Remove the battery from its seat and
replace with a new recommended
type of battery.
ENVIRONMENTAL!
Batteries contain dangerous materials
that could harm the environment.
Please dispose of them according to
local regulations or at an Authorized
Maserati Dealer. WARNING!
California Proposition 65
Operating, servicing and maintaining
a passenger vehicle or off-road vehicle
can expose you to chemicals including
such as, engine exhaust, carbon
monoxide, phthalates and lead, that
which are known to the State of
California to cause cancer and birth
defects or other reproductive harm. To
minimize exposure, avoid breathing
exhaust, do not idle the engine except
as necessary, service your vehicle in a
well-ventilated area and wear gloves
or wash your hands frequently when
servicing your vehicle. For more
information go to:
www.P65Warnings.ca.gov/passenger-
vehicle
NOTE:
A
void touching the new battery with
your fingers. Skin oils may cause
battery deterioration. If you touch a
battery, clean with alcohol.
• Match the + sign on the battery to
the + sign on the inside of the
battery clip, located on the back
cover. • Replace the printed circuit board by
using the indicated pin for the
sealing of the two covers.
• Assemble the key fob case and
reassemble the two lateral covers: a
click will indicate successful sealing.
• Combine the disassembled parts with
clamping screw and reassemble the
emergency key.
Radio Frequency RKE
Transmitter - Regulatory
Information The “Regulatory Information” for all
the radio and radar frequency devices
can be consulted by accessing the
"Services" section on the website
www.maserati.com.Before Starting
2
36
Page 41 of 396

Remote Start System This system enables the key fob RKE
transmitter to start the engine
conveniently from outside the vehicle
while still maintaining security. The
system has a range of approximately
300 ft (91 m). Obstructions between
the vehicle and the key fob may
reduce this range.
NOTE:
Changes or modifications not
expressly approved by the party
responsible for compliance could void
the user's authority to operate the
equipment.
If your RKE transmitter fails to operate
from a normal distance, check for
these conditions:
• A weak battery in the RKE
transmitter. The expected life of the
battery is a minimum of three years.
• Closeness to a radio transmitter such
as a radio station tower, airport
transmitter, and some mobile or CB
radio.
• Obstructions between the vehicle
and the Key Fob. How to use Remote Start All of the following conditions must
be met before the engine will remote
start:
• System not disabled from previous
remote start event.
• Vehicle theft alarm not active.
• Doors closed.
• Hood closed.
• Trunk lid closed.
• Hazard lights switched off.
• Brake pedal not pressed.
• Battery at an acceptable charge
level.
• The shift lever is in P (Park) position.
• The vehicle transmission is in
automatic mode.
• The remote start has not been
activated yet two consecutive times.
If EPB (Electric Parking Brake) is not
selected, at key-off in some conditions
the remote start system may not allow
engine to start. We suggest to set
“Auto Apply On” function through
the switch on the right-side of the
steering wheel (refer to “Instrument
Cluster” in section “Dashboard
Instrument and Controls”). WARNING!
• Do not start or run an engine in a
closed garage or confined area.
Exhaust gas contains Carbon
Monoxide (CO) which is odorless
and colorless
• Keep key fobs RKE transmitter away
from children. Operation of the
Remote Start System, windows,
door locks or other controls could
cause serious injury or death.
Engine Remote Start Abort
Message on Instrument Cluster The following messages will display on
the instrument cluster if the vehicle
fails to remote start or exits remote
start prematurely:
• “Remote Start Canceled Door
Open”.
• “Remote Start Canceled Trunk
Open”.
• “Remote Start Canceled Fuel Low”.
• “Remote Start Canceled Time
Expired”.
• “Remote Start Disabled Start Vehicle
to Reset”.Before Starting
2
37
Page 48 of 396

(Continued)
• there is a valid key fob RKE
transmitter outside the vehicle and
within 3.3 ft (1 m) of either “Passive
Entry” door handle;
• fifteen attempts are made to lock
the doors using the door panel
switch and/or the RH button
(on
the right lower part of the trunk lid)
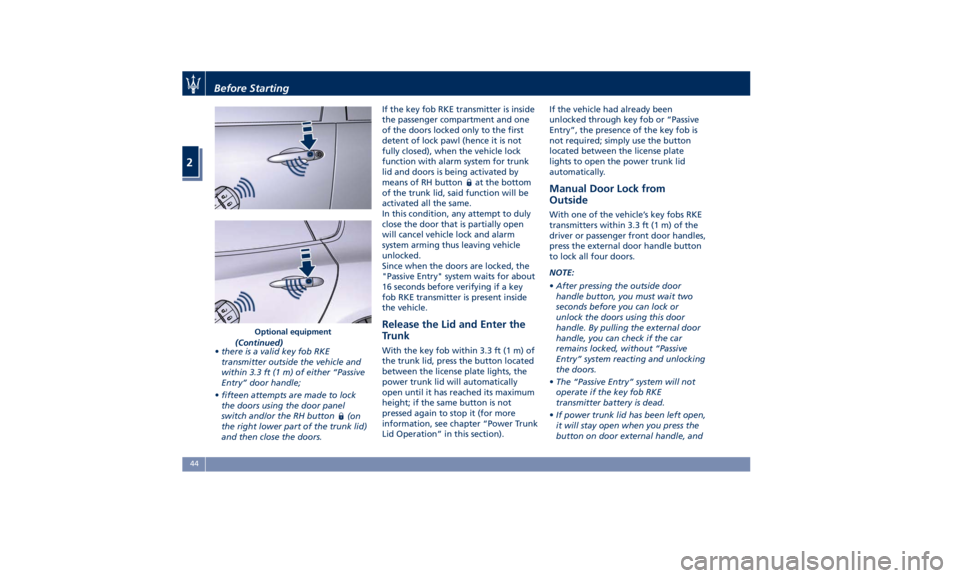
and then close the doors. If the key fob RKE transmitter is inside
the passenger compartment and one
of the doors locked only to the first
detent of lock pawl (hence it is not
fully closed), when the vehicle lock
function with alarm system for trunk
lid and doors is being activated by
means of RH button
at the bottom
of the trunk lid, said function will be
activated all the same.
In this condition, any attempt to duly
close the door that is partially open
will cancel vehicle lock and alarm
system arming thus leaving vehicle
unlocked.
Since when the doors are locked, the
"Passive Entry" system waits for about
16 seconds before verifying if a key
fob RKE transmitter is present inside
the vehicle.
Release the Lid and Enter the
Trunk With the key fob within 3.3 ft (1 m) of
the trunk lid, press the button located
between the license plate lights, the
power trunk lid will automatically
open until it has reached its maximum
height; if the same button is not
pressed again to stop it (for more
information, see chapter “Power Trunk
Lid Operation” in this section). If the vehicle had already been
unlocked through key fob or “Passive
Entry”, the presence of the key fob is
not required; simply use the button
located between the license plate
lights to open the power trunk lid
automatically.
Manual Door Lock from
Outside With one of the vehicle’s key fobs RKE
transmitters within 3.3 ft (1 m) of the
driver or passenger front door handles,
press the external door handle button
to lock all four doors.
NOTE:
• After pressing the outside door
handle button, you must wait two
seconds before you can lock or
unlock the doors using this door
handle. By pulling the external door
handle, you can check if the car
remains locked, without “Passive
Entry” system reacting and unlocking
the doors.
• The “Passive Entry” system will not
operate if the key fob RKE
transmitter battery is dead.
• If power trunk lid has been left open,
it will stay open when you press the
button on door external handle, andOptional equipmentBefore Starting
2
44
Page 54 of 396

C. Sunshade fully rolled down (DOWN
position) and Window completely
open (DOWN position)
• Pulling the control to 1 or 2 detent:
the window closes partially or
completely and the sunshade
remains rolled.
• Pressing the control to 1 or 2 detent:
no action (NOP).
Teaching Cycle
After battery disconnection, the
following teaching cycle is required to
store the limit positions the sunshades.
Use the controls on the rear doors to
move the sunshades.
• With glass closed, lift rear sunshade
control on driver side for a few
seconds. It is not necessary that the
sunshade reaches its upper limit.
• Reverse the sunshade movement by
pressing the control downwards.
Once the lower limit is reached, press
and hold the control for at least 10
seconds. This action allows setting
the control unit in initialisation
status.
• Release the movement command.
• Within maximum 15 seconds:
• Press once the control downwards
(first or second detent). In this way
the control unit stores the lower limit position. During this
operation a slight click of the
sunshade motor that switches to
mechanical lock condition can be
heard.
• Lift the control and hold it up until
the sunshade completes its
upstroke and reaches the car body
pillar, fully home. Once the upper
limit stop is reached, the sunshade
will move downwards for approx.
2-3 millimetres and the control unit
will store this height as the upper
limit. Now the teaching of the
driver side rear sunshade is
complete.
• Repeat the same operations for the
passenger side rear sunshade to
complete the teaching procedure.Rear Window Rear Window Defroster The rear window defroster button is
located on the climate control panel.
See “Air Conditioning Controls” in
section “Dashboard Instruments and
Controls”.
Power Sunshade (if equipped) Your vehicle can be equipped on
request with a power sunshade that
will reduce the amount of sunlight
that will enter through the rear
window.
The sunshade is rolled in and stored
inside the cover behind the rear seats;
when activated, it rolls out upwards.
The power sunshade can be operated
using the MTC+ System.
• Touch the “Controls” soft-key.
• Within 15 seconds, touch the “Rear
Sunshade” soft-key to raise the
power sunshade.
• Within 15 seconds, touch the “Rear
Sunshade” soft-key a second time to
lower the sunshade.Before Starting
2
50
Page 60 of 396

sideways and immediately pull it back:
from this moment, the power trunk lid
will activate within two seconds.
If closed, with the foot movement the
power trunk lid will:
• unlock and completely open;
• after another kick, will stop;
• after another kick, will reverse its
movement and completely close
unless stopped again.
If open, with the foot movement the
power trunk lid will:
• completely close but not lock;
• another kick before the completed
closing can stop the movement;
• if the movement was stopped
another kick operation will invert a
complete opening.
NOTE:
• If your foot movement fails to
activate the power trunk lid
movement, wiggling your foot under
the bumper will not help. Repeat the
whole kick movement.
• In particular situations, external
factors affecting the sensor area may
trigger the Hands free power trunk
lid release feature. For example,
when washing the vehicle, a water
jet aimed at the sensor area may trigger the “Hands free” power
trunk release feature. Keep the key
fob RKE transmitter away from the
sensing range of the sensors (10 ft/3
m) or disable the “Hands free”
feature from the MTC+ menu (see
“MTC+ Settings” in section
“Dashboard Instruments and
Controls”). A key fob RKE transmitter
located in the front seat passenger
area is considered out of range of
the “Hands free” trunk lid release
sensor.
• If somebody or something knocks
against the power trunk lid while it is
moving, the safety system might stop
lid opening or closing movement.
Trunk Lid Emergency Release If accessing the trunk from the rear
seats, operate the emergency release
lever (see the chapter "Trunk Safety"
in this section) in order to lower the
rear seat backrest (see "Cargo Area" in
section “Understanding the Vehicle”).
If the power release control operated
by pressing the button on the dome
console fails, which may occur when
the battery is low on voltage, it is
possible to temporarily power the
system by using the battery remote
poles located inside the engine compartment (see “Auxiliary
Jump-Start Procedure” in section “In
an Emergency”). Thus it is possible to
normally open the trunk lid by using
the key fob RKE transmitter. Have the
vehicle checked by an Authorized
Maserati Dealer in order to solve the
failure.Before Starting
2
56
Page 71 of 396

side windows and their covers are also
labeled “AIR bag”.
This vehicle is also equipped with
Supplemental Seat-Mounted Side Air
Bags (SAB) for driver and passenger
pelvis-chest-shoulder protection
during a side impact. The
Supplemental Seat-Mounted Side Air
Bags are mounted on front seats and
are located in the outboard side of the
front seats.
NOTE:
After any accident, the vehicle should
be taken to the Authorized Maserati
Dealer immediately.
Air Bag System Components Your vehicle may be equipped with
the following air bag system
components:
• Occupant Restraint Controller (ORC);
• Air bag warning light on the
instrument cluster;
• Steering wheel and column;
• Instrument cluster;
• Driver advanced front air bag;
• Passenger advanced front air bag;
• Supplemental Seat-Mounted Side Air
Bags (SAB); • Supplemental Side Air Bag Inflatable
Curtains (SABIC);
• Front and side impact sensors;
• Front seat belt pretensioners;
• Seat belt buckle switch;
• Seat track position sensors;
• Pyrotechnical charge to cut power
from the battery; it is located on the
positive battery terminal.
WARNING!
The air bag is not a substitute for the
seat belts. Correct use of the seat
belts, in combination with the air bag,
will offer protection for the driver and
passenger in the front seat in the
event of a head-on collision.
Advanced Front Air Bags
Properties The advanced front air bag system has
multistage driver and front passenger
air bags. This system provides air bag
inflation rates which are appropriate
to the severity and type of collision as
determined by the Occupant Restraint
Controller (ORC), which may receive
information from the front impact
sensors. The first stage inflator is triggered
immediately during an impact that
requires air bag deployment. This
inflation rate is used in less severe
collisions. A higher energy output,
inflation rate, is used for more severe
collisions.
CAUTION!
• The airbag system must be ready to
protect you in a collision. The
Occupant Restraint Controller (ORC)
monitors the internal circuits and
interconnecting wiring associated with
electrical Air Bag System Components
listed below:
– Occupant Restraint Controller
(ORC)
– Airbag Warning light on the
instrument cluster
– Steering Wheel and Column
– Instrument Cluster
– Driver advanced front air bag
– Passenger advanced front air bag
– Supplemental Seat-Mounted Side
Air Bags (SAB) Air Bags
– Supplemental Side Air Bag
Inflatable Curtains (SABIC)
– Front and side Impact Sensors
– Front seat belt pretensioners
– Seat Belt Buckle Switch
(Continued)Before Starting
2
67
Page 72 of 396

(Continued)
– Seat Track Position Sensors
– Pyrotechnical charge to cut the
power from the battery: it is
located on the positive battery
terminal
• The electronic control unit provides
for the activation of the
pretensioners, front air bags or side
air bags (front and rear) based on
different criteria, according to the
type of impact. Failure of one or
more systems to activate is not
indicative of a system malfunction.
• The front and/or lateral air bags may
inflate if the vehicle suffers a violent
impact involving the underbody
area, for example in case of violent
impacts against steps, sidewalks,
speed bumps, or when the vehicle
falls into potholes, or similar.
WARNING!
• No objects should be placed over or
near the air bag on the instrument
panel or steering wheel because any
such objects could cause harm if the
vehicle is in a collision severe
enough to cause the air bag to
inflate. • Do not place anything on or around
the air bag covers or attempt to
open them manually. You may
damage the air bags and you could
be injured because the air bags may
no longer be functional. The
protective covers for the air bag are
designed to open only when the air
bags are inflating.
• Always drive with your hands on the
steering wheel rim, so that the air
bag can inflate freely if required.
During the drive your back must be
as upright as comfort allows and be
against the seat back with the seat
belt properly fastened.
• Do not apply stickers or other
objects on the steering wheel, on
the dashboard in the passenger’s
side air bag area, on roof side trims
or on the seats.
• Do not travel with objects in your
lap, in front of your chest or
especially with a pipe, pencil or
other objects in your mouth. In the
event of a collision, the intervention
of the air bag could result in serious
injury.
• EXTREME HAZARD! Do not place a
rearward-facing infant seat onto the
front seat (see warning plate on the
dashboard and above and behind the sun visors). Deployment of the
air bag in an accident could cause
fatal injuries to the baby regardless
of the severity of the collision.
Before Starting
2
68