2019 MASERATI QUATTROPORTE dashboard warning lights
[x] Cancel search: dashboard warning lightsPage 41 of 396

Remote Start System This system enables the key fob RKE
transmitter to start the engine
conveniently from outside the vehicle
while still maintaining security. The
system has a range of approximately
300 ft (91 m). Obstructions between
the vehicle and the key fob may
reduce this range.
NOTE:
Changes or modifications not
expressly approved by the party
responsible for compliance could void
the user's authority to operate the
equipment.
If your RKE transmitter fails to operate
from a normal distance, check for
these conditions:
• A weak battery in the RKE
transmitter. The expected life of the
battery is a minimum of three years.
• Closeness to a radio transmitter such
as a radio station tower, airport
transmitter, and some mobile or CB
radio.
• Obstructions between the vehicle
and the Key Fob. How to use Remote Start All of the following conditions must
be met before the engine will remote
start:
• System not disabled from previous
remote start event.
• Vehicle theft alarm not active.
• Doors closed.
• Hood closed.
• Trunk lid closed.
• Hazard lights switched off.
• Brake pedal not pressed.
• Battery at an acceptable charge
level.
• The shift lever is in P (Park) position.
• The vehicle transmission is in
automatic mode.
• The remote start has not been
activated yet two consecutive times.
If EPB (Electric Parking Brake) is not
selected, at key-off in some conditions
the remote start system may not allow
engine to start. We suggest to set
“Auto Apply On” function through
the switch on the right-side of the
steering wheel (refer to “Instrument
Cluster” in section “Dashboard
Instrument and Controls”). WARNING!
• Do not start or run an engine in a
closed garage or confined area.
Exhaust gas contains Carbon
Monoxide (CO) which is odorless
and colorless
• Keep key fobs RKE transmitter away
from children. Operation of the
Remote Start System, windows,
door locks or other controls could
cause serious injury or death.
Engine Remote Start Abort
Message on Instrument Cluster The following messages will display on
the instrument cluster if the vehicle
fails to remote start or exits remote
start prematurely:
• “Remote Start Canceled Door
Open”.
• “Remote Start Canceled Trunk
Open”.
• “Remote Start Canceled Fuel Low”.
• “Remote Start Canceled Time
Expired”.
• “Remote Start Disabled Start Vehicle
to Reset”.Before Starting
2
37
Page 42 of 396

The message on the instrument cluster
stays active as long as the ignition
switch is in RUN position.
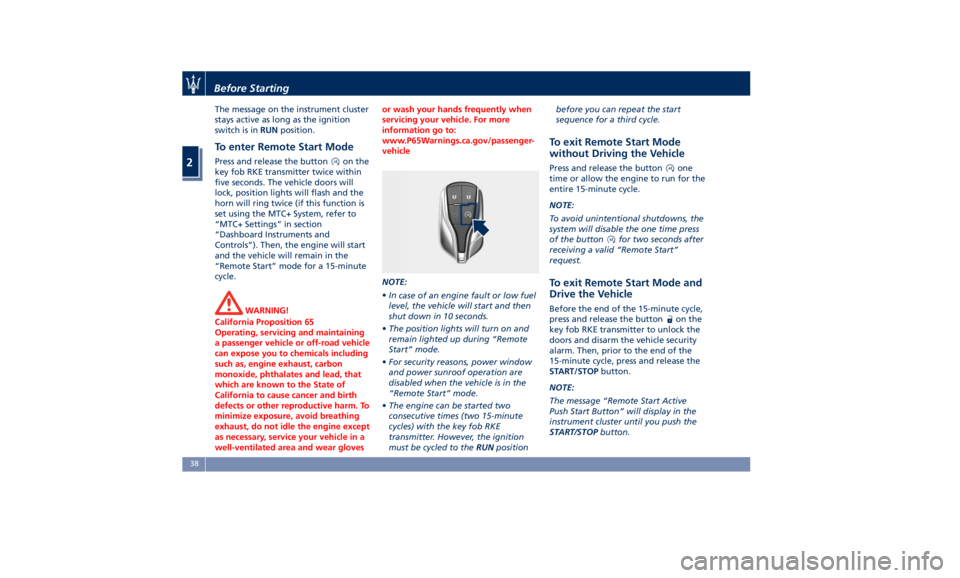
To enter Remote Start Mode Press and release the button on the
key fob RKE transmitter twice within
five seconds. The vehicle doors will
lock, position lights will flash and the
horn will ring twice (if this function is
set using the MTC+ System, refer to
“MTC+ Settings” in section
“Dashboard Instruments and
Controls”). Then, the engine will start
and the vehicle will remain in the
“Remote Start” mode for a 15-minute
cycle.
WARNING!
California Proposition 65
Operating, servicing and maintaining
a passenger vehicle or off-road vehicle
can expose you to chemicals including
such as, engine exhaust, carbon
monoxide, phthalates and lead, that
which are known to the State of
California to cause cancer and birth
defects or other reproductive harm. To
minimize exposure, avoid breathing
exhaust, do not idle the engine except
as necessary, service your vehicle in a
well-ventilated area and wear gloves or wash your hands frequently when
servicing your vehicle. For more
information go to:
www.P65Warnings.ca.gov/passenger-
vehicle
NOTE:
• In
case of an engine fault or low fuel
level, the vehicle will start and then
shut down in 10 seconds.
• The position lights will turn on and
remain lighted up during “Remote
Start” mode.
• For security reasons, power window
and power sunroof operation are
disabled when the vehicle is in the
“Remote Start” mode.
• The engine can be started two
consecutive times (two 15-minute
cycles) with the key fob RKE
transmitter. However, the ignition
must be cycled to the RUN position before you can repeat the start
sequence for a third cycle.
To exit Remote Start Mode
without Driving the Vehicle Press and release the button one
time or allow the engine to run for the
entire 15-minute cycle.
NOTE:
To avoid unintentional shutdowns, the
system will disable the one time press
of the button
for two seconds after
receiving a valid “Remote Start”
request.
To exit Remote Start Mode and
Drive the Vehicle Before the end of the 15-minute cycle,
press and release the button
on the
key fob RKE transmitter to unlock the
doors and disarm the vehicle security
alarm. Then, prior to the end of the
15-minute cycle, press and release the
START/STOP button.
NOTE:
The message “Remote Start Active
Push Start Button” will display in the
instrument cluster until you push the
START/STOP button.Before Starting
2
38
Page 96 of 396

• Check the tires (see “Tire Inflation
Pressure” chapter in section
“Features and Specifications”) for
proper cold inflation pressure.
Lights and Indicator Lights
• Have someone observe the operation
of exterior lights while you operate
the controls (see “Lights” chapter in
section “Understanding the
Vehicle”).
• Check turn signal and high beam
indicator lights on the instrument
cluster (see “Instrument Cluster”
chapter in section “Dashboard
Instruments and Controls”).
Door Latches
• Check for positive closing, latching,
and locking of doors and trunk lid
(see “Unlock the Vehicle with Key
fob” chapter in this section).
Fluid Leaks
• Check area under vehicle after
overnight parking for recent fluid
leaks (oil, fuel, etc.).
• If gasoline fumes are detected or
fluid leaks are suspected, contact the
Authorized Maserati Dealer . WARNING!
California Proposition 65
Operating, servicing and maintaining
a passenger vehicle or off-road vehicle
can expose you to chemicals including
such as, engine exhaust, carbon
monoxide, phthalates and lead, that
which are known to the State of
California to cause cancer and birth
defects or other reproductive harm. To
minimize exposure, avoid breathing
exhaust, do not idle the engine except
as necessary, service your vehicle in a
well-ventilated area and wear gloves
or wash your hands frequently when
servicing your vehicle. For more
information go to:
www.P65Warnings.ca.gov/passenger-
vehicleBefore Starting
2
92
Page 122 of 396

Automatic Headlights This system automatically turns the
headlights on or off according to
ambient light intensity detected by the
twilight sensor positioned on the inner
surface of the windshield, over the
rear view mirror. To turn the system
on, rotate the lights switch clockwise
to “AUTO” position.
When the automatic system is
activated, the headlight time delay
feature is activated as well. This means
the headlights will stay on for up to 90
seconds after you place the ignition
device into OFF position.
To turn the automatic system off,
move the lights switch out of “AUTO”
position.
NOTE:
The engine must be running before
the headlights turn on in automatic
mode.
WARNING!
The responsibility for turning on the
lights, depending on the daylight and
regulations in force in the country of
use, always lies with the driver. The
automatic system for switching on
and off the external lights is to be considered as an aid for the driver. If
necessary, switch the lights including
the rear fog lights on and off
manually.
Headlights On with Wipers
When
this feature
is active, the
headlights will turn on approximately
10 seconds after activation of the
wipers, if the lights switch is placed in
the “AUTO” position. The headlights
will additionally turn off by
deactivation of the wipers if previously
activated with this function.
NOTE:
The Headlights with wipers feature
may be turned on and off using the
MTC+ System, refer to “MTC+
Settings” in section “Dashboard
Instruments and Controls”.
Headlights Time Delay This safety feature provides headlight
illumination for up to 90 seconds
(programmable) when leaving your
vehicle in an unlit area. To activate the
delay feature, place the ignition switch
in the OFF or ACC position while the
headlights are still on. Then turn off
the headlights within 45 seconds. The delay interval begins when the
lights switch is turned off (position
“0”). If you turn the headlights or
position lights on, or place the ignition
switch in RUN , the system will cancel
the delay.
If you turn the headlights off (“0”
position) before the ignition, they will
turn off in the normal mode.
NOTE:
• To activate this feature the lights
must be turned off (“0” position)
within 45 seconds of placing the
ignition switch in the OFF or ACC
position.
• Once the delay feature is active, any
additional shifting of the light switch
will cancel the feature.
• The headlight delay time is
programmable using the MTC+
System, see “MTC+ Settings” in
section “Dashboard Instruments and
Controls”.
• If the low beam LEDs are active due
to “Headlights with Wipers”, then
the headlamps delay feature will not
be activated when the ignition
switch is set in OFF position.Understanding the Vehicle
3
118
Page 127 of 396

recommend therefore that you switch
them off when they are no longer
necessary and every time the twilight
sensor deactivates the external lights.
Automatic High Beams
The
Automatic High Beam headlight
control system provides increased
forward lighting at night by
automating high beam control
through the use of the forward digital
camera mounted behind the rearview
mirror, which is the same one used
also by the Lane Departure Warning
(LDW) system. This camera detects
vehicle specific light and automatically
switches from high beams to low
beams until the approaching vehicle is
out of view. Furthermore, the digital
camera is able to detect the urban
areas and the inhabited centers and to
turn off the high beams when driving
near of one of them.
The high beam can be turned back on
if there are all the necessary
conditions and if the vehicle speed
exceed 21.7 mph (35 km/h).
The “Auto High Beam Assist” feature
can be turned on or off using the
MTC+ System. Refer to “MTC+
Settings” in section "Dashboard
Instruments and Controls" for further
information. The function is enabled only if the
brightness sensor detects the right
lighting conditions.
To activate this function:
• Shift the multifunction lever onward
.
• Put the headlight switch in “AUTO”
position.
• Enable the “Auto High Beam Assist”
function on MTC+.
After these steps, the green indicator
on the upper right side of the TFT
display comes on. NOTE:
Broken, muddy, or obstructed
headlights and taillights of vehicles in
the field of view will cause headlights
to remain on longer (closer to the
vehicle). Also, dirt, film, and other
obstructions on the windshield or
camera lens will cause the system to
function improperly.
If the windshield or Automatic High
Beam headlight control mirror is
replaced, the mirror must be re-aimed
to ensure proper performance. See
your local Authorized Maserati Dealer .
Interior Lights The interior and exterior approach
lights turn on and off when
entering/exiting the vehicle (see
“Illuminated Entry/Exit” in section
"Before Starting" for further
information).
The brightness of the lights can be
manually adjusted with the regulator
positioned beside the light switch.
To protect the battery, the interior
lights will turn off automatically 10
minutes after the ignition switch has
been shifted to OFF . This occurs if the
interior lights were turned on
manually or by opening of a door. The
glove box light, share the sameUnderstanding the Vehicle
3
123
Page 156 of 396

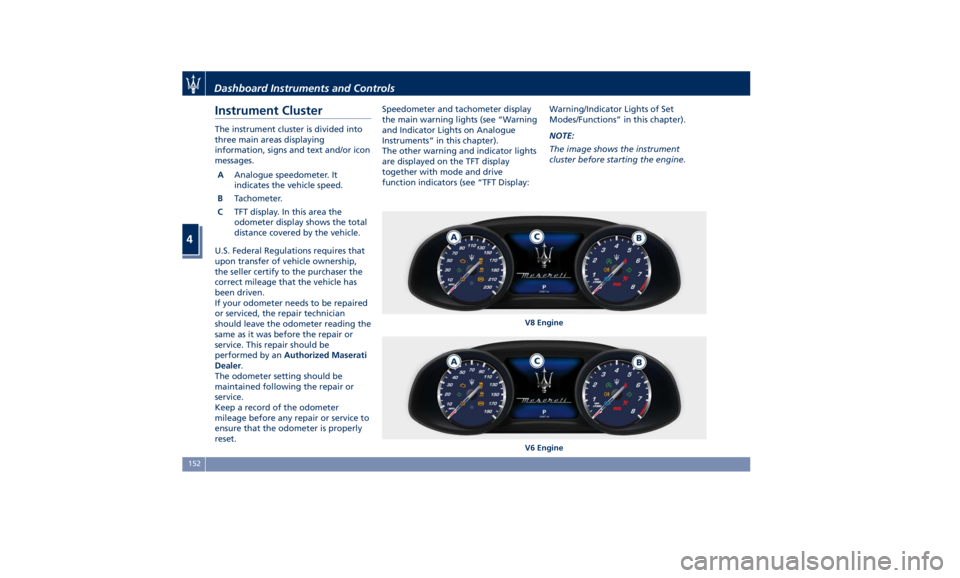
Instrument Cluster The instrument cluster is divided into
three main areas displaying
information, signs and text and/or icon
messages.
A Analogue speedometer. It
indicates the vehicle speed.
B Tachometer.
C TFT display. In this area the
odometer display shows the total
distance covered by the vehicle.
U.S. Federal Regulations requires that
upon transfer of vehicle ownership,
the seller certify to the purchaser the
correct mileage that the vehicle has
been driven.
If your odometer needs to be repaired
or serviced, the repair technician
should leave the odometer reading the
same as it was before the repair or
service. This repair should be
performed by an Authorized Maserati
Dealer .
The odometer setting should be
maintained following the repair or
service.
Keep a record of the odometer
mileage before any repair or service to
ensure that the odometer is properly
reset. Speedometer and tachometer display
the main warning lights (see “Warning
and Indicator Lights on Analogue
Instruments” in this chapter).
The other warning and indicator lights
are displayed on the TFT display
together with mode and drive
function indicators (see “TFT Display: Warning/Indicator Lights of Set
Modes/Functions” in this chapter).
NOTE:
The image shows the instrument
cluster before starting the engine.
V8 Engine
V6 EngineDashboard Instruments and Controls
4
152
Page 157 of 396

Warning and Indicator Lights
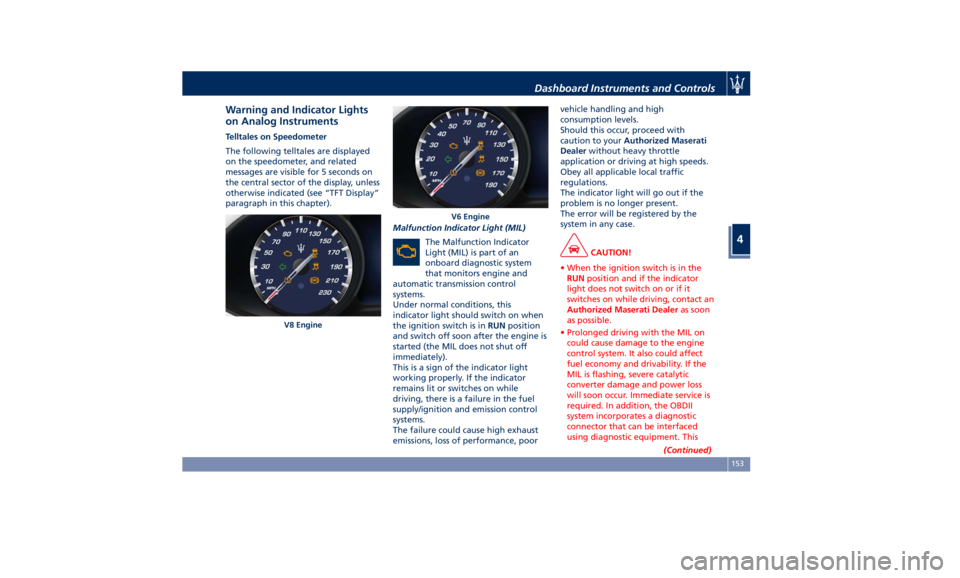
on Analog Instruments Telltales on Speedometer
The following telltales are displayed
on the speedometer, and related
messages are visible for 5 seconds on
the central sector of the display, unless
otherwise indicated (see “TFT Display”
paragraph in this chapter).
Malfunction Indicator Light (MIL)
The Malfunction Indicator
Light (MIL) is part of an
onboard diagnostic system
that monitors engine and
automatic transmission control
systems.
Under normal conditions, this
indicator light should switch on when
the ignition switch is in RUN position
and switch off soon after the engine is
started (the MIL does not shut off
immediately).
This is a sign of the indicator light
working properly. If the indicator
remains lit or switches on while
driving, there is a failure in the fuel
supply/ignition and emission control
systems.
The failure could cause high exhaust
emissions, loss of performance, poor vehicle handling and high
consumption levels.
Should this occur, proceed with
caution to your Authorized Maserati
Dealer without heavy throttle
application or driving at high speeds.
Obey all applicable local traffic
regulations.
The indicator light will go out if the
problem is no longer present.
The error will be registered by the
system in any case.
CAUTION!
• When the ignition switch is in the
RUN position and if the indicator
light does not switch on or if it
switches on while driving, contact an
Authorized Maserati Dealer as soon
as possible.
• Prolonged driving with the MIL on
could cause damage to the engine
control system. It also could affect
fuel economy and drivability. If the
MIL is flashing, severe catalytic
converter damage and power loss
will soon occur. Immediate service is
required. In addition, the OBDII
system incorporates a diagnostic
connector that can be interfaced
using diagnostic equipment. This
(Continued)V8 Engine V6 EngineDashboard Instruments and Controls
4
153
Page 158 of 396

(Continued)
makes it possible to read the error
codes stored in the control unit,
together with a set of specific
parameters for the engine operation
diagnostic cycle, for compliance with
CARB & EPA OBDII regulations.
Left Turn Signal Indicator Light
The
indicator lights
up when
the left turn signals or the
hazard flashers are turned on.
The indicator light will flash at
the same frequency of the turn signals
and is controlled by the stalk switch
lever.
If the vehicle electronics sense that the
vehicle drives for more than 1 mile
(1.6 km) with either turn signal on, a
continuous sound will alert the driver
to turn the signal off.
If the indicator flashes at a rapid rate,
check for a defective exterior light
bulb.
Tire Pressure Monitoring Light
This warning light is connected
to the Tire Pressure
Monitoring System (TPMS).
Under normal conditions, the
warning light should illuminate when
the ignition switch is in RUN and should go off once the engine is
started.
If the warning light remains lit or
illuminates while driving, the pressure
of one or more tires is too low and a
message will be displayed.
The TPMS malfunction warning light is
connected to the low tire pressure
monitoring light.
When the system detects a
malfunction, the monitoring light and
the related message will flash for
approximately one minute and then
remain lit.
This sequence will continue upon
subsequent vehicle startups as long as
the malfunction lasts.
When the malfunction warning lights
up, the system may not be able to
detect or signal low tire pressure
correctly.
Please refer to “Tire Pressure
Monitoring System (TPMS)” in section
“Driving” for further information.
Anti-Lock Braking System (ABS)
Malfunction Warning Light
This light, and its related
message, indicate possible
malfunctions of the Anti-Lock
Brake System (ABS).
The light will turn on when the
ignition switch is in RUN position and may stay on for 4 seconds. If the ABS
light remains lit or turns on while
driving, the Anti-Lock portion of the
brake system is not functioning and
requires service. However, the
conventional brake system will
continue to operate normally if the
(USA) warning light is switched
off. If the ABS light turns on while
driving, or if it does not switch on
when the ignition switch is in RUN
position, please visit an Authorized
Maserati Dealer as soon as possible to
restore the Anti-Lock brake function.
Electronic Stability Control (ESC)
Activation/Malfunction Indicator Light
The ESC activation/malfunction
indicator light on the
instrument cluster will display
when the ignition switch is in
RUN position.
It should switch off by starting the
engine.
If the light stays on with the engine
running, there is a malfunction in the
ESC system.
If the light still stays on after several
ignition cycles, and the vehicle has
been driven for several miles at more
than 30 mph (48 km/h) speed, visit an
Authorized Maserati Dealer as soon asDashboard Instruments and Controls
4
154